
|
|
|
|
||||||||||
| Xoutpost server transfer and maintenance is occurring.... |
| Xoutpost is currently undergoing a planned server migration.... stay tuned for new developments.... sincerely, the management |
 |
|
|
LinkBack | Thread Tools | Display Modes |
|
#1
 01-14-2009, 03:47 PM
|
|||
|
|||
|
X5 3.0 Alternator and belts DIY (with pictures!)
The battery light came on while driving home, tested the voltage under the hood while the engine was running and it showed 10.5V, turned the car off and it showed 11.3V (no need to do this from the battery BTW) I decided to just replace the alternator and not mess with trying to figure out if it was the voltage regulator (which you can buy separately) On a scale of 1-10, Id say this is a 3 for the average DIY gearhead, it wasnt that difficult since the alternator is right on top. Removing the radiator cooling fan without the tool was by far the hardest part of the job. The last alternator I swapped out was from my old Eclipse years ago at 160K miles so 50K miles is really premature. Dealer quoted $509 for what really is about a $200 alternator, there is nothing special about it that makes this alternator worth $509 except for the BMW sticker. So, f*ck OEM which only lasted 50K miles. I later found out why it failed, more on that later. Shopped around and found the OEM Bosch 120amp alternator on Pelican Parts for $219.75. Sourced one locally for even less than that (plus the refundable core charge) it did come with the pulley. Best of all, it was made in the USA with a lifetime warranty. Again, f*ck oem. Tools needed: Metric sockets 10mm-17mm Breaker bar (not necessary but sure does help a lot) 32mm long wrench (or large crescent) wrench for the radiator cooling fan BMW Fan Tool (a long screwdriver and some cussing also works) T-50 Torx 5/8 socket Pry bar Piece of cardboard to protect your radiator (USPS Flat Rate box works great) WD-40 Shop towels Latex gloves Parts needed: Alternator (120amp) ~$200 Serpentine Belt $18 at PelicanParts.com A/C belt $8 at PelicanParts.com First, disconnect battery leads in the back of the vehicle (under the spare tire in case you have not been back there) Youll have to remove the triangle metal brace under the turtle-looking metal thing. Trickle charge your battery if voltage is really low or replace it if its close to dying. A dead battery can kill your new alternator. My local Batteries Plus quoted me $129 for an identical replacement battery (East Penn 94-LI with a $10 MIR) Remove the large plastic intake duct, there are 4 pop-rivets that hold it in place. Pull the middle pins out carefully so you can reuse them. Dont drop them in the engine compartment or they are lost forever. Unclip the MAF from the airbox and remove the two 10mm bolts holding the airbox and remove. This is a good time to change your air filter. ($12.75 for the oem Mann filter from Pelican) 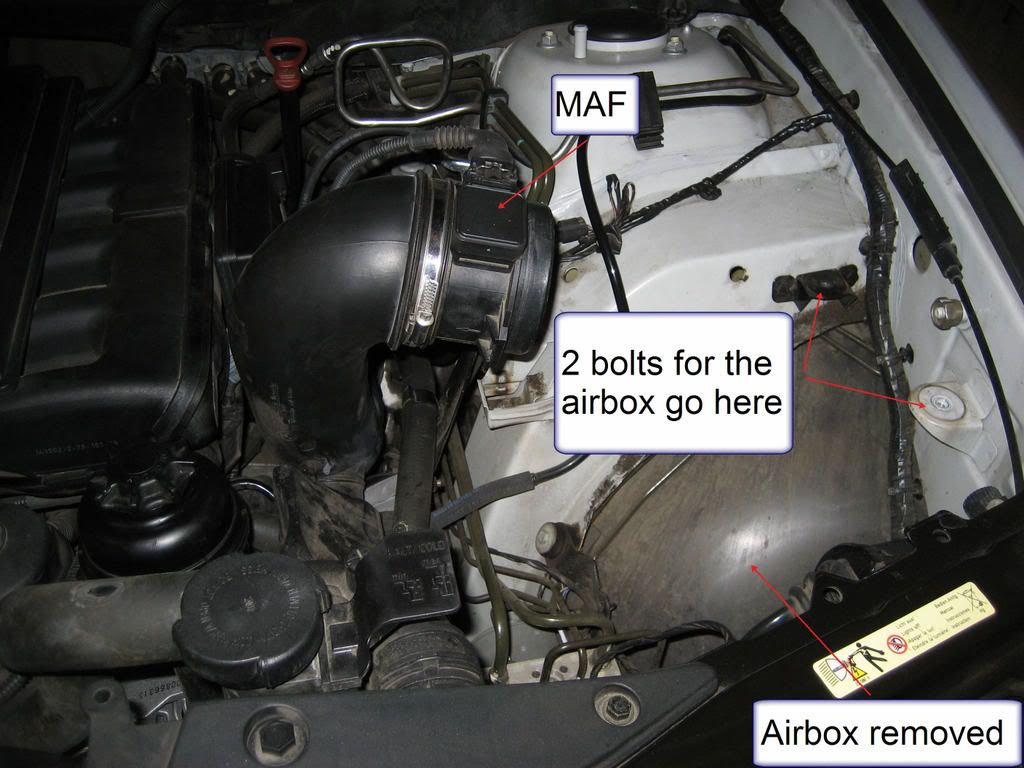 Remove the 3 pop rivets holding the radiator fan shroud. 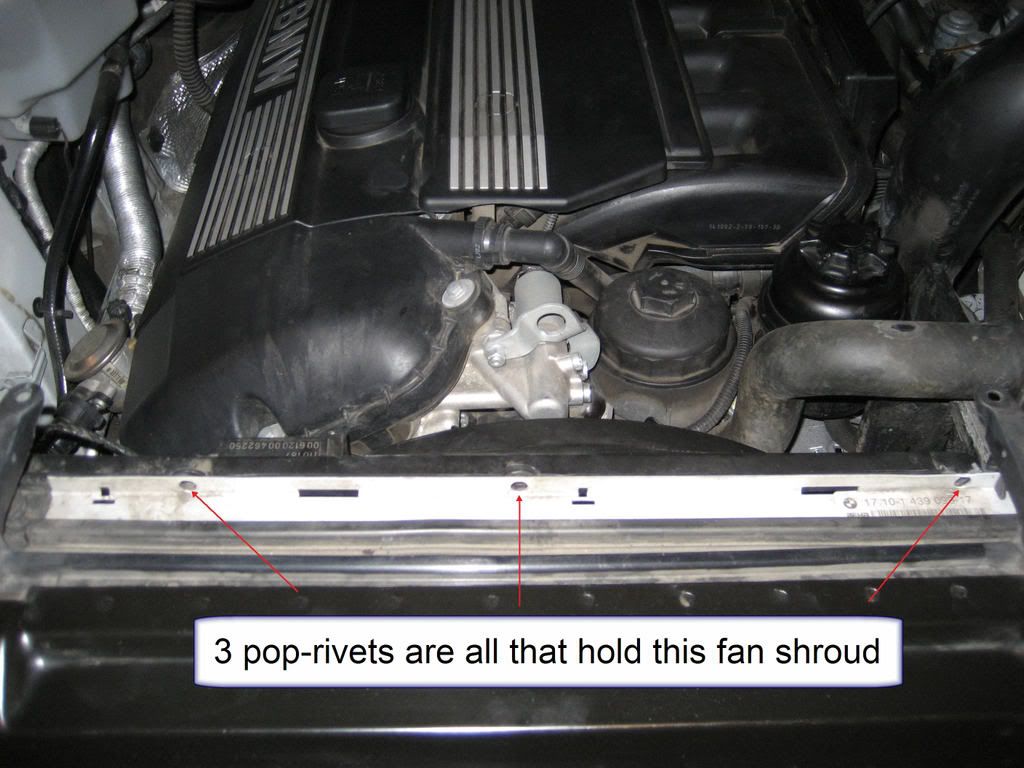 Unplug the electrical connector from the left side of the fan shroud and unclip the harness 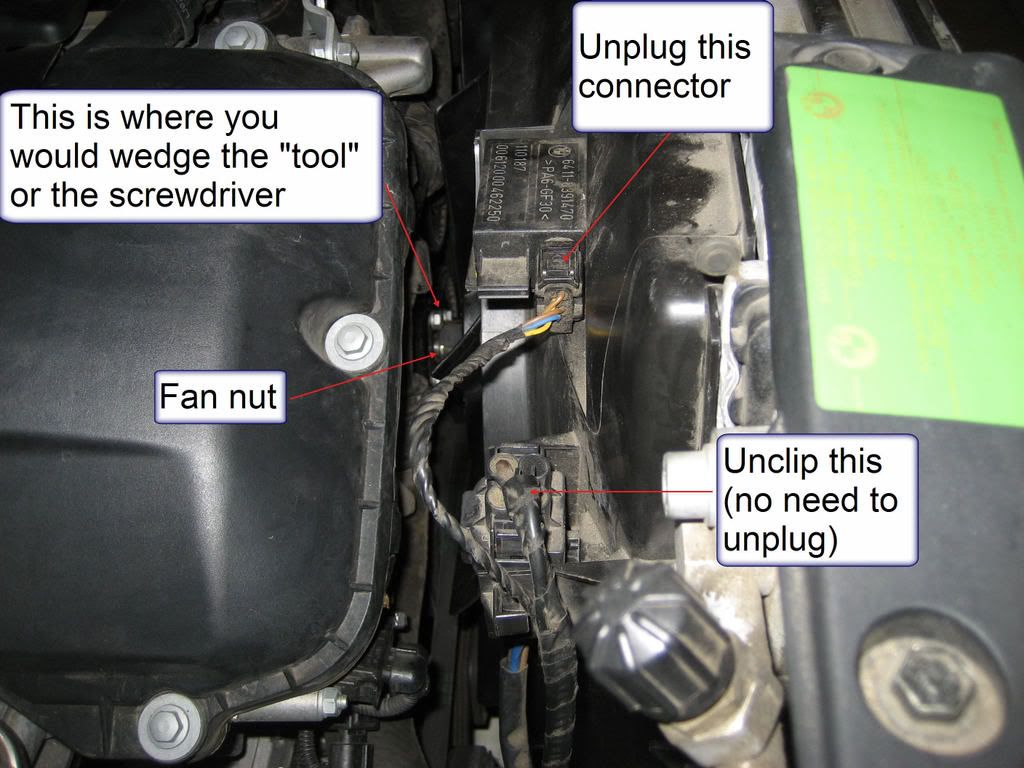 Remove the radiator fan, I used a large crescent wrench and a screwdriver. A little WD-40 may help loosen it but put a rag underneath so you dont spray the pulleys. ***Note: the fan clutch nut is left-hand thread so you need to turn it clockwise to loosen. Its easiest to remove the fan and shroud together. Set aside and store the fan vertically as it sits in the engine bay. Finally, you can actually see everything. Tape the piece of cardboard to the inside of the radiator to protect it from tools, etc. Remove the upper tensioner via the 2 bolts holding it. Some people remove the Power Steering fluid reservoir above the alternator and pull out the alternator that route but I didnt want to risk it leaking on the new alternator so I did it this way, you decide. (stupid location for the PS reservoir IMO) 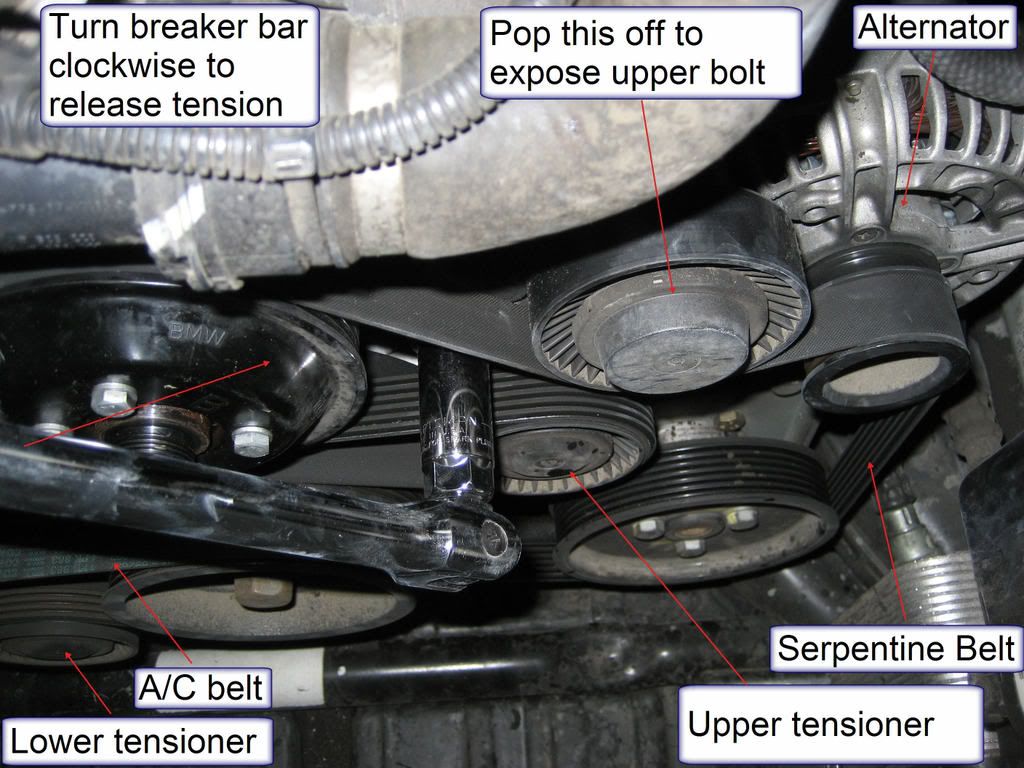 Remove the nut securing the main red + cable lead to the alternator with a 17mm socket. Unplug the harness plug from the back of the alternator. You can now remove the upper and lower bolts holding the alternator. I had to use a pry bar and then my gloved hands to wiggle the alternator out, its on there pretty tight. Be careful not to damage the plastic snorkel since you need to return the core in good shape, it just comes off with a lot of wiggling. 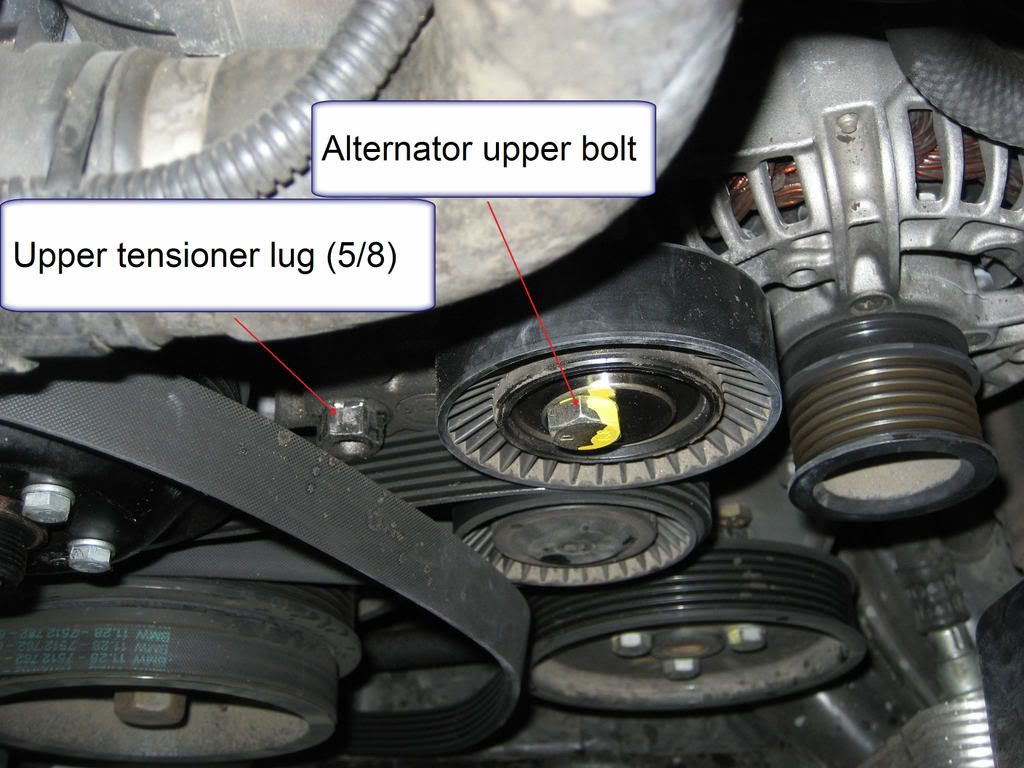 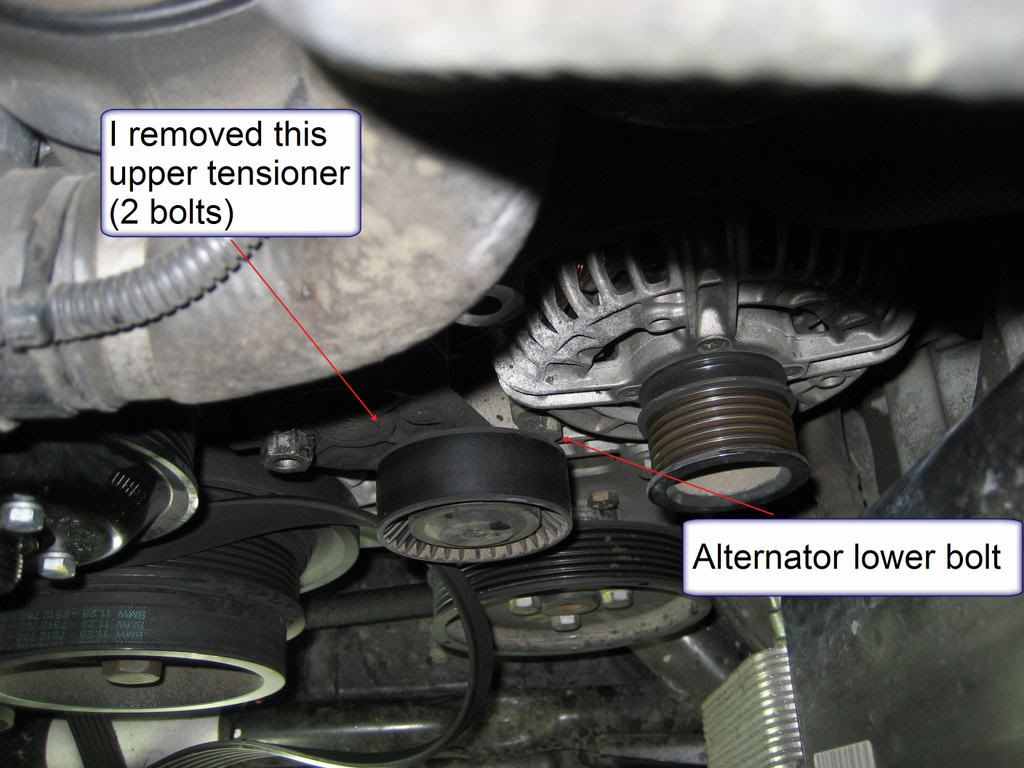 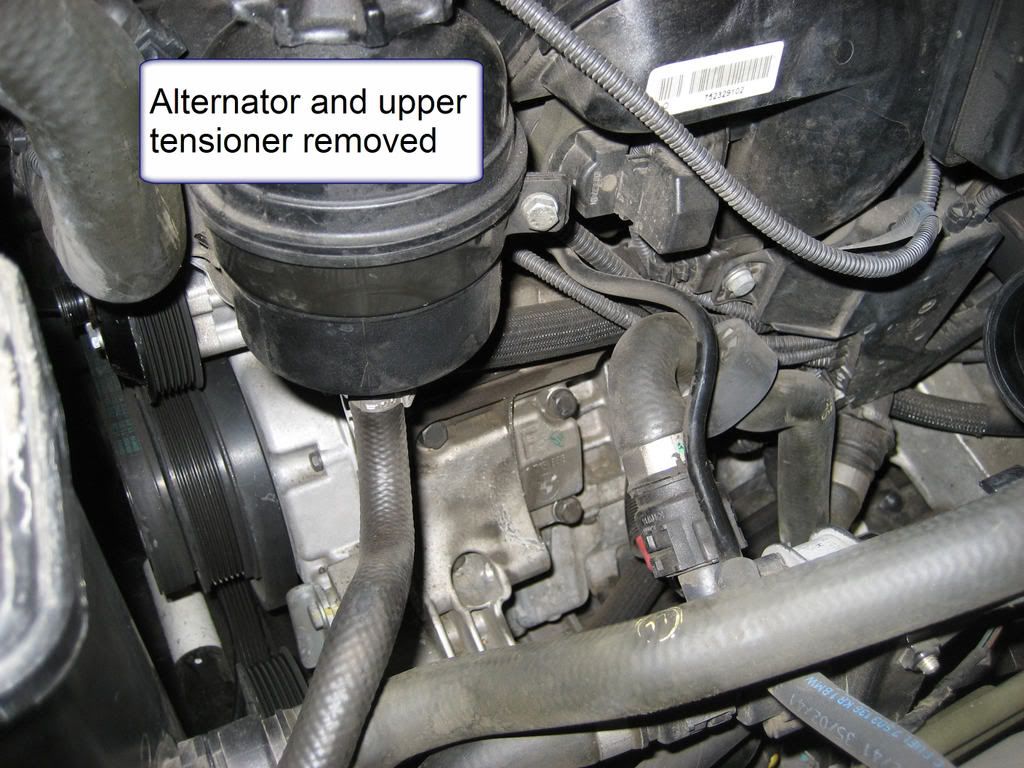 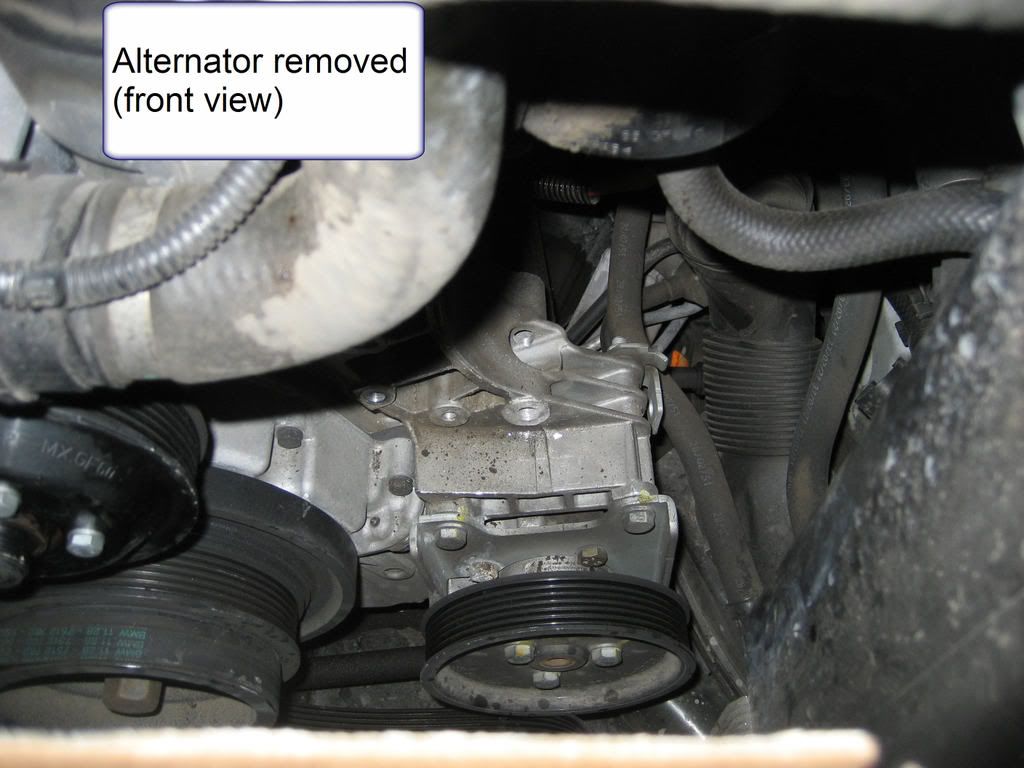 I removed the alternator pulley side up, straight up and out of the engine bay via the front of the engine (the cardboard kept my radiator unscathed so use it) After close examination, I found out why the alternator failed so prematurely (see pic) 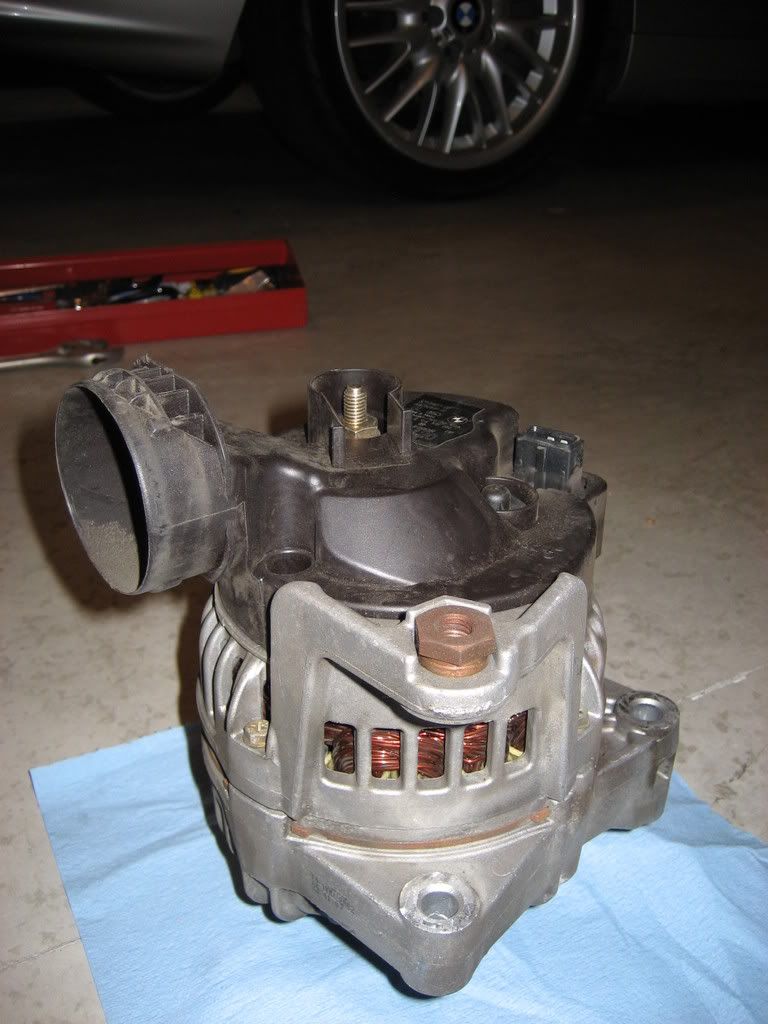 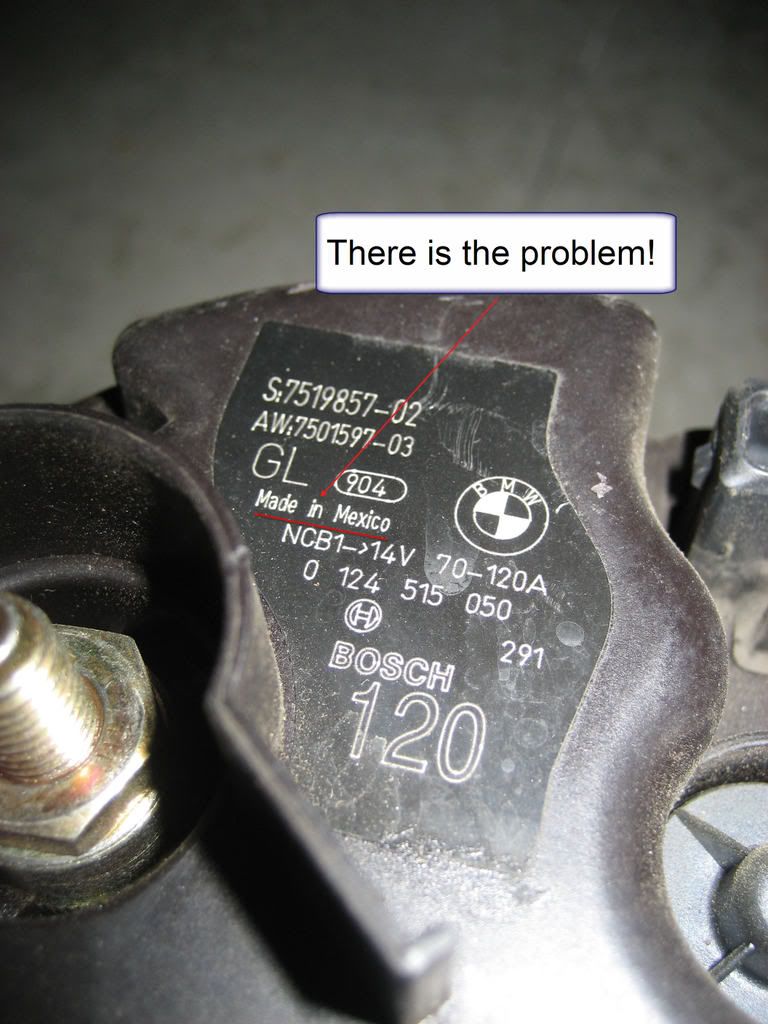 Now, compare your new alternator with the POS oem one. Make sure they are exactly the same, correct amount of grooves in the pulley, same mounting points, plugs, etc. I re-used my oem nut for the main red power lead since it had insulating plastic on the outside with the metal part inside. Installation is the reverse of removal. Remember to reinstall the tensioner. Also, the upper non-tensioner wheel (which is also the connected to the long bolt holding the alternator) is slotted for proper alignment. Now is the time to install new belts (new pulleys, new thermostat, and new water pump if youre so inclined, this way you dont splash coolant all over your new belts) Pop off the cap on the lower tensioner and use the breaker bar and the Torx T-50 to relieve tension by gently turning clockwise. The T-50 bit is really easy to snap off so be careful. Remove both belts and install the serpentine belt first.  Use the breaker bar and the 5/8 socket to relieve tension on the upper tensioner by turning clockwise. Install the serpentine belt first, then the A/C belt. For the serpentine belt, I found it easiest to loop everything around and to leave the alternator last. Make sure the belts are seated in the grooves properly or else the belts can shred or worse, come off and damage something. Install all the remaining parts in reverse order. Make sure everything is plugged in and tightened up and all no tools are left under the hood (I forgot to plug in the wiring harness on the side of the fan shroud) Turn on the ignition but dont start it, let everything re-set for a minute. Start it up and let it idle for a few minutes to make sure everything is okay. Check the voltage while the engine is running, mine showed around 14.5V. Now is the time to go for a test drive. I still had some random dash lights stay on but everything went away after about 10 minutes of driving. Best of all, the battery light is OFF. 
|
| Sponsored Links | |
|
|
|
|
#2
01-14-2009, 03:51 PM
|
||||
|
||||
|
First ... :welcome:
Second, this has gotta be the best first post ... I mean, DIY and so well documented as a first post!! Kudos! 
Last edited by TwinsPoppa; 01-14-2009 at 04:14 PM.
|
|
#4
01-14-2009, 06:22 PM
|
||||
|
||||
|
This will definitely come in handy for alot of 3.0 owners here...GREAT JOB!
__________________
'04 BMW X5 3.0i TitanSilber Metallic '03 Lexus GX470 Black Onyx --------------------------------------------- '03 BMW X5 3.0i Black Sapphire SOLD 
|
|
#9
01-15-2009, 02:28 PM
|
|||
|
|||
|
Thanks all and please feel free to email me with questions. Kamusta to my island brothers from the P.I. Glad to help out and it's great that I actually remembered to take pictures this time since taking off all that crap on top as well as the fan is something we all have to do at some point in time to get to all the mechanicals down there.
Im in the process of fabricating a fan tool from a piece of flat metal since Im too cheap to buy the $40 one. Its a $2.99 Ratchet bar clamp/spreader that I bought from Harbor Freight and took apart yesterday. Its about 13-inches long, ¾ inches wide and fairly thick:  I plan to enlarge the existing hole to fit the head of the 10mm bolt so I hope its wide enough, then I will probably drill another hole so that it will hold the 2 bolt heads on the fan pulley securely. They make this spreader in longer lengths too but they were out of them, I think a longer one may be better for leverage. Im helping my brother do his belts in the next week or two so Ill see if it works and post an update.
|
|
#10
01-15-2009, 06:45 PM
|
||||
|
||||
|
In regards to your post about why the alternator died prematurely, I dont think the country where it was made had anything to do with it. I had my Valeo 140amp alternator die at 60K and it was made in Germany.
What probably went wrong with your alternator is the voltage regulator was worn out or faulty. Changing that piece may have solved your issue. Thats what I changed out and found it to solve my alternator issue. This was after purchasing a new alternator since I didn't have much time to be without a car.
|
|
| Bookmarks |
|
|
|
|


 Linear Mode


