
|
|
|
|
||||||||||
| Xoutpost server transfer and maintenance is occurring.... |
| Xoutpost is currently undergoing a planned server migration.... stay tuned for new developments.... sincerely, the management |
|
|
LinkBack | Thread Tools | Display Modes |
|
|
|
#1
 01-09-2006, 11:05 AM
|
|||
|
|||
|
Bluetooth Retrofit in a 2003 BMW X5
Contributed by: IFlyX5
BMW BLUETOOTH INSTALLATION IN A 2003 BMW X5 This small guide is intended to supplement the BMW Bluetooth Installation Guide to help you with the installation of the Bluetooth Retrofit Kit in your X5. The installation was done on an '03 X5 4.6iS (production date 08/03). It took me about 1 hour and 20 minutes because I wanted to take my time and do everything right and not damage (or break) anything inside the vehicle. I am also very picky about noises inside the vehicle so extreme care was taken to ensure that nothing will rattle after the installation is complete. My mobile phone is a Sony Ericsson T616 from AT&T. BMW does not, at the writing of this guide, make a snap-in adapter for this phone, but I expect it would be available soon, since it's one of the recommended Bluetooth phones by BMW. As soon as my T616 is paired with the Bluetooth ULF unit, all of the contacts were downloaded into the vehicle. Everything works even before the system is coded into the vehicle. However, the sound quality is a little bit noisy and static and the system should be coded in order to improve the sound quality (per the BMW Installation Guide). Tools you will need: · Torx-10 screwdriver (from Home Depot, Sears, or your favorite hardware store) · 10mm socket · 10mm key wrench · 3" wrench extension · A couple of flat-head screwdrivers · Wire cutter · Patience! The Bluetooth Retrofit Kit contains these items as pictured. 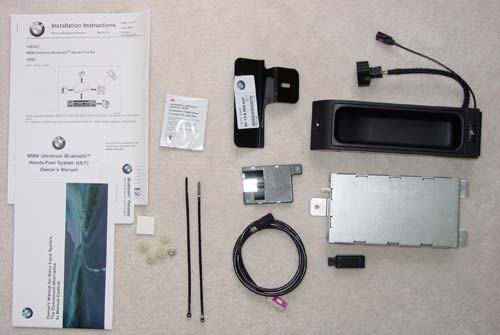 Below is a picture of the trunk, driver's side, before installation. 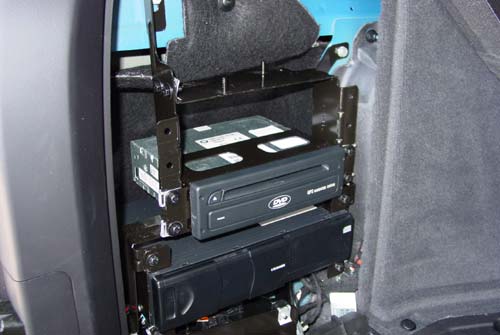 Picture of the Bluetooth Antenna: 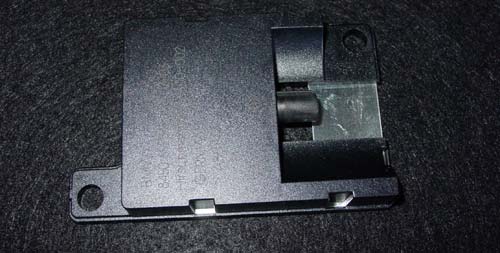 This is where the Bluetooth Antenna goes (attached to the top bracket, above the GPS DVD-drive). Use the 10mm key wrench to mount the Bluetooth antenna using 2 white plastic nuts. After mounting the antenna, plug one end of the Bluetooth Antenna cable into the connector on the antenna. Run the cable down along the bracket and use the supplied wire tie to tie it down, nice and neat. 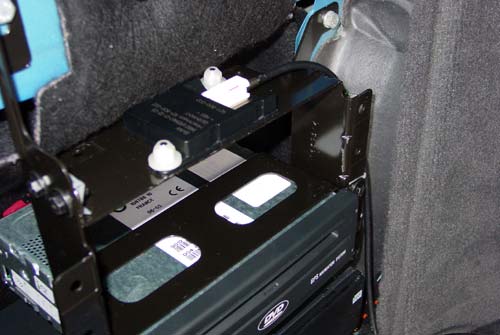 Picture of the trunk area where the Bluetooth ULF unit will be installed. Note the black plastic piece under the trunk cargo cover has been removed (where the blue paint is shown). You need to remove this black plastic piece in order to get access to the wires tied down underneath it. Remove it by unscrew the 3 bolts using a 10mm hex socket wrench. 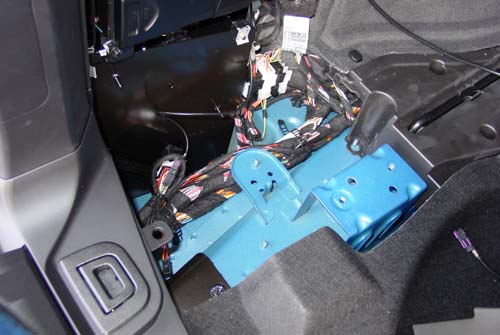 Picture of the black plastic phone harness and the antenna connector bundled together with a wire tie underneath the black plastic piece (removed in previous step). Don't cut the wire tie because you will need it later to re-tie the wires, but untie it from the hook hidden on the left side of the tie and separate them. 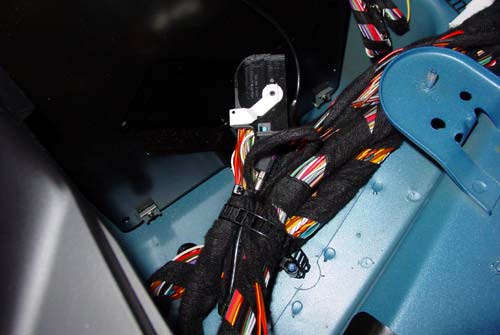 Connect the other end of the Bluetooth antenna wire to the Bluetooth ULF unit.  Plug the phone harness into the other end of the Bluetooth ULF unit.  Before bolting the Bluetooth ULF unit into the bracket, remove the Bluetooth Passcode sticker from the ULF and paste it on the while Bluetooth card. The Passcode should be a 4-digit number. Picture of the Bluetooth ULF unit attached to the bracket, ready to go. The area where the white plastic nut goes (by the antenna connector) is very tight. I used a 10mm hex socket with a 3" extension to bolt it in. 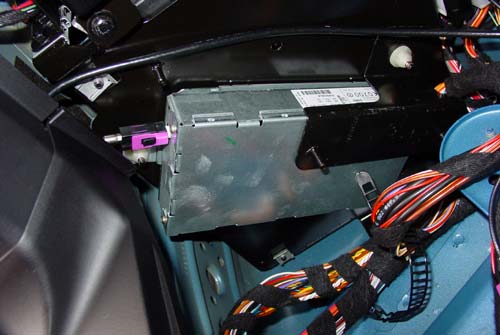 Picture of the trunk after everything has been put back together. You can see the Bluetooth ULF unit protruding from the rear (with the purple Bluetooth antenna connector shown). The Bluetooth antenna is shown attached to the top bracket with 2 white plastic nuts and the Bluetooth antenna wire runs down from the top bracket to the Bluetooth ULF unit.  The BMW Bluetooth Installation says to remove the front reading/map light and the mike fret (blank) to install the hands-free mike. I found it a lot easier to remove the whole light overhead console, remove the mike blank, insert the hands-free mike, and re-install the console. To remove the overhead console, first remove the reading/map light by inserting the tip of a small flat-head screwdriver into the middle area of the unit (by the middle push button) and slightly pry it open. Once it's opened, swing it down to remove the light from the console. Disconnect the wire that plugs into the light. The next step is to unscrew the four (4) Torx-10 screws from the overhead console to remove it. Two (2) of these Torx-10 screws are behind the sunglass holder, and the other two (2) are located behind the reading/map light unit you just removed in the previous step. Once the Torx screws are removed, the console just drops down. Be careful, you want to hang on to it and not let it scratch the rear-view mirror surface. The picture below shows how to remove the reading/map light unit using the flat-head screwdriver.  Picture of the overhead console showing the mike blank (from inside). It's the slotted one and is the first slot from the right side of the console. One vehicle that does not have the Mayday System, it's the only blank in the overhead console. You should see the hands-free harness hanging loose from here. If not, it is usually tied together with the Mayday wire (if available). 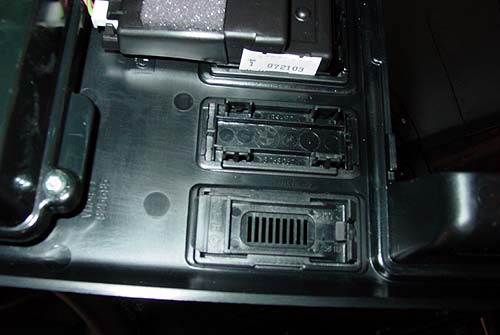 Picture of the hands-free mike and the mike blank. They snap together and make sure the green-color is facing up (the felt-cover face is facing down towards the slots on the mike blank). The BMW instruction says to connect the hands-free mike and the wire before snapping the mike blank into the console. It should be the other way around. I fed the blank into the opening in the console, connected the wire, and then snapped the blank into the console.  Picture of the bottom after the cover has been removed. Notice the snap-in Bluetooth antenna wire and the black phone harness are tied together. Cut the wire tie.  I've heard a lot of complaints about removing the oddment tray from the center console. The BMW Bluetooth Installation does not show you how to remove it properly but I found the instructions in the TIS CD that helps with the removal of this. Insert two (2) screwdrivers in the 2 holes (as circled in red) and pry them slightly. What you are doing is unhook the clips that hold the oddment tray to the center console. Make sure the tray is extended all the way up. Notice the screwdriver is inserted in one of the holes. You will pry the clip located in this hole to the RIGHT and the one in the other hole to the LEFT to unhook the clips. Do both sides at the same time. The oddment tray should come out nice and easy. 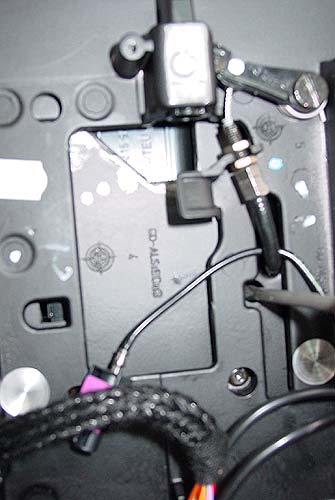 Picture of the center console with the oddment tray removed. It looks naked here.  From this point on, everything else is a piece of cake. Feed the wires from the new tray insert through the big hole and connect them. Snap the tray insert into the tray holder, and put the cover back on. I place some adhesive felt tape around the Bluetooth harness and the antenna connector before putting the cover back on to deaden any rattles. Follow the instructions in the BMW Bluetooth Installation to pair your mobile phone. Basically, turn off the ignition, hold the button (with the speaking face) on the new insert tray for at least 1 second, then turn the ignition key on while holding the button for another 2-3 seconds more. The display should show BLUETOOTH PAIRING. You will need the Bluetooth Passcode from the Bluetooth ULF unit to pair your mobile phone. |
| Bookmarks |
|
|
|
|


 Hybrid Mode


