BMW
BLUETOOTH INSTALL FOR X5 BUILT BEFORE 04/2002
PREWIRED FOR CPT
PHONES WITH OPTION SA640A
KIT & ADAPTERS
AVAILABLE FROM http://eiskits.com
|
Please note that in the installation
shown here, I decided to remove the mounting bracket and screw in place
the ULF module. Some people simply use velcro or wire ties although it is
not the optimal solution. I also completely removed the center console
which you may or may not have to do depending on whether or not you are
installing the eject box console.
|
 |
Start by removing the floor board and
unscrew the black plastic panel. There are three plastic nuts socket size
10mm
|
 |
Remove the plastic panel
by wiggling it out as shown.
|
 |
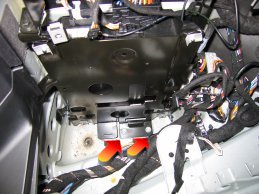
If you have a CD changer,
remove it by unscrewing the 4 nuts holding it in place. Socket size 8mm.
|
 |
Now we are going to remove
the holding bracket so that the Bluetooth ULF module can be screwed in
place. This is only for vehicles produced prior to April 2002 that
do not have a designated mounting location for the module. Use the
mounting bracket for vehicles made after 04/2002.
Remove the 2 nuts as shown, socket
size 10mm.
|
 |
There are 2 more nuts on
the very bottom of the bracket, and two on the sides
|
 |
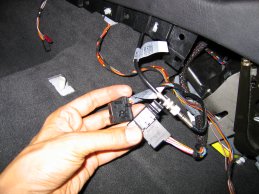
Remove the X400 plug by
sliding it down and out of the plastic holder.
|
 |
Remove the 2 bolts behind
the x400 plug as shown.
|
 |
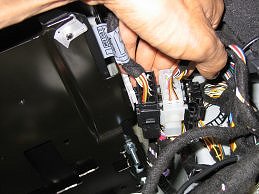
If you have a DSP amp,
remove all connectors. The black connector is tricky to get off. Slide it
to the right and the plug should come off.
|
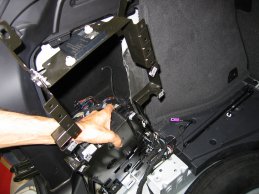 |
Now the whole mounting
bracket should come out as shown along with the DSP amp.
|
 |
Remove the DSP amp from
the mounting bracket. There should be 4 screws at the corners. The bottom
2 can just be loosened. The top 2 need to come off.
|
 |
Line up your ULF module on
the front of the bracket as shown and mark the three holes with a pencil.
Drill the holes where marked.
|
 |
I used 3 plastic nuts as
shown here. They work better than metal screws and will not come loose
with any vibration. Also use rubber washers before screwing on the ULF
module. You hav have to bend one of the tabs on the mounting bracket to
allow for a flat surface before mounting the ULF module in place.
|
 |
Here is the ULF module
screwed in place. This is a good time to plug in the cable from your
bmwbluetooth kit. I also used a wire tie to keep it from coming out. Mount
the module with the sticker facing up as shown.
|
 |
Ever wonder where the
Bluetooth cable goes? Here's where... It goes along the rear seat and
under the carpet along the driver's seat as shown, to the centre console.
You will NOT have to do this if you buy the kit from bmwbluetooth and the
necessary adapters. This harness only needs to be put in place if your car
was manufactured before 04/2002 and did NOT come prewired for a phone.
I.E. cars without option 640A.
|
 |
Here I have removed the
driver's seat & center console. You will only have to remove the
console alone. The instructions from bmwbluetooth will giude you through
this process.
If you choose not to have the eject
box cradle, then you will not have to remove the console.
|
 |
Install the eject box as
per instructions from bmwbluetooth. Here is the inside of the console box.
You will need an extension cable that goes from the driver's seat area up
and into the console to the eject box.
Also in here is the adapter to
convert your coax antenna connector to the fakra plug on the eject box.
This adapter and the extension cable should come with your kit.
|
 |
Here is the other end of
the connector by the driver's seat. Plug the connectors from the eject box
in console to these connectors. These are the main bluetooth cables which
go to the trunk.
|
 |
Reassemble the console.
This is a good time to vacuum and clean under the console and seats.
|
 |
Next, install the bluetooth antenna. Use the 2 plastic nuts that came with
the kit. Plug in the antenna cable. The other end goes to the ULF module.
You may have another antenna cable
that comes from the centre console area. This should plug into the other
end of the vehicle's antenna. Both fakra connectors should be in the trunk
with the rest of the cables. If you are unable to find it, look behind the
carpeted panel on the left side of the trunk.
|
 |
You should now be ready to
reinstall the mounting bracket. You can now see the ULF module located
below on the left.
|
 |
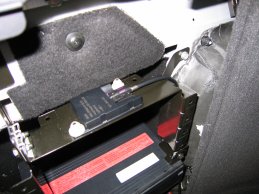
Locate the 25pin DB plug
shown. if you have this connector, your vehicle is prewired for the BMW
CPT phone (Option 640A). This will plug in to the adapter that came with
the kit from bmwbluetooth.
|
 |
Plug in the adapter as
shown.
|
 |
Locate the following blue
24 pin connector. It should have a jumper plug on the end as shown. Your
jumper plug may look different. If there is no jumper installed, you will
need to get one. these are available from bmwbluetooth or your local
dealer.
|
 |
After cleaning up all the
cables and using wire ties to secure them in place, you can reinstall the
black plastic panel. Reinstall your CD player and reconnect all plugs to
the CD player, DSP amp etc.
|
 |
With the vehicle put back
together, you should be ready to pair the phone. make sure your cell phone
is on and hold down the pairing button as shown while you turn the
ignition to the ON position. If you have a snap-in adapter for your phone,
you can snap it in now and it should charge your phone. Mine is not shown
here yet.
|
 |
Your display should now
show BLUETOOTH PAIRING as shown and the three LEDs should be flashing.
Follow the directions that came with your kit to pair the phone. You don't
necessarily have to get your vehicle coded at the dealer although some
people seem to get better reception after doing so. I had mine coded and
have not had any problems so far.
|
 |
To test your install, hold
down the speak button on the steering wheel or eject box, and your dash
should show VOICE RECOGNITION. Say "Dial Number" and it should
show the following SPEAK NUMBER. If you get this far, your install is
successful!
|

 01-09-2006, 11:05 AM


 Linear Mode


