
|
|
|
|
||||||||||
| Xoutpost server transfer and maintenance is occurring.... |
| Xoutpost is currently undergoing a planned server migration.... stay tuned for new developments.... sincerely, the management |
|
|
LinkBack | Thread Tools | Display Modes |
|
#1
 02-09-2008, 04:21 PM
|
|||
|
|||
|
Bi-Xenon Conversion for Pre-Facelift X5 (E53)
Introduction: For a while now I have been interested in upgrading my pre-facelift BMW X5 (E53) headlights from Xenon to Bi-Xenon, but only with best quality OEM type parts. After much research, quite some trial and error, and some dead-ends, I found there is a very good way to do this and so I felt in worth writing this up for those who may be interested in this modification. Challenges: The first challenge I faced is that my car is one of the very last, pre-facelift cars, (manufactured August 2003). Therefore the headlights fitted were permanently sealed ones and cannot be baked open. However, after some close examination, I determined that the non-Xenon headlights use the same shell as the Xenon lights. Hence I was able to purchase from eBay some very good quality non-Xenon headlights manufactured in the year 2000 and to avoid using my original headlights, I also found some very cheap Xenon headlights from a wrecked X5 on eBay, these headlights were damaged, but all I wanted from them was the inside silvered plate that holds the lamp units and a few other small parts. Hella makes all of these headlights for BMW. The second challenge was to find a Bi-Xenon projector unit and solenoid electronics, to fit into the original BMW headlight units. At this stage it is worthwhile to explain what I mean by solenoid electronics. To achieve the Bi-Xenon capability, the projectors all have solenoids that move the normal dipped beam shield out of the way of the Xenon bulb, thus achieving a high beam pattern. The solenoid needs a high current to move the lever and then a much lower holding current to keep it in place until main beam is switched off again. Some solenoids have one coil (two wires) and use electronics to reduce the current through the coil after about 1 second; some solenoids have two coils (three wires) and expect full voltage on the first coil for one second and then full voltage on the holding coil (only) thereafter. As it happens the post-facelifted E53 Bi-Xenon headlight uses one coil and incorporates the electronics into the integrated ballast unit, whilst the E46, for instance, uses the dual coil method but also integrates the electronics into the ballast unit. Without the correct electronics the solenoids simply burn out or fail to work. Another consideration is that of right-hand drive, left-hand drive and ECE (EURO) versus DOT (US) projectors. ECE projectors give out more light and have a sharper pattern than DOT projectors due to local regulations. In my case, I needed an ECE projector suitable for the UK (right-hand drive), but with a mechanism to alter the pattern to suit left-hand drive operation, when needed, for frequent driving in Europe. The original Xenon lights fitted to E53s in the UK have a lever on the Xenon projector that move a plate to blank off the raised kerb-side pattern, thus making the dipped beam pattern a straight line cut-off. Right-hand drive pattern:  Left-hand drive pattern: 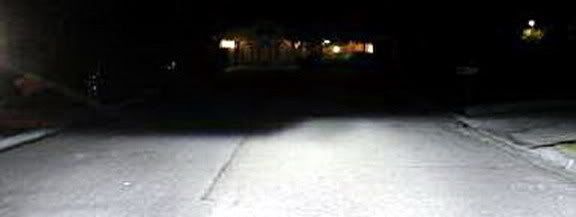 Right-hand drive pattern (in LHD setting), or adapted unit (see below): 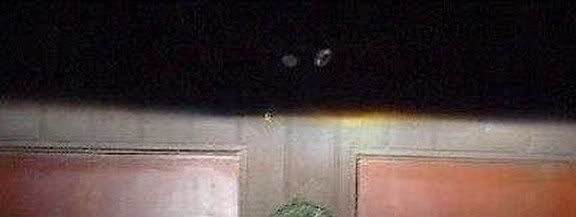 After extensive research, and after buying several trial projector units off eBay, I discovered that there are several options for Bi-Xenon projectors. For example, the post face-lift E53 Bi-Xenon headlight projector fits directly into the pre-facelift housing, but it does not come with integrated solenoid electronics and it is actually of a much poorer manufacturing quality than the pre-facelift unit, (I managed to acquire two brand new units, but found that the projector is much less reflective, quite flimsy and that the design of the movable plate and the right-hand drive to left-hand drive adjustment lever is pretty poor in construction, (the adjustment mechanism hardly works in reality). I therefore started to look for other suitable units and particularly considered cars from Germany that might have Hella Bi-Xenon units fitted in them. With the help of some very useful web sites: http://faqlight.carpassion.info and http://www.intellexual.net/hid.html and after some further eBaying, I found that the Audi A6 projectors from around 2002/2003 are a very good choice for the following reasons: Firstly they are of very good quality, (as good as, if not better than the original Xenon projectors), secondly the solenoid comes with integrated electronics, (so only needs to be cabled to the high beam bulb circuit directly), and thirdly the projectors match up and fit perfectly into the headlight housing mounting bolts. These units also have a very good right-hand drive to left-hand drive switchable mechanism, regardless of whether you buy an original left-hand drive or right-hand drive version and are made by Hella. As you will probably have gathered I ended up buying quite a few different projectors, some of which are now in the rubbish bin. Eventually I bought purchased some ECE version Audi A6 units from HID Planet http://www.hidplanet.com/rs6.html based in the US. These were left-hand drive units and convinced me that these were the correct type of projector for this application. These units are perfect for left-hand drive cars, so if you have left-hand drive this is the way to go. However, as my car is a right-hand drive car, and these were left-hand drive units, the dipped beam kicks up the wrong way (see pictures above). There are two solutions for this issue. You can disassemble the movable shield and carefully file off the kicked up part so that the beam pattern is completely flat and then fit the modified shield back to the projector, (it now has a very effective universal pattern suitable for left-hand or right-hand drive without any switching, see picture above), or, if you wish to have the original right-hand drive pattern then you can try to hunt down an original right hand-drive unit. However, I could not find any right-hand drive units on eBay or anywhere else and resorted to buying two completely new Audi A6 headlights from the local dealer, then stripping out the Bi-Xenon projectors, (and scrapping the rest). The first option is the cheapest by far and is actually an advantage if you switch from right-hand drive to left-hand drive frequently, because you do not have to make any changes, however the dipped beam is a little compromised when compared to a right-hand drive unit used in right-hand drive mode. The choice is yours. The part numbers for the right-hand drive Audi headlights in the UK are 4B0941003BP and 4B0941004BP. Original Xenon Projector: 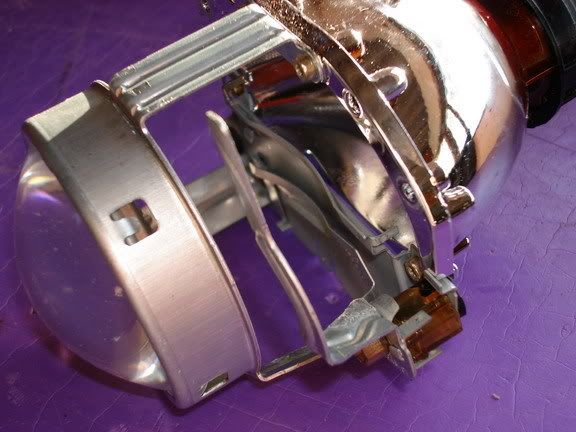 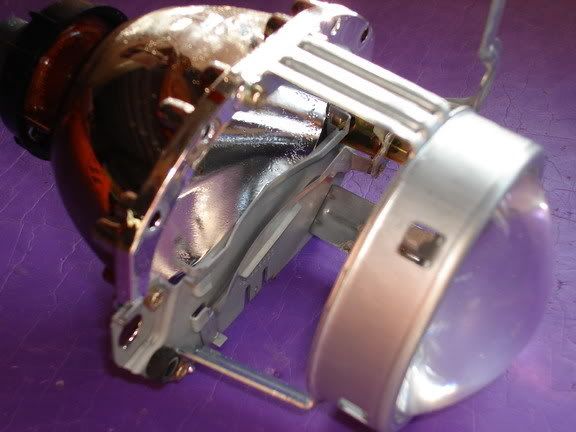 Audi A6 B-Xenon Projector: 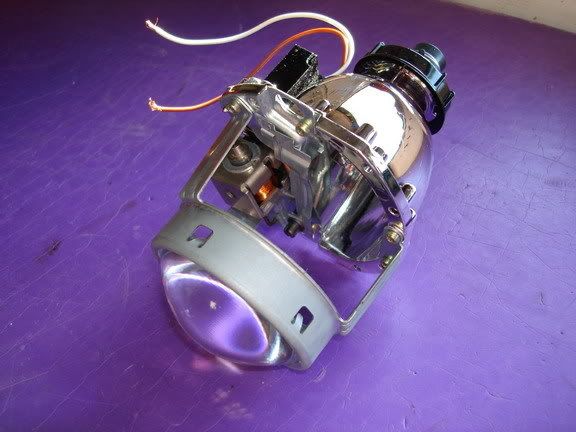 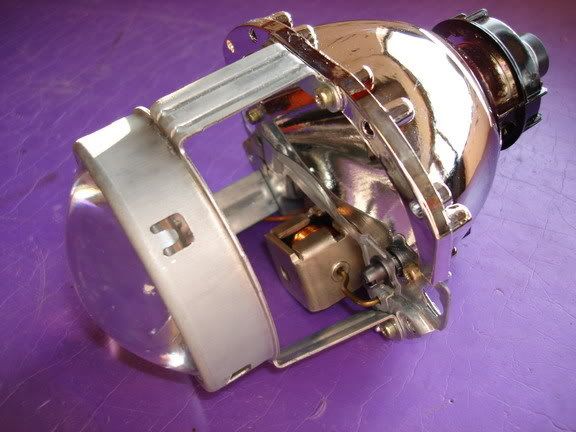 Construction: So the time came to do the work. The non-Xenon headlights were opened by baking them in the oven at 110 degrees centigrade for 15 minutes. There are plenty of guides covering the opening procedure elsewhere on the web. The scrap Xenon headlights were opened carefully with a dremel, (as these were much later units and were permanently sealed), making sure that the innards were not spoilt. If you have openable Xenon headlights then the process below is a little simpler! You would remove the original lights, follow the process below and then re-fit. Preparation of the non-Xenon headlight shell: This involved using a heat gun to warm up the remaining sealant in all the channels around the light housing and also from the front cover, so that the units could be re-sealed later with fresh sealant. This also allowed for good access to the screws that hold on the front plate (the black plastic piece that holds the clear plastic lenses that sit in front of the main and dipped beams). This plate was then removed. Next the screws on the rear of the housing that fasten the bulb holder to the reflectors need to be removed and stored. Then the inner silvered unit, (made up of the low and high beam reflectors), was also removed from the housing by carefully prising it off the adjusting mechanisms. This can be thrown away. Removal of the required pars from the scrap Xenon headlights: All you need to retrieve from these headlights is the silvered plate with the Xenon projector bolted to it, the clear plastic lens in front of the Xenon projector and the rear housing extension for the Xenon bulb cabling. These will be fitted back into the non-Xenon housing. Preparing the new Bi-Xenon projector for fitting: The Audi A6 Bi-Xenon will fit directly in the place of the old projector, however if you refit the silvered plate into the headlight housing, you will see that the small black box for the solenoid electronics fouls the overall headlight housing at the back. However, this is easily fixed. Fortunately the black electronics box can be removed from the solenoid and be fitted remotely, I wired up the unit to the solenoid directly and placed the electronic box inside the housing behind the silvered plate. You can either solder the wires directly to the solenoid or use a plug and socket connector. Bi-Xenon unit with integrated electronics: 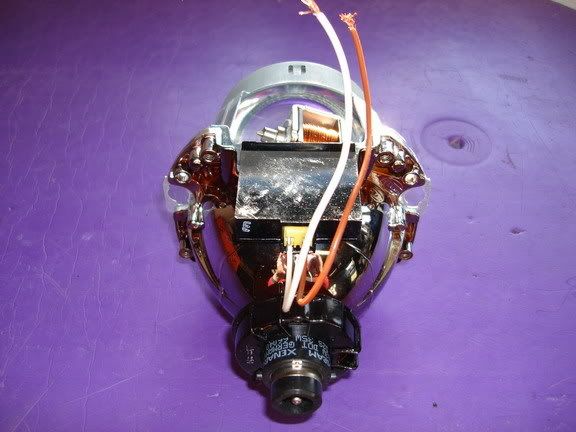 Bi-Xenon unit with remote electronics using BMW connector: 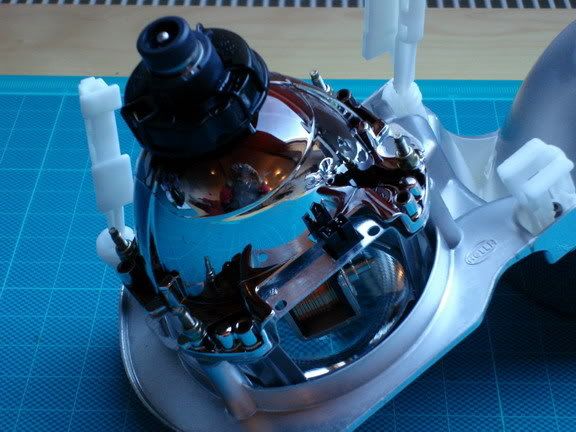 Remote solenoid electronics (removed from projector and wired up): 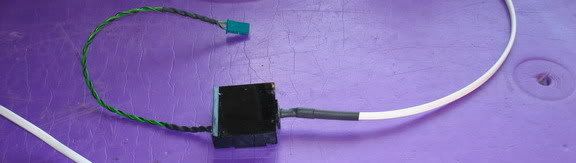 Fitting the Bi-Xenon unit: The original Xenon projector was removed from the original Xenon slivered reflector and the new Bi-Xenon projector fitted in its place. At this stage the Xenon unit needs to be lined up with the high beam. The original unit uses rubber washers to do this, I found it best to use brass washers, just vary the number to get the alignment. To align the unit you need to power up the Bi-Xenon bulb and at the same time the main beam bulb and project these onto a wall some 10 metres away. A right-hand drive Bi-Xenon unit in dipped mode should be aligned so that that main beam itself centres some 5 centimetres above the dipped pattern line and some 5 centimetres to the right of the point where the dipped beam kicks up to the kerb. For a left-hand drive unit, it should be to the left instead of the right. Please see the diagram below, (you can also refer the BMW headlight alignment procedure from the BMW TIS program if you have this). This alignment must be done prior to fitting the silvered plate back into the housing as once the headlight is re-sealed it is too late. It is also important to test the Bi-Xenon function at this stage to make sure the solenoid and electronics works, before fitting it to the headlight. Re-assembling the headlight unit: Fit the electronics for the Bi-Xenon solenoid inside the housing at the rear, in such a place that does not foul anything, (see picture below). Fit the silvered plate with the Bi-Xenon unit back into the prepared rear housing, just pop it in making sure that the balls on the plate push in fully to the sockets on the adjusters, this make take some pressure to do. Then re-fit the headlight levelling adjustment motor to the rear of the housing, making sure the ball on this unit is properly engaged with the plate, (simply the reverse of the removal). Check that the plate can no longer move freely. Fit the main beam bulb holder and seal at the rear of the unit with the three original screws (again the reverse of removal). Prepared housing with electronics inside: 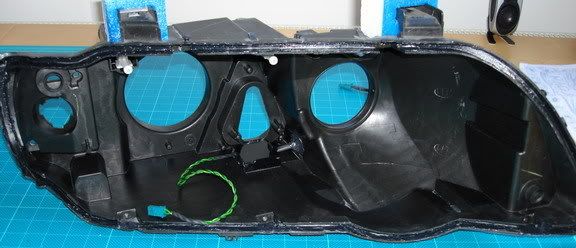 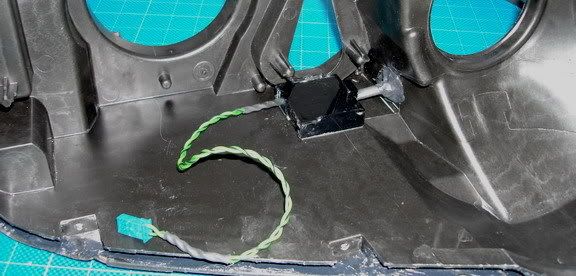 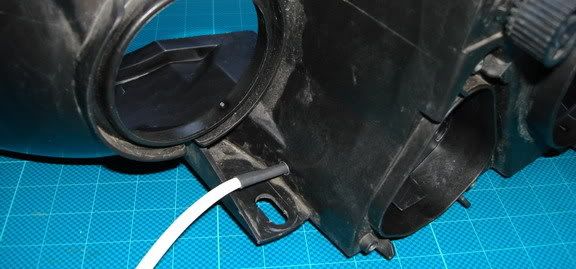 Housing with Bi-Xenon projector re-fitted: 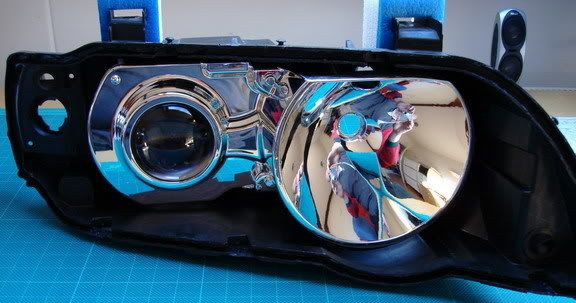 Fitting the front lenses: Fit the front lens that you retrieved from in front of the original Xenon projector (the one with a hole in) and re-fit this to the original black surround. You should now have a font surround with the correct lenses. Re-fit the surround to the headlights. See picture below. Front lens replacement: 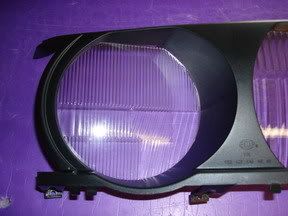 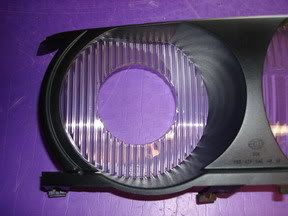 Pre-fitment testing: At this point you should have a complete housing ready for use, but minus the front cover. This is a good time to test all the functionality by connecting the Xenon bulb to a ballast and by connecting both of these to a suitable power source, including the Bi-Xenon solenoid, (wired across the main beam connector). Test all the headlight functionality and do a last check on dipped beam versus high beam alignment as described above, because once the light is sealed it is too late. Once tested, remove the headlights again. Re-sealing the headlights: Now you can proceed to sealing the front cover, however you may wish to consider fitting some extras such as Angle Eyes or removing the amber corner lenses. This is purely a personal choice, for robustness I stuck to OEM, but did install Osram Silverstar main beam bulbs along with Philips Blue Vision tinted sidelight bulbs, (these give better light and are more matched to the Xenon light tint of the OEM Xenon bulbs). Another possible upgrade is to fit genuine Philips DL50 Xenon bulbs to the Bi-Xenon unit, these bulbs can fit directly into the units and give out nearly twice the light, but you also need 50w ballasts. The bulbs are available from: http://www.bulbman.com/index.php?mai...ducts_id=16015 and the ballasts can be found here, (you need the XVD2 to directly replace the OEM unit): http://www.aerovisions.com/hid/hid_o....html#ballasts After you have fitted all the upgrades and made sure that they all work you can re-seal the lights. I used a Polymer-MS based sealer. (used for many applications such as sealing glass). It comes in all colours, so I used black. Fill the sealant channels with the sealant (using a sealant gun) but not to the top of the channel, as you need to allow for the space taken by the cover. I left a 3mm space from the top and this seems to be about right. After filling replace the cover and re-fit the screw at the corner that holds the front cover in place (the only screw fitted to the front cover and removed at disassembly stage). Using this sort of sealer makes for a completely watertight joint, but it cannot be undone again. Some people just re-heat the headlights and rely on the original heat based sealant, but in my experience this process does not properly reseal the lights, the choice is yours! If you do use Polymer-MS, then leave the sealant to harden for at least a day, then refit all the ancillaries to the headlight, (the bracket for the Xenon ballasts, the rubber seals, sidelight bulbs, etc.). Removal of original headlights: Park the car in the garage or in such a place that you can mark up the dipped beam pattern on a wall some 10 to 20 metres away. These marks will be used to align the new headlights. Remove the original headlights; taking care of the paintwork by masking it off, I used duck tape for this. There are plenty of guides on the web that show you how best to remove the lights. Fit the new headlights: Temporarily place the new lights in their correct positions, making sure that the wiring is all back in place correctly, wire up the Bi-Xenon solenoid across the main beam headlight bulb connector, but make sure that you get the polarity correct to avoid damaging the solenoid electronics! Before you finally bolt in the lights do a complete functionality check. If they test out fine then you can fasten them back into place. Alignment: Once the headlights are back in the car, re-align headlights to the point you marked on the wall before you removed the original units. If needed you can make some slight adjustments after road-testing and if you do not have a convenient wall then get the lights properly aligned by a professional (if you can find one). These lights should be aligned to 1.1% dipped beam, in other words the beam should be at the floor after approximately 100 metres length. You now have top quality Bi-Xenon lights. ENJOY! |
| Sponsored Links | |
|
|
|
| Bookmarks |
|
|
|
|


 Linear Mode


