
|
|
|
|
||||||||||
| Xoutpost server transfer and maintenance is occurring.... |
| Xoutpost is currently undergoing a planned server migration.... stay tuned for new developments.... sincerely, the management |
|
|
LinkBack | Thread Tools | Display Modes |
|
#1
 01-09-2006, 11:05 AM
|
||||
|
||||
|
Halogen to Xenon Conversion in a BMW X5
Halogen to Xenon Instructions The Halogen to OEM Xenon headlamp upgrade is an easy conversion but you will need to do a few things. Relay Packs are required. If you are doing the simple change out without the OEM $2000 kit you cannot reprogram the computer. (Somebody paid their dealer to do this then had to pay to have it reprogrammed. Then there were other errors from that that resulted in a complete mess.) I don't think you can just pull a fuse without disabling the whole check system somebody else can look into that. Hella do a relay pack at $90 each. . The relay pack I made works just fine HID RETROFIT Relay Packs This is my version of the relay packs that eliminate the "Check Bulb" error indicated on the dashboard after retro fitting HID headlamps. The circuit is very simple putting a 1 ohm 1Watt resistor across the two wires feeding the low beam bulb on each light unit. The relay coil is also across the same wires so that the resistor/fuse combo is switched out of circuit when the lights are turned on. I also included a self resetting 1 amp fuse in that circuit just in case! See circuit diagram below.) The fuse/resistor is wired across the normally closed terminals of a DIP micro relay package and all the components fitted onto a 1" X .75" piece of "Veroboard". I used silver solder for all soldered joints and to join the two ends of the 9006 plug/socket combo used to make it easy to insert the packs into circuit without modifying the vehicle electrics. If you are also installing Angel Eyes then this is as good place to get a low beam feed to power the Angel eyes. 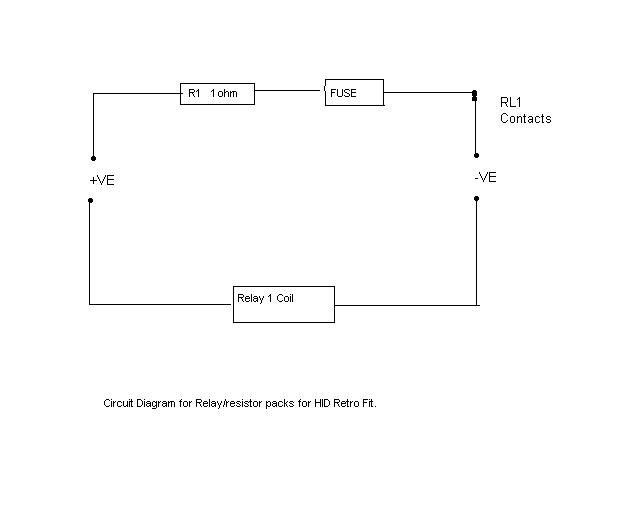   Picture 2 shows one side view of the circuit board.  Picture 3 shows the other side view of the circuit board.  Picture 4 shows the circuit board mounted in the box attached to the wiring loom ready for encapsulation. All electronic parts available from www.allelectronics.com. The case is from Radio Shack Relay # RLY 622 Resistor # 1 ohm 1 Watt Fuse # RXE 065 Case # 270-1801 (3" X 2" X 1") Available from any RS store. 9006 plug/socket with wire tails available from [email protected] Daniel Stern When it comes to the parts needed because of the voltages and safety provisions involved you would be better off with the OEM ballast from Ebay or dealer. (Your choice!) Picture below.  These fit in a slot below the light unit and have a small metal retainer to hold them in place available from the dealer. The rubber bellows seals the rear of the light unit. They do not come as a separate part but integral with the ballast. You will also need the plastic retainers for the rubber bellows See below. In the photo you can also see the plastic clip that holds the whole thing together on the light unit.   As there is 25K Volts in the system it's very important that moisture stays out! To actually pull the headlight unit from your vehicle first removes the 4 screws from the positions indicated below.  This is the fastest and easiest way to do it. Slip the unit forward a little and remove the trim piece. See below.  Once you have the old unit out then the new slip right in again. In the photo above you can see a black ground wire. This needs to be grounded because of the high operating voltages. Parts from dealer.  2 X Ballast # 2 above. 2 X Metal Ballast Retainers # 11 above. 2 X Screw & Clip # 12 & 13 above. . 2 X Plastic U clip # 10 above 2 X Warning Label # 8 above 2 X Bulb retainer # 9 above (If not already on lamp units.) For additional tips, see bmwtips.com for resistor values and schematics. http://bmwtips.com/xuf/xenon_upgrade_fix_instructions.htm |
| Sponsored Links | |
|
|
|
| Bookmarks |
|
|
|
|


 Linear Mode


