
|
|
|
|
||||||||||
| Xoutpost server transfer and maintenance is occurring.... |
| Xoutpost is currently undergoing a planned server migration.... stay tuned for new developments.... sincerely, the management |
|
|
LinkBack | Thread Tools | Display Modes |
|
#1
 01-09-2006, 11:05 AM
|
|||
|
|||
|
X5 Sirius Installation with Navigation
BMW Sirius Receiver Installation Guide For X5 (E53) with Navigation (MY03+) This installation guide is intended to supplement the BMW Installation Instructions to help you with the installation of the BMW Sirius Receiver for X5 (E53) with Navigation. I opted for the Terk SIR3 Low-Profile Magnetic Mount antenna and mounted it in the spoiler. As a result, this guide will not cover the installation of the BMW Sirius Satellite Antenna and you should follow the instructions supplied with the BMW Sirius Satellite Antenna Kit if you decide to go that route. I found no signal loss or weak reception with the antenna being in the spoiler and would strongly recommend if you want to be stealth and do not like the obtrusive shape of the BMW Sirius antenna on your roof. You could also try to mount the BMW Sirius Satellite Antenna in the spoiler, but it is too big to fit in there. I attempted to remove the antenna cover to make room, but could not pull back the weather stripping to expose the torx screws. Pictures of the BMW Sirius Satellite Antenna are attached in the last section to show you more details. Cost wise, the Terk SIR3 and SIR-SP splitter cost about $65 plus sales tax and can be purchased from Best Buy, Circuit City, Crutchfield, Sound Advice, or your local audio shops. The BMW Satellite Roof Antenna is retailed at $125.00 and can be purchased for as little as $93.60 from Pacific BMW, Circle BMW, or Crevier BMW. It took me about 3 hours to complete the project, and the bulk of time was spent on mounting the Terk SIR3 antenna on the spoiler and fishing the antenna lead through the rubber grommets (about 1 and ½ hours!). But I also wanted to take my time and do it right, especially not rushing through the procedures and kink or crimp the antenna leads. Last but not least, some of the pictures included in this guide came from Slappy, who had mounted his XM antenna in the spoiler as well. Click herefor the web site if you are interested. Part Numbers · SIRIUS RECEIVER NAV 84.11.0.153.365 · E53/E46 SIRIUS INSTALLATION KIT 84.11.0.141.976 · EXTENSION CABLE 84.11.0.141.977 · CD CHANGER CABLE 84.11.0.141.978 (only needed if you have the 6-disc CD changer installed) · SIRIUS ROOF ANTENNA 84.11.0.141.979 (not needed if you plan to use the low-profile Terk® SR3 Roof Mount Antenna) Recommend Tools and Additional Parts · Torx-30 screwdriver · 8mm, 10mm, and 13mm sockets · Dremel or hand saw · 3/8" wrench and 4" extension · Sheet of felt tape · Black electrical tape · Tape measure · Philips screwdriver · Small metal strap (not required if you wish to mount the antenna using adhesive tape) WRITE DOWN THE BMW SIRIUS RECEIVER ESN HERE _____________________________ SIRIUS Website: http://www.sirius.com SIRIUS ACTIVATION PHONE NUMBER: 1-888-539-SIRIUS (7474). MOUNTING OF TERK SIR3 LOW PROFILE ROOF ANTENNA IN SPOILER The Terk SIR3 Roof Mount Antenna is a low-profile magnetic-mount antenna with a single lead. However, in order to use it with the BMW Sirius Receiver (which is a dual antenna input receiver), you will also need to purchase the Terk SIR-SP Splitter. Parts Required TERK SIR3 Low-Profile Roof Antenna $49.99 TERK SIR-SP Splitter $14.95 REMOVAL OF THE ROOF SPOILER Remove the spoiler by unscrewing the five (5) Torx-30 screws from the underside of the spoiler. As you can see from the photos below, four (4) of the Torx-30 screws are located on the left and right sides, and one is in the middle of the spoiler. One of the screws on each side is hidden under the black, round plastic cover. Use a thin-blade screwdriver to pop the cover off, and remove the screw underneath. Take your time and be very careful removing this screw. You do not want to drop it in the hatch compartment because it would be a nightmare to retrieve it (if at all possible). TWO TORX-30 SCREWS LOCATED ON EACH SIDE OF THE SPOILER  POP THE PLASTIC COVER TO REMOVE THE SECOND TORX-30 SCREW  LOCATION OF THE MIDDLE TORX-30 SCREW  After all five (5) screws have been loosened; remove the spoiler cover by lifting it from the front of the spoiler toward the rear. Be careful as you do not want to scratch the spoiler or the roof. Put it aside for now. REMOVE THE SPOILER COVER  SPOILER WITH THE COVER REMOVED  I chose the right side of the spoiler to mount the Terk SIR3 antenna because the antenna lead would be closer to the Sirius receiver. But either side would be OK. In fact, I think it could be easier if the antenna was mounted on the left side and fed through the rubber grommet. The antenna lead is long enough to install on either side. RIGHT SIDE OF THE SPOILER  MOUNTING OF THE METAL BRACKET FOR THE TERK SIR3 ANTENNA Many people argue about the fact that the antenna must be mounted on a metal surface. As a result, I decided to mount the Terk SIR3 antenna on a metal part. Since there is no metal part in the spoiler (the spoiler is made of fiberglass in case you did not know), I bought a piece of metal strap from Home Depot for $0.39 and bent it into a Z-shape bracket. One end of the bracket is secured with one of the hex bolts in the spoiler (one bolt on each side see previous picture.) As you can see from the pictures below, I still need a lot of practice. It is in a very crude form, but it serves the purpose! I put some double-sided adhesive tape under the bottom of the bracket to mount it onto the spoiler body. The Terk SIR3 antenna was then mounted on top of the bracket. The magnet is extremely strong and you do not have to worry about its moving around in the spoiler. PICTURE OF THE METAL STRAP BOUGHT FROM HOME DEPOT  STRAP IS BENT INTO AN Z-SHAPE  BRACKET UNDERSIDE OF BRACKET WITH DOUBLE-SIDED TAPE  PICTURE OF THE TERK SIR3 ANTENNA MOUNTED ON TOP OF THE METAL BRACKET  The rubber grommet located on near the right edge of the spoiler is removed and the antenna lead is fished through the hole. Before the antenna lead is fished through, I removed the FAKRA connector to ease the fishing of the lead. The FAKRA connector can be removed by slightly prying the white-color locking tab on the connector and separating the lead and the connector. ANTENNA LEAD WITH THE FAKRA CONNECTOR REMOVED  After the lead is fed through the opening in the spoiler, I removed the rubber grommet located right at the right edge of the spoiler and inserted a wire tie to fish the antenna lead through it. As you fish the lead, make sure you do it very slowly in a push-pull fashion. This will make the whole process easier and faster. I did not want to use the metal wire hanger (as you will see in the next step) for fear that it might puncture and tear the grommet. RUBBER GROMMET UNDER THE SPOILER  YELLOW WIRE TIE IS USED TO FISH THE ANTENNA LEAD THROUGH THE GROMMET 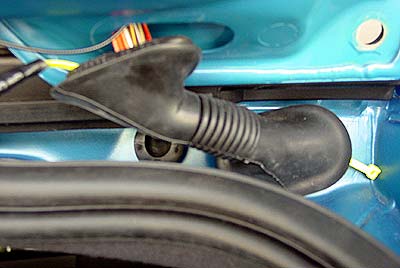 As a side note, do not attempt to push the grommet back into its place as soon as you finish fishing it through. You will need the opening to fish the antenna lead to the D-pillar. ANTENNA LEAD IS FED THROUGH THE GROMMET  FISHING OF ANTENNA LEAD THROUGH THE D-PILLAR After the antenna lead is fished through the grommet, I used a wire hanger (thanks for the idea, Slappy) as a fishing tool. To remove the D-pillar, loosen the screw in the middle of the D-pillar and slightly pry it open. Pull down the weather stripping to expose the D-pillar and the rear headliner that attaches to the D-pillar. Using a wire hanger as the fishing tool, pull the antenna lead through the D-pillar. Take your time and be patient as this part is very tricky. Make sure you have enough slack and tape the wire hanger and the antenna lead tightly. Once the antenna lead is fished through into the D-pillar, drop it down to the trunk, push back the weather stripping, and replace the screw to secure the D-pillar. As an extra caution, I wrapped the antenna lead with small strips of felt tape to deaden any rattles. Use wire tie to secure the antenna lead. LOOSEN THE SCREW TO REMOVE THE D-PILLAR  WIRE HANGER IS USED TO FISH THE ANTENNA LEAD THROUGH THE D-PILLAR  Reattach the rubber grommet in the spoiler body and underside. I used a razor and cut a tiny groove in the rubber grommet (in the spoiler) to make room for the antenna lead. This will make sure the lead will not be kinked. ANTENNA LEAD IS FED THROUGH AND HOLE IS COVERED  RUBBER GROMMET IS PUSHED BACK IN PLACE  INSTALLATION OF THE BMW SIRIUS RECEIVER Remove the trunk floor panel and the left and right trunk side panels. For your reference, the left side panel is where the CD Changer is located, and the right is where the DSP Subwoofers are housed (if you have DSP). Remove the CD changer (if you have one) and unplug the 3-pin and 6-pin wires. If you have DSP and your X5 is MY02 or earlier, you will only have a 3-pin wire and the coaxial digital cable. Remove the spare tire. If you have a 4.6iS, remove the spare tire cover and the spare tire. Remove the left and right black plastic support trays. The left tray is held in place by three (3) 10mm hex plastic nuts. The right tray is secured by two (2) 10mm nuts. LEFT SUPPORT TRAY HELD IN PLACE BY THREE 10MM HEX PLASTIC NUTS  RIGHT SUPPORT TRAY IS HELD IN PLACE BY TWO 10MM HEX PLASTIC NUTS  Remove the black round cover by loosening four (4) 10mm bolts. Then remove the forward and rearward fasteners from the spare tire bracket by loosening two (2) 13mm nuts and two (2) 13mm bolts. FORWARD AND REARWARD FASTENERS  Remove three (3) screws from the battery access panel cover (aka battery module panel) and remove it (the one with the big BMW logo). BATTERY MODULE PANEL  After the battery module panel is removed, you will see the black plastic compartment right underneath it. Remove four (4) small screws from the plastic compartment to remove it. TRIMMING OF THE PLASTIC COMPARTMENT TO MAKE ROOM FOR THE SIRIUS RECEIVER You will need to trim the plastic compartment to install the BMW Sirius receiver. Refer to the BMW Sirius Receiver Installation Instructions for more information. Basically, you need to cut an opening of 7 inches in width. From the right edge of plastic compartment, measure 2.5 inches and mark it. From the rear of the compartment, measure inward 1.5 inches. Draw a rectangular shape as shown in the picture below and use a Dremel or hand saw to trim it. AREA TO BE TRIMMED FROM THE PLASTIC COMPARTMENT  PLASTIC COMPARTMENT AFTER BEING TRIMMED  INSTALLING OF SIRIUS RECEIVER IN SDARS BRACKET Install the BMW Sirius receiver inside the SDARS bracket and secure it with four (4) small (M4x6) black screws provided in the kit. Make sure the Sirius receiver is installed in correct direction (see picture below.) Insert the SDARS bracket assembly (with the receiver) into the plastic compartment. Make sure the bracket is secured in placed by two locking feet. NOTE: Before you mount the BMW Sirius Receiver into the SDARS bracket, write down the ESN number. You will need it to activate your Sirius subscription. SDARS BRACKET  BMW SIRIUS RECEIVER INSIDE THE SDARS BRACKET  RECEIVER IS SECURED INSIDE THE PLASTIC COMPARTMENT  Put the plastic compartment back into its original location and secure it with four (4) screws. THE PLASTIC COMPARTMENT IS RETURNED TO ITS POSITION WITH SIRIUS RECEIVER  Locate the 3-pin and 6-pin wires from the CD Changer (in the left trunk) and connect them to the extension cable (part number 84.11.0.141.977). Plug the other ends of the cable into their appropriate locations on the BMW Sirius receiver. Remove the black rubber insert on the BMW Sirius receiver and insert the CD Changer Extension Cable (part number 84.11.0.141.978). Route both extension cables along the rear wall of the spare tire well to the CD changer location. Plug the 3-pin and 6-pin plugs into the back of the CD changer and remount the changer in its bracket. Then secure the extension cables with the supplied wire ties. Make sure the cables are routed along with the wire bundles at the battery module panel and make sure that they do not obstruct the mounting of the battery compartment cover. At this time, reconnect the FAKRA connector on the antenna lead. Plug the antenna lead into one end of the Terk SIR- SP splitter and connect the other two connectors on the other end of the splitter to the BMW Sirius receiver. Make sure you that connect the correct antenna lead into the correct connector on the receiver (they are color-coded). Cut a strip of felt tape and wrap it around the Terk SIR-SP splitter to avoid rattles and tuck it inside the battery compartment. Secure all wires and antenna lead with wire ties supplied with the kit. Be careful with the antenna lead as you do not want to kink or crimp it while arranging and securing the wires. SIRIUS RECEIVER WITH ALL WIRES AND ANTENNA LEADS CONNECTED  Replace the battery access panel cover and make sure that the antenna leads (on the Sirius receiver) are not obstructing its placement. Secure it with three (3) screws. Replace the forward and rearward fasteners but do not tighten the bolts and nuts yet. Re-mount the black round piece with four (4) screws. Then, tighten the bolts and nuts to secure the fasteners. Re-mount the spare tire and the spare tire cover (if you have a 4.6is or 4.8is). Replace the left and right trunk support trays. Replace the left and right side panel covers. Replace the trunk floor cover and you are done. ACTIVATING YOUR SIRIUS SUBSCRIPTION You can activate your Sirius subscription by going to the Sirius website (www.sirius.com) and clicking on the Activation link to activate online, or call 1-888-539-SIRIUS (7474) to activate by phone. If you activate online, the activation cost is $5. If you do it by phone, the cost is $15. To activate online, just click on the Activation link and follow the steps. You will need the ESN number and a credit card. Note that you do not have to have the vehicle outside during the activation process. Right after you have activated your subscription, park your X5 in a location that has a clear line-of-sight to the sky. It takes about 5 minutes for Sirius to activate your Sirius receiver. SCREEN SHOTS OF SIRIUS IN ACTION If you have not yet activated your Sirius subscription, the navigation screen will show the Preview channel (channel 184) as seen in the picture below. If it shows ACQUIRING, it means that there is no signal or signal is very weak. PREVIEW CHANNEL     NO SIGNAL  The screen below shows all available categories. Moving the selection to the >> entry and push the Selection button (the right button on the navigation screen) will display the next category screen. CATEGORY SCREEN  CHANNELS/PROGRAMS WITHIN A CATEGORY  The song screen shows the song's title, artist name, and genre. The channel is also displayed on the screen. However, there is no display in the instrument pod. When you push the buttons on the steering wheel, the instrument pod is blank. SONG WITH ARTIST NAME AND SONG TITLE  STEERING WHEEL CONTROLS The volume buttons adjust the volume up and down accordingly. The station buttons (located above the R/T button) takes you to a preset channel. NAVIGATION SCREEN CONTROLS Use the ENTER button (the round button right below the MENU button) to select your choices (category, channels, programs, etc.) Use the SELECT button (next to TONE) to display category or channel. Use the RIGHT and LEFT arrow buttons to move between channels. Pushing the INF button and hold it for 2 seconds displays the ESN number for your Sirius receiver. There is a total of 6 preset channels (as opposed to 18 in the non-NAV version). SIRUS OWNER'S MANUAL The Owner's Manual that came with the BMW Sirius Receiver was written for the non-NAV version so it did not help a lot. PICTURES OF THE TERK SIR3 ANTENNA AND SIR-SP SPLITTER TERK SIR3 LOW-PROFILE MAGNETIC MOUNT ANTENNA  TERK SIR-SP SINGLE-LEAD TO DUAL-OUTPUT SPLITTER  BOX OF THE TERK SIR3 LOW-PROFILE ANTENNA  PICTURES OF THE BMW SIRIUS SATELLITE ANTENNA Since the BMW Sirius Satellite Antenna is too big to fit inside the spoiler, I had attempted to remove the cover but failed to pull back the weather stripping to expose the screws inside. From the pictures below, you could see that it is impossible to remove the stripping without tearing it apart. Since I had originally bought the BMW Sirius Antenna with the kit, I didn't want to mess it up so I can either return or sell it back. I gave up and went with the Terk SIR3 antenna. POSSIBLE LOCATION OF THE TORX SCREWS TO REMOVE THE COVER?  IT IS IMPOSSIBLE TO REMOVE THE STRIPPING WITHOUT TEARING IT APART 
|
| Sponsored Links | |
|
|
|
| Bookmarks |
|
|
|
|


 Linear Mode


