
|
|
|
|
||||||||||
| Xoutpost server transfer and maintenance is occurring.... |
| Xoutpost is currently undergoing a planned server migration.... stay tuned for new developments.... sincerely, the management |
 |
|
|
LinkBack | Thread Tools | Display Modes |
|
#21
 10-28-2010, 11:05 PM
|
||||
|
||||
|
__________________
================================================== ======================================= BMW X5 2004 - 2005 MB E320 BMW 1999 528i/ 1998 Nissan PathFinder (sold) 
|
| Sponsored Links | |
|
|
|
|
#22
07-02-2011, 07:53 PM
|
||||
|
||||
|
Heritage Pic's
Quote:
|
|
#23
10-15-2011, 04:56 PM
|
||||
|
||||
|
noticed this thread has been in-active for a while but im going to give this a shot anyway. I just installed my dynvain today.i was wondering how you moved the MID to the glove box.from what i can tell, the entire area behind the radio is enclosed so i don't see how you had managed to extend the harness with out a mess of wiries on your dash.steps, pics would be greatly appreciated
|
|
#24
10-15-2011, 08:18 PM
|
||||
|
||||
|
My X5 is Right hand drive so I just unwound the braid around the loom and fed it through the side of the glove box. I would love to show pic's but after having got my head unit to finally sit right I don't really want to remove it again. It was really quite easy. A lot easier than running the reverse camera and head rest display cables.
|
|
#25
10-15-2011, 10:13 PM
|
||||
|
||||
|
Very easy to explain but a very tedious task: buy a wire harness set or in my case I bought 5 kinds of different colored speaker wires with almost the same gauge/ thickness of the ones used for the MID connector. The idea is to extend the length of the MID wire harness to reach the glove box - so you're basically gonna cut the connector wires and use the new ones you got. It is crucial and imperative that you cut the WIRES ONE BY ONE and also CONNECT THEM ONE BY ONE so that you don't accidentally short them. Remove the glove box and route the WIRES to come in from the back or fuse box at the top part of the glove box. Connect to MID. Open a bottle of beer. Cheers!
|
|
#26
10-16-2011, 10:09 AM
|
||||
|
||||
|
understadable, as for the last 2 posts the dynvians don't fit with the OEM brackets, ive seen multiple people mention "cutting it".My question is how did you go about doing it because i don't think a typical pocket knife won't do the trick. a rotary hand say maybe?
|
|
#27
10-16-2011, 11:23 AM
|
||||
|
||||
|
Guys guys, anyone here changed their unit from HUALINGAN TO DYNAVIN? I'm planning on purchasing the updated DYNAVIN unit to replace my HUALINGAN. Had too many problems with it
 However I'm not sure whether the DYNAVIN would still fit in my butchered dashboard because installing the HUALINGAN required me/us to butcher and saw off the middle support part of the orig MID radio. Plus the HL unit mounts using 2 hidden screw in front? The DYNAVIN (I think) do not have or need those screws but snap on type clips that snaps into the original unbutchered dash.? I also assume (from reading posts about the DYNAVIN unit) that you need not butcher the dashboard to fit this. So Will I be able to change to DYNAVIN or am I stuck with the HUALINGAN? However I'm not sure whether the DYNAVIN would still fit in my butchered dashboard because installing the HUALINGAN required me/us to butcher and saw off the middle support part of the orig MID radio. Plus the HL unit mounts using 2 hidden screw in front? The DYNAVIN (I think) do not have or need those screws but snap on type clips that snaps into the original unbutchered dash.? I also assume (from reading posts about the DYNAVIN unit) that you need not butcher the dashboard to fit this. So Will I be able to change to DYNAVIN or am I stuck with the HUALINGAN?
|
|
#28
10-16-2011, 07:33 PM
|
||||
|
||||
|
you should be be fine.the new dynvain units come with mounting brackets
|
|
#29
10-16-2011, 09:17 PM
|
||||
|
||||
|
where will the Dynavin attach itself to?
Quote:
...You'd see that the clips will have to clip on the plastic catch which I consequently and unfortunately sawed off to accommodate the Hualingan. This was my dash before... 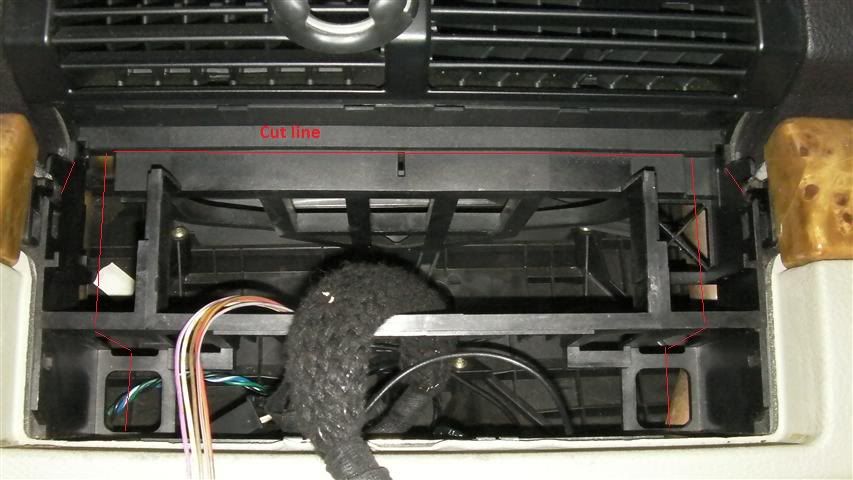 and now it looks like this... 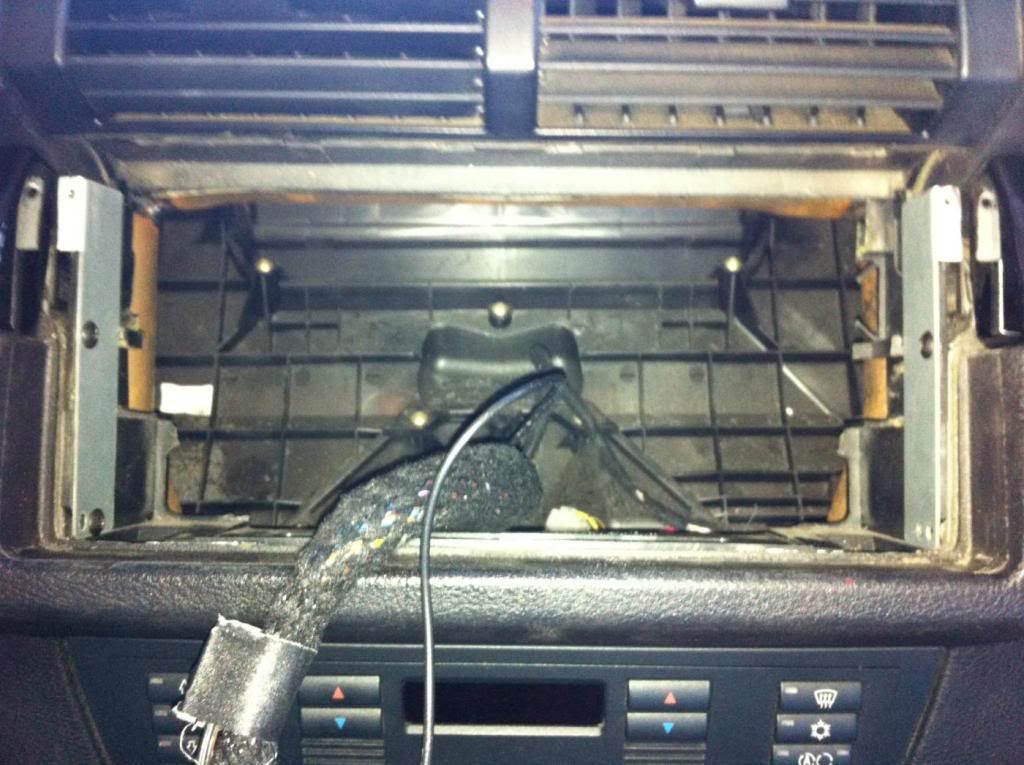 ...Where will the DYNAVIN CLIP itself in this situation now?
|
|
#30
10-16-2011, 09:29 PM
|
||||
|
||||
|
i stand corrected. velcro the dynavin bracket into place?

|
|
| Bookmarks |
|
|
|
|


 Linear Mode


