
|
|
|
|
||||||||||
| Xoutpost server transfer and maintenance is occurring.... |
| Xoutpost is currently undergoing a planned server migration.... stay tuned for new developments.... sincerely, the management |
 |
|
|
LinkBack | Thread Tools | Display Modes |
|
#1
 01-19-2012, 04:18 PM
|
||||
|
||||
|
Cleaning Oxidized Headlights
(In about 2 Hours, and under $25) By: cpgifford
 Before  After  I bought most items at Wal-Mart because they are cheaper on sandpaper. Items Needed -400 Grit Wet Sandpaper ($3) -800 Grit Wet Sandpaper ($3) -1000 Grit Wet Sandpaper ($3) -2000 Grit Wet Sandpaper ($3) -Meguiar's Scratch X 2.0 ($10) 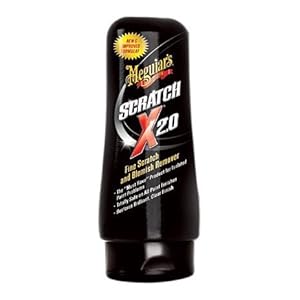 -Water Bucket filled with water Procedure 1. Removing Headlights. Post-Facelift Pre-Facelift I would only take one out at a time just to be careful. 2. 400 Grit Wet Sanding (~20-30 minutes)  Start by dipping the sandpaper in to water so that you clean the area so the sandpaper can sand away the oxidation. You will notice a change of color in the water and plastic that is coming off of the headlight. Check the sandpaper for plastic caught in the grit and clean it off with the bucket of water. Make sure you sand evenly across the headlight because you don't want one area to be really clean and another to be kinda hazy. The water should start out yellowish and turn to a white in color. Once you get an even overall smoothness or lack of on the surface and the yellow water is gone, then move on to next step Wipe off any water and trash left on the surface with a towel or cloth. You will notice the color hazed to be gone and you will see a even haze from the sandpaper. 3. 800 Grit Wet Sanding (~10 Minutes)  This step is to reduce the scratches and scoring from the 400 grit so that you are left with a smooth glossy finished product. You will notice from start to finish that the sandpaper starts out rough meaning you can feel it sanding and by the end you will notice it "Glide" over the area. Once it glides, wipe off the surface and continue to step 4. 4. 1000 Grit Wet Sanding (~10 Minutes)  Same procedure from step 3. 5. 2000 Grit Wet Sanding (~10 Minutes)  Same procedure but instead of continuing on to the next step, make sure after you wipe it off for any oxidation left on the surface. If there is left over oxidation use the 800 to remove and then sand back up to 2000 grit. 6. Polish (~8 Minutes)  For this step, the headlight has got to be dry and clean. I suggest wiping it off and letting it sit for about 5 minutes so the excess water can dry off. Start by using a little Scratch X (Quarter sized) on a Waxing Pad and slowly work it in to the surface, applying more as needed. This step is important and you need to take your time. The more you polish the more it will look like new. Once your done with that, Wipe off the excess polish and install it back in the vehicle. Then move on to the other light. End Result          Last edited by cpgifford; 01-19-2012 at 04:24 PM. 
|
| Sponsored Links | |
|
|
|
|
#3
01-19-2012, 05:28 PM
|
||||
|
||||
|
If you don't seal them with a protective sealant they will haze up again
__________________
2002 X5 4.6is 1999 C5 Corvette 1992 Mitsubishi 3000GT VR-4 1994 Kawasaki ZX-9R 2005 Mazda 6 Wagon (Wife's) 1991 Mitsubishi 3000GT VR-4
|
|
#4
01-19-2012, 05:58 PM
|
||||
|
||||
|
On my cars a little compound and a high speed orbital always does a great job of cleaning up the lenses, then a heavy coat of good wax (such as the P21S found HERE) to help keep them looking great longer.
ECS Tuning
__________________
 Have questions? Need answers? Live Chat us! 8:30am to 12:00am Midnight EST [email protected] | [email protected] 800.924.5172 Facebook | YouTube OEM BMW Part Number Search
|
|
#7
01-19-2012, 11:56 PM
|
|||
|
|||
|
My brother owns a detail shop. Long and short, he sees oxidized lenses all day long. Never has he recommended wet-sanding them, let alone with 400 grit. A high speed buffer with a bit of scratch removing product, followed by a simple polish works great. Plus, its less than 5 minutes per headlight, max, even if you mask off the paint to keep splatter down.
Your results look good, but the pics still show a bit o haze even after the re-install. Worst case, he might do a quick 2000 grit wet sand, then the above mentioned steps. Granted, a typical guy won't have a high speed buffer (quite different than an orbital), but maybe that's why we should all know a decent detailer....
|
|
#10
01-24-2012, 06:44 PM
|
||||
|
||||
|
I had my body shop do mine, cost me $80 they sand them and spray with clearcoat, a year later still look great. ymmv
__________________
BMWCCA # 12660 14 GLK 350 M/B (hatefull POS gone) 05 CLK 500 AMG Cabrio 07 530xiT 09 Boxster
|
|
| Bookmarks |
| Tags |
| cleaning, headlights, oxidation |
|
|
|
|


 Linear Mode


