|
Avin Avant 2 Install E53 w/Nav - Very Long and Detailed
If you would like to view this offline and with everything in Word, here is a link to download the DIY in its entirety: Avin E53 Install Word Doc.
First, I accept no liability for any damage or injury caused by attempting this installation. I tried to document as well as possible while still making decent progress on my installation. I may have missed something here or there so use this as a guide as I'm sure it's not perfect. And now that that's out of the way.
What I am hopefully going to help you do here is install your new Avin Avant 2 head unit into a factory nav equipped E53 X5. The one in the install is a 2005 4.4i, but this should apply to all flavors of the E53 w/ factory navigation. I also installed the backup camera sold by AvinUSA. I only recommend this for seasoned and skilled installers. It requires a lot of work as the camera is in no way a direct fit for an E53. It took me 8 hours of work to modify and install to a point I was happy with it. I also installed a few other accessories... external mic, external video and USB. Good luck, this is a VERY detailed guide so anyone should be able to pull it off so long as you take your time.

Tools/Things You Might Need/Want
1. Panel removal tools are handy around BMW's. Pick some up... they are cheap and save a lot of time AvinUSA sells good ones.
2. Soldering iron w/ solder or crimps of your preference. I solder almost everything but it's not everyone's thing I understand.
3. Zip ties... lots and lots of zip ties
4. Sockets: 8mm, 10mm, 12mm, 13mm, and 16mm
5. Torx bits: T10, T20, T25, and T30
6. Phillips and slotted drivers
7. Allen Keys: 4mm
8. Razor blades/exacto knife
9. Electric tape - one roll should suffice... use quality 3M stuff or equivalent
10. Heat shrink - this is really only if you are soldering, and could be subbed for the above electric tape
11. Replacement BMW clips/rivets of different sorts: 51717002953, 51411973500, 51438225567, and others...
12. Flashlight - your battery will be disconnected most of the time, you will need a light
13. Drill with multibits - might not need it depending on your installation
14. Heat gun - for the heat shrink, not a necessity if you aren't soldering/heat shrinking
15. At least a full weekend's worth of time. I took ~40 hours but am extremely OCD when it comes to wiring paths/neatness. I also installed extra accessories which added considerable time (especially the backup cam).
16. Patience - you will definitely need a bunch of it. Take your time and it will be done right the first time. Mine powered up beautifully first try and yours should too.
17. Having some zip-lock baggies to hold/label nuts, bolts, clips, etc wouldn't hurt either
18. A dremel or similar tool is REQUIRED. You will see why when the head unit is actually going into the dash.
19. Hot glue gun and silicon gasket maker. I use permaseal black, but others will work.
20. Long "grasp" tool helps a lot for running wires. It has a claw that is retractable and is ~2 feet long.
Removing Interior for Wiring
1. Roll down all 4 windows (provided all your regulators are good). As an experienced installer, it's just a precaution. I have seen far too many installers locked out vehicles. It also gives you better ventilation which is nice.
2. Raise and retract steering wheel in as far as it will go. It gives more clearance to remove the front seats. You can do the install without removing the seats, but you will have to follow your own wiring path as mine requires at least the passenger to come out.
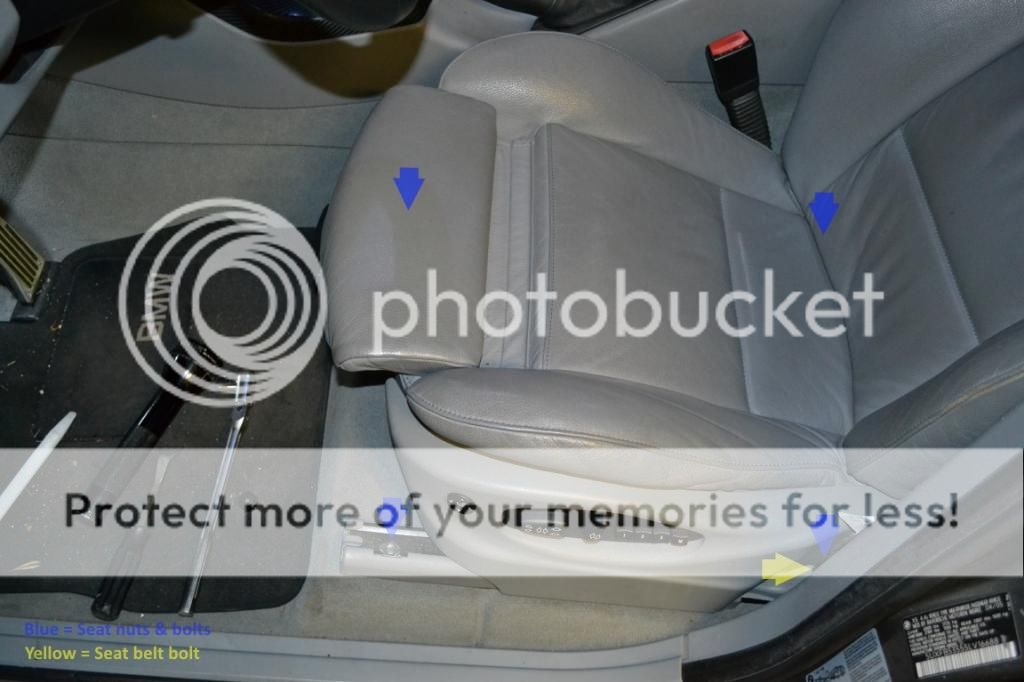
3. Move seat backwards in its tracks to access (2) 16mm nuts in the front tracks. They are covered by plastic domes which pop off. Then move seat forwards all the way to access (2) 16mm bolts in the rear seat tracks. Another (1) 16mm bolt secures the front seat belts to the seats. Now lower and center the seats. Also tilt the seat back forward as much as possible. This makes the seats as compact as possible and much easier to remove. DO NOT UNPLUG SEATS YET. You will trip the SRS warning.
4. Remove the rear cargo cover and remove the spare tire.
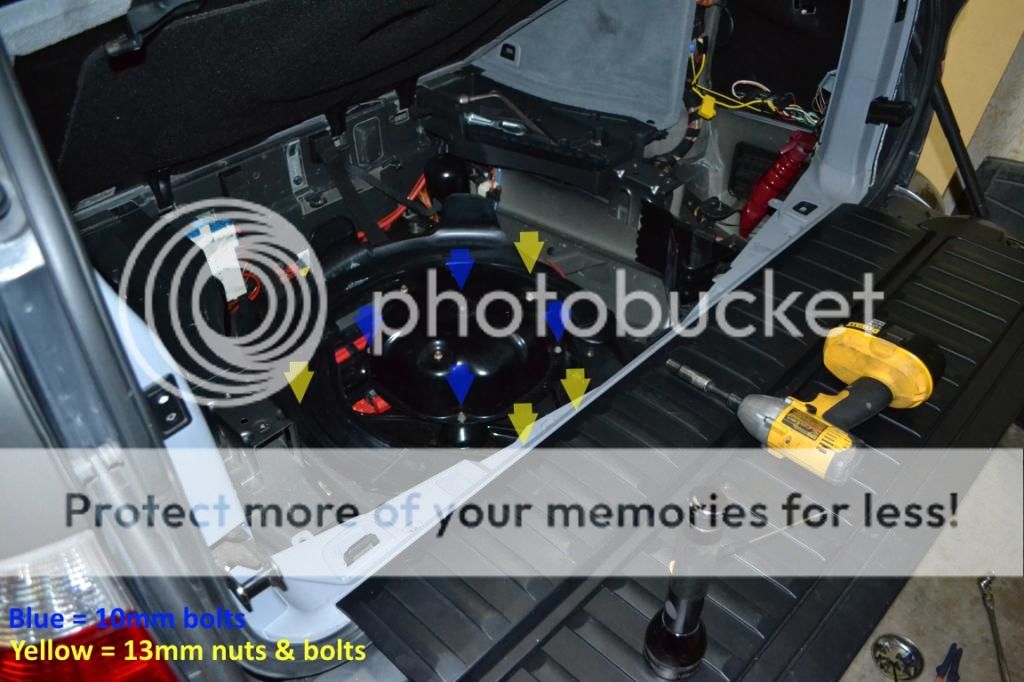
5. Now undo (4) 10mm bolts, (2) 13mm nuts, and (2) 13mm bolts securing air pump (if equipped) and cross braces. Lift air pump housing out of the way... no need to disconnect any air lines or harnesses. Now remove the cross braces.
6. Loosen (1) 10mm nut securing negative battery terminal and remove terminal. Tape terminal with electric tape to prevent accidental contact with loose negative cable.
7. Tilt the front seats back, unplug, and remove. Be careful, they weigh at least 75lbs each. A helper at this point is nice, though I was able to man-handle them out. I have long arms though (I'm 6'8") so YMMV.
8. Remove (1) phillips screw from the front of each side of the center console. Then pull out the front carpeted trim panel of each side of the center console working towards the back. There are (3) plastic clips holding it in place. Now remove the rear carpeted section of each side in similar fashion. It is also held in with (3) plastic clips.
9. Open arm rest and pull out plastic cubby insert. Remove the (2) phillips screws from bottom. Also remove (1) lowest phillips screws from the bottom rear of the console on each side. Only the bottom most on each side must be removed.
10. Follow up the console another (2) phillips screws per side will need to be removed. Go ahead and disconnect the antenna cable, cig lighter socket harness, and the 18 pin black harness as well on the driver's side. Note: in my install the metal bracket that is pictured sitting by the E-brake handle will stay mounted just behind the shifter area upon removal. I removed the second screw under the hazard switch mentioned in step 12 so my bracket was loose.
11. Now remove the shifter handle with the shift boot and pull up the center shift console. Sometimes it is very difficult to pull off the shift knob. Be careful, I've read about people breaking their nose or windshields while doing this. Disconnect the 3 harnesses on the console.
12. Reach through the shifter area and pop out the hazard/lock switch from behind. Disconnect the harness. Remove (1) phillips screw from directly underneath the switch. There are 2 there, only the one directly under the switch need be removed.

13. Disconnect air duct inside storage cubby and remove (2) phillips screws that hold the rear air vents in place. Disconnect 2 harnesses for rear cig lighter/LED and pull out rear vents.
14. Remove parking brake handle after lifting it ALL the way up. The boot pulls out and the handle slides off after that. You need it all the way up in order to clear the console during removal.
15. Step on brake, turn key to position 2, and place the shifter in D or lower. This is also necessary for clearance when lifting the console out.
16. The console is now ready for removal with the exception of the harness for control panel (DSC, PDC, HDC, Seat warmers, etc.) above the ashtray. It is a single harness and can be removed by sliding the console towards the rear slightly and reaching behind to pop out the control panel.
17. If you have someone to help you it couldn't hurt as the center console is a bit unwieldy. Lift the console back while rotating it up to an almost vertical position. Once clear of the E-brake handle and the shifter you can start maneuvering it to one side or the other. Be careful not to mar any of the trim or other surfaces during removal. Cover anything you are worried about with towels or the like.
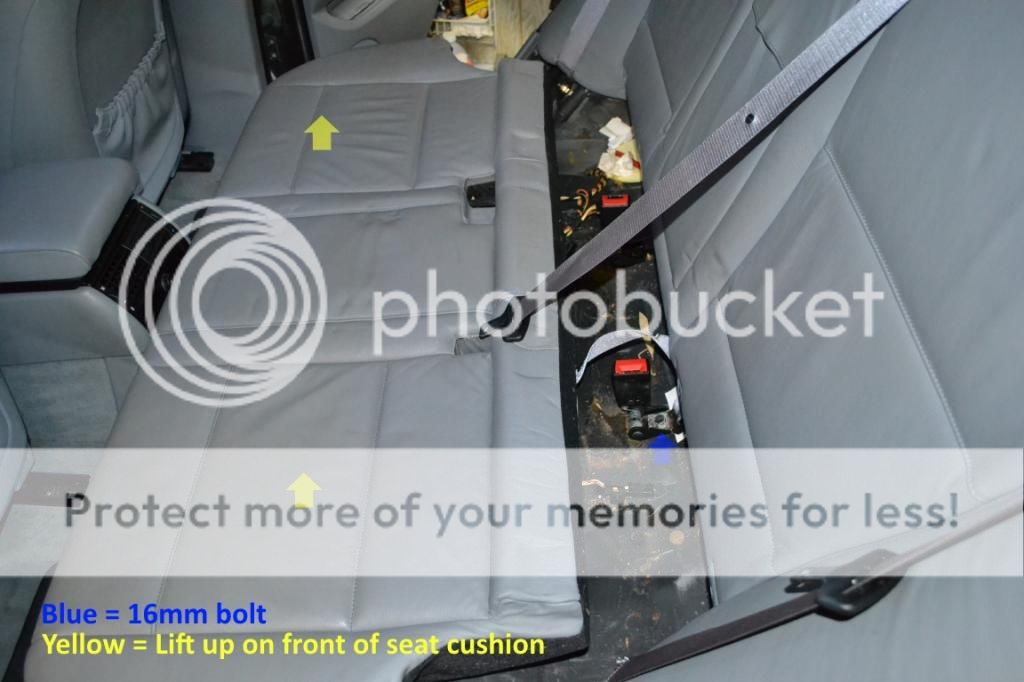
18. Now we can focus on the rear seats. Pull up on the front of each side of the bottom seat cushion. Remove (1) 16mm bolt holding in a seat belt receptacle and remove the bottom cushion.
19. Remove (1) 16mm nut on each side holding rear seat belt anchor in. Remove the rear side cushion bolsters by pulling firmly at the top and then lifting up. It is only held on by a big plastic clip on top and a notch that slides into a metal hoop on bottom. Note: when folding the rear seats flat, put a thick towel over the locking tabs that secured the lower seat portion to avoid marring or tearing the leather. They will dig into the upper seat portion when folded down.

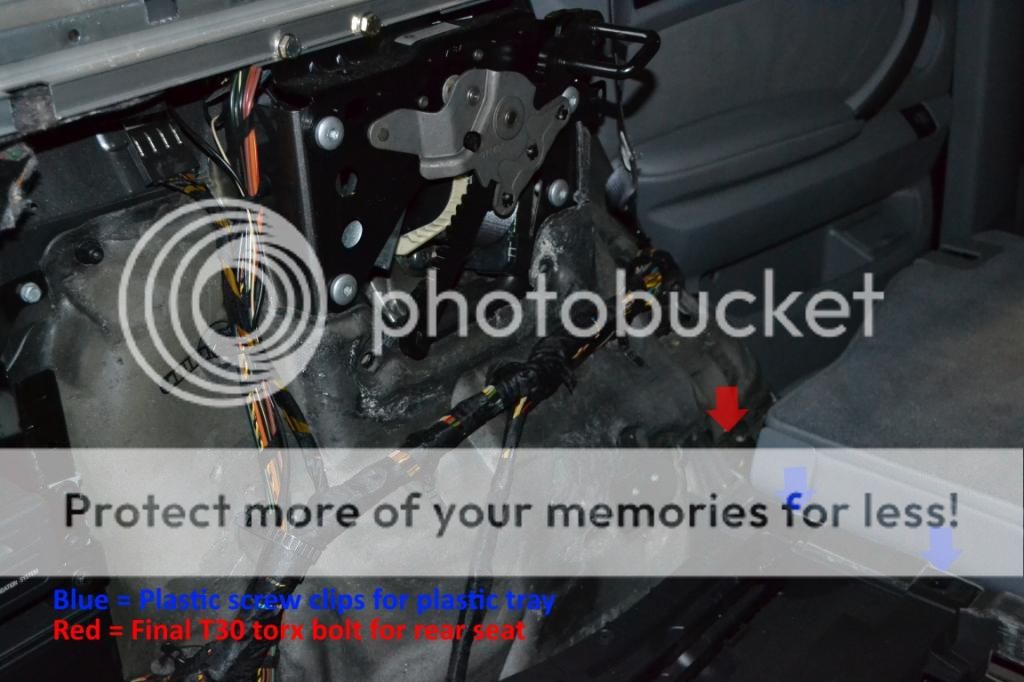
20. Remove (2) T30 torx bolts from the center of the upper back seat and remove the metal bracket. Remove (1) T30 torx bolt from each outer side of the rear seat. There are (2) more bolts (one per side) but they are inaccessible at this point, we will come back to them. Note: I did this on an X5 with power reclining rear seats, your seats may be secured slightly differently.

21. Now move to the cargo area of the vehicle. Remove the storage doors for the cubby and for the factory nav/amp/etc. Remove (3) 4mm allen key bolts from the top of each rear vent panel.
22. Now remove the (2) plastic phillips screws at the back of the upper rear grey vent panels. I don't believe these are reusable and I had to drill mine out. The heads just snapped off when trying to unscrew them. The rear air vent panel is now loose but cannot be removed until the C pillar is popped out. The rear vent panel has a section that slides under the C pillar.
23. The C pillar is only held on by (2) plastic push pin style clips and (1) push pin at the bottom. Remove the one visible push pin, then remove the door weather stripping that covers the C pillar, and start prying at the bottom. You should be able to see where the clips are through the slit where you removed the weather stripping. Once you have the C pillars hanging by the rear seat belt you can remove the rear grey air vent panels.
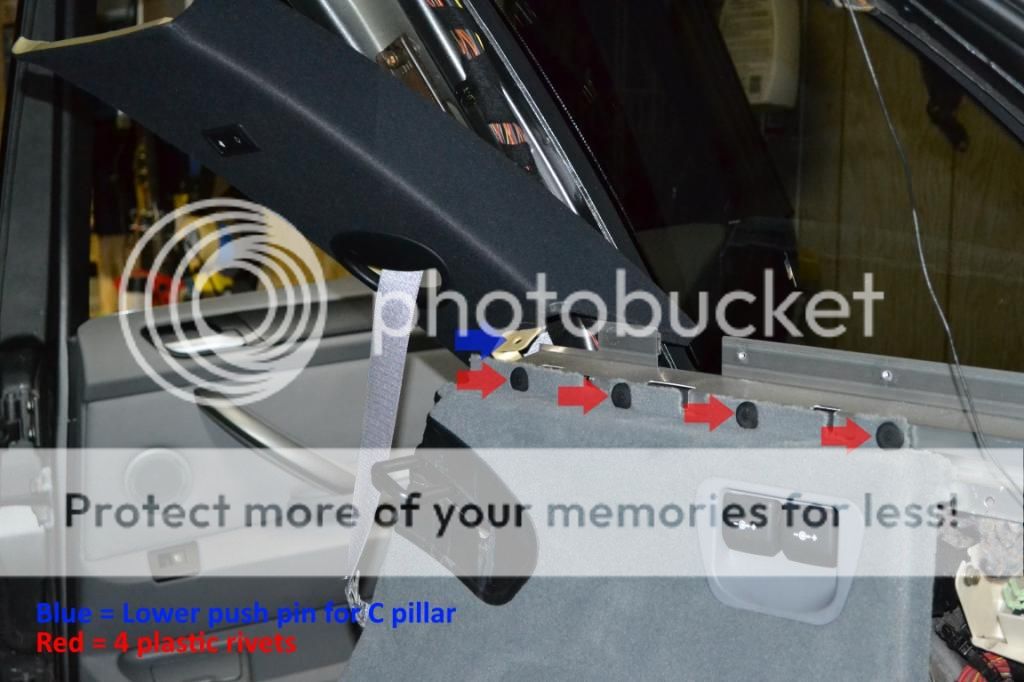
24. To remove the forward cargo cover panels. Remove the (2) phillips bolts holding the tie down anchors in the front of the lower panel shown below. These bolts need to be removed simultaneously or they will get stuck on the anchor. To access them you have to use a pick or small slotted screwdriver to pop out the plastic insert. Now remove (4) plastic rivets from the top of the panels pictured above. These are not reusable.
25. Now you can remove your lower cargo cover floor that has been your comfortable place to sit. Take it out and you can access the last of (3) plastic push pins holding in the lower panels, 2 on the front and 1 in rear. Unplug the (2) power outlets on the passenger side and remove the panels.
26. You should now be able to see the final (2) T30 torx bolts holding on the rear seat backs. Remove them and the brackets that secure the seats. You can now lift the seats out of their tracks after folding them flat. The seats split into 2 sections to become more manageable at the middle bracket section.
27. Now remove the (4) plastic trays on each side of the cargo area. They are held on with (2) plastic screw clip and (2) 10mm plastic nuts on each side of the vehicle. You can also remove the wheel chock bracket at this time by removing another (2) 10mm plastic nuts.
 Rear Backup Camera Installation
This section is only for the brave (foolish) who ordered the e46/e53 rear backup camera at the same time they bought their Avin. If you are installing a different backup camera portions of this will apply to you and others will not. The rear backup camera sold by AvinUSA in no way shape or form fits the e53. Not even close. I hope you are handy with a dremel. This alone took me a day to get a result I was happy with. If you are not installing a rear camera you can skip ahead to the next section (LUCKY). It starts at step 48.
28. Before doing any of the following... test your camera somehow. I used a 9V battery to supply power to both the LED lights and the camera itself. I used the video cable supplied and hooked it up to my A/V receiver in the living room to test for full functionality and quality. Bench testing is always a good idea if you have the capability. Eliminating bad parts now is easy compared to later.


29. Remove the portions of the hatch rubber weather seal that cover the D pillars.
30. Remove the bottom trim panel (the one with the spring loaded folding plastic door). There are (8) phillips screws total to accomplish this. (4) on the exposed section, and (4) on the inner underneath the door. Then remove the cargo tie downs in the same fashion as the ones removed on the front lower carpeted side trims. (2) phillips bolts after popping out the plastic cover.
31. Remove plastic trim pieces from around the lower hatch metal latches shown above. IMPORTANT: before removing your latches, mark their location/orientation somehow. I'm not sure how much fun it would be to align everything again if you were to skip this. You remove the latches by undoing (2) 12mm bolts on each side.
__________________
2005 X5 4.4i Build 04/05 Maintenance/Build Log
Nav, Pano, Sport (Purchased 06/14 w/ 109,000 miles) (Sold 8/15 w/121,000 miles)
2006 X5 4.8is Build 11/05 Maintenance/Build Log
Nav, DSP, Pano, Running Boards, OEM Tow Hitch, Cold Weather Pckg (Purchased 08/15 w/ 90,500 miles)
2010 X5 35d Build 02/10
Nav, HiFi, 6 DVD, Sports Pckg, Cold Weather Pckg, HUD, CAS, Running Boards, Leather Dash, PDC, Pano (Purchased 03/17 w/ 136,120 miles)
Last edited by crystalworks; 12-28-2019 at 06:38 PM.
|