Done. My experiences here - anything you do is at your own risk, not mine.
tl;dr
-------
It's straightforward to repair, just needs time and patience. Costs: front mech 54137118849 £221 ; rear mech 54107227894 £109.01, total GBP £330.01 / USD ~$430.
Removal / gotchas
----------------------
1) Start with the D-pillar trim by removing the spring flap trim from the trunk - the piece with the lashing eyelets. You need this out to get the side trims out. Under the load floor release the black plastic fittings that the trim notches into, this will make it easier to get out.
Pop these cover panels from the back; these hide a second screw holding the d-pillar:

Don't bother releasing any door trim on any pillars - just pull them free.
2) Remove side bolsters of back seat to get the C-Pillar exposed. It has a plastic rivet at the bottom and a pop fixing concealed at the top. Pull the c-pillar trim out and let it lie to one side with the seat belt. Don't remove the belt mechanism.
3) Grasp the B-pillar and pull out at the top and lift up to disengage, don't remove the seat belt or door trim. It hooks into the lower part of the pillar trim which doesn't need to be removed.
4) A-Pillars: don't remove. Just release the T25 screw under the "Airbag" cover plate, pull the pillars to the back of the car. You can then use these to rest the headliner when that comes out.
5) Centre front light fitting is held with four screws into a plastic frame that the headliner covers. Connection to sunroof switch was hard to unplug. Visors and front light are easy to remove, as are retainers for the cargo net. Rear lights have to have the cover levered out from the switch end (I think!) and that serves as a 'hinge' to clip the light to the headliner.
6) Take out th four T10 Torq screws that the TIS doesn't tell you about
:

7) Remove head restraints all round.
8) With all of the fittings out, start at the back of the car, put your hand between headliner and roof and pull the three clips out (L/C/R). You'll take the metal fittings with them, but don't worry as you'll find these highly adjustable and re-usable.
9) Get an assistant. Trust me on this. Put the back seats down and have the assistant support the back of the headliner while you pull the headliner from the sunroof cassette. Nice fittings, pop them all the way round and the headliner will drop into your assistant's hands and the tops of the A-pillars. Remove carefully out the back of the car.
10) Open all doors and disconnect battery. Unscrew the 3 torq screws for the airbag pyro pull mechanism, and tape the mechanism to one side:

11) Move wires, unplug motors, front motor controller connections, four drains.
12) Remove glass panels. Leave the front bellows if it won't come off - mine didn't budge. You just have to get the three screws each side at the front, the two each side at the back. The back panel has to tilt up and move to the back of the car to get out - check the tapered profile and you'll see what I mean. The front panel lifts clean upwards, brushing the seal each side.
13) Remove the centre drain channel once you have the glass out. It's easier to remove and replace when the cassette is in the car and it makes the cassette easier to handle.
14) Remove the carrier for the front light console. Two screws.
15) Check again the routing of the wiring at the front of the car and be sure the cassette removal won't catch a cable or two.
16) Mark the cassette retaining screws by circling them with a pencil. Then you can put everything back the way it came out.
17) Get your assistant again, and have help holding the cassette while you remove all screws. Keep the two b-pillar screws to last. Watch out for plastic washers which go between the cassette and roof, you'll need these re-installed later.
18) Get the cassette out and on a table. It's pretty light to carry.
19) Follow the excellent videos posted earlier in this thread to dismantle the key components of the cassette. Note that you sacrifice rear glass mechanism parts which have to be broken to overhaul this mechanism. Do one side at a time. Remove all parts, including the sacrificed ones, clean everything thoroughly and re-assemble using the old parts (apart from the two broken bits). Yes - I mean it about the old parts. Clean, operate the mechanism, take everything as far as it goes in each track, and get completely comfortable about re-assembly. Use white lithium grease to help things to do what they should. Rehearse re-assembly - especially of the front mechanism - until you understand how to use the detent to stop the front and back of the mechanism from arguing with each other about the last bits of metal work. Keep using the old mechanism until you understand how this front assembly works. At this point, if you don't convince yourself you can assemble the new bits just stop and get some help. Seriously. You would be better off calling in help now than breaking your new parts.
20) Whatever you do, keep the rear gutter carrier / endstop and pivot piece for the rear glass to one side. Don't re-install these yet - they cannot be removed without breaking and you need to ask one final question before you put them in.
21) The critical bit of re-assembly is to get the timing - the placement of the front mechanism - to be the same left to right. It's easy to do and shown in the 3D animated video, you just have to make sure you do it. Once you have this done, you're not quite re-assembled yet but put the front motor back in once the timing is set. Use the hex key from the toolkit now to be absolutely convinced you can move the mechanism without undue force. There will be some binding - these are new plastic parts and they are a tight fit, but keep focused on being sure that they are operating correctly. You'll know what I am describing when you 'feel' the required force to move the mechanisms. As a reference point - before I started, I basically could not move this hex key in the motor without fear of breaking stuff. My sunroof was too jammed up - that motor is heroically strong.
22) Once you are happy with the mechanism operation, set the position back to the 'timed' location and fit those last pieces in the rear mechanism channel. They pop in but need some gentle encouragement from a screwdriver. Note that the rear drain channel stops are coded left-right so you can't get them wrong.
23) Refitting is the reverse sequence to removal and it's pretty easy. In fact, I did everything to re-assemble without help - I just got creative with cardboard boxes to support the cassette. Refit cassette, glass, pyros and get the power back on. Then you can re-initialise the sunroof and enjoy the working mechanism before re-fitting the headliner. Use a little water to help with the drains. I got a trans error light from the power cycle but that disappeared quickly.
24) Careful with the b-pillars. Make sure the seat belt adjuster engages correctly with the corresponding pieces.
Failure mode
---------------
OK - this is really why I wanted to do this. To find out why these sunroof mechanisms die.
For my 12 year old car, the rear tilt failed for the primary reason that the grease had dried and accumulated so much grit (I have parked at the beach with the roof tilted and now I regret it) that the mechanism locked tight. It was sand and grit that came out of the cleaning The controller box for the front motor knows all about the load on the mechanism and it can back the motor off - or go into the failure mode where the components start to break. Which is where I ended up.
These bits get degraded and brittle. Here's the hall of shame:

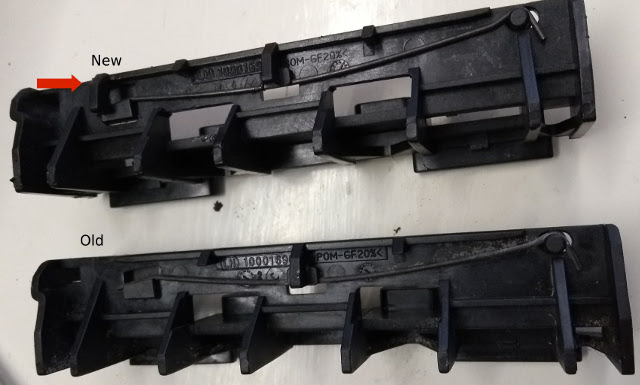
Note that some of the new bits are slightly different. I'm not sure if this is genuinely one, but when comparing old and new I saw this:
So, major lesson learned is that the rear mechanism is highly exposed to the environment. No bellows for instance. So the greasy track is a dirt magnet. The front stays fairly clean in comparison. However, if you get this far in a similar situation just buy both replacement mechanisms.
Hope this is useful, ask questions in the thread or PM me if you want.