
01-09-2006, 11:05 AM
|
 |
co-founder
|
|
Join Date: Mar 2005
Location: Hockeytown, USA
Posts: 9,741
|
|
|
BMW X5 4:3 to 16:9 Navigation Widescreen Retrofit
Contributed by: UCrewX5
4:3 to 16:9 Widescreen Retrofit
Owners of 2000 and early production 2001 X5's came with the narrow screen, 4:3 format screen.
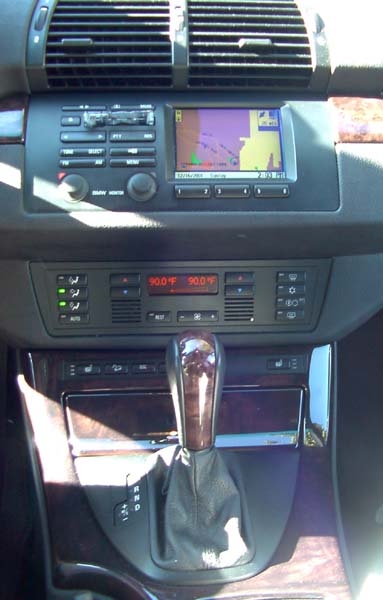
Starting with April 2001production, BMW introduced the 16:9 widescreen format bordmonitor. This documents how to upgrade your early production X5 to the 16:9 screen.
First step is to remove the 4:3 screen. To do this the vent above the NAV screen is first removed. There are two clips built into the bottom of the vent opening pressing down towards the top of the NAV unit. These are located 4 slots from the left and right, respectively. Insert a very small, flat bladed screwdriver into the center bottom slot of the vent. You will see the clip or retainer in the lower surface the vent. Insert the screwdriver into the edge of the clip and lift slightly. Now gently pull w/ wiggle the vent outward. Repeat on the other clip until the vent is free.
Next there are two Phillips screws on the top left and top right of the nav unit located behind a felt cover. Remove the felt cover and then remove the two Phillips screws.
Finally, remove the rotary button on the Nav screen that is on the light. Insert a small screwdriver into the aperture and turn it approximately 45 degree counter-clockwise to unlock the Nav monitor. The NAV head unit should now just lift right out. Once the monitor is removed from the opening, unplug the two connector modules from the back of the Nav unit.
After pulling out the 4:3 Nav Screen you will notice that the 16:9 screen will not just drop into the 4:3 opening. Checking the ETK reflects that a new dash is needed, which runs approximately $700 from Crevier BMW. With enough money already invested in your new widescreen, the last thing you want to hear is that you need to replace the whole dash. Well the good news is that you can still make this work without a dash replacement.
The main problem is that the 16:9 screen will not fit directly into the opening due to the 2 tabs in the lower left and right corners that hold the 4:3 screen in place.
At this point you have two routes you can go. One is the quick and dirty (which I did the first time) and the other is the more "official" way using retrofit brackets that are available from BMW.
THE QUICK AND DIRTY METHOD:

Under this method you will carefully and evenly cut and trim these two tabs until there are two small "stumps" of even length on each side such that the 16:9 nav screen will fit into place with the frame. A dremel tool works well for this chore. Here's what the tabs look like after trimming them down (note: they are not trimmed all the way down, just enough to center the screen in the opening):

With the 16:9 screen now fitting nicely into your opening you will now find the next challenge. The two mounting points on the top of the 16:9 screen do not have anything to secure a screw into because they are in a COMPLETELY different location than the 4:3 screen. Use a zip tie and loop it around the old screw location and the new screw location. The NAV screen goes in at an angle, so in general it will stay in place. This just keeps it snug. The zip ties worked perfectly.

Next reconnect the 2 module connectors that were removed from the 4:3 screen and plug them into your new 16:9 screen. Before buttoning everything up this would be a good time to make sure that the new screen is functioning properly :-)
Ok, now you want to set the new screen into position and secure the zip ties to the top mounting points. See the two pictures below as a guide.


Once the zip ties are secured, use some small self-tapping screws to screw in the bottom 4 screw locations. Don't worry, they should catch onto something and make the whole installation very secure.
THE OFFICIAL RETROFIT METHOD:
BMW makes a pair of adaptor brackets (part numbers are 65900140347 and 65900140348) that are designed to simply bolt into place to give you all of the mounting points you need to retrofit the nav screen. (Update: Note that it appears that BMW has discontinued the availability of these brackets. Refer to the zip tie method above if you are unable to buy these from your dealer)
These brackets look like this:


Like the quick and dirty method described above, you still need to use a dremmel tool to cut out the two lower plastic square corner pieces. The only difference is with that with using these brackets you basically want to trim them off flush (as opposed to leaving small "stubs"). When mounted the brackets look like this:


Once these are properly mounted and secured you can install the nav screen into the opening. You secure the screen to the brackets using 4 M3 threaded screws (available at your local hardware), one in each corner. Be sure to plug the 2 connectors in the back of the screen and test everything before mounting the unit into place.
FINAL ASSEMBLY:
Finally, push the center air vent back into place until it clicks into position and then snap on the trim frame and everything is complete and looks 100% OEM.
Congratulations!


ENJOY!!!!
|