Contributed by: PersonaNonGrata
iPodYourBMW Installation Instructions
These instructions are intended to help you be better prepared to install your BW iPod kit. It is to be used in conjunction with the instructions supplied by BMW and available here:
http://www.bmwmotorsports.org/pdf/ip...terinstall.pdf
This will give you a better idea of what everything looks like and what to expect. The BMW instructions are adequate and with some help from X5world, it's not a difficult project. These instructions will pull together a couple of tips from other parts of X5world. Installation time is estimated at 0.75 hours per the BMW instructions. That is not too far off if you use these instructions and you have all the necessary tools at hand.
Difficulty rating is not high but if you are not comfortable with doing some basic wiring, you might want to get some help. If I can do it, so can you. Good luck!
Tools:
· Torx #8 screwdriver
· Hex (Allen) wrenches
· Flat bladed screwdriver
· Phillips screwdrivers
· Miniature flat bladed screwdriver
· Wire snips and stripper
· Needlenose pliers
· Drill with 5/8th inch bit
Preparation: Open up the box and make sure all of the parts are there. Luckily there aren't many. The instructions direct you to unhook the battery but you might want to just pull the fuses for the radio and OBC. There are two: one in the glove box fuse panel and one if the rear cargo area fuse panel. I wound up blowing the rear fuse and it was the cause of my wondering why the install didn't work.
Here is the kit: It includes a user guide, a new wiring harness, 5 bullet connectors, black plastic connector, a white iPod cable, the iPod interface, a rubber grommet, and a foam sleeve.
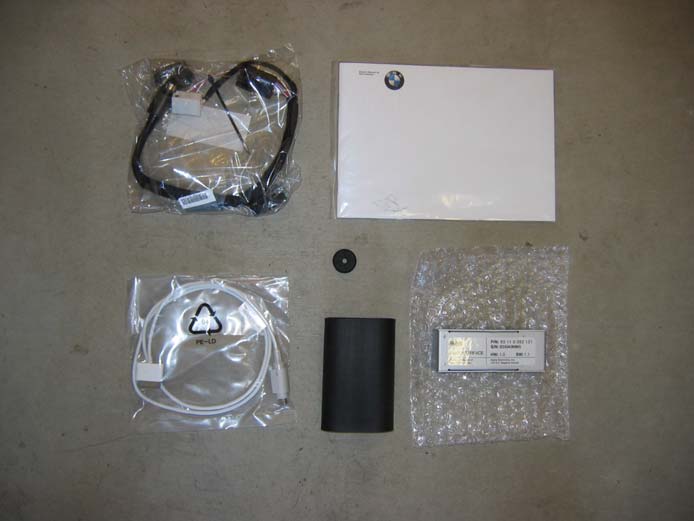

Interestingly, the iPod interface is made by Alpine.

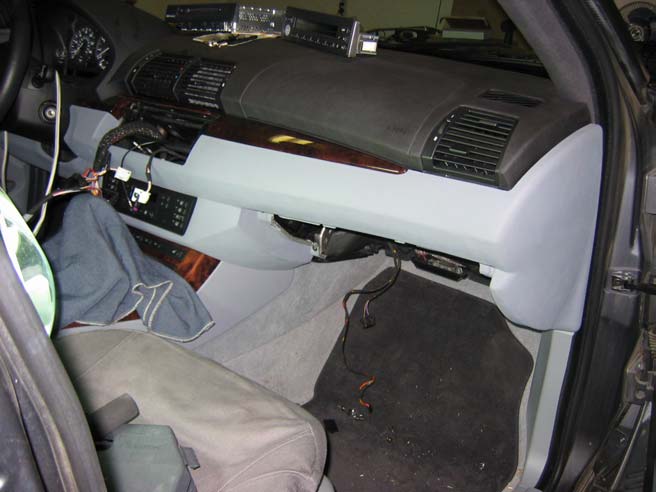
 Step 1: Remove the OBC MID and radio
 To remove the OBC (On-Board Computer) MID (Multi-information Display), pull off the radio volume knob. At the bottom you will see a Torx screw. Turn it about 90 degrees.
Use a small flat bladed screwdriver your gently pry out the OBC MID from the bottom. The dash trim is flexible so it will give. Once out, you can disconnect the OBC MID from the attached cable. Additional instructions:
http://www.bmwmotorsports.org/crew/u...images/mid.jpg. To remove the radio, there are two small hex screws. They are like expansion anchors. You will need to turn them out for what seems like too long because the screws will just spin. Just keep turning them until you can pull the radio out.


Once you have the radio out you can disconnect the small black wire and the wiring harness. (The small black wire can be seen dangling in the background. The white connector is from the OBC MID.)
Step 2: Pulling wires This is the mess of wires you will be dealing with.


You will have to remove a blue retaining clip by pressing on the release tab and sliding it out.
It holds in the connectors for the wires that you will be pulling out.
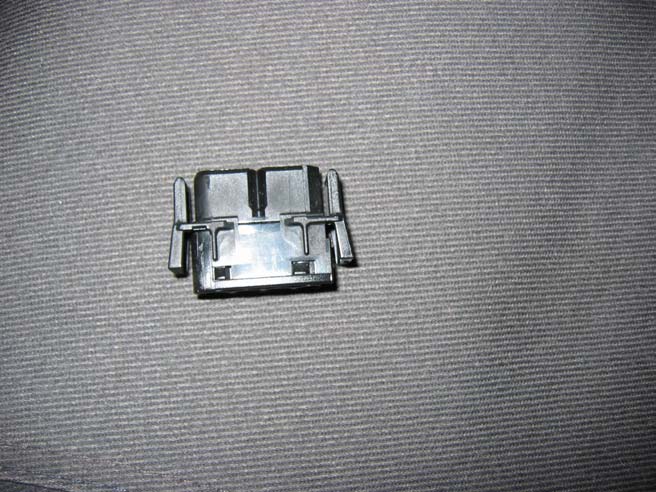
Once you have that out you will have to identify the four wires you will be working with. They are referenced in the instructions by color and by position number. As you can see, there are numbers for each wire. The instructions state that wire colors may vary depending on production year. Mine is a March 2002 production and only one wire was different. What the instruction state was a red/white wire, mine was a yellow/white wire. The violet/white, red/green, and brown wires were all the consistent. You will also unplug the original white plug from the harness. You will be replacing it with a new one from the iPod harness.


These are the wires you will be looking for. (Sorry for the blurry picture.) Notice the square ends. Those will be changed to the provided bullet type connectors.
To remove the wires from the black harness/block, you are supposed to have a special tool. I just used a miniature flat bladed screwdriver. What you do is wedge the blade in to release the connector and gently pull on the wire. It should just pop out.

Once you have the four wires pulled, cut off the square ends as close to the original crimp as possible. Strip off about 1/8th inch of insulation. Use the supplied bullet connectors to crimp the wires. They will be inserted into a new plug.
The instructions will specify the order of the wires. You shouldn't screw this up because you can match up the new connector with the new harness which has the corresponding wire colors. The new connector will only fit the harness one way so you can't flip it backwards by mistake. The new connector with original wires and the new harness connector are circled.

Make sure of your crimps because once you get the bullet connectors plugged into the connector, you will have a heck of a time getting them out. Here are the two connectors getting together.
Once that connection is made, connect the new white plug from the iPod harness to the radio harness. The original one will go unused. You can only plug in the white plug one way so you won't screw that up either. The next thing you need to do is fill the slots vacated by your newly crimped wires. The iPod harness has four corresponding wires with the square type connectors, one in each color. The ends look exactly like the ones you just removed. Those will be plugged into the slots you took the original wires out of. Your iPod harness will now be connected to the original harness by the new connector pictured above and by the four wires you just plugged in. Make sure you match up the right color wire with the right slot. The blue retaining clip should then be reinserted. You can do this next part now or later. It doesn't matter. Plug the end of the iPod harness into the iPod. Do not plug in the white iPod cable yet. You still need to run it through the glove box. Note: You can do the glove box portion first, removing it and drilling it. It's up to you but I went in this order, starting with the radio and wiring portion since you will have to route the iPod wire through the dash. When you do route the cable through you might want to only pull through enough wire as is necessary so that you have enough slack to take your iPod out. I left enough so that my iPod can rest in my non-smoker ashtray.

 Step 3: Removing the glovebox
 Open the glove box and remove all the gloves from there. (Who actually keeps gloves in there???) There are four screws across the top and two on either side, underneath. Remove the top four first. Remove the plastic "bolt" that holds the strut on the left side. Squeeze the right side of the box portion so that a rubber bumper can clear the trim. That will allow you to open the glove box further and gain access to the two vertically mounted screws on either side.

Gently pull out the glove box and then disconnect the wires for the light and flashlight.
Step 4: Drill your hole Use whatever sized drill bit to drill a hole big enough for the round connector of the iPod cable to go through. The instructions have measurements for where exactly to drill the hole but an approximation will do just fine. Cut the supplied rubber grommet, slip the iPod cable in, and insert the grommet into the hole.

Route the iPod cable through the dash and out the radio opening. It's very accessible back there.
Re-install the glove box.
Step 5: Hook it up! Connect the iPod cable to the iPod interface and plug in the iPod harness if you had not already done so. (Pictured at the end of Step 2.) Slide the black foam sleeve over the interface and insert it in and out of the way along with the new harness so that the OBC MID and radio will fit Plug the white plug from the iPod harness into the cluster of wires that goes into the radio. Make sure all connections are correct and solid. Connect the OBC MID plug. Plug the radio harness back into the radio, plug in the black wire in, slide the radio back into position, tighten the two hex screws, slide the OBC MID in and turn the Torx screw to lock. Don't forget to replace the two fuses! That's it! You're done!

Some initial observations: Very cool and way better than a CD changer! It was not very difficult once I figured out the little things like how to remove the radio and how to release the wires from the harness. I do wish ID3 tags were displayed. The iPod displays as above when playing. iPodYourBMW user instructions:
http://www.bmwmotorsports.org/pdf/iPod_Owners_Manual.pdf