
|
|
|
|
||||||||||
| Xoutpost server transfer and maintenance is occurring.... |
| Xoutpost is currently undergoing a planned server migration.... stay tuned for new developments.... sincerely, the management |
 |
|
|
LinkBack | Thread Tools | Display Modes |
|
#1
 06-12-2024, 09:48 PM
|
|||
|
|||
|
thanks
__________________
 2005 X5 4.4i M Sport 2003 X5 4.4i 
|
| Sponsored Links | |
|
|
|
|
#2
06-13-2024, 03:40 AM
|
||||
|
||||
|
Here's the plugs...
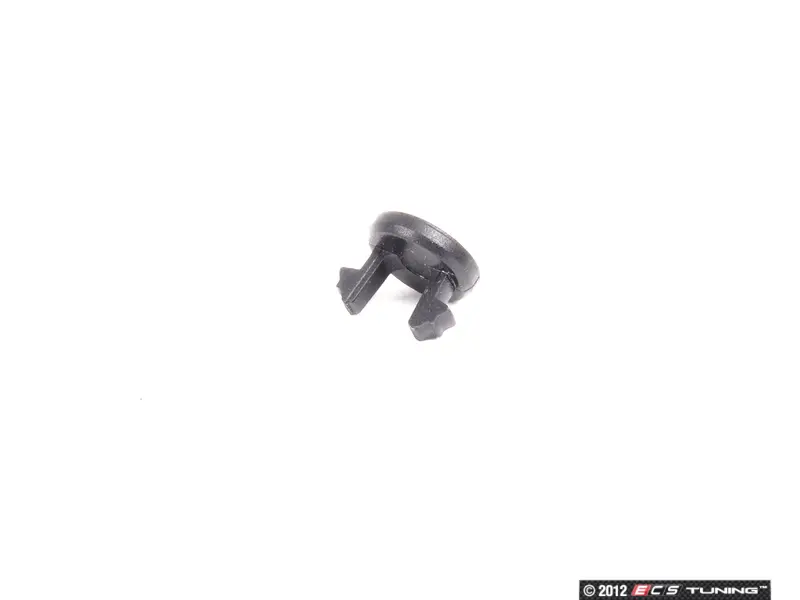 Looks like they could pull out but that may be dificult to do without damaging them. So, the part number is: 51168263771. 
__________________
Wayne 2005 BMW X5 3.0d (b 02/05) 2001 BMW F650GS Dakar (b 06/01) 
|
|
#3
06-13-2024, 04:46 AM
|
||||
|
||||
|
Quote:
Sent from Embassy network using Tapatalk
__________________
"When the Team Chief said.... You're trapped in a hole with nothing but a goat and a slinky, what do you do? Stubby said, I'm not sure but it won't end well for the goat...." ~(Overheard) Last day, Phase 3, Q Course
|
|
#4
06-13-2024, 05:35 AM
|
|||
|
|||
|
Great thanks. Bmw sent me the drawing and I was wondering how to get the tabs in. That is going to be very hard as I can’t even pull them out a little bit. I think i will just drill them and bin them. They should have used the rubber ones on the bottom as well but I suppose bmw was concerned about people stealing the lid. Anyway, I think the rubber ones will fit in the bottom as well so i will get two new ones. I will post the result.
__________________
2005 X5 4.4i M Sport 2003 X5 4.4i
|
|
#5
06-13-2024, 11:46 AM
|
||||
|
||||
|
Clean small hole you can pull off with angled pick tool. Clean enough hole you might not even mind the look when replaced
__________________
2011 E70 N55 (me) 2012 E70 N63 (wife)
|
|
#6
06-14-2024, 01:45 AM
|
|||
|
|||
|
Here is the state of the original:
 Removal of top stop buffers part no 51168262830   Trying to remove lower plug (part no. 51168263771) with no luck. Then drilled hole but you will break tags when removing.     Finally attach new lid and all good.  Notes: 1) make sure seats are back and are reclined back away from lid to avoid damage. 2) you will need a torx size 10 screwdriver (with handle to get leverage) when you screw the screws back into the new holes for the first time. 3) with new lid you may need to cut some leather away from the screw holes as the holes on my new lid were hidden behind the over lap of leather. cheers
__________________
2005 X5 4.4i M Sport 2003 X5 4.4i
|
|
| Bookmarks |
|
|
|
|


 Linear Mode


