
|
|
|
|
||||||||||
| Xoutpost server transfer and maintenance is occurring.... |
| Xoutpost is currently undergoing a planned server migration.... stay tuned for new developments.... sincerely, the management |
|
|
LinkBack | Thread Tools | Display Modes |
|
#1
 01-09-2006, 11:05 AM
|
|||
|
|||
|
Interior Trim Replacement in an X3
Contributed by: climrgrl
DIY Article on Replacing Interior Trim in a 2005 BMW X3 I thought I'd post about trim replacement, in case anyone else was thinking about it. I'm not trying to bag on the wood or aluminum -- they're just not my style. Neither is the "matte titanium" (which is really plastic painted with a metallic gray), but it's the one I prefer. So, I ordered the matte titanium trim kit thru Pacific BMW. They were great. Super-responsive, and even though some of the parts had to come from Germany, I think I had everything at my door in about a week. Price came to $160 including tax & shipping for all 5 parts. The quote from my local stealer was $800 (no joke). I inquired about the pricing, asking for part numbers to make sure we were talking about the same thing. They never responded. The first task was to do the door handles. They pop off with some prying, but make sure you have "BMW Tool 00 9 317" like the instructions say. I found that a hard plastic Cuisinart spatula worked quite nicely. Someone on eBay wrote some instructions using a screwdriver, but I'd want to use a material that is softer than the door handles and trim and won't scratch.  I started prying at the bottom, then did the top. They pop off quite suddenly and forcefully, so careful that you don't drop the piece when it finally comes off.    To put the new ones on, start at the bottom. Make sure the tang on the bottom of the trim is aligned with the bottom lip on the door handle, and pop in the first two bottom center clips first. Then make sure that the alignment post on the top is placed inside the door. Work your way up, bottom to top, pressing firmly to snap the center clips in and the smaller clips on each side evenly. That's it! 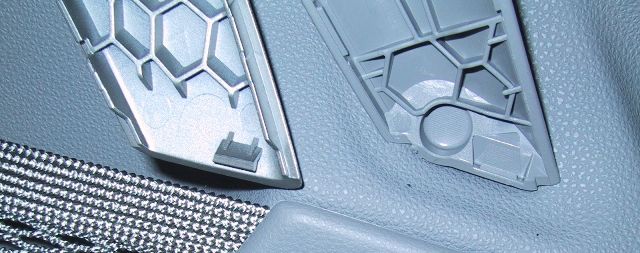 Pics of the back of the trim pieces and before & after shots.      I was pretty timid on the first handle, but after doing 2, it takes about 5 minutes each for the full replacement. Now on to the console. I'd like to point out that I am in no way a trained professional, so you'll be crazy too if you follow these instructions. You have to take apart pretty much the entire center section. It took 2 hours, if I were to do it again, it'd probably take an hour. Don't be discouraged, if a chick can do it, you can too!  There are 2-3 tools you need: a large (#2ish) phillips screwdriver, your handy Cuisinart spatula (BMW tool 00 9 317), and one hard plastic prying tool. There was a bit of serendipity today -- my ProClip that will hold my iPod came today. It was about $30 and allows you to mount an iPod (or other device, cellphone, etc) without drilling any holes in your dash. It came with a very handy black plastic prying tool. I had to be a little careful, because it is a pretty hard plastic and will scratch if you really dig it into something. The shifter/center console trim is the same whether your car is an automatic or manual. The instructions will be pretty much the same for an auto. These instructions will also be pretty helpful if you're planning on doing an CD player head unit replacement or self install of mp3 player cables (BMW iPod or ice>link). 1: Pop out your shifter boot frame. Push in the right and left sides, pull up gently, and it should pop out. You don't have to take off your shifter knob, I didn't. 2: Unscrew the two screws at under the top of the shifter boot. In the picture below, the left one is already out.  3: Pop out the two clips under the bottom of the shifter boot (see pic below). You can pry with a screwdriver (careful not to push against the edge of the trim) or pull out with some pliers.  4: Pop out your hazard/door lock button assembly. Pry gently from the bottom of the door lock button with the handy black plastic tool, or similar object. (In retrospect, I'm not sure this is necessary, but my instructions said to do it).  5: Pry out your vent panel. I found the Cuisinart spatula to be a better tool here. Insert under the bottom right edge of the vent panel and gently pry out. Do the same at the bottom left. Pull out the vent panel most of the way, revealing the top 2 screws for your climate control/CD player panel.  6: Unscrew the top right and left screws for the climate control/CD player panel. They're a little short, so be careful that you don't drop them into the center hole, they'll never be seen again (but probably to be heard, rattling around!)  7: Pop out the panel by prying gently with black tool or spatula under bottom right edge of black climate control panel. You don't have to undo any of the electrical connections in the back, and you don't have to take out the head unit. Although you'll be in a perfect position to do so at this point. 8: Now you should be able to see the top two screws for the shifter trim. I taped all the other hanging pieces out of the way with some blue masking tape (doesn't leave residue like the beige stuff)  9: Unscrew the the two top screws. 10: Pull the panel out gently, there are short wires connecting it. Make a note that the copper-colored wire with bare metal terminal connector on your 12V outlet is toward the passenger side. The connectors are pictured below, this one is kind of hidden. The one covered with white plastic is toward the driver (US, man, I assume it's reversed if you're in the UK). Both of these simply pull out. So does another little 2-pin black connector in that same vicinity. This goes to the red LED inside the ashtray. Finally, pull out the big main connector (going to everything by the DSC OFF button), making sure to push in the ears on either side while pulling back.   11: Your shifter trim piece should now be free, pull it out! The matte titanium center trim piece is shown below, as it is delivered (without a few modules you have to transfer). The wood trim is also shown, right after it was pulled out.   12: Transfer the DSC piece to the new trim. It's held in by two aluminum clips on the right and left. Push them in and push the DSC piece out. It easily snaps into the new piece, pictured below.  13: Transfer the cigarette lighter to the new trim.  14: Transfer the LED to the new trim. It's shown in the center of the second picture. Getting it out was a little tricky because it was a tight spot. I used a small screwdriver to push in the tab on one side, and my finger for the other. Wiggle it gently backwards (towards the 12V outlet) and it will pop out. Pop it into the new trim.  15: Put everything back! Put the electrical connectors on the new trim, careful of the polarity on that 12V outlet! Screw in the 4 screws first, pushing up at the bottom of the shifter trim piece so that it aligns properly and there is no gap. Then pop the clips back on. Pop the shifter boot back in. 16: Pop the climate/CD player trim back into place. Screw down at the top. 17: Pop the vents back in and pop in the hazard/door lock button assembly.   18: Enjoy! The material is just plastic which has been made to look like metal. Whatever process they use seems to be better than your typical spray-paint -- I tried scratching the back of the piece hard with a fingernail, and there was no mark. No gloss either which means no smudgy-looking fingerprints! It's pretty much identical to the shifter knob (I think all X3's come with the same metallic-looking one?), except that the shifter knob is glossy. There's a little bit of a rough texture, but of course it feels like plastic, not metal. I think either a plain brushed aluminum trim or a matte chrome one that matches the 2005 door handles would be super-nice. The door handles actually feel like metal to me and look nice with all the interior upholstery colors. |
| Bookmarks |
|
|
|
|


 Threaded Mode

