
|
|
|
|
||||||||||
| Xoutpost server transfer and maintenance is occurring.... |
| Xoutpost is currently undergoing a planned server migration.... stay tuned for new developments.... sincerely, the management |
|
|
LinkBack | Thread Tools | Display Modes |
|
#1
 06-02-2006, 03:33 AM
|
||||
|
||||
|
BMW AUX Input Installation - With Navigation
1. Pull top vents straight out, they are held in with spring-loaded clamps. You dont need to pull it out very far. Just an inch or so to get the screwdriver in for the next step.  2. Unscrew two screws to release the top of the covering surrounding the radio. There is another screw in the same place on the other side (I borrowed this pic from someone else as I forgot to get a pic of this part, thanks to whoever this came from!).  3. Work your fingers down to either side of the climate control button area (lower half) and pull straight out. I wouldnt pull too hard on the plastic on either side of the radio (upper half) as it feels like it could break off. There are two strong springs holding this whole assembly in right behind the climate control button area.  4. Let the whole cover and climate control assembly hang from the wires off to the right.  5. Unscrew two screws holding radio in place, then pull radio straight out. On the back of the radio, a pin with rubber on it holds the back of the radio in place and provides some vibration isolation. This rubberized pin just slides into a receptacle.  6. Disconnect both cables (see red arrows) from the back of the radio and place the radio off to the side. There is one large plug bracket that is released by pulling up on a rotating clamping handle. I believe there is a little release that you need to squeeze before pulling up on the clamp handle. The other cable is for the antenna and also has a release that you need to squeeze while pulling out.  7. Pull the black cable with yellow wires out of the larger cable bracket (see green arrow for location in larger cable bracket). Then remove the smaller plug assembly out of that by pressing the release tab (see red arrow) on the side.  8. You need to take the white wires out of the black plug that comes with the Aux In kit that you buy from BMW (on the right) and put them in the same position in the plug with yellow wires (on the left).  9. Release the pins from the plug in the kit by gently pressing on the metal tabs that hold them in with a pen or small screwdriver.  10. You will probably need to press on the retaining tab twice (see red arrows) as the metal pin slides into the second hole as it is coming out. This can be tricky so take your time and be gentle. Eventually you will figure out how to pull them out without hurting the metal pin.  11.Press the pins into the black plug with yellow wires in the same position that they were in the other plug. The instructions tell you where they go also. Numbers printed on the black plug tell you the plug pin numbers. Press the white wire pins in all the way. Try pulling the wires out gently to see if the retaining clip is working.  12. Press the small black plug back into the larger plug surround until it latches into place and will not slide out easily.  13. Press the whole plug assembly into the larger bracket (see red arrow).  14. I used one of the wire ties from the kit to tie the new cable to the others attached to the large radio plug bracket. This should relieve the strain on the cable and pins.  15. I chose to run the cable to the middle console between the driver and passenger seat instead of running it to the glove box as suggested in the kit. To access this area you need to remove the wood panel below the radio and surrounding the shifter. To begin unscrew the two screws at the top of this panel (see the red arrows).  16. The other screws (and clips) that hold this panel in are located under the shifter surround. To remove it grab the leather and pull up. This surround is only held in by spring loaded clips. 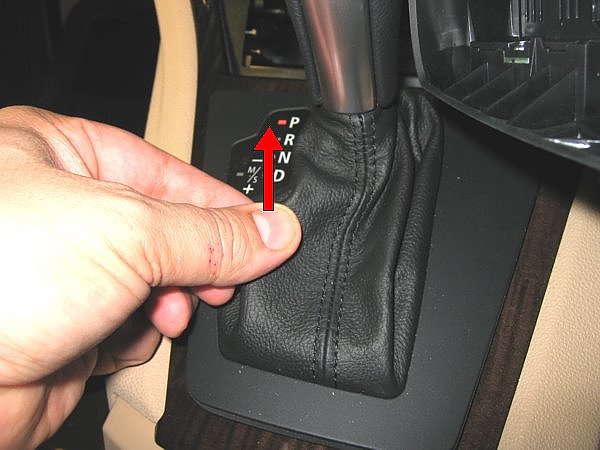 17. Under the shifter surround are two screws toward the front of the car and two brass clips at the back. Unscrew the two screws first.  18. Pry the two clips out next being careful not to let them drop down into the compartment below. I bet they would be tough to get out. The wood panel is now loose.  19. I was having trouble getting the panel out of the way enough to get into the side so I decided to disassemble the shifter surround some more by pressing the tabs shown with red arrows. I dont know if that was necessary as I really needed to get the shifter into the Drive position to move it more. Put the key in position 1 to move the shifter.  20. Here is the panel moved over enough to get to the rear of the compartment.  21. Take the liner out of the middle console by grabbing it on both sides (I needed the other hand for the camera here) and pulling up. Just the friction of pressing out and pulling up should release the spring clips that hold it in. 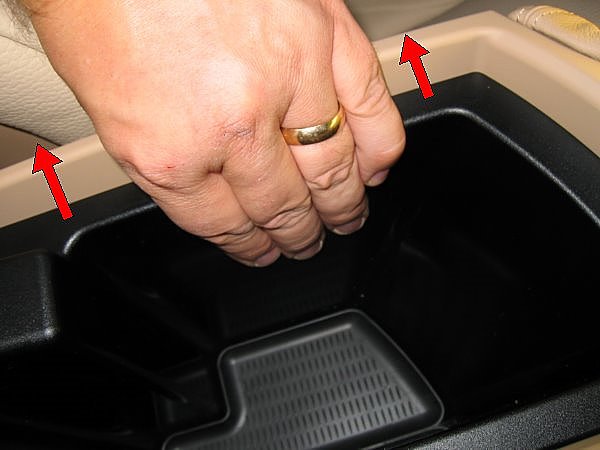 22. I decided to run a 6 foot monster cable with the plug shown on either end, starting at the shifter and going back to the middle console area. I figured the shielding on this cable would be better than the BMW Aux In cable. To pull the Monster cable through, I took a length of irrigation drip system spaghetti tube, pressed them together, and taped them together.  23. Here they are together before taping them together. They were a perfect fit. The spaghetti tube was stiff enough to push through the small opening between the two compartments.  24. Here is a shot from the middle compartment looking toward the shifter. This is the small hole between the compartment that the cable ran through. I started from the shifter area and poked the tubing around trying to push it back into the middle compartment. It took a little while before I found this hole. I couldnt see any of this, just went by feeling.  25. I pulled the Monster Cable through from the shifter into the middle compartment. There was a little resistance as the hole was small, but it went through easy enough. I think the small diameter of the Monster Cable helped. I then plugged the Monster Cable into the BMW cable, wrapped the BMW cable in a loop, taped the Monster Cable to the BMW cable, and tucked it into the compartment in front of the shifter.  26. I then tied the excess cable up in the middle compartment so it wouldnt get cut and ran the other end of the cable out the bottom of the compartment near the middle of the passenger's seat.  27. Here is the cable running out of the bottom of the middle compartment (see red arrow). I may decide to put it some where else later on but it is working great for the time being. Reverse the procedure to put everything back together. That's it. Works great. 
|
| Sponsored Links | |
|
|
|
| Bookmarks |
|
|
|
|


 Linear Mode


