
|
|
|
|
||||||||||
| Xoutpost server transfer and maintenance is occurring.... |
| Xoutpost is currently undergoing a planned server migration.... stay tuned for new developments.... sincerely, the management |
|
|
LinkBack | Thread Tools | Display Modes |
|
#1
 05-30-2006, 08:08 PM
|
|||
|
|||
|
Intake camshaft sensor replacement DIY for 01 X5 3.0
DIY-Intake camshaft sensor for 01 X5 3.0 I have SES light on with code P0365- camshaft position bank 1 sensor malfunction. I changed exhaust sensor and intake sensor in my X5. Hope this information will help. It took me about 1.5 hrs. Difficulty level is medium. These are the tool you will need:   Remove the hose connect the air filter housing to the engine.   Remove the oil filter cap along with the filter. You will see the intake lies behind a white aluminum part (blue arrow and sorry, I dont know the name of this part). You have to take this part out in order to get access to the sensor.  This is what it looks like when you take them out. There is a connector at one end (red arrow). Remove it too.  There is another cable (yellow arrow) you need to remove it in order to have space to take this part out. I used ¾ wrench to remove it. 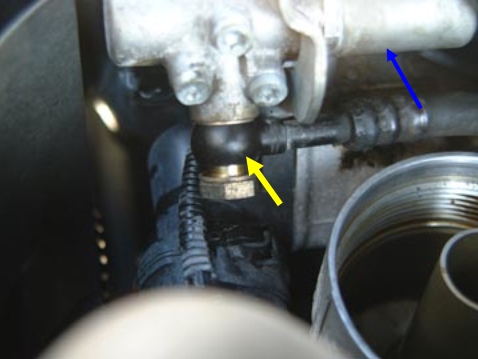 Now you can see the sensor clearly and have enough space to take the sensor out.  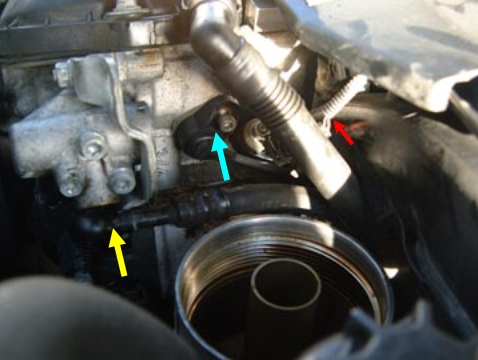 The other end of the sensor is a connector. It runs down to a box. You can easily access to the box and see the connector. Press down the spring and remove the connector then remove the sensor from the top. It may get stuck a little bit. If you have a small hand, you can stick you hand in and easily move it out.  I used color code in here to help illustrate the different parts you need to pay attention to. Hope this will make it more clear to visualize: Red arrow: Connector of the part with blue arrow Blue arrow: the aluminum part blocks the access to the sensor Yellow arrow: the cable blocks the access to untight the part with blue arrow Turqoir arrow: the intake sensor and its connector at the other end. White arrow: plastic rivets and air hose. |
| Sponsored Links | |
|
|
|
| Bookmarks |
|
|
|
|


 Linear Mode


