
|
|
|
|
||||||||||
| Xoutpost server transfer and maintenance is occurring.... |
| Xoutpost is currently undergoing a planned server migration.... stay tuned for new developments.... sincerely, the management |
 |
|
|
LinkBack | Thread Tools | Display Modes |
|
#1
 11-20-2012, 09:57 AM
|
|||
|
|||
|
ZF 6HP26 Teardown
First, a bit of background .....  Pierre Lepelletier is one of my heroes. He was born in 1928 and spent the whole of his career working for Ferodo (now Valeo) in France. At the age of 59 he took early retirement and then, two years later, filed a patent application for a new geartrain arrangement for automatic transmissions that could produce six well-spaced ratios using only 5 clutches, a Ravigneaux epicyclic and a simple epicyclic.  This was in December 1989. A few years later he had signed licenses with Aisin-AW (the worlds largest automatic transmission manufacturer), ZF, Ford, Jatco & GM allowing them all to manufacture transmissions using his geartrain system. Why was his invention so important? Well, in ZFs case - compared with the 5-speed 5HP24 unit that it replaced - the 6HP26 had 29% fewer parts (down from 666 to 470), was 44mm shorter (reduced from 697mm to 653mm) and weighed 12% less, despite its higher torque capacity and increased ratio spread. Most of the worlds OEMs switched to 6-speed transmissions as a result. A colleague of mine was lucky enough to meet and have a chat with Monsieur Lepelletier at a conference a few years ago and told me that hes a perfect gentleman. Now in his mid-eighties, I hope he enjoys a long and healthy retirement. His patent will have expired 21 years after its priority date (i.e. in December 2010) but hopefully hes made a few quid in the meantime from the 20 million or so 6-speed transmissions that have so far been produced using his idea! The ZF 6HP26 transmission first appeared in 2001 in the 7 Series BMW, the year before the L322 Range Rover was launched, but since Ford had taken Land Rover off BMWs hands in 2000, the L322 driveline development was frozen resulting in the Range Rover being launched with the already out-of-date 5-speed ZF unit in 2002. It wasnt until 2006MY, when the Jaguar petrol engines were introduced, that the Range Rover finally caught up and the 6-speed unit became available. The diesel version had to wait yet another year for the TDV8 to be introduced before the infamous GM 5L40-E was finally abandoned in favour of the 6HP26. Strictly, the Range Rover is fitted with the ZF 6HP26X transmission (the X stands for external 4WD i.e. fitted with a separate transfer box) with part numbers starting 1068 020 XXX, the rear-wheel drive variant being the ZF 6HP26 (part numbers starting 1068 010 XXX) and the internal 4WD version for Audi & Bentley being designated the ZF 6HP26A61 with part numbers starting 1068 030 XXX. Anyway, on with the teardown . 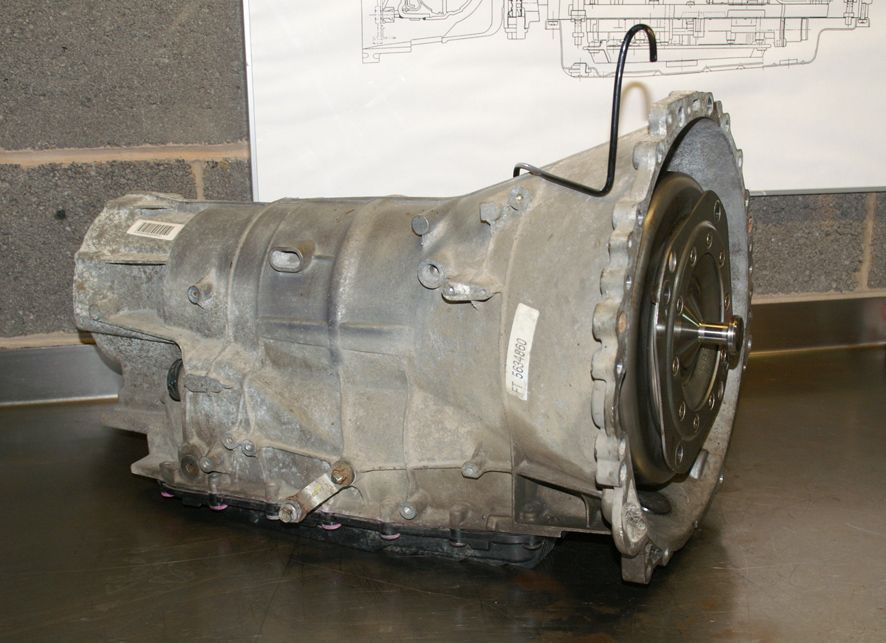 I saw this particular transmission on eBay, actually from a supercharged 4.2l V8 Range Rover Sport, with a starting price of £50 and I turned out to be the only bidder. After sliding the torque converter off its splines, and placing it safely to one side, I drained out the transmission fluid. The drain plug is at the back of the plastic sump pan. 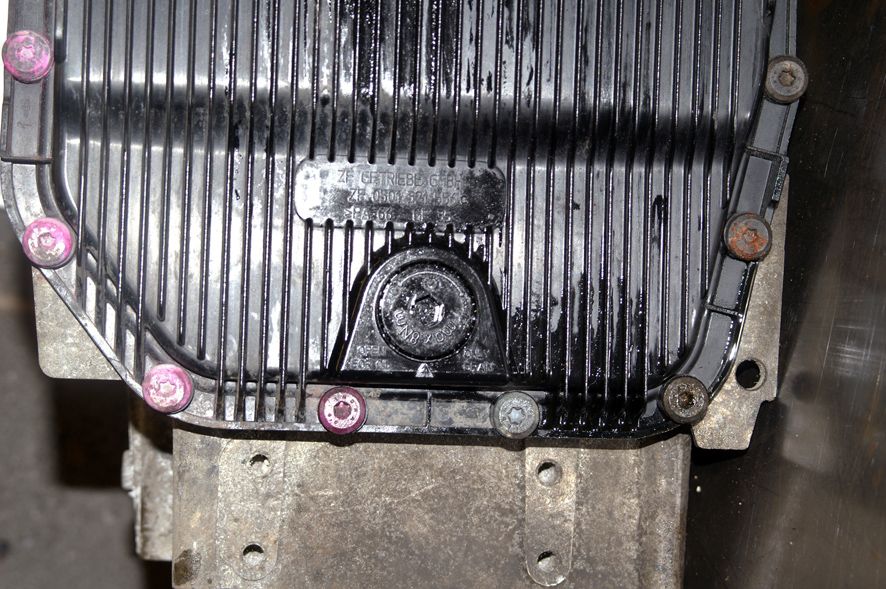 Incidentally, the filler/level plug is on the right side of the casing, in a location similar to the 5-speed units  Sump pan removal next there are 21 screws in all and its good to see that the head size has been increased to Torx T40, from T27 used on the 5HP24, to make the heads less likely to strip  These screws are tightened to 8Nm. ZF warn against removing the sump pan at fluid temperatures above 40 deg. C due to the risk of the plastic distorting at higher temperatures! The sump pan then just pulls off  The filter is an integral part of the sump pan and the photo shows where the oil enters the filter at the very bottom of the sump and also the suction tube which engages in a hole in the oil pump housing   This particular sump pan/filter had never been changed, as revealed by the 2005 date stamp  The OEM is Filtran (as for the 5HP24)  and two sump magnets sit either side of the drain plug at the rear of the sump pan  The electrical connector sleeve is removed next, by first pulling out its retaining clip 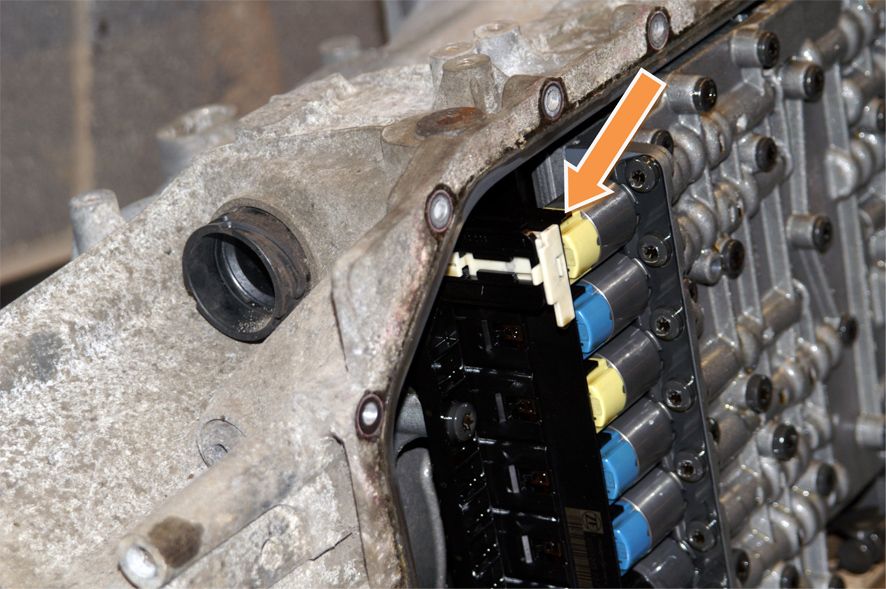 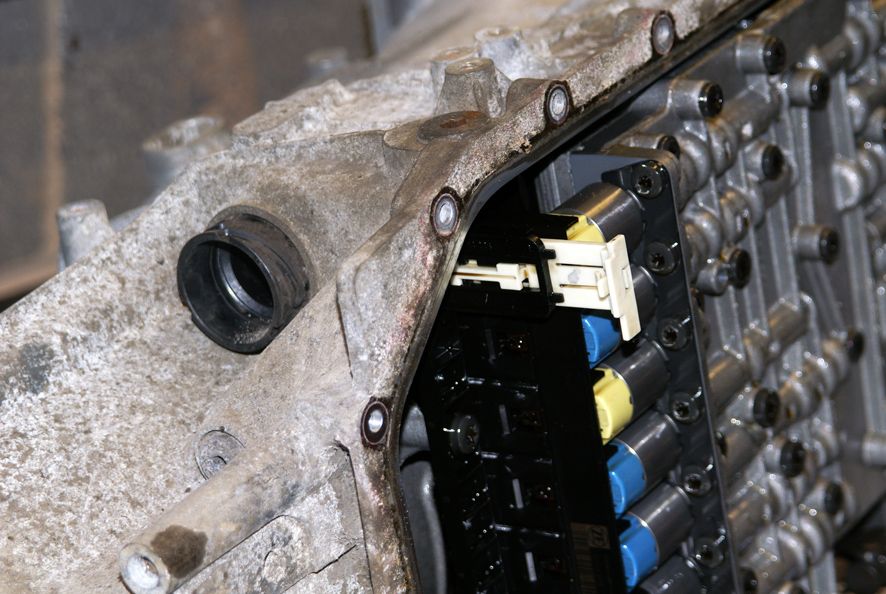 and the connector sleeve will then come out of the casing 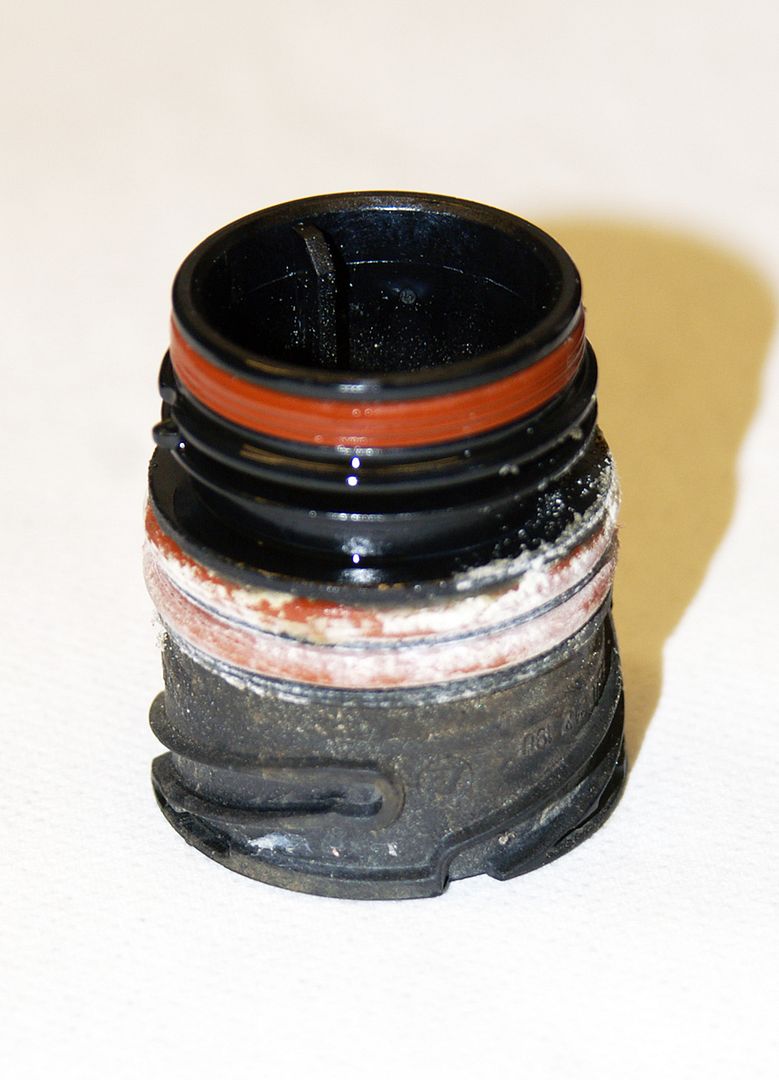 Its easy to see, from the casing corrosion which has coated the two O-ring seals, why this is a very common source of oil leaks in the 6HP26 transmission. The electrical pins on the Mechatronic module can be seen through the hole in the casing where the sleeve was extracted  There are ten screws in all (Torx T40) which bolt the Mechatronic module to the casing - seven long and three short - and these are easy to distinguish from the screws which hold the two valve block halves together which are only T27 and have a smaller head size 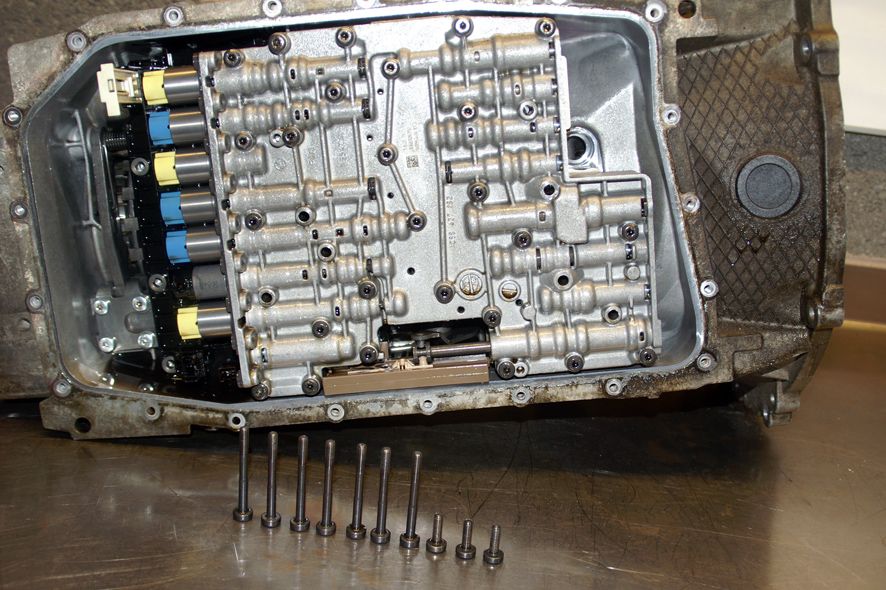 The rooster comb pin engages in a slot in the manual valve which also drives the slider on the (brown) potentiometer so that the controller knows which gear position has been selected by the driver  The Mechatronic module can then be lifted out 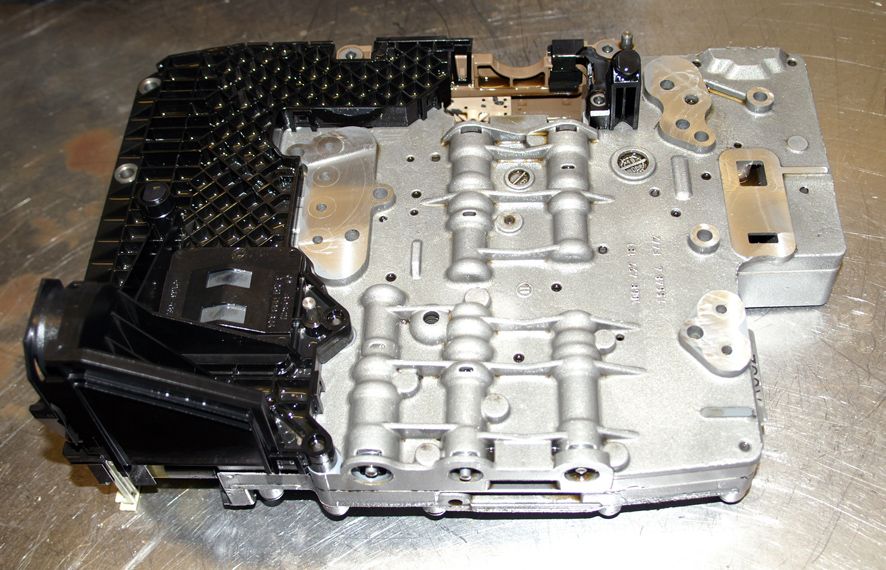 The Mechatronic module is a combined hydraulic valve block and transmission ECU. It also houses both the turbine and output speed sensors and also the fluid temperature sensor. Theres a risk that electro-static discharge could damage the ECU so ZF recommend that a ground strap is worn when handling it 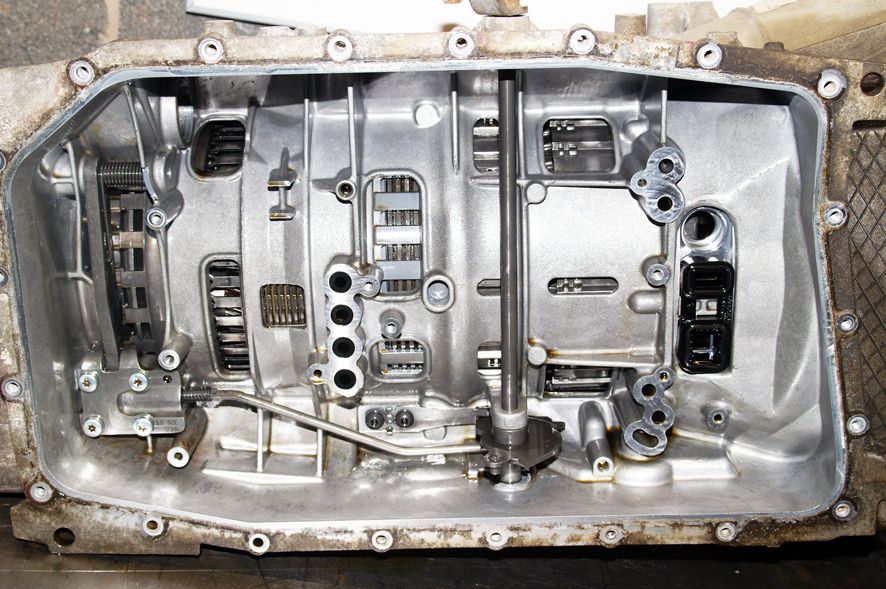 This is how the underside of the casing looks with the Mechatronic module removed 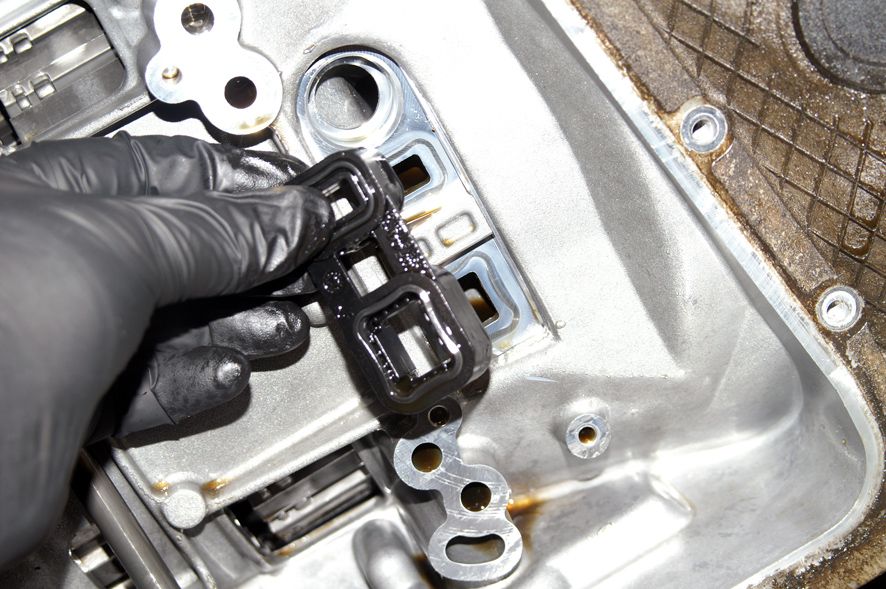 Next, the bridge seal to the pump housing just lifts off  and then each of the four rubber jump tubes has to be extracted  In terms of length, there are two small, one medium and one large tube 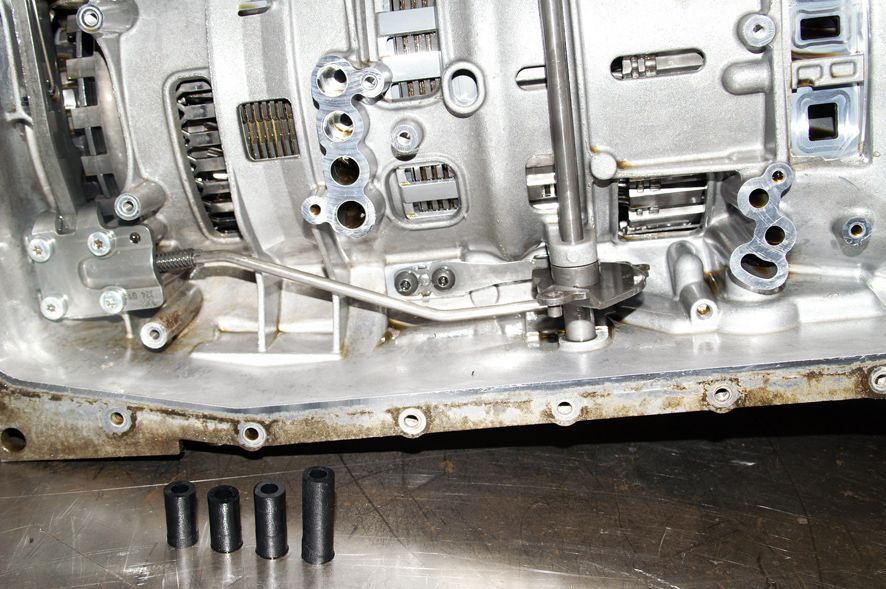 The park lock engagement mechanism can be seen in the photo above and this is removed next, together with the selector shaft  So thats it for the underside, next our attention turns to the front of the transmission. The oil pump and stator support assembly is retained by 13 Torx T27 screws 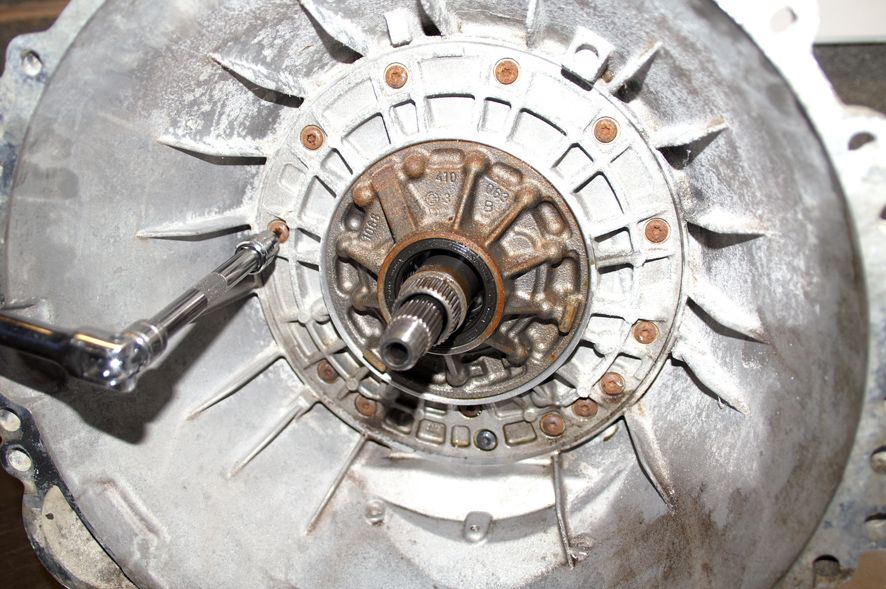 and each of the (identical) screws is fitted with a washer with a rubber insert to prevent leaks  The assembly can then be drawn out from the casing   Next out is the A & E clutch assembly, which includes the front epicyclic  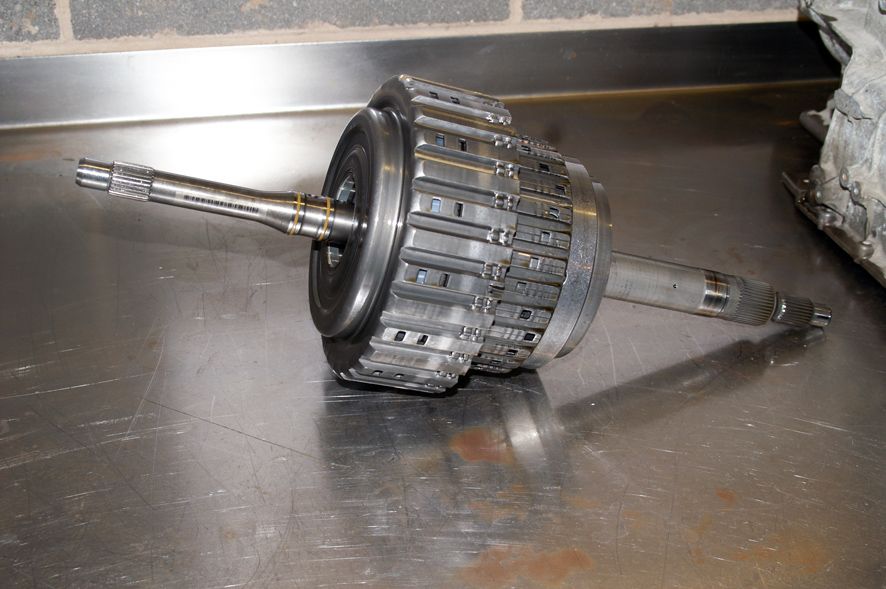 Followed by the B clutch assembly   To remove the static C clutch (& D clutch) housing, the large snap ring has to be extracted first   and it can then be drawn out  The two rectangular blocks in slots on the outside of the drum prevent the assembly rotating in the casing 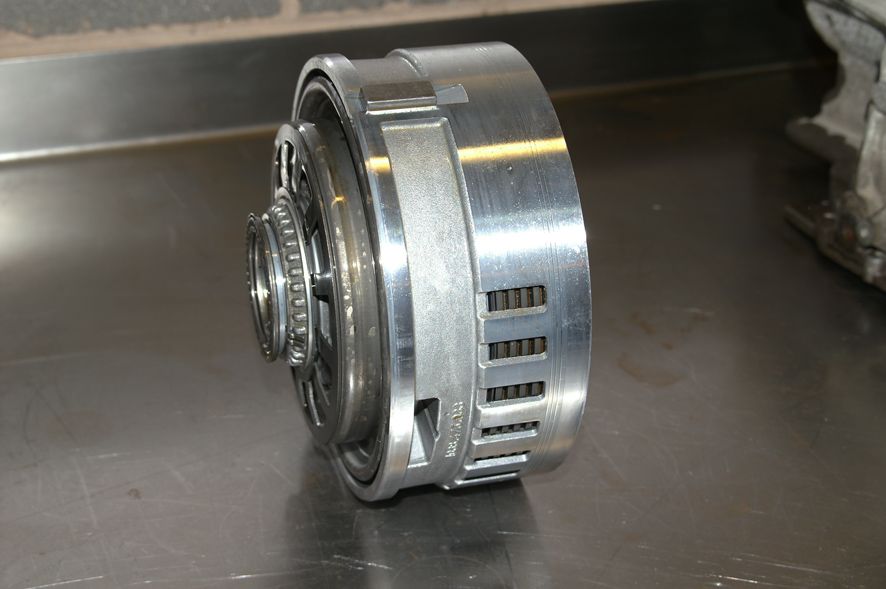 Now the Ravigneaux epicyclic, together with the D clutch pack, follow   Which just leaves the output shaft  The intricate basket weaving around the annulus gear is actually the target wheel for the output speed sensor  Turning to the back of the transmission, the rear output seal is removed  to reveal a snap ring that retains the insert which locates the rear axial bearing  A couple of threaded holes allow extraction bolts to be screwed in to assist with its removal  So thats just about it. The casing is now empty  A very simple process requiring no special tools. Next step is to disassemble each of the subassemblies in turn. Ill follow up with reports on progress with those. Phil 
|
| Sponsored Links | |
|
|
|
|
#4
11-20-2012, 06:49 PM
|
|||
|
|||
|
Holy crap I love when Phil comes and schools us with his transmission repair skillz.
Our 6hp26 transmissions have a different sump pan. The fill and drain are both on the bottom, and the filter is not part of it.
__________________
2006 4.8is, Black on White. SOLD Sniff Sniff. 2017 F85 x5m, Black on Red. BEAST MODE "The older we grow the greater becomes our wonder at how much ignorance one can contain without bursting one's clothes." - Mark Twain Unlock OBC post 5
|
|
#5
11-20-2012, 09:25 PM
|
||||
|
||||
|
You have the best posts! Great work, you definitely have a fan here!
|
|
#8
11-21-2012, 06:09 PM
|
|||
|
|||
|
Nice tutorial Phil.
Now I just whish I will refer to this post for entertainment reading only, not as a service manual. ")
__________________

|
|
#10
11-22-2012, 09:53 AM
|
||||
|
||||
|
Phil, great post and exquisite pictures!
Did the seller indicate if anything was wrong with the unit? BTW, I sold my 4.8iS and got an e70 diesel (to be the schoolbus) but kept the 4.4i for commuting. The 4.4i now has 15,000 miles since the cleanup of the 5HP24 and running strong. Again many thanks for your help last year! Each pictures says much more than a 1000 words :-)
__________________
2003 4.4i black ext./black int./black headliner (kid's runabout) 2014 535d X-drive, M package, silver/black interior Sold but not forgotten: 2009 E70 35d, black ext./black int./black headliner (sold 2021) 2006 4.8iS Le Mans blue/cream int./black headliner, SOLD in 2012 sadly... Other hardware: 2015 Cayenne S (wife's new DD and definitely wroooommmmm) 2016 Tundra 1794 edition crew cab, luxo hauler 2005 Tundra crew cab, weekend hauler. Sold after 150k very happy miles.
|
|
| Bookmarks |
|
|
|
|


 Linear Mode


