
|
|
|
|
||||||||||
| Xoutpost server transfer and maintenance is occurring.... |
| Xoutpost is currently undergoing a planned server migration.... stay tuned for new developments.... sincerely, the management |
 |
|
|
LinkBack | Thread Tools | Display Modes |
|
#1
 11-04-2020, 01:16 AM
|
||||
|
||||
|
DIY N62 Engine Mounts (The "Easy" Way)
All helped guide me to this method, and I'm sure saved countless hours of struggle.  I am writing this in a step x step manner, probably over illustrated and explained for most of the vets on here. But I took a few pics and figured I'd make this anyway. I am writing this in a step x step manner, probably over illustrated and explained for most of the vets on here. But I took a few pics and figured I'd make this anyway.Usual disclaimers apply here, do this at your own risk. Yada yada. This is working under your truck while suspending your engine/subframe. Use reasonable caution and common sense. My truck (2006 LHD US 4.8is) vibrated at idle pretty heavily, by my standards, and caused a rattle in the steering wheel. Turning the AC on (bumping the RPMs) would alleviate it. After the experience with our E61 with the same symptoms and going to buttery smooth after engine and transfer case mounts, I wanted to change Red's mounts as well. I do want to the trans mount too, but will get to that later. Here is what an old one looked like vs. the new one. Neither side looked overly worn and neither was leaking oil (are these fluid filled?) but it is shorter than the new one. Corteco brand FWIW. Picture below not taken perfectly clocked but you'll get the idea. 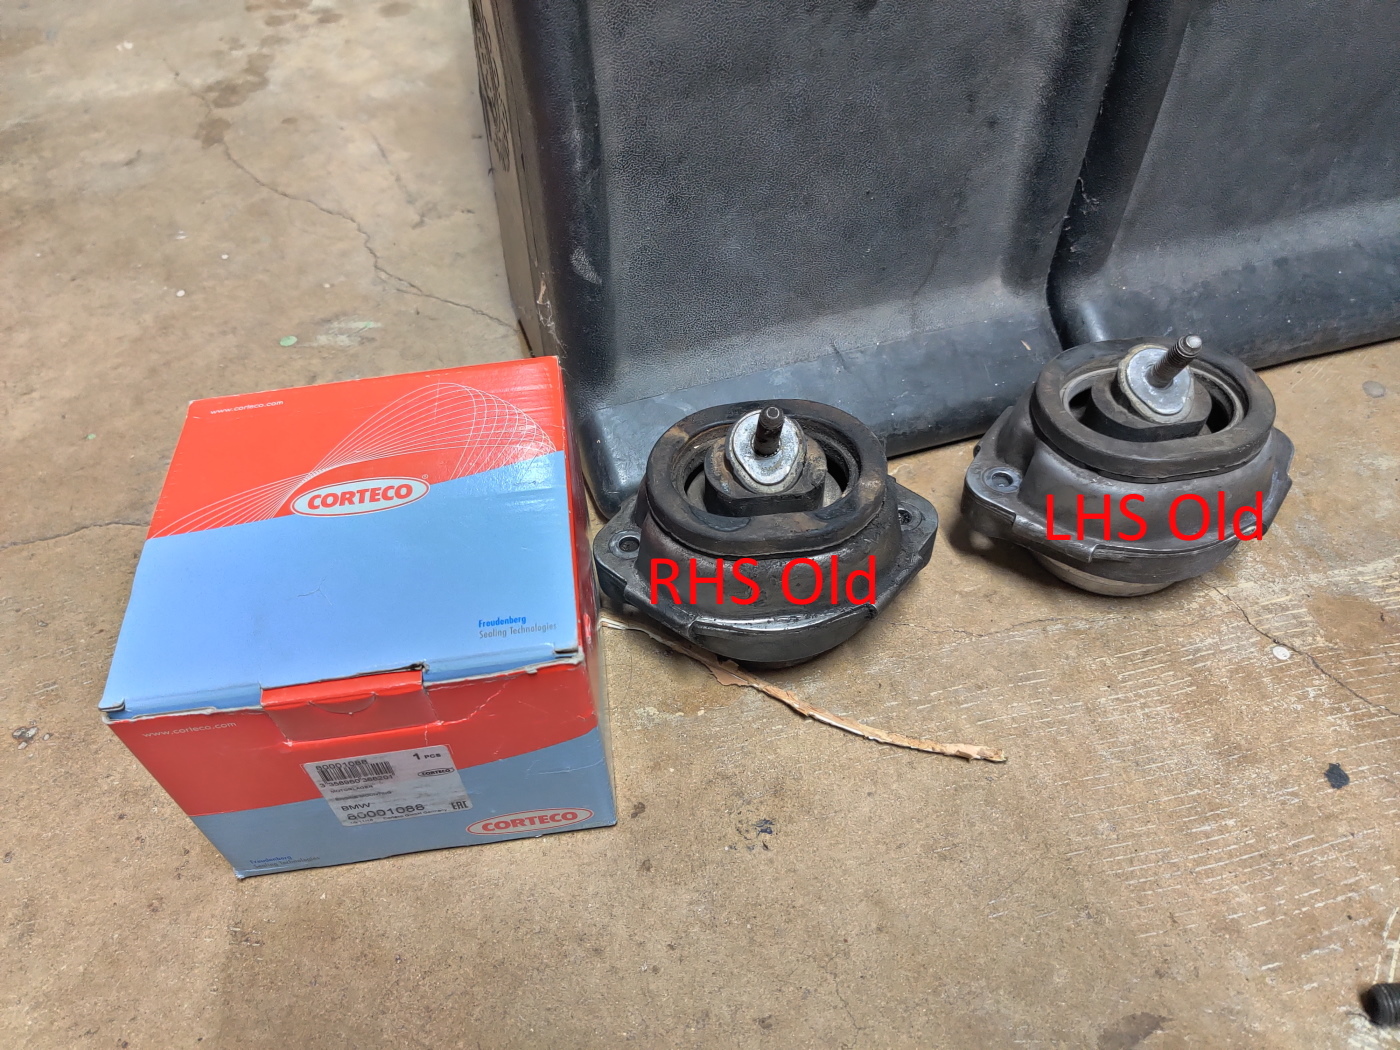  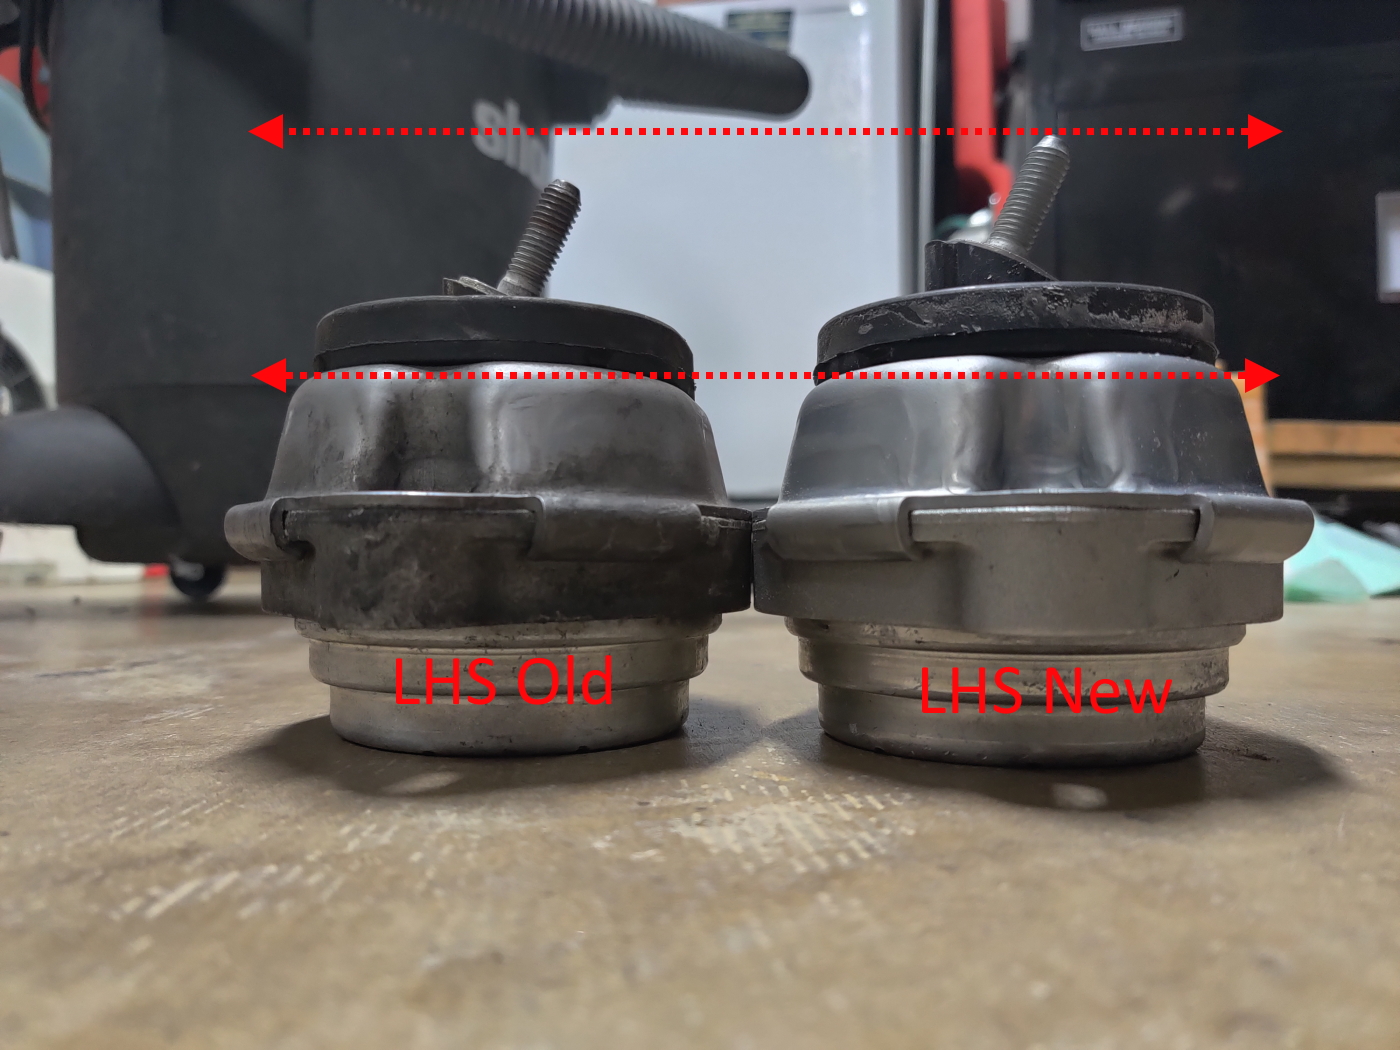 This took my wife, yes, you read that correctly, and I about 4 hours to do working leisurely. This is not hard at all and is about the same process I used on our E61 wagon to replace its motor mounts. It's not a hard process but does require a Harbor Freight engine cross bar to be most effective. I suppose you could do this with multiple jacks but youd really be limiting your work area. The reason we are doing it this way is because reaching the E12 torx and 16mm nut from the top is madness. It's a recipe for rounding/stripping the heads. I briefly tried starting this way the day before and moved on to other projects with the truck. This method allows both axles, control arms, the front driveshaft, and all other components to remain in place. I am typing this from memory so bear with me if there are some slight mistakes in bolt sizes or something. You will need an alignment after doing this, but I think that is the same for all methods of N62 mount replacement.  Tools you need: 1. Pry bar(s) multiple of differing sizes is nice to manipulate the subframe. 2. E12, E14, and E18 external torx sockets 3. 8mm, 10mm, 16mm, 17mm, 18mm and 19mm sockets (I used ratcheting wrenches as well in some of these sizes) 4. Harbor Freight top engine support 5. 2 jack stands of reasonable quality and load rating 6. Trim pry tool 7. Hydraulic jack of sufficient lift height and rating for an X5 8. Impact driver - nice but not required (I used one) Procedure: 1. Loosen lug bolts on front wheels 2. Remove the engine sound insulation/beauty cover. 3. Jack up the front end, place the vehicle securely on jack stands. Now give the truck a decent push from the side. If it moves re-secure the way the jack stands are placed. You are going to be under the truck, you dont want it falling. Do not place them on the back of the subframe obviously. You are wanting to drop that. After youre satisfied with the stability of the truck, remove the front wheels. 4. Remove the front plastic splash shield with a bunch of 8mm and 10mm screws/bolts. 5. Remove the stiffening plate by using a 16mm box end wrench (or ratcheting in my case) on the nuts on top and 16mm socket on the bolt heads on bottom of the plate. Some people find this tricky but Ive had this thing off and on so many times its a 10 minute job. 6. Now, unplug and then unclip the wires going to both front level sensors. The wires are not long enough to drop with the subframe as I almost found out the hard way.  7. Remove the 2 bolts/nuts that secure the steering rack to the subframe. The bolts are E14 and the nuts on top are 18mm. I used a ratcheting wrench on the nut. Why do this you ask? Well. Again, learning the hard way, at first I did not do this. When I lowered the subframe it was trying to pull the steering linkage out of the top seal where it connects to the rack and sprung a pretty gnarly leak. Once I realized why the truck was now hemorrhaging steering fluid I raised the subframe and loosed the rack. Fortunately when raised back up and rack loosened I had no more leak so I think I avoided a torn seal or needing to pull the rack. This happens because we are lowering the frame a long way to gain EASY access to the 3 bolts and clearance for getting the mounts out of their cups. Alternatively, I suppose you could undo the steering linkage but I didnt want to worry about things getting misaligned or reaching into the area to undo it. Easier to get the 2 fasteners for the rack up front. 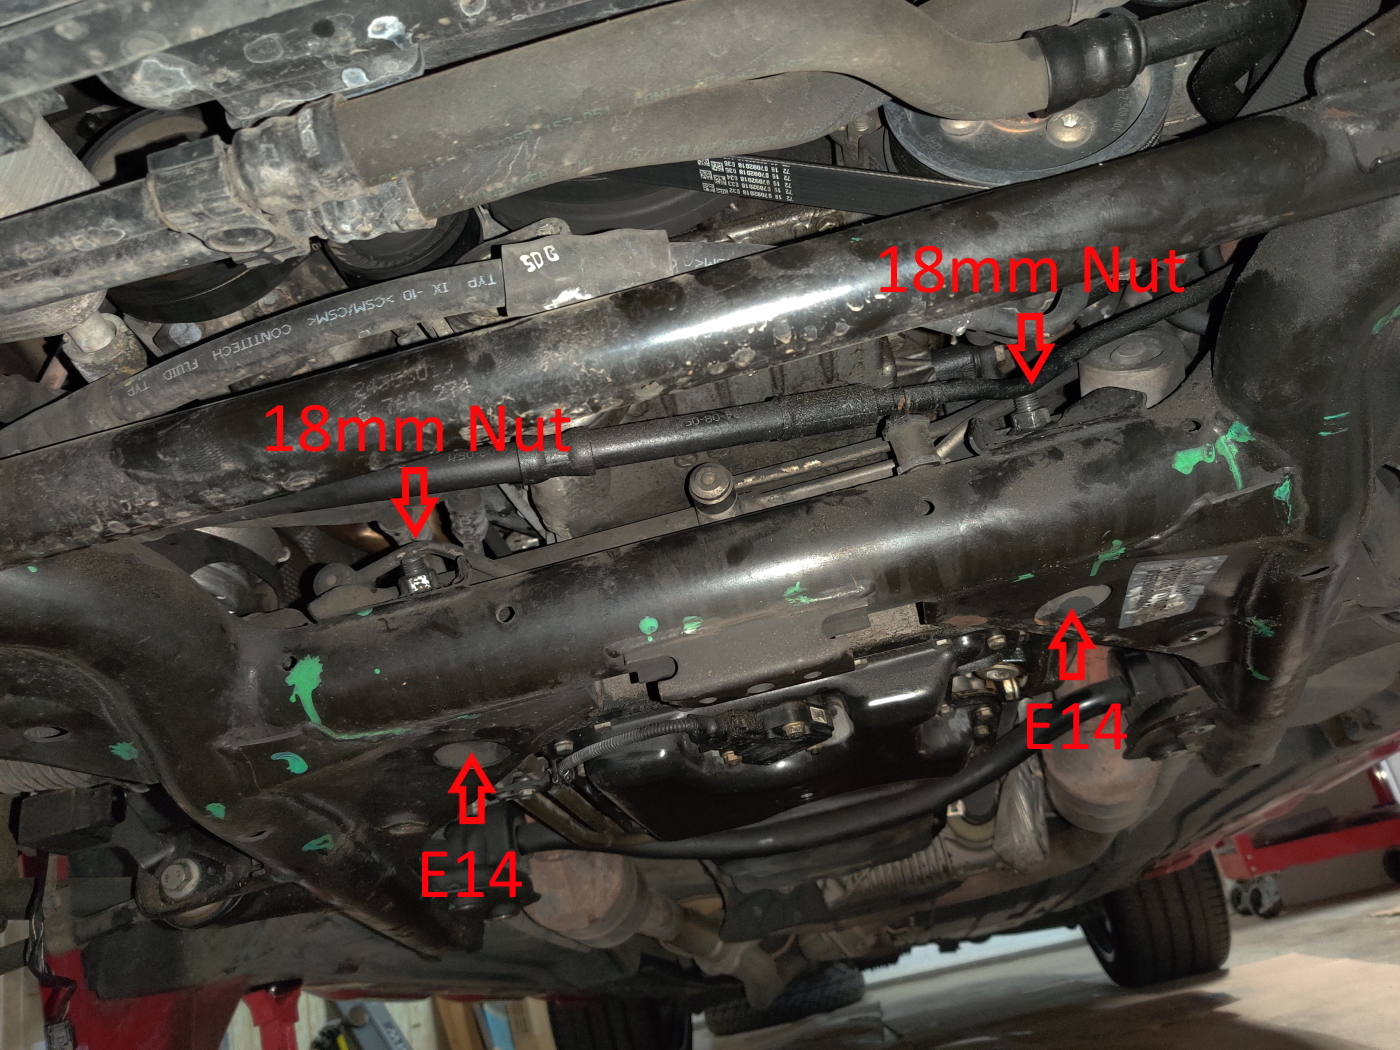 8. Install the Harbor Freight engine bar up top and take the weight off the subframe. I added painters tape along the fender channel just for added precaution, but the bar appears to have plenty of cushion to avoid any damage. 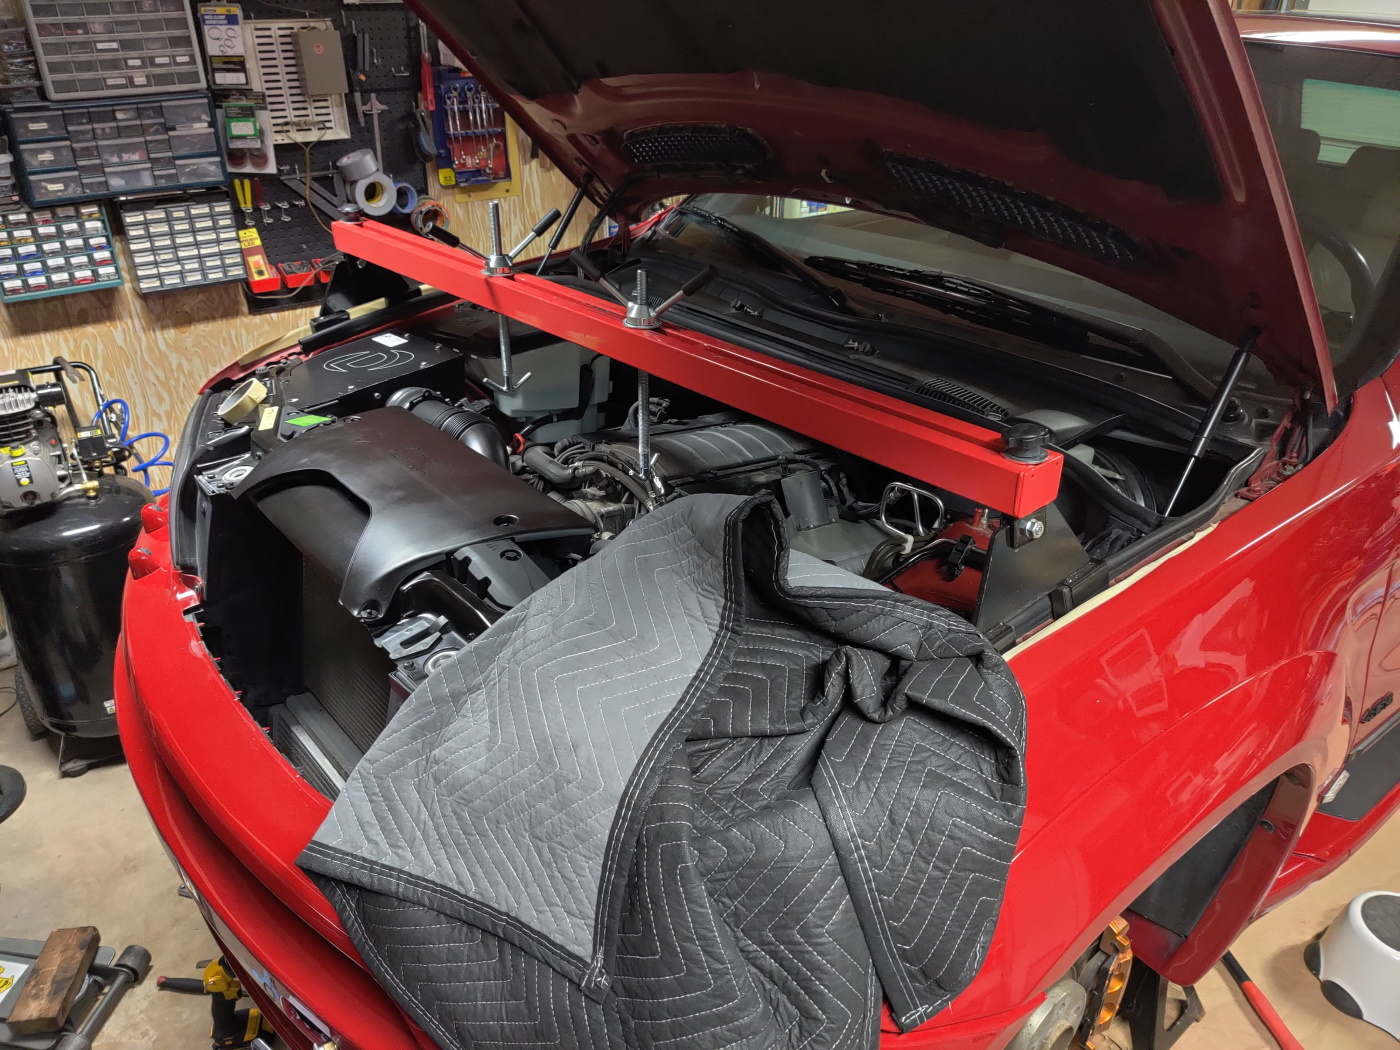 9. Loosen the right hand side subframe bolts. There are (3) E18 bolts. Take them out a good 5 turns. This will give you added lowering clearance on the left hand side. You can always back them out a little more should you need more clearance while trying to remove the left hand side mount. 10. Completely remove the (3) E18 bolts securing the left hand side of the subframe. There is no danger of it falling down while its attached to the suspension and engine. The engine is being supported by the Harbor Freight bar up top.  11. If you are feeling squirrely now about lowering the engine with just the half-in 3 bolts on the right hand side of the subframe you can place a safety jack under it. I did not. Lower the engine with the engine cross bar up top. Keep lowering the engine/subframe until you can see the (2) E12 bolts that secure the mount to the subframe and the 16mm nut that secures the engine to the mount and have room to access them. 12. Remove the 16mm nut holding the engine to the mount. Once removed the subframe may want to drop further so be prepared and have a jack under it at this point just in case. 13. With the 16mm out, raise the engine back up using the Harbor Freight engine bar up top. Seeing a pattern here? Youll be raising and lowering the engine more than a few times. Keep taking it way up so you have plenty of clearance between the exhaust manifold and the mount. This gives you easy access to the (2) E12 bolts and ease of egress for the mount. 14. Remove the old mount and plop in the new one. A pry bar can gain you that extra quarter inch or so needed to get the mount out/in. Loosely install the (2) E12 bolts in the new mount. You want a little bit of wiggle room when setting the motor back down onto the subframe/mounts. 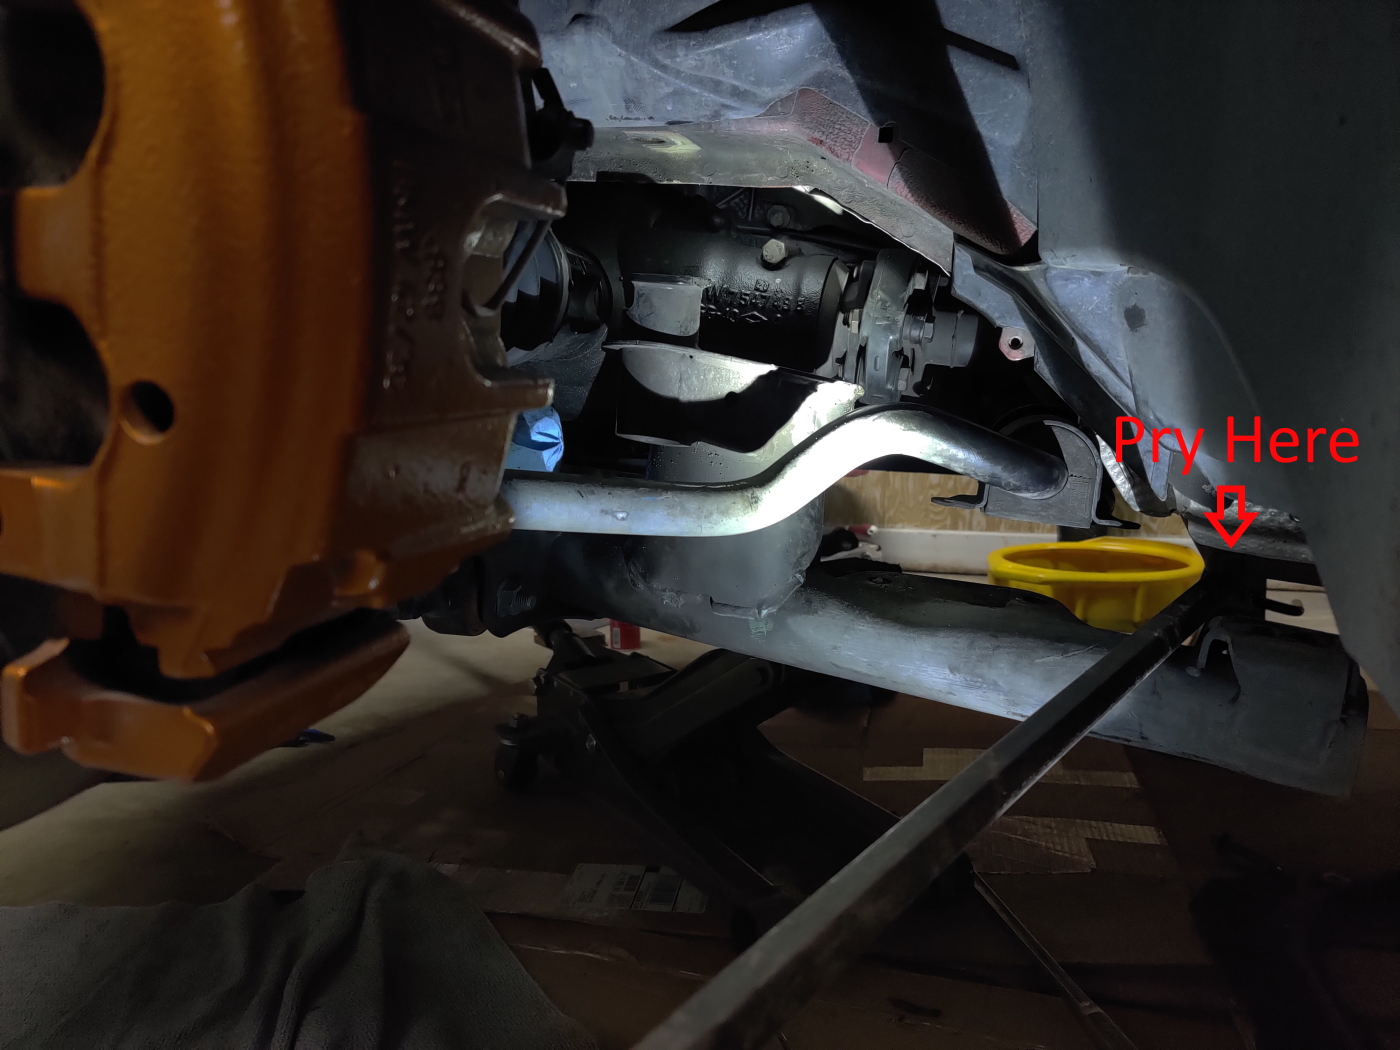 15. Use a combination of lowering the engine back down from above and raising the subframe from below with a jack until the mount stud is almost touching the engine support arm that the 16mm nut secures. You need to line this stud up with the hole in the support arm so use a pry bar to manipulate the subframe or move the new mount around as it is loose in its cup. I was able to do this by myself on both sides but having a helper might be easier. 16. Once the mounting hole aligns with the stud from the engine, lower the engine down until you again have easy access to all 3 fasteners. Installing the 2 E12 first is easier as you can still raise the engine a little to give you clearance for your E12 socket and ratchet. I could not find the torque values for the E12s in my Bentley or online. It didnt take too much to release them so use your best judgment. Once the E12s are in you can lower the engine fully onto the mount and install the 16mm nut. Torque 16mm nut to 41 ft-lbs. 17. Now raise the engine with the subframe using a jack and/or the engine support bar. You want to get it up onto the dowel guide on the frame and hand thread the E18 bolts back in. I gave mine a clean with the wire brush and some brake clean, followed by a light antiseize just for good measure. You want to thread them back in so that the subframe is loose like on the right hand side. 18. Now you can remove the 3 E18 completely on the right hand side and repeat the process you followed with the left hand side to remove the E12 bolts and 16mm nut to free the engine mount. So repeat steps 10-17 for the right hand side mount. There is nothing different between the two sides. The passenger side has more room as well so its easier to work (no steering linkage or driveshaft). Here's a shot of the right hand side with the new mount in. 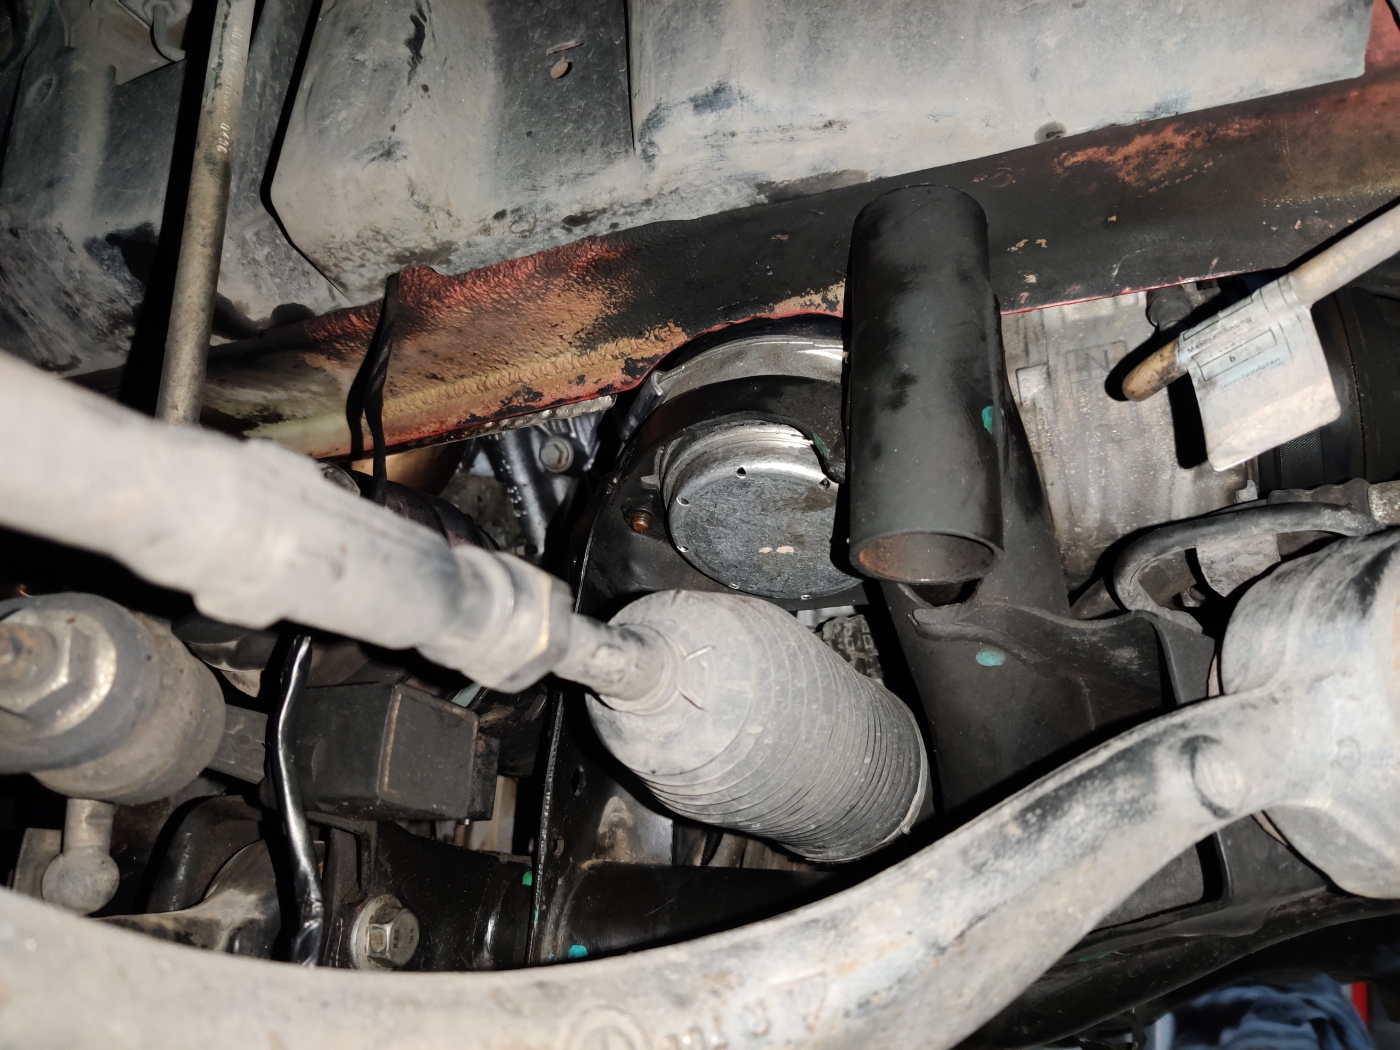 19. Now youve got your new mounts in and the subframe can be lifted all the way up and the E18 bolts fully torqued to 74ft-lbs. 20. Now install the (2) E14 bolts and (2) 18mm nuts that secure the steering rack to the subframe. Torque them to 37ft-lbs + 90 degrees. BMW calls for replacement bolts/nuts. 21. Reinstall the clips and plugs for both of the ride height level sensors. 22. Reinstall the wheels, raise the truck with a jack, remove the jack stands, and lower the truck onto ramps. Torque front wheels to your chosen spec. I use 100ft-lbs personally. 23. Reinstall the chassis stiffening plate with your choice of reusing the old bolts or purchasing new ones. BMW recommends new fasteners. They also recommend to torque with the vehicle on the ground, hence the ramps in the previous step. Torque to 41ft-lbs + 90 degree angle. If reusing the bolts, you may want to do a smaller angle of around 45 degrees. 24. Reinstall the front plastic splash shield. 25. Remove the Harbor Freight engine support bar and reinstall your acoustic/beauty cover on the engine. 26. Youre done. Get the truck aligned and enjoy saving around $600 changing the mounts yourself.
__________________
2005 X5 4.4i Build 04/05 Maintenance/Build Log Nav, Pano, Sport (Purchased 06/14 w/ 109,000 miles) (Sold 8/15 w/121,000 miles) 2006 X5 4.8is Build 11/05 Maintenance/Build Log Nav, DSP, Pano, Running Boards, OEM Tow Hitch, Cold Weather Pckg (Purchased 08/15 w/ 90,500 miles) 2010 X5 35d Build 02/10 Nav, HiFi, 6 DVD, Sports Pckg, Cold Weather Pckg, HUD, CAS, Running Boards, Leather Dash, PDC, Pano (Purchased 03/17 w/ 136,120 miles) 
|
| Sponsored Links | |
|
|
|
|
#2
11-04-2020, 01:30 AM
|
|||
|
|||
|
Ah-maze-balls.
Sensational write-up. Thank you so very much. This kind of pictorial and written description will be extremely helpful to future dooers. Glad to hear the wife likes wrenching a bit too. Keep up the great work. Sent from my Pixel 3 using Tapatalk
__________________
I swear, my cars are like a girlfriend. Sometimes its a rough ride, sometimes its smooth motorin'. Sometimes she doesnt like how i treat her and sometimes i dont like how she behaves. BUT at the end of the day, she loves it when I am inside her. _______________________ '91 850i '05 X5 4.4i '09 Clubman S
|
|
#3
11-04-2020, 07:07 AM
|
|||
|
|||
|
thanks for the write-up!
|
|
#4
11-04-2020, 12:49 PM
|
||||
|
||||
|
Quote:
Quote:
One of my next tasks is the alternator housing gasket as preventative maintenance. I'm not looking forward to that one at all. Oh, and "likes" is a strong word for how the wife feels about wrenching.  She loves to clean the interior and parts but does not really enjoy the more greasy work. She loves to clean the interior and parts but does not really enjoy the more greasy work.  Only reason she helped was because the work involved me being under the suspended engine. She wanted to be present to watch the carnage should the support bar give out. Only reason she helped was because the work involved me being under the suspended engine. She wanted to be present to watch the carnage should the support bar give out. 
__________________
2005 X5 4.4i Build 04/05 Maintenance/Build Log Nav, Pano, Sport (Purchased 06/14 w/ 109,000 miles) (Sold 8/15 w/121,000 miles) 2006 X5 4.8is Build 11/05 Maintenance/Build Log Nav, DSP, Pano, Running Boards, OEM Tow Hitch, Cold Weather Pckg (Purchased 08/15 w/ 90,500 miles) 2010 X5 35d Build 02/10 Nav, HiFi, 6 DVD, Sports Pckg, Cold Weather Pckg, HUD, CAS, Running Boards, Leather Dash, PDC, Pano (Purchased 03/17 w/ 136,120 miles)
|
|
#5
11-04-2020, 12:57 PM
|
|||
|
|||
|
That's a good wife.
Sent from my Pixel 3 using Tapatalk
__________________
I swear, my cars are like a girlfriend. Sometimes its a rough ride, sometimes its smooth motorin'. Sometimes she doesnt like how i treat her and sometimes i dont like how she behaves. BUT at the end of the day, she loves it when I am inside her. _______________________ '91 850i '05 X5 4.4i '09 Clubman S
|
|
#6
11-06-2020, 01:23 AM
|
|||
|
|||
|
Thanks for an excellent photo write up!
__________________
2005 X5 4.4i SterlingGrau, Sport Package, DSP Build 3/12/2005
|
|
#7
11-23-2021, 08:39 PM
|
||||
|
||||
|
Crystalworks, thank you for the guide. I appreciate your time and effort in putting it together. I just finished this job thanks to your help.
I have a question regarding the alignment. Is it necessary? My car is driving perfectly, and it seems as the bolts that go into the rack have almost zero play inside their mounting holes. Many thanks again.
|
|
#8
11-23-2021, 09:10 PM
|
||||
|
||||
|
Nice work and great write up!
I would think there would be some stress on the exhaust hangers? Did you consider loosening them as well? Funny your wife wanted to witness you crawling under a suspended engine.... If I did that the job would be suspended....indefinitely! At any rate, I'd opt for a jack stand under either side of the sub-frame. Those engine support bars make me nervous.
__________________
2003 4.4i black ext./black int./black headliner (kid's runabout) 2014 535d X-drive, M package, silver/black interior Sold but not forgotten: 2009 E70 35d, black ext./black int./black headliner (sold 2021) 2006 4.8iS Le Mans blue/cream int./black headliner, SOLD in 2012 sadly... Other hardware: 2015 Cayenne S (wife's new DD and definitely wroooommmmm) 2016 Tundra 1794 edition crew cab, luxo hauler 2005 Tundra crew cab, weekend hauler. Sold after 150k very happy miles.
|
|
#9
11-24-2021, 12:30 AM
|
||||
|
||||
|
Quote:
I did not have as easy as a time removing the bolts as crystal works described. Its tight, but doable. I was also solo, but a second pair of hands is always a big help. I really dont understand how this job is possible at all without dropping the subframe; at least on the N62. There is barely space to move the mounts out/in.
|
|
#10
11-24-2021, 02:13 PM
|
||||
|
||||
|
Quote:
I agree. Without dropping the subframe... job is not worth tackling for the headache you'd endure IMO. Quote:
Hah! The wife knows I am safe when I do things. She's seen it enough times to not be nervous anymore, though does still come check on me if she hears a tool drop or other loud noise. The subframe is still connected to the suspension too so it can't drop too far. 
__________________
2005 X5 4.4i Build 04/05 Maintenance/Build Log Nav, Pano, Sport (Purchased 06/14 w/ 109,000 miles) (Sold 8/15 w/121,000 miles) 2006 X5 4.8is Build 11/05 Maintenance/Build Log Nav, DSP, Pano, Running Boards, OEM Tow Hitch, Cold Weather Pckg (Purchased 08/15 w/ 90,500 miles) 2010 X5 35d Build 02/10 Nav, HiFi, 6 DVD, Sports Pckg, Cold Weather Pckg, HUD, CAS, Running Boards, Leather Dash, PDC, Pano (Purchased 03/17 w/ 136,120 miles)
|
|
| Bookmarks |
|
|
|
|


 Linear Mode


