
|
|
|
|
||||||||||
| Xoutpost server transfer and maintenance is occurring.... |
| Xoutpost is currently undergoing a planned server migration.... stay tuned for new developments.... sincerely, the management |
 |
|
|
LinkBack | Thread Tools | Display Modes |
|
#1
 05-31-2009, 11:03 AM
|
||||
|
||||
 [QUOTE] [QUOTE]If you have a 4.8 and want to install the aluminum running board kit, normally you have to buy the rear flares that work with the running board kit. This normally adds $400-$500 in cost. Then, if you want the front flares too that will add another $400-$500. So, that adds up to $800-$1000 more that you have to spend over the cost of the Aluminum Running Board Kit ($500-$600). I'm going to show you how to re-use the rear flares so all you need to buy is just the running board kit - just like 3.0 & 4.4 owners!  I will not go over how to remove them. The running board kit will have instructions on how to remove all the wheel arches. All that's entailed is removing some plastic rivets. So, here's what it will look like when you remove it. Notice the 6 metal clips that hold the flare to the wheel arch. 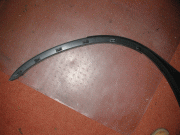 Remove the 6 metal clips. I used a small flathead screwdriver to pop them out (in the pic is a pointed one but the flathead is better). Insert the screwdriver into the side slots (looks like this > or <) and carefully pry the clips open to remove them. Separate the flare from the wheel arch.  Next make a stencil that will mark the location of the slots. You will need to make slots in the rear wheel arches that come with the running board kit. Then you can attach your old flares to it. Lay down the old flare on some cardboard paper. Traced the outside first to get the shape. Then keep cutting it until the stencil fits INSIDE the wheel arch. When its close to the proper fit, lay the cardboard inside and pressed it down until it makes creases on the edges - easy way to get the shape. My cardboard wasn't big enough so I had to make it out of 2 pieces then taped them together. You don't need an EXACT match. You only need to make sure that if fits inside BUT not move around. I used the pointed end section as my starting point and then kept fitting it inside from there. Once finished tape the stencil to the inside of the your old wheel arch. You only need to tape it near where there are slots. Turn it over so you can see the slots and use an exacto knife to cut slot openings into the stencil.  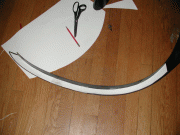 Afterwards, remove the stencil from your old wheel arch. Attach it, with tape, to the INSIDE of the matching rear wheel arch from your running board kit. Then use something to trace the slot opening onto the new wheel arch. I used a pointy screwdriver and scored the outline. Now take an exacto knife and cut the slot openings on the new wheel arch. The plastic is not very thick and soft enough. I started drilling it out but the exacto knife was faster.  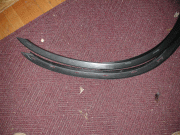 Take the flare and attach it to your new wheel arch. Now push in those metal clips and you're all done! Make sure when you attach the flare that it fits flush on the bottom (side towards the tire) and outside (side where the flare attaches). My slots turned out to be too low at first so the flare was sitting too low. So, I just cut the slots bigger on the top side only - so the flare would fit higher and be flush on the bottom. The slots don't have to be perfect. The corners of the metal clips keep it from moving in all directions. Here's the final assembly with the clips on. 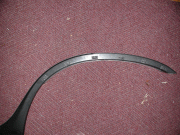  If you want running boards and rear flares only, buy this: Aluminum Running Board Kit = Part 51710017315 ($499 at BMW of Bloomfield, NJ) Then re-use the rear flares as shown above. If you want running boards, rear flares & front flares, buy these: Aluminum Running Board Kit = Part 51710017315 ($499 at BMW of Bloomfield, NJ) Front/Left Wheel Arch with flare = 51717051037 ($200 at BMW of Bloomfield, NJ) Front/Right Wheel Arch with flare = 51717051038 ($200 at BMW of Bloomfield, NJ) Then re-use the rear flares as shown above. Hope this helps and Good luck!  [QUOTE] [QUOTE]__________________________________________________ ____________ First of all, I have a 2006 X5 4.4i w/the Aluminum Running Boards that I had previously installed and decided to purchased: Part Number ------ Description ------------------------- QTY 51 11 7 073 517 -- MOUNTING PARTS SET (REAR SUPPORTS) -- 1 51 12 7 046 919 -- REAR SUPPORT BUMPER TRIM, LEFT------- 1 51 12 7 046 920 -- REAR SUPPORT BUMPER TRIM, RIGHT------ 1 51 71 7 051 035 -- FLARED WHEEL ARCH, REAR LEFT -------- 1 51 71 7 051 036 -- FLARED WHEEL ARCH, REAR RIGHT ------- 1 51 71 7 051 037 -- FLARED WHEEL ARCH, FRONT LEFT ------- 1 51 71 7 051 038 -- FLARED WHEEL ARCH, FRONT RIGHT ------ 1 Reading your post and after carefully inspecting the parts that came with the retrofit kit, it seemed as though one could just purchase the flares that are attacked to the wheel arches, rather than purchasing the entire redundant plastic piece. Are these flares even sold separately because they should since there's nothing to them...... In any case, I ended up purchasing all of the pieces stated above for $1K+!!. Since the rest of the wheel arch is identical to what I already have installed with my aluminum running boards, I was thinking of just removing the flares to new arches and adding these flares to what's already on my car. I think I can do this without even removing the entire wheel arch. I will just remove the 6 blind rivets on the wheel wheel and then pull to the arch to the side and cut the slots as shown on your post. It will be a heck of a lot simpler than removing the whole friggen thing? Also, does anyone have clear, step by step instructions on how to attach the "rear support bumper trim". The kit I purchased from Morristown did not come with a template and it looks like in order to attach the metal clips to hold these trims in place, I'll need to remove the bumper. Is there a better way? I don't plan on adding the rear 4.6 bumper anytime soon so will these rear support bumper trims look out of place like in this picture?  Any suggestion on how anyone has done it will be most appreciated. BTW, very nice write-up!!
__________________
 '06 X5 4.4i w/Sterling Gray/Black Dakota Leather, Premium, Sports, Cold Weather, Rear Climate, Heated Steering, Nav, CD Changer w/MP3, Escort Passport 9500ix, BMW Valve Stem Covers, Aluminum Running Boards w/Flared Wheel Arches, AUX Input, Hood Protector, Titanium Grill/Hood Vents & Titanium Rings on Inst. Cluster, Decorative Front Skid Plate, AC Schnitzer pedals/shift knob, Rear Bumper Protector, Chrome Exhaust Tips, '20 Vredestein Ultrac Tires on Style 214's '06 X5 4.4i w/Sterling Gray/Black Dakota Leather, Premium, Sports, Cold Weather, Rear Climate, Heated Steering, Nav, CD Changer w/MP3, Escort Passport 9500ix, BMW Valve Stem Covers, Aluminum Running Boards w/Flared Wheel Arches, AUX Input, Hood Protector, Titanium Grill/Hood Vents & Titanium Rings on Inst. Cluster, Decorative Front Skid Plate, AC Schnitzer pedals/shift knob, Rear Bumper Protector, Chrome Exhaust Tips, '20 Vredestein Ultrac Tires on Style 214's"BMW El Placer de Conducir"
Last edited by chile1; 06-12-2009 at 02:00 PM. 
|
| Sponsored Links | |
|
|
|
|
| Bookmarks |
|
|
|
|


 Linear Mode


