
|
|
|
|
||||||||||
| Xoutpost server transfer and maintenance is occurring.... |
| Xoutpost is currently undergoing a planned server migration.... stay tuned for new developments.... sincerely, the management |
 |
|
|
LinkBack | Thread Tools | Display Modes |
|
#1
 03-06-2010, 04:02 AM
|
|||
|
|||
|
Instrument Cluster Disassembly
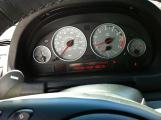
I am in the process of doing a pixel repair and chrome ring installation on my 2001 X5 4.4. I looked around the forums for instructions on how to get the cluster out and disassemble it. Nothing really available, but it turns out that removing the cluster from the car is very easy - just 2 torx screws above the cluster. Disassembling the cluster once out is another story .... I've attached 2 pics. Does anyone know how to remove these X shaped plastic lug things ? I've tried gently turning them a few times but they're not budging. I'm wondering if these X shaped lugs and the other clips (circled to the left on the second pic) need to be manitupated and removed at the same time ? If so I'm afraid I'm about 2 hands too short ....
__________________
2001 X5 4.4i 
|
| Sponsored Links | |
|
|
|
|
#2
03-06-2010, 10:25 AM
|
|||
|
|||
|
The X things need to be bent. Just torque them until they stay lined up with the holes. It's not something that comes out, it's all one piece that doesn't move. If you break them, it doesn't really matter as the thing is still held in with clips. I just left mine lined up. Also, I recommend going this route to clean/replace your ribbon cable: Google Translate
Drilling the holes is the easiest option so you don't have to mess with the needles. If you really want to do it without drilling holes, you need to take pliers and grab the shaft of each needle from behind right between the motor and the PCB and then pull the cap off (try not to twist too much or you'll screw up the spring). To make it easier to replace the needles, move the needle (usually has to be pulled past the little pin) counter clockwise until you feel it stop. Once you know where the needle should be at the stop, you can line it up at that stop when reinstalling it. Otherwise you have to run the car and calibrate it. RPM, fuel and coolant are easy, the MPG and speedo are difficult. RPM should read about 500 at idle when the car is warm, coolant should be in the middle when car is warm and fuel should be at full when the tank is full. You would need GPS or someone driving beside you to calibrate speed and MPG is pretty much impossible I think. I guess you could floor it before taking it out and see where it peaks and make note of that, then try it after installing the needle and see if it ends up in the same spot.
|
|
#4
03-06-2010, 11:00 AM
|
|||
|
|||
|
I wouldn't say almost impossible (since I did it by myself), but it can get quite frustrating trying to pull the back housing off and trying to push in the tabs that hold the connectors in at the same time. You need to keep tension on the housing or the tabs just slide back into place. Definitely take your time and make sure you understand everything before doing it. Also, I would pour a little goo gone or some sort of adhesive remover into the seam of where the LCD ribbon connects with the PCB after removing the 4 screws holding the LCD housing. That way, when you pull out the LCD, it should come off cleanly instead of ripping all the traces off. They do sell a new ribbon for ~$40 that you can get on ebay in case yours is trashed.
|
|
#6
03-06-2010, 06:00 PM
|
|||
|
|||
|
TrickerZ - thank you very much. A very useful post indeed.

__________________
2001 X5 4.4i
|
|
#8
03-07-2010, 05:29 PM
|
||||
|
||||
|
__________________
650hp 10 X5///M - Stage 2, Vibrant 1794's , gutted cats, custom intake, AC Forged 22's 325hp 98 BMW 740iL - ///M5 6spd, www.bavengine.com w/ Performance Option, electric fan, CF intake tube w/ heatshield, Mag 14816 w/ notched bumper, Bilstein/H&R Stage II/Powerflex 600+hp 02 Harley F150 - MHP900 Stage 3 engine, KB2.3, 8# lower, 60# inj, Walbro FP's 135hp 01 TL1000R - M4 full exhaust, K&N, Yosh box, -1/+2 gears, 2CT's
|
|
| Bookmarks |
|
|
|
|


 2001 X5 4.4i WHITE-Loaded like a baby's diaper SOLD


 Linear Mode


