
|
|
|
|
||||||||||
| Xoutpost server transfer and maintenance is occurring.... |
| Xoutpost is currently undergoing a planned server migration.... stay tuned for new developments.... sincerely, the management |
 |
|
|
LinkBack | Thread Tools | Display Modes |
|
|
|
#1
 02-16-2011, 05:19 AM
|
||||
|
||||
|
Hey all, long time reader, first time poster.
I purchased my 2006 BMW X5 3.0d in December '10, after trading in a 2008 Dodge Nitro SXT CRD. No comparison, I'm a BMW fan! Anyway, I run a rather large car audio website in Australia, so have a keen interest in upgrading the audio entertainment. Below is what I have completed in the last few weeks. The car in the yard (before any mods)   Interior:  My X5 is a non-DSP version which makes life a little easier for me. So first things first were to rip out the factory tweeters up in the dash. For those not familiar with the Morel Supremo Tweeter, it has a rather large baffle, much bigger than the width of the factory tweeter grill. Standard Morel Supremo:  So I removed the baffle from the Supremo, and made a new 6mm MDF baffle that I grafted onto the top of the factory tweeter grill.   Next along came a wheel change as I wasn't big on the 19" factory alloys. Truth be told, I wanted the same wheel in 20" and I probably would have been happy. Unable to find a lot of options here in Australia, I settled for these which I have since grown to love.  Back to the stereo ... I am running a 3 way active front stage (Tweeter, Midrange, Midbass) so the best option for mounting dedicated midrange drivers was the 'A' sails. This was relatively straight forward, making a 12mm recessed baffle for the Morel CDM88 midrange driver to sit in, and then grafting that to the factory trim.     There's a process many of you may not have heard of, but will have seen called 'flocking'. It what the other part of your door rubbers, around windows etc is covered in, that sort of looks and feels like velvet / suede. It's sprayed on. I had these trims flocked, and they are now in place looking very 'factory' IMO.   Next on, I ran all the cable from the rear, through to the front of the car. I didn't get a chance to get any photos this, but three pairs of speaker cable down each side of the car, all loomed and cloth taped to look factory. Factory tweeter upgrade:  I'm using an Audison BitOne processor. This means I can pick up the input just before the factory amp (under the floor), and solder RCA plugs straight on, and use that as my input to the processor. From the processor, not only can I set all my crossovers and equalisers, but it also gives me plenty of outputs to run active into my amplifiers. I mounted it into the right hand side panel behind the trim.  I then removed the factory floor, made an exact replica out of 16mm MDF and dropped it back in (transferring the lift housing, brackets and clips). Poor quality photo sorry:  I had a cabinet maker build the subwoofer enclosure to the recommended specification for the woofers I am using. I designed the enclosure to fit perfectly behind the seats, and be held down by the rear extendable privacy cover. This was then trimmed by a friend who's an auto upholsterer, who matched the carpet, and color and texture matched the vinyl to the factory leather.  The subwoofers I am using are out of Indonesia, 'Crescendo' 10" Woofers. Please see the review on my website here: REVIEW Crescendo Etude 2.10 10” Subwoofer Back to the car, my suspension arrived. I installed Eibach lowered springs. Only subtle, but now rides better than the factory springs for comfort, and has certainly reduced some of the body roll I was experiencing.  The subwoofer enclosure in place, amps in place and false floor in production:   Fitting the woofers:  Mark from Frankston Car Audio made some nice little trim rings for me to hide the unusual basket shape of these woofers:  I should have pointed out earlier, that I designed this so as to still retain the spare wheel and full functionality.  Basically you drop the back seats. Remove the rear privacy cover, roll the subwoofer enclosure onto it back, and lift the false floor. Just like factory still.     That's pretty much it. As some may have noticed I have not upgraded the factory midbass door speakers as yet. I needed to have this done to go away on holiday in it this week. The door speakers will require extensive modifications so I have kept that as a seperate project that I will update this thread with in a few weeks time. This is also my practical day to day installation that I can still cart things around in, and remove the subwoofer enclosure very easily. I will be making a second interchangeable installation soon, that is full show with fibreglass, carbon fibre and factory leather. A last pic:  A few thank you's for use of the workshops and their advice: Mark @ Frankston Car Audio Michael @ Riverside Customs Tim @ Sew Fine Interiors As soon as I get back from holiday I am booked in for a Remus exhaust and Tunit chip. That should improve the power a little, and give it a nicer note. Thanks for reading, and I will keep this thread up to date as progress happens. Last edited by MRTEK; 02-16-2011 at 08:23 AM. 
|
|
#2
02-16-2011, 07:52 AM
|
||||
|
||||
|
Great job on the X5! I think there is something very wrong though...
The steering wheel is on the wrong side! 
__________________
2009 E70 White w/black int 2006 E53 X5 4.8is Sold 2000 SVT Cobra R #193 2003 SVT Mustang convertible
|
|
#3
02-16-2011, 09:15 AM
|
||||
|
||||
|
Great job, I enjoy seeing things done right and with care.

__________________
"When you do things right, people won't be sure you've done anything at all" (Bender, futurama) You make something idiotproof, they'll make a better idiot You think professional is expensive, just wait until you pay for amateur. Never let your sense of morals prevent you from doing what is right. Examine what is said, not who speaks. X5 pics RIP 4.6is..... 2003 4.6is 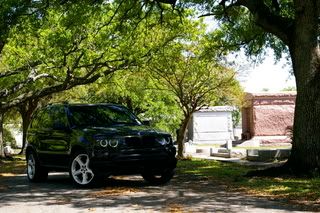
|
|
#4
02-16-2011, 10:10 AM
|
|||
|
|||
|
Fantastic looking install, very good craftsmanship! I was just thinking looking at it "I bet the lower flap of black plastic that slides out on the liftgate rattles like hell". Did you take steps to secure that somehow?
__________________
~2003 X5 4.4i~
|
|
#5
02-16-2011, 10:33 AM
|
||||
|
||||
|
Great post and superior workmanship if I were "down under" I'd come to your shop with confidence. Keep us posted on other mods and welcome to the forum.
__________________
Current Rides: 2017 (F15) X5 50i M-Sport 2015 (I01) i3 2010 (K46) Motorsport S1000RR Retired: 14 (F25) Alpine White 3.5i MSport, 2005 (E53) Imola Red 4.8is, 95 (E36) Boston Metallic 325i
|
|
#6
02-16-2011, 03:16 PM
|
||||
|
||||
|
Where did you get the exhaust covers?
__________________
[Sold] 2004 X5 4.4i - Sterling Gray - Truffle Brown, Sport, Preminum, Rear Climate, DSP, Sirius, PDC, 132's (19 inch wheel), Comfort Seats Dynavin, JL Audio Stealthbox, Alpine PDX-5 Amp
|
|
#7
02-16-2011, 03:49 PM
|
|||
|
|||
|
I was looking at the exhaust cover too wondering where the tailpipes went. Awesome install also. I think the thing I really enjoy about this forum is that the members take a lot of pride in adding to their vehicles. Not just slapping stuff together to make it rattle windows. Good on ya for taking the time to show us pics through the process.
__________________
If you can still see the disapointment on his face in your rear view mirror, he's not far enough behind. 98 M3 Sedan blk/blk Sold 00 BMW 540i Sold 03 BMW 4.6IS 98 BMW E36 M3 modified
|
|
#8
02-16-2011, 05:35 PM
|
||||
|
||||
|
superior workmanship.
Quote:
http://www.xoutpost.com/61747-post1.html
|
|
#9
02-16-2011, 04:17 PM
|
||||
|
||||
|
Thanks for the comments all. That was about 5-6 solid days work (but over about 3 weeks). The quality of an X5 just makes you want to do thing properly.
There are absolutely no rattles at all, and I have not had to add any sound deadening as yet, but I will on the next stage of the installation. As for the sound... this is not a doof doof car. It's a sound quality audio system capable of competing in SQ competitions (and I will after many many nights of tuning with an RTA and oscilloscope). Exhaust covers? Ugly aren't they? Standard 3.0d. My Remus exhaust will fix that and see the tail pipes where they should be, behind the car, not behind the bumper! The best part of this installation, is everything is 100% reversible come time to sell the car if I choose to return it all to stock.
|
|
#10
02-16-2011, 05:48 PM
|
||||
|
||||
|
Quote:
__________________
Kirk Las Vegas 2016 X5 40e Mineral White/Black Dakota Leather, ZLL, ZCW, ZDA, ZDB, ZPP, multi contour seats, rear side window shades, HK stereo 2011 E90M3, 6-speed manual
|
|
| Bookmarks |
|
|
|
|


 Hybrid Mode


