
|
|
|
|
||||||||||
| Xoutpost server transfer and maintenance is occurring.... |
| Xoutpost is currently undergoing a planned server migration.... stay tuned for new developments.... sincerely, the management |
 |
|
|
LinkBack | Thread Tools | Display Modes |
|
#1
 11-29-2012, 09:15 AM
|
|||
|
|||
|
Front & Back Badge Replacement - How to
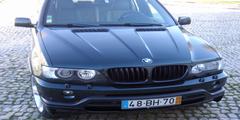
My front BMW (UK Model) badge was rather worn and tatty & therefore decided to replace both the front and back badges, but not with the original BMW colour badges, but black carbon badges. Searching on ebay,most sellers were selling the X5 front bagde as 82mm and the rear badge as 72mm/73mm, but the correct size for the rear is 78mm. Front badge size: 82mm Rear badge size: 78mm Tools: Flat head screwdriver, old credit card, sticky pads/double sided tape Time: 10mins Front Badge: The front badge is simply attached to the bonnett with 2 pins on the back of the badge, inserted into 2 holes on the bonnett. You simply have to prise the badge off. I found that placing the card between the badge/bonnett, prevented you from damaging the bonnett with the screwdriver. Original front badge.  Front badge removed.  Replacement front badge.  Rear Badge: The rear badge is also attached to the boot with 2 pins on the back of the badge, inserted into 2 holes on the bonnett, but also sticky tape (didnt come with replacment rear badge). You simply have to prise the badge off, with a little bit more force due to sticky stuf. As with the front, I found that placing the card between the badge/boot, prevented you from damaging the bonnett with the screwdriver. Original rear badge.  Rear badge removed.  Replacement rear badge.  Thats it, quick, simply and maximum effect. 
|
| Sponsored Links | |
|
|
|
|
#2
11-29-2012, 09:45 AM
|
||||
|
||||
|
Congrats Mate!! did you take it out for a picnic afterwards????

__________________
GEORGE "EVERY FORM OF REFUGE HAS IT'S PRICE" 2002 4.4i BMW X5 - 166K Topaz Blue Ext/ Tan/Beige Leather Int 1994 Nissan Pathfinder SE 132K Black Ext / Grey Leather Int
|
|
#3
11-29-2012, 01:08 PM
|
||||
|
||||
|
Great info...thanks.
Which emphasizes why it's always good to search & buy parts from non BMW dealerships by using the BMW 11 digit part nbr. Some BMWs use the same size Roundel on the hood/bonnet & trunk/boot...where as some have a smaller Roundel on the trunk/boot. And as you've indicated in this thread...there are multiple "smaller" trunk/boot Roundels. The e53 X5 trunk/boot Roundel part nbr is 51 14 1 970 248 and was only used on the:

__________________
Become a BMW CCA member! Click HERE to join and feel free to use my BMW CCA member #191509 as a referral.

|
|
#4
11-29-2012, 01:53 PM
|
|||
|
|||
|
Quote:
|
|
#5
11-29-2012, 02:04 PM
|
||||
|
||||
|
Thanks Brotha - I TRY!!!
 Quote:
__________________
GEORGE "EVERY FORM OF REFUGE HAS IT'S PRICE" 2002 4.4i BMW X5 - 166K Topaz Blue Ext/ Tan/Beige Leather Int 1994 Nissan Pathfinder SE 132K Black Ext / Grey Leather Int
|
|
#6
03-16-2015, 09:51 AM
|
|||
|
|||
|
For "ny x5 guy"
|
|
#7
03-16-2015, 01:48 PM
|
||||
|
||||
|
Hi ,Darkstranger,nice simple write up!Kind of you to take the time to do it
 Just to to add more info to your thread,I replaced my OE roundels a a year ago,not because they were tatty but I wanted the black CF look. You right about the sizes,but if anyone does get a 73mm rear roundel by mistake ,its a perfect fit to replace the roundel on the 3.0D engine cover Bought both roundels from different Uk sellers and unfortunately the rear roundel didnt last long !Became yellow and ,moisture got in between the clear coat!I didnt want to risk another one ,so I decided to fit some 3D CF vynil over the "blue" and looks just fine to me!The front roundel is still ok but if it goes ,I will do the same thing to it. Hope you were luckier than I was and yours lasts much longer . Heres the photo of my OE roundel ,vynil wrapped (sorry for the unclean car!But I did wipe the roundel for the photo )
__________________
 2003 BMW X5 E53 3.0D-Auto, Sportpack,full extras. Oxford green/Leder Dakota interior. 56, 875miles @24th October 2024 Heavily OE modded,including full facelift grill install.4.6is body kit,wheels,exhaust tips and ext.fender flares Non OE mods.Depo "custom" Angel eye headlights. Last edited by powers1; 03-16-2015 at 01:53 PM.
|
|
#8
03-17-2015, 05:15 PM
|
|||
|
|||
|
Thanks for the write up, my badge went from looking 100% normal one day to having no paint at all left on it and just shiny mirror like plastic. ordered the replacement part and 3m trim tape, nice tip about using a credit card so as not to mar the surrounding bright work.
|
|
| Bookmarks |
|
|
|
|


 Linear Mode


