
|
|
|
|
||||||||||
| Xoutpost server transfer and maintenance is occurring.... |
| Xoutpost is currently undergoing a planned server migration.... stay tuned for new developments.... sincerely, the management |
 |
|
|
LinkBack | Thread Tools | Display Modes |
|
#1
 03-20-2014, 02:22 PM
|
||||
|
||||
|
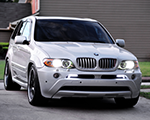
Headlight Restoration Project

__________________
Indy Shops: Berkeley: German Auto Sport Phoenix: Babbitt Motor Werks | Arizona Bimmer Motor Works Reno: Reno Rennsport Rides: 00 BMW X5 4.4 93 Nissan 300ZXTT 88 Nissan 300ZXT Shiro #853 88 Nissan 300ZXT Shiro #773 84 Nissan 300ZXT 50th AE 78 Datsun 280Z Black Pearl 15 Yamaha WR250R 06 Yamaha R1 AE Email: WE350Z at gmail 
|
| Sponsored Links | |
|
|
|
|
#2
03-20-2014, 02:38 PM
|
||||
|
||||
|
Nice work on them man.
Now put a fresh coat of sealant on them and you should be good!
__________________
2018 Ram 2500 6.7L Cummins 68RFE 19k miles -Bright White/Black - Big Horn Sport - Crew Cab Short Bed 2013 X5 35D (CEO's) - Born on 5/17/2013 - 82k miles - Alpine White/Cinnamon Brown/Premium Pkg, Sport Activity/Premium Pkg and Sound/20" Style 214/Running Boards
|
|
#3
03-20-2014, 02:39 PM
|
|||
|
|||
|
youve given me hope again. my lens's i felt were past fixing.. i didnt wanna use a 200 pad tho.. i have 1000, but maybe i will go to a 600 and work up from there. i initially used a 2000 grit.. less than spectacular results. plus i used my hand to sand.. ok im gonna try your method..
|
|
#4
03-20-2014, 02:48 PM
|
||||
|
||||
|
I think you need to start with a low grit to knock the heavy oxidation off. There is plenty of plastic and if you cover with vinyl you should never need to do this again (just replace the vinyl when it gets gnar).
I can still see very faint scratches so not sure if I need to go over it with the buffer again. I'm afraid of burning the lens. I think it's impossible to get it perfect, but at least now I have a fairly clean lens. I also think covering it with the light smoke vinyl will further hide any imperfections. Any way you cut it (haha) it's light years better than it was and it should make a HUGE improvement to the vehicle.
__________________
Indy Shops: Berkeley: German Auto Sport Phoenix: Babbitt Motor Werks | Arizona Bimmer Motor Works Reno: Reno Rennsport Rides: 00 BMW X5 4.4 93 Nissan 300ZXTT 88 Nissan 300ZXT Shiro #853 88 Nissan 300ZXT Shiro #773 84 Nissan 300ZXT 50th AE 78 Datsun 280Z Black Pearl 15 Yamaha WR250R 06 Yamaha R1 AE Email: WE350Z at gmail
|
|
#5
03-20-2014, 02:56 PM
|
||||
|
||||
|
Nice work!
__________________
 X5 4.6 2002 Black Sap, Black interior. 2013 X5M Melbourne Red, Bamboo interior X5 4.6 2002 Black Sap, Black interior. 2013 X5M Melbourne Red, Bamboo interiorDallas
|
|
#6
03-20-2014, 04:08 PM
|
||||
|
||||
|
Good work.
You need to change your screen name, BTW. No more Z33 right?
__________________
 00 E39 DINAN S1 //M5 (82k miles) 06 E53 DINAN 4.8iS, born 2/18/2006 (126k miles) http://www.xoutpost.com/bmw-sav-foru...s-my-dslr.html 90 Straman Z32 TwinTurbo Convertible, (1 of 44 ever made) 5 speed, 444rwhp/451rwtq 01 360 Novitec Spider F1 (26k miles)
|
|
#8
03-20-2014, 08:10 PM
|
||||
|
||||
|
Quote:
|
|
#9
03-21-2014, 09:02 AM
|
|||
|
|||
|
Great job! I so need to do this also. The store bought "kit" (hey, it was on sale so I tried) was less than successful, what a waste of money. I could've bought lots of wet dry sandpaper instead. Not even steelwool worked although what I have is more for final polishing. Thanks for the inspiration of what can be!
|
|
#10
03-21-2014, 01:26 PM
|
||||
|
||||
|
For others considering the project.
I used the 3M kit for a power drill. I tried several one step options that didn't do squat and will be added to the stuff in the garage I never use. I had to use a little more course sandpaper to remove the clear coat than the 3M kit came with because I wanted to finish the project in this century. I learned from the first headlight I had to be very careful to remove only the coating with the courser stuff. I had two meals in the garage because I didn't go to the 3M paper soon enough on the first one. It was much easier to get a scratch free lens if I didn't spend that much time on the the first stage of the 3M kit. The second lens looked so much better when I was done I decided I must have only dreamed I worked on the first. I removed it and pinched myself several times until I got it right. I had no problem with burning a lens though I always kept the drill moving at least a bit. I don't know the drill RPMs but it was always redlined. I did all of the sanding dividing the headlights into four sections working one section at a time until I got it where it should be for that stage. I did the final two stages in even smaller sections. I used very little compound in the last two stages and keep the pad wet enough to spatter anything within 5 feet and then buffed that section until the the pad dried out and I could see very little compound on the lens. It seemed that some heat in the lens from buffing helped the process. At the very least it made me feel like I was making progress. I could see the symbol of infinity in the lens before I got the first one done. The second one took about the same time it takes me for a round trip to Lowe's including wandering the isles. I didn't use a clear paint version coating on the finished lens, right or wrong, it didn't seem to me that process would be as effective longterm and it would be the first time I was able to get a coating imperfection free, flow out evenly. The original coating had only spider webbed some but had not yellowed. I decided that was because of the stuff I have always used on the headlights as well as the paint. More than that it saved me that trip to Lowe's and the usual $$$ of stuff I end up buying that is not on my list. I used 5 coats of Zaino polish and the sealer and the shine enhancer as a coating.
__________________
X5 4.6 2002 Black Sap, Black interior. 2013 X5M Melbourne Red, Bamboo interiorDallas Last edited by bcredliner; 03-26-2014 at 01:54 PM.
|
|
| Bookmarks |
|
|
|
|


 Linear Mode


