
|
|
|
|
||||||||||
| Xoutpost server transfer and maintenance is occurring.... |
| Xoutpost is currently undergoing a planned server migration.... stay tuned for new developments.... sincerely, the management |
 |
|
|
LinkBack | Thread Tools | Display Modes |
|
#1
 04-09-2013, 02:08 AM
|
||||
|
||||
|
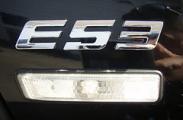
DIY Rear Roundel emblem removal and replaced
I've notice the rear roundel was cracking and pealing and needed replacing.  Old tired Roundel needs to go.  1st - Get some fishing line and start to separate the roundel from the strong double stick tape underneath. You don't need a hair dryer or blower and I did this on a 50 degree spring evening. 2nd - After you run it through a couple of times, I used a flat plastic pry tool and towel to pop out the roundel.  3rd - Use a small needle nose pliers to remove the 2 black grommets. 4th - remove the double stick tape if it did not come off the roundel and clean up with some goo-gone.  5th- reinsert two new grommets and the shinny new Roundel. Press and hold for about 1 min and clean up. Pic below of new(left) old (right). You cant see the cracking from the glare but look at the first pic for proof. The new roundel comes with double stick tape ready to go underneath the white wax paper.  Part numbers: 51-14-7-157-696 = emblem rear 51-14-1-807-495 = grommet (2) $23 total Thought it would be tougher but only took 10mins including cleanup. Did a search here but didn't find what I was looking for so I hope this helps others in the future. 
Last edited by balx5; 04-09-2013 at 04:41 AM. 
|
| Sponsored Links | |
|
|
|
|
#4
04-10-2013, 09:38 AM
|
||||
|
||||
|
damn and people often pay so much money "just for the badge"!

__________________
'08 X5 3.0si - Alpine White / Saddle Brown interior Specs: Sport Pkg, Premium Pkg, Tech Pkg, Comfort Access, Aero Kit, Style 433 staggered 20s on Conti DWS Mods: Carbon 35 tint, LED angel eyes, GP Thunder 7500k fogs, H&R 20mm/25mm spacers, clear reflectors, gunsmoke-tinted taillights Coded: Digital speedo, windows/sunroof/tailgate close via keyfob X5 pics at Flickr
|
|
#5
04-10-2013, 10:26 AM
|
||||
|
||||
|
I need to replace mine, does anybody know if the process is the same for e53?
__________________
'06 X5 4.4i| (08/06 built date) | Executive Edition | Sport Package '08 X3 (wife's ride) - Sold '05 325i - Sold '03 325i - Sold _______________________ projecttechnik.com - Alberta BMW Forum
|
|
#6
04-10-2013, 12:32 PM
|
||||
|
||||
|
Quote:
For the rear you need just remove the logo not the base by using some fishing line and start to separate the roundel from the strong double stick tape underneath.
|
|
#7
03-12-2014, 03:40 AM
|
|||
|
|||
|
Quote:
I want to take it off and paint it then put it and the roundel back on. I remove the screw behind the roundel but it doesn't seem to release the backing part. Are there screws under the trunk trim panels inside or is it also "glue taped" on? Thanks
__________________
I love this forum!!!! Alan 1999 BMW 328i sedan with auto...In progress... 2002 BMW X5 3.0i with auto...In progress... 2007 BMW Z4 3.0i 6 speed manual...In progress...
|
|
| Bookmarks |
|
|
|
|


 Linear Mode


