Home Forums Articles How To's FAQ Register
Go Back   Xoutpost.com > BMW SAV Forums > X5 (E70) Forum
Fluid Motor Union
User Name
Password
Member List Premier Membership Today's Posts New Posts

Xoutpost server transfer and maintenance is occurring....
Xoutpost is currently undergoing a planned server migration.... stay tuned for new developments.... sincerely, the management


Reply
 
LinkBack Thread Tools Display Modes
  #11  
Old 02-06-2015, 06:15 PM
Member
 
Join Date: Dec 2009
Location: Atlanta
Posts: 47
golf4dj is on a distinguished road
No problem with reusing the ones you have. No need to replace. Good luck let us know how it goes.

Sent from my SAMSUNG-SM-N900A using Tapatalk
Reply With Quote

Sponsored Links

  #12  
Old 02-06-2015, 09:57 PM
SmartSolution's Avatar
Member
 
Join Date: Aug 2014
Location: Maryland
Posts: 43
SmartSolution is on a distinguished road
Got it! Thanks for the info.

A few weeks back when I did an initial inspection under the cover I noticed the breather hose insulation was torn. I'm guessing it's ok since the X5 runs fine and gets lots of highway miles. I'll just hope it's not too brittle and break when removing because I didn't order one. Whoever worked on it did a bad job. My leak seems to come from a prior leak around the eccentric sensor that was a patch job so I'm replacing the whole VC with a new one.
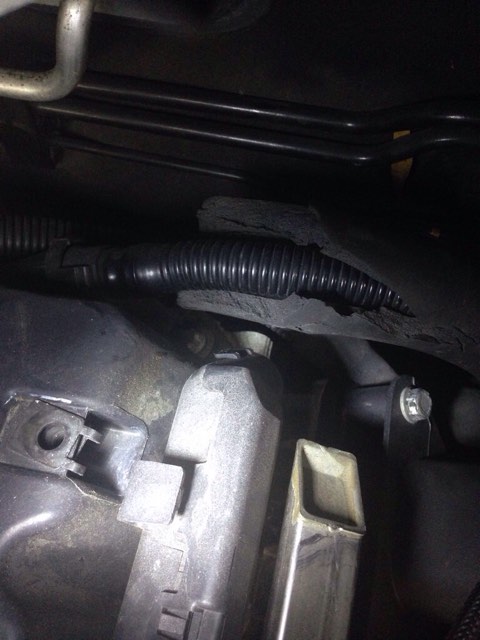
Name:  ImageUploadedByTapatalk1423274122.952993.jpg
Views: 433
Size:  52.6 KB
Name:  ImageUploadedByTapatalk1423274247.093702.jpg
Views: 513
Size:  49.4 KB
Reply With Quote
  #13  
Old 02-06-2015, 10:21 PM
Member
 
Join Date: Dec 2009
Location: Atlanta
Posts: 47
golf4dj is on a distinguished road
I replaced the valve cover gasket, essentric shafts sensor seal and the valvetronic motor seal. All where pretty straight forward to replace once the valve cover was off. Unless the valve cover is damaged not sure it needs to be replaced.

As it relates to the breather hose I really struggled disconnecting it from the valve cover. I probably spent an hour trying to follow the video instructions that didn't work for me. I was able to insert a screw driver between the valve cover and the hose connecter and was able to press the tab release with the screw driver on one side and my fingers on the other and it came right apart. However, in order to push the tabs in to release the hose i needed to push the house as if i were reinstalling it and then it came right off without much effort at all.
Reply With Quote
  #14  
Old 02-06-2015, 11:11 PM
SmartSolution's Avatar
Member
 
Join Date: Aug 2014
Location: Maryland
Posts: 43
SmartSolution is on a distinguished road
Thanks for the tips! I will replace the ESS because I have a new one and one of the tabs on the current one is slightly cracked but holding well. There was no oil on the current ESS so I may glue it back then keep it as a back up or sell it. This thread has been very informative.
Thanks golf4dj!!!
Reply With Quote
  #15  
Old 02-14-2015, 03:04 AM
Member
 
Join Date: Jan 2014
Location: Bay Area
Posts: 4
leonbtwo is on a distinguished road
I just finished my valve cover gasket change this weekend. Removing the metal bracket which took an extra 2 minute made all the difference in the world when it was time to remove my valve cover. It was a struggle at first the the bracket in place.

Here's more picture for references. I still had bracket installed when this picture was taken.


Quote:
Originally Posted by golf4dj View Post
OK, follow-up post. I was able to put everything back together yesterday with no real problems following the DIY video linked in the first post and reversing the order that I took things apart. Everything works great and job is done!!!!!


Couple of notes that may help others. The DIY videos from the X3 are great but there is a couple nuances with our X5 3.0si.

1. There is a metal bracket on the back rear portion of the valve cover (circled in first picture on this post) that serves no other purpose than to attach the decorative cover on top of the engine. I did not realize it but I bent this bracket inwards at least 1/2 to 3/4 inch when removing the valve cover to clear a couple AC lines. I did not realize that I had bent bracket until I tried to attach the decorate engine cover and it would not fit before bending it back into place. Anyway, the bracket appears to be attached to the valve cover with 2 torx screws. Removing this bracket would allow the valve cover to come off with relative ease. It will be very difficult to see and remove these screws but I believe very worthwhile. I spent over 3 hours just trying to get the valve cover off before pulling like heck and bending that bracket. Others have likely seen a video where someone actually removed the AC lines to get the cover off on their X5. I don't have equipment to bleed the AC system so that was not a desirable option. I am pretty sure that removing the bracket would solve the problem.

2. I also removed the plastic cover that was protecting the 2 flexible electrical conduits (second picture in this post). This allowed me even more room.

3. Most of the bolts have a pressed fitting that slides into the valve cover. Most are the same shape and size with the exception of two bolts (back left corner of valve cover and front right corner of valve cover if I remember right). The individual from the DIY video in the first post indicates that these can be removed completely from the valve cover during removal (they can and I did). The problem is lining the bolts back up and seating them within the valve cover if the valve cover is in its place (not much room, difficult to see and get leverage). I could not get the back left corner bolt to seat into place and had to remove the valve cover again and set those bolts before re-positioning the valve cover. If you remove all the bolts during removal I would recommend that you re-seat the ones in the hard to reach places before setting the valve cover back on.

4. I would recommend investing in a 1/4 torque wrench. Hard to believe how light the torque setting of 6NM (53 inch lbs?) really is. I read where several individuals broke the bolts and I can see why. Harbor Freight may be your friend here as places like HD, Lowes and the Auto Parts Stores don't really stock these and if they do they run around $60 - $70 on the low end. I purchased one from Harbor Freight for $15 on sale.

Final thoughts. The Oil Filter Housing gasket repair was quite simple and easy following the DIY video from same guy linked above (took me about 1 1/2 hours). The valve cover gasket replacement while not very difficult requires a lot of patience and perseverance. I spent the better part of a day and a half getting it all done with at least half of that associated with things I got stuck on. An Independent quoted me just over $1100 to replace valve cover gaskets, spark plugs, and the oil filter housing gasket. I would do it again if I had to thinking it would only take about 3 - 5 hours. Hopefully this thread will help others.

DJ
Attached Images
 
Reply With Quote
  #16  
Old 02-14-2015, 03:21 AM
Member
 
Join Date: Jan 2014
Location: Bay Area
Posts: 4
leonbtwo is on a distinguished road
Just in case anyone is changing their oil filter housing gasket while your in there. I actually came up with a clever way to remove it without having to remove my whole manifold. I was able to get to the inner bolt right below the manifold by first loosing it with an 8mm wrench from the top. After that i took a 8mm socket attached to a flat head screw drive with tape to keep it from falling apart. This gave me the angle i needed along with the thinnest to get into the tight spot.
Attached Images
   
Reply With Quote
  #17  
Old 02-14-2015, 08:46 AM
Member
 
Join Date: Dec 2009
Location: Atlanta
Posts: 47
golf4dj is on a distinguished road
Great to hear you were able to remove that bracket from the back left corner of the valve cover.

Good job on the oil filter housing. You can definately get to that bolt without removing the manifold.

Sent from my SAMSUNG-SM-N900A using Tapatalk
Reply With Quote
Reply

Bookmarks


Posting Rules
You may not post new threads
You may not post replies
You may not post attachments
You may not edit your posts

BB code is On
Smilies are On
[IMG] code is On
HTML code is Off
Trackbacks are On
Pingbacks are On
Refbacks are On


All times are GMT -4. The time now is 11:27 AM.
vBulletin, Copyright 2026, Jelsoft Enterprises Ltd. SEO by vBSEO 3.6.0
© 2017 Xoutpost.com. All rights reserved. Xoutpost.com is a private enthusiast site not associated with BMW AG.
The BMW name, marks, M stripe logo, and Roundel logo as well as X3, X5 and X6 designations used in the pages of this Web Site are the property of BMW AG.
This web site is not sponsored or affiliated in any way with BMW AG or any of its subsidiaries.