DIY: 2006 BMW X5 3.0i Fuel Filter
The other thread is here. You
need to read this thread below in detail!!!
---> http://www.xoutpost.com/bmw-sav-foru...placement.html
The lessons are:
1. The Quick Disconnect is a pain, options:
a. It can be squeezed to remove, but it is difficult to squeeze and tried to remove the line from the Fuel Filter.
b. Some people remove the clip from the connector, but in the process of doing so, you can break it too. Yes, you can easily break the Plastic Clip in the Quick Disconnect!
2. You should buy
three (3) Dorman 800-027 clips, $3/each at Advance Auto (you may have to special order) or online.
I broke 2 of the 3 clips and it was Sunday! No parts store carried Dorman 800-027, so I went to local O’Reilly Auto and picked up
Dorman 800-023 for Ford/GM package ($4 for the package), modified the clips to fit and it worked perfectly, read on.
PARTS/TOOLS:
1. E53 Fuel Filter,
Mann WK513/3 or BMW PN 16126754016, which includes the Pressure Regulator.
About $45 at autohausaz.com
2. Dorman
800-027 is best, if you don’t have that, use Dorman
800-023, which is readily available at O’Reilly Auto. But you need to modify Dorman 800-023.
3. Short section of vacuum hose.
4. 8-mm, 10-mm, and 13-mm sockets and LONG extension!
 PROCEDDURE:
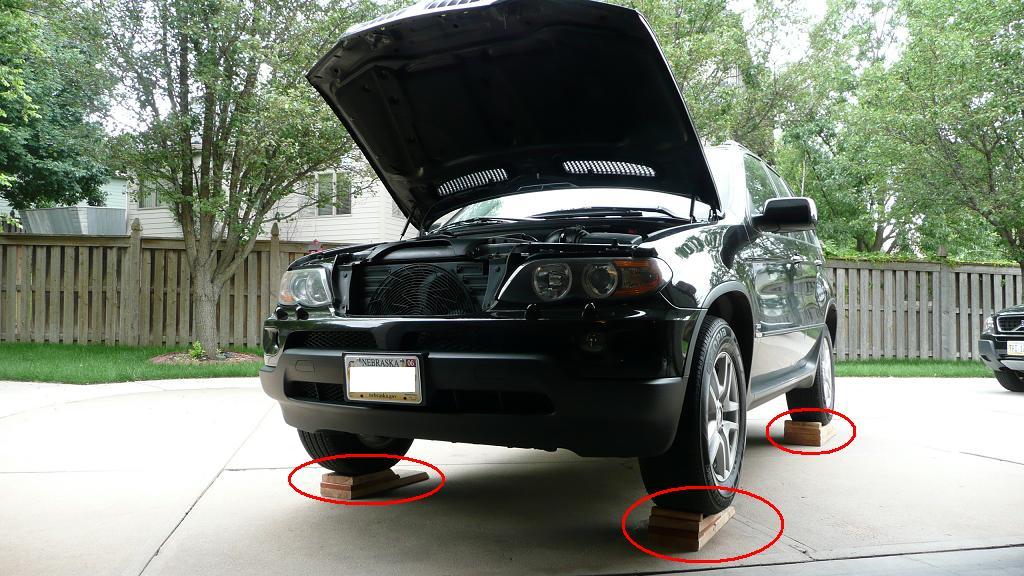
1. Car on wood ramps. You can pull the Fuse #47 as in the link above. I did not pull the Fuse and very little fuel came out.
2. The Big Cover on the driver side is a pain because nobody ever posted detailed photo of the exact location of the bolts, so I had to fool around a bit. No worry, if you follow this guide, it is not bad at all. IIRC, there are some
10-mm bolts near the heat shield and
Eleven (11) 13-mm bolts (some require long extension and socket to get to: 4 bolts are alongside the driveshaft, 2 are near the muffler, 2 are inside the holes, and 1 is hidden just in front to the rear tire!!!
3. Do not remove the Big Cover, all you need is to lower it.

Off topic but in the Spring, if you need to wash the brake metal lines to prevent corrosion, use some water (gentle stream, no pressure washer) and aim it up
holes #3 and #4, water will dissolve the salt used in winter to prevent corrosion!
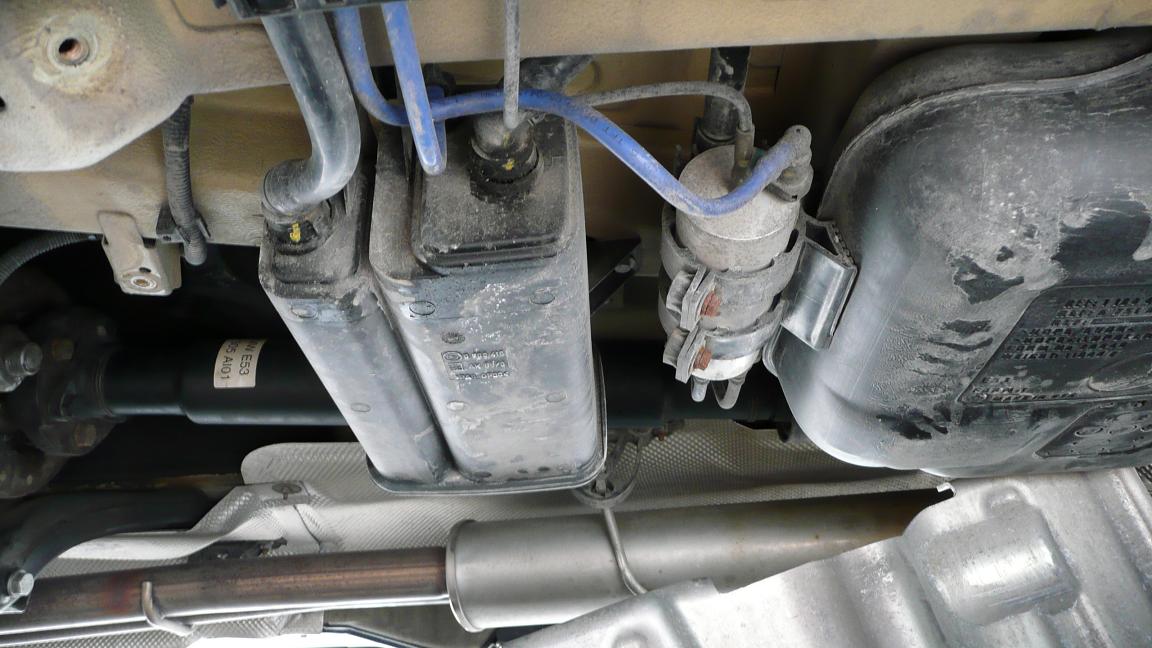
3. The setup looks like this:
4. The old vacuum hose: use a utility knife and cut it GENTLY along its length to remove it. Replace with new vacuum hose, oil the nipple a bit to allow the hose to slide better.
- I could not remove one of the 10-mm bolts (the nut just spins), so I simply slide the old Fuel Filter out and new one in.
- Note in the DIY above, there are 2 ways to undo the connections: squeeze the sides or remove the clips, whatever you do, the chance of breaking the clips is high. I broke 2 out of 3 clips.
5. Dorman
800-027 is best, if you don’t have that, use Dorman
800-023, which is readily available at O’Reilly Auto. But you need to modify Dorman 800-023 (Ford/GM type): shorten the WHITE clips a bit and trim alongside (taking off about 1mm or so using utility knife).
- Just look at the factory BLUE clip AS A GUIDE. There is only one way to insert it, the concave side of the the clip faces the Fuel Filter.
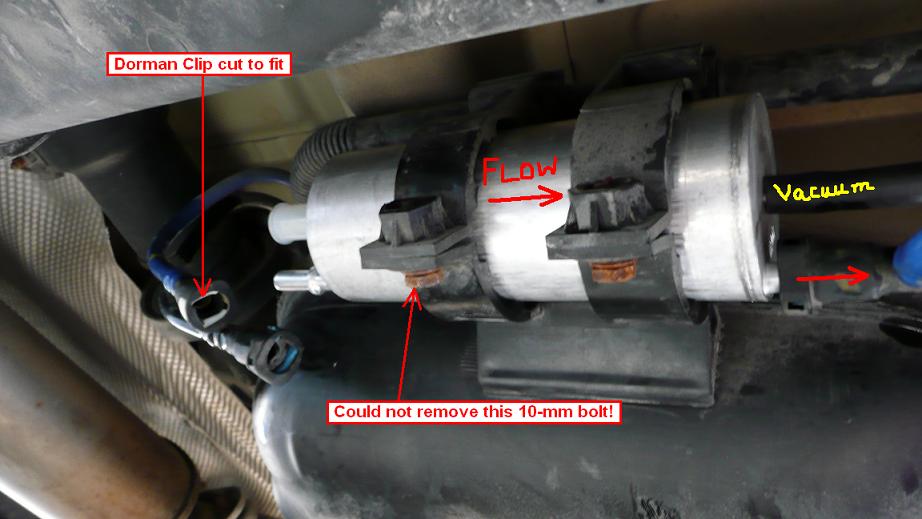


6. Before you install the connectors, be absolutely sure which is which because once it is installed, it is difficult to undo it and you risk breaking your new plastic clips.
So
BLUE is fuel feed and goes to the center of the Fuel Filter. And
BLACK is the return line. Do NOT mix up these lines!
- Oil the nipples a bit before installing the connectors. You must hear a “CLICK”.
- Gently tug the connector a bit to be sure it is fully seated. I added zip ties to be sure.

7. Now test the new Fuel Filter by:
- Key in position II a few times to prime the Fuel Filter.
- Start engine and watch for any leaks.
8. Turn off engine and re-install the Big Cover.
PS: For comparison, replacing the Fuel Filter in my 2005 Volvo XC90 is a 10-minute deal, in the X5, it is a 3h job because of the stupid Big Cover, the dumb connection clips and a trip to local parts store.
However, you follow the above advice, then it should be easy for you.
---