
|
|
|
|
||||||||||
| Xoutpost server transfer and maintenance is occurring.... |
| Xoutpost is currently undergoing a planned server migration.... stay tuned for new developments.... sincerely, the management |
|
|
LinkBack | Thread Tools | Display Modes |
|
#1
 04-24-2007, 11:32 AM
|
||||
|
||||
|
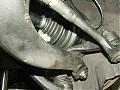
Polished Valve Covers
Note the following was done to my valve covers off my E38. The same procedure will apply to the X5 valve covers though  What you'll need Airplane paint stripper (I used Tal Strip made by Bondo) 5" orbital sander (100g, 120g) Sandpaper grits: (100, 120, 150, 320, 400, 600, 800, 1000, 1500, 2000) with sanding block (I used the one by 3M with the triangle head) Our little buddy "Dremel" with sanding and polishing bits. (Used around hard to reach surfacesand factory imperfections) Mothers Aluminum polish (liquid or paste) Safety: Dusk Masks & Eye Protection Ok first you want to strip the paint off. Don't sand as you'll find yourself sanding for ever and a minute. Thats what the paint stripper is for. Spray on and let it set in for about a 2-3 minutes. You'll notice the paint bubble up which then you can peal it right off.   Once the paint is off you can start sanding down with your 5" orbital sander. The key here is the get to down to the shiny surface. First 100g, then up to 150g. Your power sander then bare muscle with sanding block will be the key here. (Most painful of the whole process)   Now use 320g with sanding block. You can start wet sanding at 400g and work your way up to 2000g. The key here as well is to use different sanding motions to polish up the surface. You don't nessarely have to go up to 2000g, but that just depends on the luster or finish that your looking for. Your probably wondering how about that dremel and when do you us it? You'll figure it out and use it on those hard to reach areas like the ones below in particular.  Now back to 400g and up to 2000g (depending on luster you want) applying Mothers aluminum polish starting @ 1000g     All that hard work pays off to the following    ***Note only sand and polish areas which are visible to the eye under the hood. As for the hidden areas, paint with high heat enamel (aluminum or black will look fine)*** Lito 
|
| Sponsored Links | |
|
|
|
| Bookmarks |
|
|
|
|


 Linear Mode


