|
Xoutpost server transfer and maintenance is occurring.... |
Xoutpost is currently undergoing a planned server migration.... stay tuned for new developments.... sincerely, the management |
![]() |
|
LinkBack | Thread Tools | Display Modes |
#1
|
|||
|
|||
DIY: E53 X5 Siphon Pump with Improved O-ring and Teflon Wrap
- This is strictly maintenance as I don't want to be stranded by failed Siphon Pump. My 2006 X5 runs fine down to Fuel Tank YELLOW light but I did this as preventive maintenance. - If you don't want to do this job then: 1. Use Test #6 to periodically monitor the Siphon Pump function. 2. On very long trips, keep fuel above 40% at all time. This is b/c when the Siphon Pump fails, the Right tank will go dry when fuel is less than 32L or so. By keeping tank above 40% at all time, you are safe on very long trips. - Special thanks to andrewwynn for being the pioneer of the E53 X5 Fuel Tank Design and Siphon Pump DIY. - I put everything in this thread so it is easier for others. - IMPORTANT threads... ---> E53 X5 Fuel Tank Design and Function by andrewwynn: https://xoutpost.com/bmw-sav-forums/...stic-help.html ---> E53 X5 Siphon Pump Repair by andrewwynn: https://xoutpost.com/bmw-sav-forums/...iy-repair.html PARTS/TOOLS: - Search ebay for PN 16116761645, but don't buy the factory O-ring. Instead look for the listing with "Improved E53 X5 Siphon Pump O-ring". This Improved O-ring is much better than factory O-ring b/c it is THICKER! - Fuel Pump Removal Tool. I like OEMTOOLS 25156, about $18-$20 on ebay. - Small hose clamp. ![]() PROCEDURE: 1. Read the above DIYs by andrewwynn first! Work outside with a low fuel tank, ideally less than 10L. Open both REAR doors to vent fume. Hit the center console switch to turn OFF the interior lights, to prevent draining battery. * Remember the Siphon Pump assembly is not meant for rebuild like this, so you have to be creative when prying things apart etc. Proceed with CAUTION... 2. Lift the FRONT of the seat bottom upward and prop it up. If you want to remove the seat from the car, then undo the 16-mm bolt holding the middle seatbelt. I see no need to remove the 16-mm bolt. 3. Remove the four (4) 10-mm nuts, then remove the metal cover. 4. Remove the factory Oetiker clamp (during re-assembly, use a new small clamp), and squeeze the sides of the connector to d/c the connector. Use a right-angle pair of pliers, ROTATE the hose a bit to unseat it, then GENTLY lift it upward. Do NOT break the plastic nipple. If you break the plastic nipple, search forum for the repair using a brass barb fitting! ![]() ![]() ![]() ![]() 
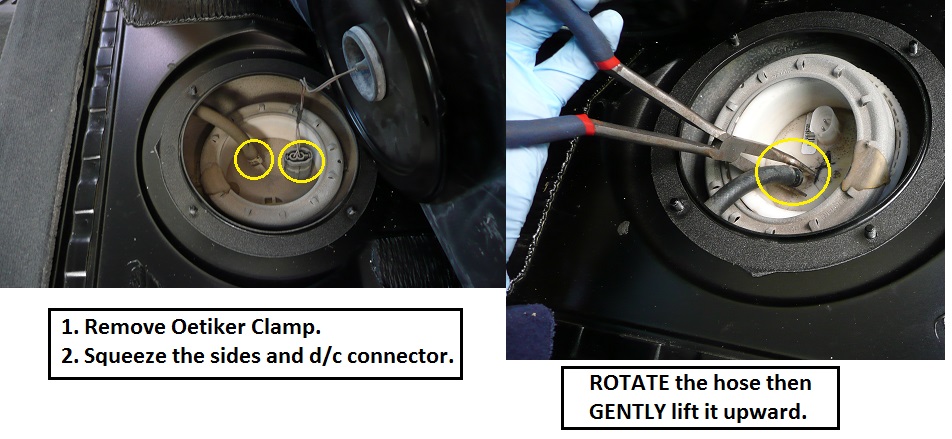
5. The White Plastic Collar slides along the rubber seal during factory installation. So pry it UPWARD on all sides slowly, spray a bit of lubricant such as WD-40 to make it easier to slide upward. ![]() 6. NOTE that the design is: Return Fuel (I think it is about 20-30 psi) ---> Plastic Nipple ---> "Coupler" ---> Two (2) black pipes to drive 2 separate "Suction Foot" devices. The COUPLER: - On top is the O-ring. - On the lower part, it is a press-fit seal (not ideal but adequate for this). The idea is to use "Improved O-ring", which is thicker and fits tighter for the UPPER part of the Coupler and Teflon for the LOWER part of the Coupler. ![]() 7. To separate the Coupler from the Lid: press on the 2 tabs with a small screwdriver, then use a larger screwdriver to GENTLY pry it out. - Remember that this was designed from factory for "single use" (i.e. "get a new Siphon Pump if this fails") and not for rebuild like this DIY. 8. Once separated, you can see that: ---> The floater can theoretically get stuck at > 1/4, mine worked fine, but in order to avoid that, I bent the floater a bit as shown to avoid the floater from hitting the side of the fuel tank. This is the part I don't understand: some people (car from factory ant not repaired previously) had the floater stuck at 40%, causing stalling b/c people think they have 40% of fuel, when in fact, they ran out of fuel. ![]() 9. The next step is OPTIONAL bc/ prying this apart is NOT easy with one person. Basically wrapping Teflon to the LOWER part of the Coupler to prevent any leak. However, the factory design is probably good enough with a "press-fit" seal. Since I don't want to do this job again, I followed the advice by andrewwynn to wrap it with Teflon. - Prying this part apart is NOT fun, if you have a second person as helper, it is better b/c you have to use small screwdriver to push the small tabs inward while prying the fittings apart. Work SLOWLY and METHODICALLY to pry it apart. You don't want to break it. If you break this, time for new Siphon Pump! Again this step #9 is Optional! 10. Install the new and Improved O-ring. I apply some engine oil on the O-ring and it is a nice and tight fit (factory O-ring is a loose fit). ![]() ![]() ---
__________________
1998 E39 528i 5sp MT 2006 E53 X5 3.0 6sp MT |
Sponsored Links | |
|
#2
|
|||
|
|||
Part II...
11. Since andrewwynn said you need to apply a zip tie as shown to prevent movement,
I did the same thing as advised, although I doubt it makes a difference. Anyway, a zip tie does NOT hurt. ![]() ![]() 12. During re-assembly note: a. Oil the Plastic Flange, Seal so it slides well. b. New small clamp for the return hose (place the metal lock ring in place first!). c. When you tighten the Metal Lock Ring properly, the factory glue will line up. Better: mark with sharpie from the beginning, this way you know where things should line up. d. Don't forget the connector! e. If you drop any debris, leaves etc. remove them from the fuel tank. BEST is to vacuum the Lid are BEFORE opening the Lid! 13. Replace the metal cover, big grommet rubber seal (above metal cover), then rear seat bottom. - Make sure you pull the all 3 seatbelt buckles through. ![]() 14. Now test drive with about 1/2 tank and use "Test #6" to see when it drops below 32L. - Make sure the RIGHT tank always have anywhere between 2L-5L. - Note that when fuel is below 30L or so, during right/left turns or deceleration/acceleration, the fuel level on the RIGHT side will vary widely, but during cruise, they remain stable. That is all boys and girls. Hopefully you don't get stranded with the improved O-ring... ---
__________________
1998 E39 528i 5sp MT 2006 E53 X5 3.0 6sp MT Last edited by cn90; 10-29-2018 at 12:16 AM. |
#3
|
|||
|
|||
I plan on doing this tomorrow since I have to order a new intake manifold gasket. Gotta make sure of that downtime! Did you use PTFE or Gasoline Rated Teflon Tape? Will keep it from dissolving.
Also. What are you calling an improved o ring? I ordered the OEM one from BAVAuto. Simple 2x22 o ring.
__________________
Auto Enthusiast. Tech Extraordinaire. 05' Land Rover LR3 06' E53 X5 3.0i 07' X3 3.0si 08' X3 3.0si 17' Interceptor 3.7 AWD Sedan |
#4
|
||||
|
||||
DIY: E53 X5 Siphon Pump with Improved O-ring and Teflon Wrap
The zip tie, not the o-ring is the actual fix. The failure happens because the o-ring is not held square not because the o-ring is too small or somehow wears out.
There is nothing in the original design to hold the o-ring square. It's far more important to solve the twist of the seating surface than use a thicker o-ring. Time and pressure will win just like geology. ![]() This photo shows the problem. The blue lines are parallel and where the bottom part should be. The red line shows where it is. The seal fails because nothing in the design holds the right side of the o-ring seal up. It's held only on one side it's like wearing one suspender of course your pants will fall down on one side. EDIT: this photo just is a representative of HOW it fails I think that this picture was taken during disassembly on a unit that I believe hasn't actually failed yet (hence the indifference on the importance of the zip tie). It's a better representative photo than any I have as I already had mine either apart or from the wrong side to show the failure mode. The zip tie forces the left side down forcing the right side up. It has to be a wide enough zip tie to touch the bottom part when assembled. The other solution I recommend is to drill a 7/64 hole outside of the high pressure zone of the o-ring and install a 3mm stainless screw that's even better than the zip tie but the zip tie is instant. Also after about 3-4000 hours on my car the second seal was leaking significantly but just drip drip drip not spraying like the open o-ring. There is no actual seal. The factory design has a plastic to plastic flare that will absolutely fail. In my case the female side was 0.2 mm larger diameter and has no choice but to leak. The teflon wrap is a quick fix the better fix is to add an o-ring groove and add an o-ring, that said the teflon will eliminate the gap and reset the clock for a long time. Nice complete step by step I only took the critical steps photos it'll be a lot easier for somebody to follow this new recipe. The only other tips I could think of off hand are these: Run the car with the electric pump unplugged to drain the fuel lines A bent metal bar and a big vice grip will substitute for the proper tool to open the monster nut, other options I've used when I've misplaced my tool I made: lock a small vice grips on opposite sides and use a long rod between the two: it's Better to use even pressure than try to use a hammer and chisel method that only puts pressure on one side I wet the seal with gas v oil I figure that way it will evaporate and be rubber to plastic seal no oil left over Not specifically mentioned above but the photo shows: the seal around the sender unit will typically come out with the unit leaving most to believe it should be on the unit when installing but that is impossible. You must remove the seal and install into the tank first (shown in the photo but I didn't see the description). Wet the ID of the big seal (I'm wearing surgical gloves when I do this so I just dip my fingers in the gas tank and wet the seal with gas) Have a fresh roll of paper towels handy to soak up any fuel and "dispose of properly" (by which I mean burn them in a safe container): liquid fuel will safely burn; evaporated gas that reaches the proper stoichiometric* ratio will explode! Eg much safer to burn a soaked rag than risk it evaporating into an explosive situation. I did the first two fuel pump repairs with the seat in the car but with impact tools it's so easy to remove the 16mm bolt and there is twice the elbow room with the seat out I now remove the seat bottom from the car when doing this job it's worth it for the extra room but totally not necessary. I've just had the seat fall on me enough times I've retired the leave the seat in method. *Thank you MythBusters for teaching me that word.
__________________
2011 E70 • N55 (me) 2012 E70 • N63 (wife) Last edited by andrewwynn; 10-29-2018 at 10:06 PM. |
#5
|
|||
|
|||
Great post!
__________________
![]() 2005 X5 4.8IS The Blue ones are always FASTER.... Current Garage: 2005 X5 4.8is 2002 M5 TiSilver 2003 525iT 1998 528i Former Garage Stable Highlights 2004 325XiT Sport 1973 De Tomaso Pantera, L Model 1970 Dodge Challenger T/A 4 sp Alpine White 1970 Dodge Challenger T/A 4 sp GoManGo Green 1971 Dart Sport, “Dart Light” package 1969 Road Runner 383 1968 Ply Barracuda 340S FB Sea-foam Green |
#6
|
|||
|
|||
Thanks andrewwynn,
The photo you posted above should NOT be used to show your point. That photo I took is when I pried the Coupler out. It was halfway out so it is NOT an in-situ photo of factory setup! I am very convinced the root cause is either: A. O-ring shrinking with time. B. The one-way valve (Plastic+Spring) momentarily seized, pressure builds up and blows the O-ring outward... Just some theories... BTW, I think one can remove the Plastic+Spring combo (I did not) w/o any issues. This is an over-engineered part.
__________________
1998 E39 528i 5sp MT 2006 E53 X5 3.0 6sp MT |
#7
|
|||
|
|||
270_BMW,
The improved O-ring is thicker. I used it and love it. It is a tight fit and almost impossible to blow out under pressure. Remember O-ring usually blows out because it is "under-sized" for the gap it tries to seal, or bc the pressure is too high for the design.
__________________
1998 E39 528i 5sp MT 2006 E53 X5 3.0 6sp MT |
#8
|
|||
|
|||
Another thought as to root cause...
The fuel pressure regulator is built into the fuel filter. I wonder if or when the FPR fails, does it allow too much fuel pressure in the return line to rise let's say from 20-25 psi (does anyone know the normal fuel pressure in a return line?) to the 45-55 psi range (which is normal operating range), causing seal blowout? For every problem, there must be a cause...
__________________
1998 E39 528i 5sp MT 2006 E53 X5 3.0 6sp MT |
#9
|
|||
|
|||
Could you provide a link or description for the improved one? I’m curious of the size.
__________________
Auto Enthusiast. Tech Extraordinaire. 05' Land Rover LR3 06' E53 X5 3.0i 07' X3 3.0si 08' X3 3.0si 17' Interceptor 3.7 AWD Sedan |
#10
|
||||
|
||||
DIY: E53 X5 Siphon Pump with Improved O-ring and Teflon Wrap
Thought a link was in the start post.
1.2-1.3 bar if memory serves. It's in my detailed fuel system thread. I think it's about 15-18psi. It will of course vary over the life of the electric pump as the pump weakens. As far as the cause it's oversight on the designers part that didn't hold the o-ring from both sides. If the fpr fails there is a relief valve to dump the extra fuel directly to the right tank. It's labeled on my fuel system thread
__________________
2011 E70 • N55 (me) 2012 E70 • N63 (wife) Last edited by andrewwynn; 10-29-2018 at 09:48 PM. |
![]() |
Bookmarks |
Thread Tools | |
Display Modes | |
|
|
|