
|
|
|
|
||||||||||
| Xoutpost server transfer and maintenance is occurring.... |
| Xoutpost is currently undergoing a planned server migration.... stay tuned for new developments.... sincerely, the management |
 |
|
|
LinkBack | Thread Tools | Display Modes |
|
#1
 04-12-2006, 08:18 PM
|
||||
|
||||
|
ANGEL EYES WIRING For Dummies (for X5 00-02)
 Unfortunately, there is no book like this exists(yet). Unfortunately, there is no book like this exists(yet).I hope this thread will turn into an article to help dummies like me. The pic below is the wire/relay harness from the Predator chromiums and i numbered each connection with a corresponding description/where to connect info. ( although there might be several configurations of the setup, please post on how you connected yours)  i will try to update the KEY as soon as i get new info from all of you. 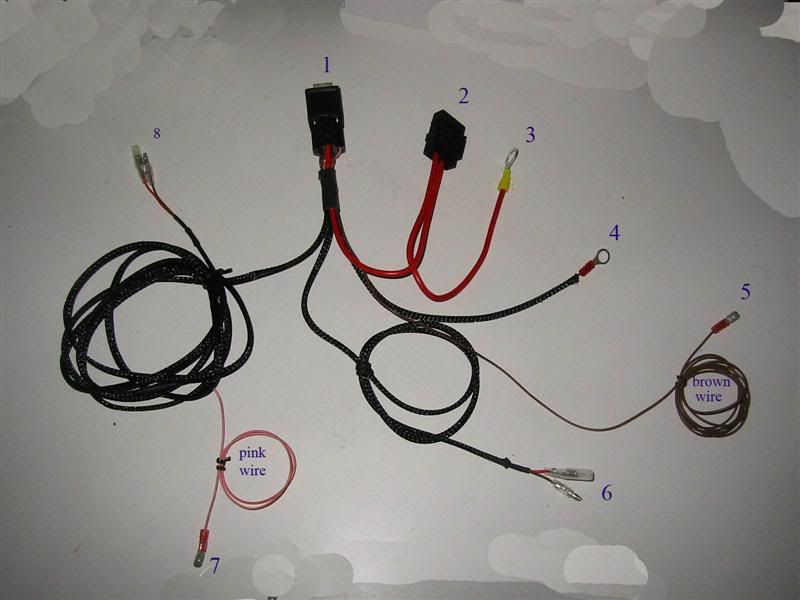 KEY: 1. Relay - to be mounted close to the power supply djbock's pic 2. Fuse-last item to be installed, so remove from socket first 3. Power Supply- connect to positive terminal of battery (engine bay)see pic 4. Ground - i mounted mine where the hood's ground connection is clik pic 5. Brown wire - goes through the fire wall into the footwell light, connect to the blue/red strip color wire of the light assembly connection, Just to elaborate, the footwell connection is so your new eyes illuminate when you hit the remote button open, lock or even to open the trunk. Related article 6. Connect to ballast#1 see pic there are different wire color sets for the ballasts/harness for this, so i just did trial and error!( ex. if A to A and B to B dont work, then it should work A to B and A to B) and success was achieved 7. pink wire- connect to ECU ( look for white/red strip color wire) so AE on when key position is "on" ..pic 1 .. pic 2 .....i just found out that the wiring will be different from the 3.0 and 4.4, ( the red/white strip wire is the third wire from the left on the black socket connector for the 4.4-see pic) ( for the 3.0, it is located differently-i think its on the 2nd row--so just look for it) 8. connect to ballast #2 ...see pic For X5's with PDC: this article is for you: http://www.jlevisw.com/CWP.pdf Write up by rayxi : http://www.xoutpost.com/x5-e53-forum/...uctions-2.html Engine bay pics by djbock : http://www.xoutpost.com/x5-e53-forum/...uctions-3.html
__________________
... thank you X5world! Last edited by iop9000; 04-22-2006 at 06:53 PM. 
|
| Sponsored Links | |
|
|
|
|
#2
04-12-2006, 08:21 PM
|
||||
|
||||
|
oh, and one more question, see pic,
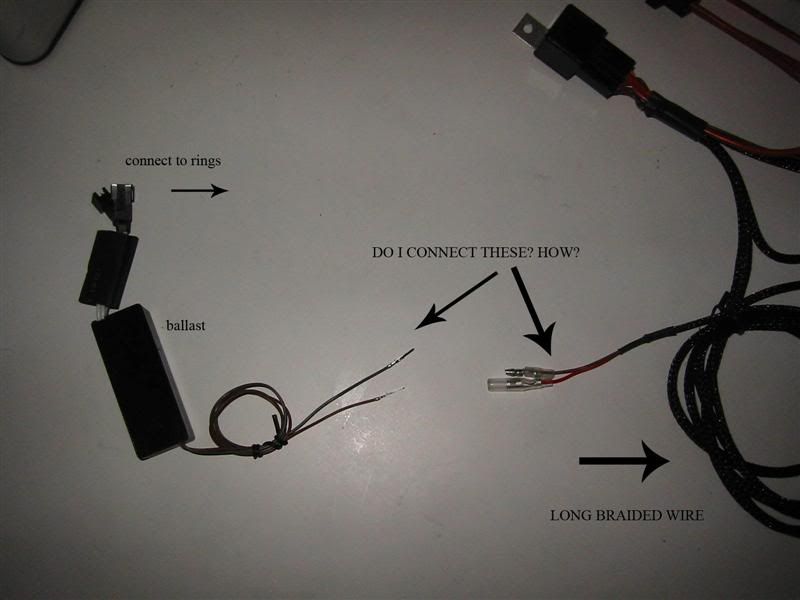 update...PROBLEM SOLVED BY ME... there are different wire color sets for the ballasts/harness for this, so i just did trial and error!( ex. if A to A and B to B dont work, then it should work A to B and A to B) and success was achieved.. 
__________________
... thank you X5world! Last edited by iop9000; 04-21-2006 at 10:01 PM.
|
|
#3
04-12-2006, 08:31 PM
|
|||
|
|||
|
Looks like this if I'm correct.
#4 is a ground #5 goes to the foot well #7 goes to the ECU which is just a power on switch when the key is in the #2 position. Yes you connect the ballast to the wire shown. You will need wire connectors (best to use a removable connector) and make sure Brown goes to Brown and Red to Red. How is that...And I've not installed mine yet.
|
|
#4
04-12-2006, 08:37 PM
|
|||
|
|||
|
Quote:
Hope that helps. I've been doing my homework.
|
|
#5
04-12-2006, 08:50 PM
|
||||
|
||||
|
Quote:
__________________
2011 X5 35i Space Gray/Black Nevada Leather w Dark Bamboo Trim Convenience Pkg/Running Boards/Cold Weather Pkg/Comfort Access 3rd Row Seating/20% Tint/Style 215 wrapped with Toyo Proxes ST II/ LUX v4 2001 X5 4.4i TiAG/Grey Leather-Retired djbock's Custom X Page!
|
|
#6
04-12-2006, 08:54 PM
|
|||
|
|||
|
Quote:
Michael
|
|
#7
04-12-2006, 08:55 PM
|
||||
|
||||
|
Quote:
__________________
2011 X5 35i Space Gray/Black Nevada Leather w Dark Bamboo Trim Convenience Pkg/Running Boards/Cold Weather Pkg/Comfort Access 3rd Row Seating/20% Tint/Style 215 wrapped with Toyo Proxes ST II/ LUX v4 2001 X5 4.4i TiAG/Grey Leather-Retired djbock's Custom X Page!
|
|
#8
04-12-2006, 08:56 PM
|
||||
|
||||
|
iop,
Here is a link to another post where I put in some pics. Hope it helps with your q's. http://www.xoutpost.com/x5-e53-forum/...tructions.html
__________________
2011 X5 35i Space Gray/Black Nevada Leather w Dark Bamboo Trim Convenience Pkg/Running Boards/Cold Weather Pkg/Comfort Access 3rd Row Seating/20% Tint/Style 215 wrapped with Toyo Proxes ST II/ LUX v4 2001 X5 4.4i TiAG/Grey Leather-Retired djbock's Custom X Page!
|
|
#10
04-13-2006, 01:06 AM
|
||||
|
||||
|
Quote:

__________________
... thank you X5world!
|
|
| Bookmarks |
|
|
|
|


 Linear Mode


