
|
|
|
|
||||||||||
| Xoutpost server transfer and maintenance is occurring.... |
| Xoutpost is currently undergoing a planned server migration.... stay tuned for new developments.... sincerely, the management |
|
|
LinkBack | Thread Tools | Display Modes |
|
#1
 08-28-2012, 10:21 PM
|
||||
|
||||
|
DSC Internal Sensor?
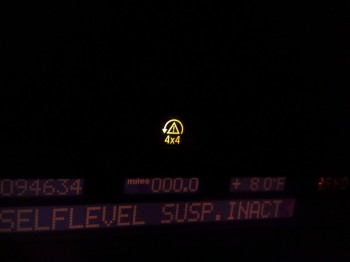
The DSC/xDrive (4x4) light came on and its a solid yellow. I also get the SLS Inactive message on the Check Control Alphanumeric Display.
 Tried pressing the DSC button on the console to turn the DSC light off - no change. Pulled, checked and re-installed fuses in the back and glove compartment - no change. BTW ... there's a 30amp fuse in the back panel, looking at the panel its the last one all the way to the right, that only has one connector on the female side - unlike the others which have two. I think I found another one IIRC that was marked "trailer socket" and it also had one connector in the fuse block. Weird. Anyways, scanned it with the GT1. Got a "5F0C DSC sensor, internal" fault in memory that was not selectable or deletable. 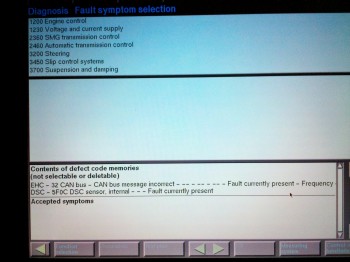 Went through the Test plan and got these screens.   Based on those screens, I interpret it as the internal sensor fault was found in the DSC module not a separate sensor that could be replaced. So, before I buy a DSC module I want to see what the forum has to say. The external sensors are a Brake Pressure sensor, (Four) Wheel Speed sensors, (Two) Rotation Rate sensors, and a Steering Angle sensor. There's also a DSC Hydraulic unit but it doesn't seem to be related to any of these at first glance. Maybe I should disconnect the battery for about 1hr and see if that helps. SOLUTION: Replace Rotation Rate (yaw) sensor under the center console. Old sensor (discontinued) on the left and made in Germany. New sensor on the right and made in Hungary. After replacement, the DSC/xDrive (4x4) light and SLS Inactive message went away. I did not have to code/program anything. 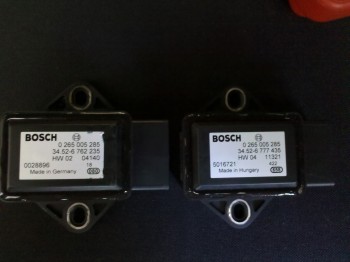
Last edited by TwinsPoppa; 09-11-2012 at 02:24 AM. 
|
| Bookmarks |
|
|
|
|


 Threaded Mode

