Home Forums Articles How To's FAQ Register
Go Back   Xoutpost.com > BMW SAV Forums > X5 (E53) Forum
Arnott
User Name
Password
Member List Premier Membership Search Today's Posts Mark Forums Read

Xoutpost server transfer and maintenance is occurring....
Xoutpost is currently undergoing a planned server migration.... stay tuned for new developments.... sincerely, the management


Reply
 
LinkBack Thread Tools Display Modes
  #1  
Old 06-09-2013, 01:44 AM
Member
 
Join Date: Sep 2011
Location: Calgary
Posts: 747
Doru is on a distinguished road
2004 X5 hood cable removal & installation

It was quite hard to pull the lever to open the hood, so I inspected the cable, and towards the front, it was in a very poor shape:


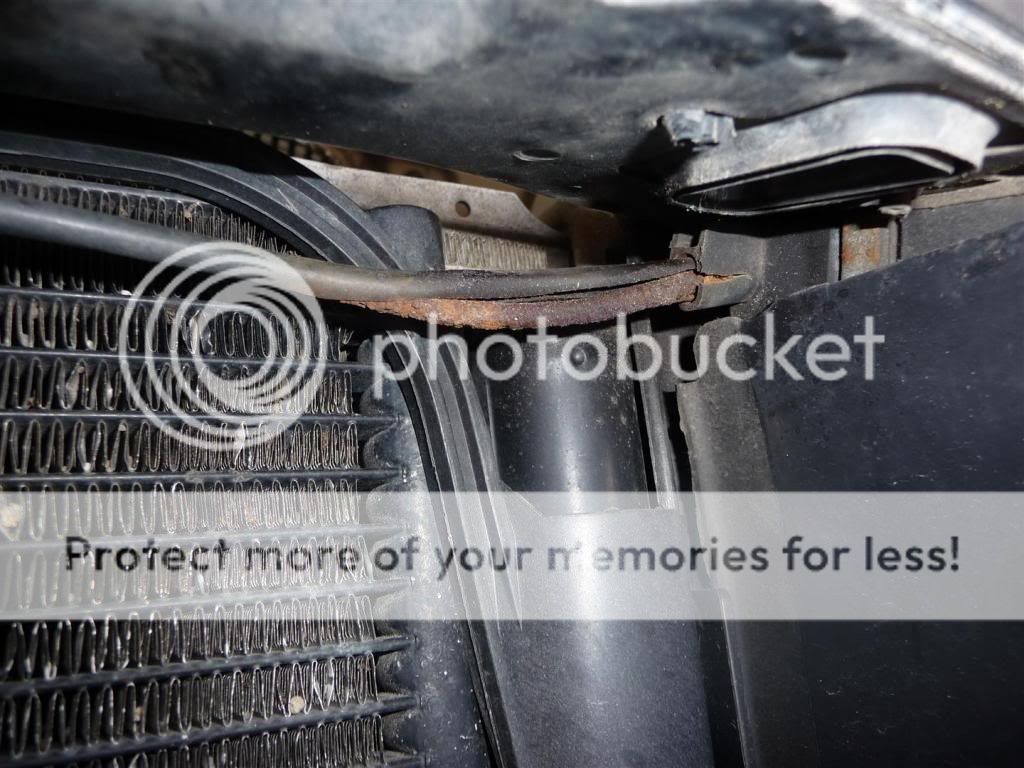
Decision was made to replace the cable, in order to avoid one of those surprises. Out of 3 cables, I decided I need only the 2 cables that activate the 2 latches and the intermediate cable. These:


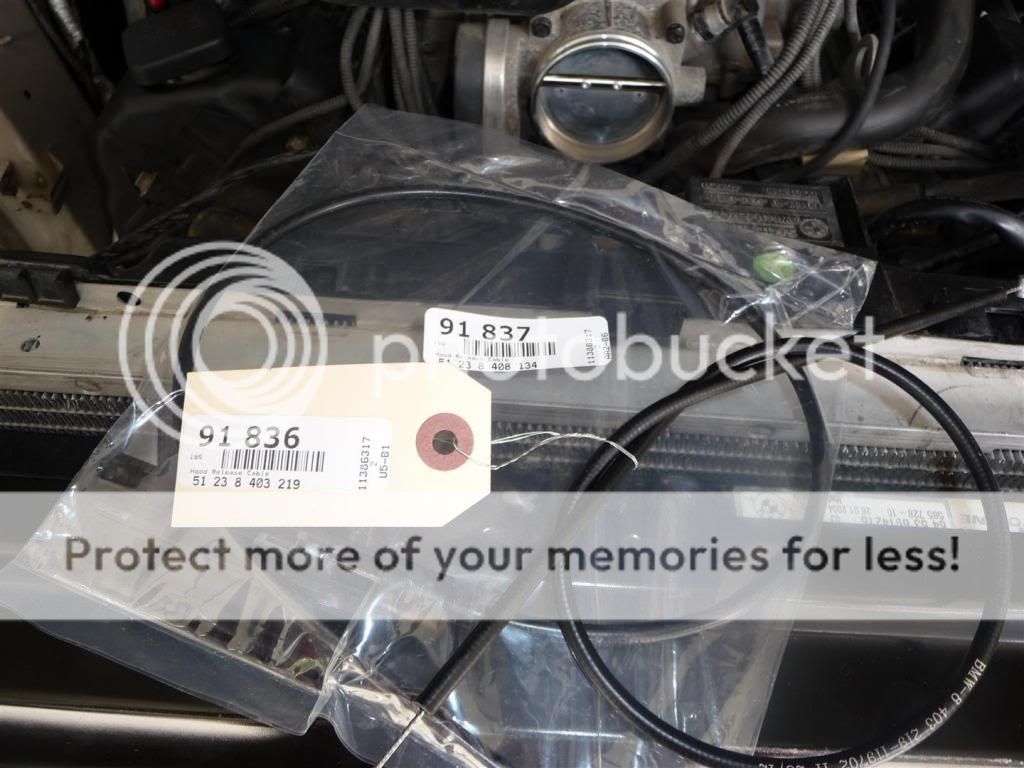
To reach the cables, unfortunately, you will need to remove the front bumper, then the driver side headlight. For the front bumper I used this DIY. For the headlight, DIY's not necessary - it's a straight forward process: Unplug the light harness, remove the top 2 screws, remove the bottom 2 screws and slide out. Done.

The reason you want the headlight out, is to allow for the cable to slide out under the front cross member. The reason you want the bumper out, is to be able to reach the latches - you will need to remove the air duct left & right (p/n 51717124217 & 51717123350) and the air duct ornamental grille left & right (p/n 51717123351 & 51717123352).

Next, you need a torx bit T30 to remove the 3 screws that hold the 2 latches:


To reach the latches, you need to pull out the middle pin of the plastic rivet that holds each air duct (left & right) mentioned above:


Then, pull on the 3 tabs that hold the ornament grille to the above airduct:


Now, the airducts can be folded away, and you can access the latches. This is why you need to remove the bumper. The front cable ties the 2 latches, and is also held in place by clip under the cross member. Slide it out. Here is the passenger side latch:


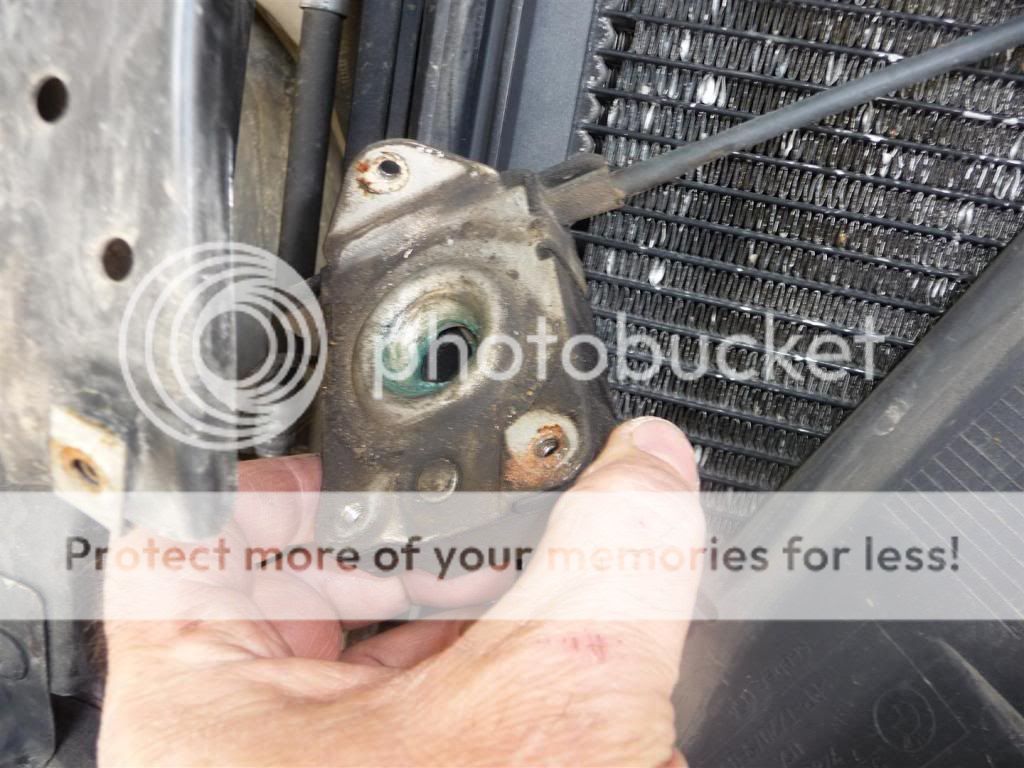
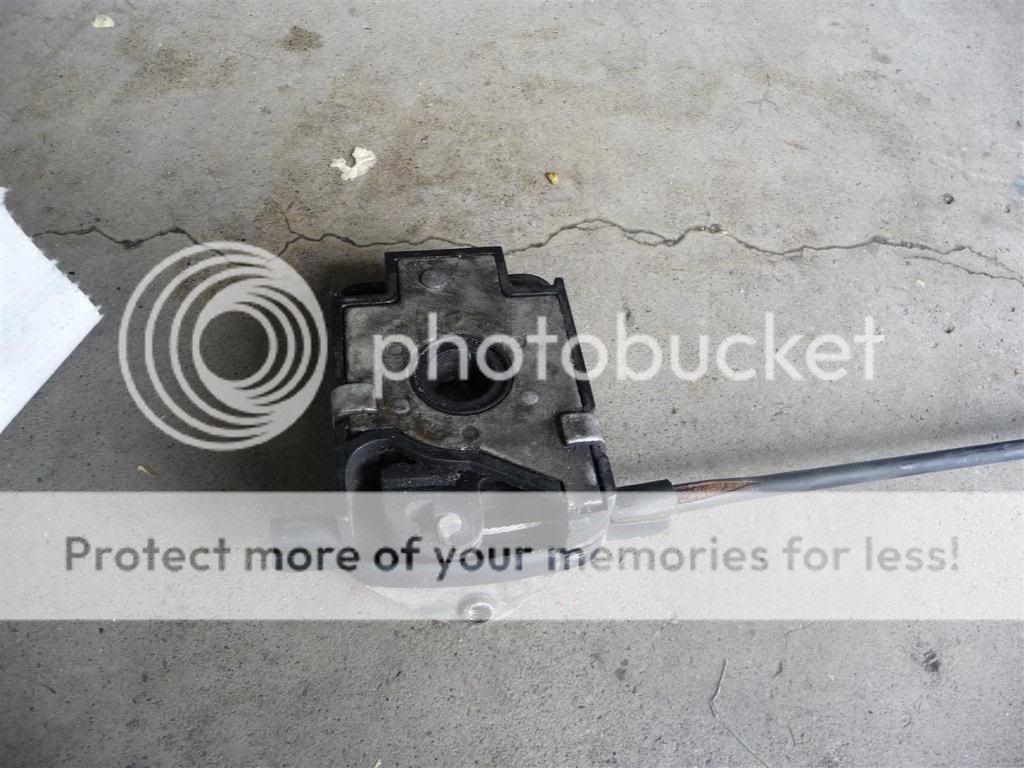
Pull the cable sheath out the guide of the latch, then the cable is exposed, and you can slide the cable out of the latch:


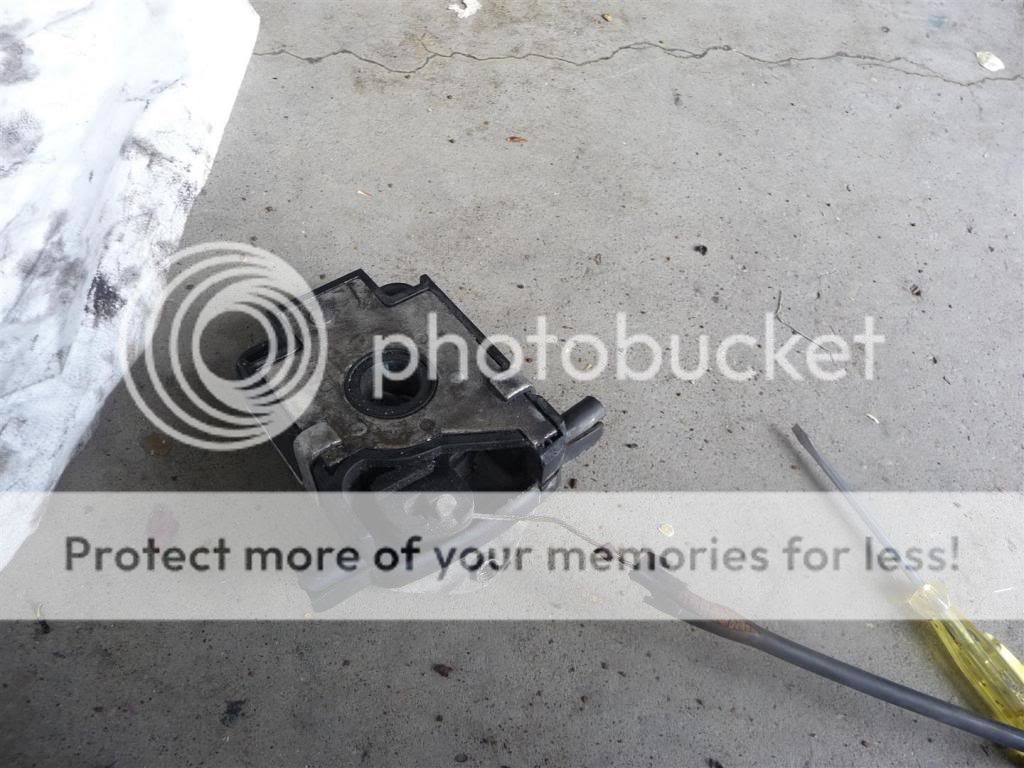
The driver side latch is also tied to the intermediate cable. This one has the connecting element as well. To get the latch out, you will first need to open the connecting element, by pressing and pushing with a screwdriver on the 2 tabs:


Then just pull the whole unit with cables still attached, from the body. It's held in place by 2 plastic tabs. They won't break, and even if they would, if you change the intermediate cable, you will have a new unit anyways.

Once the connecting element is out, you need to find a small screwdriver, or a fine pick and pull the round lead of the cable that goes towards the firewall. In this picture, it's the one to the right:


Once the lead cable is off (the one that goes towards the firewall), you can slide the cable with the connecting element through the cross member and out. This is why you need the headlight out.
The 2 latches are identical. Because the driver side latch had the guide damaged, I switched the 2 latches, to avoid buying a new unit. The guide is housing the sheath of the cable.
Both latches side-by-side:


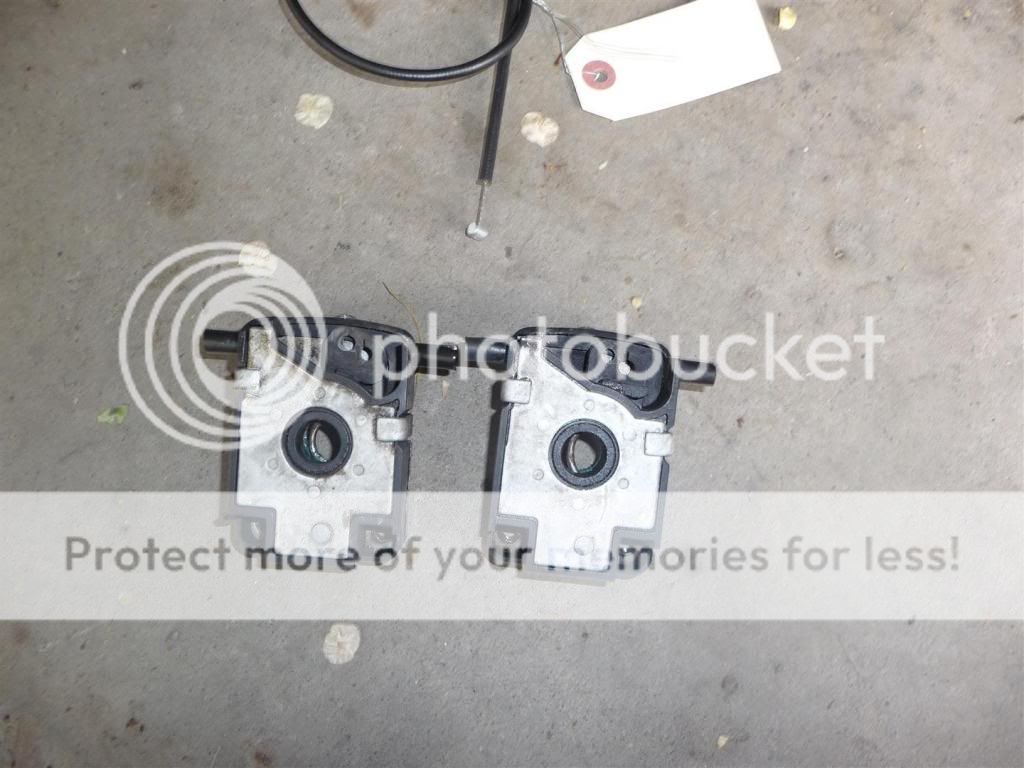
Damaged guide on the driver side latch:


Installation is the reverse. It's quite easy in my opinion. The hardest part was to find the 2 tabs on each side of the bumper. Opening the hood is very easy now, a minimal effort is needed to pull the lever now. Yes, I had the mandatory beer afterwards.
__________________
Stable: e92is, e46 M54B25, e83 N52, e53 N62 - sold, e39 M54B30 R.I.P.
Reply With Quote

Sponsored Links

  #2  
Old 06-09-2013, 04:24 AM
Member
 
Join Date: Apr 2013
Location: Australia
Posts: 41
mrjayviper is on a distinguished road
thanks for the guide. I might need this steps soon
Reply With Quote
  #3  
Old 06-09-2013, 09:30 AM
X5SND's Avatar
Member
 
Join Date: Apr 2008
Location: Winnipeg, Mb
Posts: 1,908
X5SND is on a distinguished road
Great write-up! This will undoubtedly come in handy for many here.
__________________
2004 X5 3.0i

Mod list: Currently Longer than the maximum allowed characters that can be typed here...

Reply With Quote
  #4  
Old 05-10-2014, 02:03 PM
Member
 
Join Date: Feb 2014
Location: KC MO
Posts: 52
kesslerbmw is on a distinguished road
About to do this job in a couple hours! Thanks for the write up.. Now to find the info to remove an early bumper!
Reply With Quote
  #5  
Old 05-10-2014, 06:11 PM
Ricky Bobby's Avatar
Member
 
Join Date: Dec 2011
Location: Wake Forest, NC
Posts: 9,344
Ricky Bobby will become famous soon enough
Doru, wonderful write up with pics, it should be stickied in the "Tips & Tricks" for easy access. I will be inspecting my cables for rust/wear and using this when needed!
__________________
2018 Ram 2500 6.7L Cummins 68RFE
19k miles -Bright White/Black - Big Horn Sport - Crew Cab Short Bed
2013 X5 35D (CEO's) - Born on 5/17/2013 -
82k miles - Alpine White/Cinnamon Brown/Premium Pkg, Sport Activity/Premium Pkg and Sound/20" Style 214/Running Boards

Reply With Quote
  #6  
Old 05-10-2014, 06:20 PM
ProfessorX5's Avatar
Member
 
Join Date: Nov 2013
Location: Toronto
Posts: 655
ProfessorX5 is on a distinguished road
Just did this one. Wish I'd seen this guide, would have made things easier. Third section was rusted out. The new latches didn't work, so I put the old latches on, and voila, the hood works again.
__________________
Motivation can change what you do, but inspiration can change who you are.
---------------------------------------------------------
2003 BMW X5 3.0i, Black Sapphire, 287,423 km and kicking!
www.sam-medina.com
My online graphic novel:
Reply With Quote
  #7  
Old 05-11-2014, 12:21 PM
Member
 
Join Date: Feb 2014
Location: KC MO
Posts: 52
kesslerbmw is on a distinguished road
Did this yesterday in a couple hours including replacing the first cable from the cabin, went pretty well, hardest part was removing and replacing the plastic shields next to and in front of the aux fan. Hood latches work beautifully now.
Reply With Quote
  #8  
Old 05-11-2014, 03:01 PM
upallnight's Avatar
Member
 
Join Date: Aug 2012
Location: Cook County
Posts: 7,280
upallnight is on a distinguished road
Quote:
Originally Posted by kesslerbmw View Post
Did this yesterday in a couple hours including replacing the first cable from the cabin, went pretty well, hardest part was removing and replacing the plastic shields next to and in front of the aux fan. Hood latches work beautifully now.
I found out that to remove those two shields the front bumper cover as well as the metal bumper had to come out when I replace the aux fan. Mine is a prefaced X.
__________________
2006 Infiniti G35
2001 BMW 3.0I E53 X5 Build date 08/2000 SOLD
Lotus Europa 1970 Destroyed by fire
Lotus Europa 1970 S2 Renault Powered
Lotus Type 52 1970 Twincam Webers Powered
PORSCHE 911 Targa 1982 The Garage Queen
Audi Avant donated to Kars for Kids
BMW 525IT Sold
Audi 4000CS Quattro Sold
Jensen Healey Lotus Powered Sold
Opel 1900 Sold
Triumph Spitfire 1971 Sold
Triumph Spitfire 1968 Sold
Plymouth "Cuda" 340 Six pack SOLD
Reply With Quote
  #9  
Old 07-27-2020, 06:13 PM
BigBody's Avatar
Member
 
Join Date: Oct 2016
Location: nyc
Posts: 370
BigBody is on a distinguished road
Hi guys,

Sorry to bump an old thread but this seems to be the only guide on xoutpost.

Id like to add that the latches and cables can be replaced without requiring removal of the front bumper or headlights. This is at least the case on my N62. My plastic rivets absolutely refused to move & i was unable to remove them without severely bending or damaging them. All you need to do is pull/bend the plastic piece a little to the side out of its grove, & there is enough room slide in/out the latches from the side. No damage is done, & its a whole lot easier then removing the front bumper. Be sure to tap the latches before attempting to install them in the car. I lost a bolt that way, & ended up purchasing another because i absolutely could not find it. Hope that helps.
Reply With Quote
  #10  
Old 07-27-2020, 09:41 PM
Member
 
Join Date: Apr 2009
Location: Ohio
Posts: 1,099
Purplefade is on a distinguished road
Quote:
Originally Posted by BigBody View Post
Hi guys,

Sorry to bump an old thread but this seems to be the only guide on xoutpost.

Id like to add that the latches and cables can be replaced without requiring removal of the front bumper or headlights. This is at least the case on my N62. My plastic rivets absolutely refused to move & i was unable to remove them without severely bending or damaging them. All you need to do is pull/bend the plastic piece a little to the side out of its grove, & there is enough room slide in/out the latches from the side. No damage is done, & its a whole lot easier then removing the front bumper. Be sure to tap the latches before attempting to install them in the car. I lost a bolt that way, & ended up purchasing another because i absolutely could not find it. Hope that helps.


Thanks BigBody, that is great info to have!! Though I hope I never have to find out


Sent from my iPhone using Xoutpost.com
Reply With Quote
Reply

Bookmarks

Thread Tools
Display Modes

Posting Rules
You may not post new threads
You may not post replies
You may not post attachments
You may not edit your posts

BB code is On
Smilies are On
[IMG] code is On
HTML code is Off
Trackbacks are On
Pingbacks are On
Refbacks are On


All times are GMT -4. The time now is 07:14 PM.
vBulletin, Copyright 2024, Jelsoft Enterprises Ltd. SEO by vBSEO 3.6.0
© 2017 Xoutpost.com. All rights reserved. Xoutpost.com is a private enthusiast site not associated with BMW AG.
The BMW name, marks, M stripe logo, and Roundel logo as well as X3, X5 and X6 designations used in the pages of this Web Site are the property of BMW AG.
This web site is not sponsored or affiliated in any way with BMW AG or any of its subsidiaries.