
|
|
|
|
||||||||||
| Xoutpost server transfer and maintenance is occurring.... |
| Xoutpost is currently undergoing a planned server migration.... stay tuned for new developments.... sincerely, the management |
 |
|
|
LinkBack | Thread Tools | Display Modes |
|
#1
 07-13-2013, 12:12 AM
|
||||
|
||||
|
E70 Headliner Removal /X5M Roof Rails Railing Install - DIY
What you need to know before you start is that you do need to drop the headliner, there is simply no other way around it. I wasted a lot of time trying to find a way how to sneak a wrench by tilting edges of the headliner with no real luck. Tools you need: fastener and molding removal plastic tools, wrench, wrench extensions (much easier to get around), metric wrench head #13, phillips screwdriver, torx bit T20 and T8, small flat screwdriver for things that cant be pulled by the plastic tools (see Pic1). To let headliner lose you need to remove covers for pillars A, C and D. NOTE: No need to remove pillar B cover (between doors), compounded cover goes all the way to the bottom so it would be a real PIA to remove it. The headliner edge around the pillar is not reinforced so very flexible and can be pulled and tuck in without any damage to the surface. Before start make sure to open your sunroof for better access and more light. Pillar D cover - is held by 3 plastic clips so simply pull it out. Pillar C cover - you need to first remove the rear seat leather edge, pull it from the top, there is large while clip that holds it right on the middle and two C shaped plastic strips that slide into the bottom opening so make sure not to break them. Pillar C cover is held by a black plastic clip at the bottom, black screw (phillips) and a T20 screw behind the plastic Airbag plug. Once removed, let the cover hang on the seatbelt (see Pic4). Pillar A cover - start by unscrewing the bolt behind plastic Airbag plug. It is tricky as the bolt is in angled position and the windshield doesnt let enough room, good if you have a short handle screw driver or use an allen wrench. Once unscrewed, unclip only top part of the cover (simply pull) and let it hang no need to remove the entire cover. Now you need to remove all of the handles with the phillips screwdriver. Use very small allen wrench to pop the cover to access the screw heads or you can do the same with the paper clip. Sunvisors pop the cover where the sunvisor is attached to the headliner, you will see 3 screw heads so use phillips screwdriver to remove them. On the other side where sunvisor clips (near rear view mirror) pop the cover and remove the screw. I let both sunvisors just hang on the cable. Light console - use you plastic tolls to pry the console around so it should pop out, there is nothing it holding but clips all around. Pull it from the windshield side. Behind the console you should see two black plastic clips that hold the headliner to the roof. When you move the headliner you should see them holding the black plastic frame of the headliner. The clips are pulled out in two pieces. I let the console hang on all the cable (see Pic5). It also keeps headliner from falling down. Outside sunroof there are 4 small screws (use torx bit T8) holding the headliner from the outside roof. The sunroof covers them so you need to have it open (see Pic6). Remove them. Now when all the attachments/support pieces are removed, use the plastic tool to work your way around the headliner to pull it from underneath the rubber seals all around the roof of the car. When you do these, clips around the sunroof would let go from the weight of the headliner, if not just push it down by inserting your hand in between metal roof and headliner. There is no need to remove the headliner from the car I left it sitting on the headrests. You can shift it around when trying to access the roof rails hex nuts. Now removing the old rails there are three hex nuts that hold them to the roof. You cant see them right beneath the headliner as they are deep inside the roof frame brackets - this is why having different wrench extensions would help (see Pic7) . You might need to push airbag curtains of the way but no need to remove them. If you are removing old rails, you can spot locations of the bolts and hex nuts by where the rails are attached to the roof. You will need a wrench head #13 to remove all three hex nuts (see Pic8). I recommend use electrical or masking tape to keep the head attach to the wrench as you can easily loose it inside the roof bracket when pulling out. Also be careful not to lose the hex nuts when pulling out. Note that in order to access the rear hex nuts you need to remove two rubber seals that will allow you to insert the wench head (see pic9 and 10). Once all three hex nuts are removed you can pull the rails up (pic11 and 12). When the new rails are installed, follow the steps above to reattach the headliner (start with the clips around the sunroof to center the headliner, then tackle it underneath the B pillars as I mentioned before around 1 cm of the headliner edge surrounding B pillar area is soft so dont be afraid if it looks like it is getting cracked or bended, once repositioned (use plastic tools to tuck ) it would look fine). Then reinstalled all the components and finally tuck in the edges of the headliner underneath he rubber strips around the roof. Done! Here is some additional aid from fellow forum members note that this one is for E53 but still has detailed visuals that might help: http://www.xoutpost.com/attachments/...a-sunroof-.pdf And here is another post of how it was done on the 01 740: Replacing the headliner (LOTS of photos)
__________________
2009 X5 3.0si Black Sapphire / Black Nevada + STOCK: Sport, Premium, Tech, Adaptive Drive, Self-Leveling, Sirius, Climatised/Heated/Comfort/Active Seats, High Gloss Shadowline + MODS: BMW Performance (Aero Kit, Aero Rocker Panels), X5M Roof Railing, LCI Grills, 3M 25% Tint, LUX H8 V3 2007 328xi Alpine White / Black Dakota (wifey's ride) 2001 X5 3.0i Topaz Blue / Grey (sold) 
|
| Sponsored Links | |
|
|
|
|
#2
07-13-2013, 12:14 AM
|
||||
|
||||
|
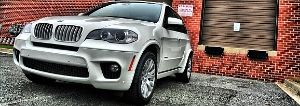
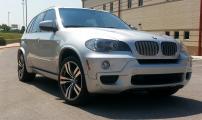
Final Product
Final Product
__________________
2009 X5 3.0si Black Sapphire / Black Nevada + STOCK: Sport, Premium, Tech, Adaptive Drive, Self-Leveling, Sirius, Climatised/Heated/Comfort/Active Seats, High Gloss Shadowline + MODS: BMW Performance (Aero Kit, Aero Rocker Panels), X5M Roof Railing, LCI Grills, 3M 25% Tint, LUX H8 V3 2007 328xi Alpine White / Black Dakota (wifey's ride) 2001 X5 3.0i Topaz Blue / Grey (sold)
|
|
#3
07-13-2013, 12:23 AM
|
||||
|
||||
|
wow you are brave!!! great right up, it looks great man! so from the pictures, you cant really do a rack delete right? the holes left behind are huge!
__________________
 "This is My X5 there are many like it but this one is mine" "This is My X5 there are many like it but this one is mine"
|
|
#4
07-13-2013, 12:30 AM
|
||||
|
||||
|
Quote:
__________________
2009 X5 3.0si Black Sapphire / Black Nevada + STOCK: Sport, Premium, Tech, Adaptive Drive, Self-Leveling, Sirius, Climatised/Heated/Comfort/Active Seats, High Gloss Shadowline + MODS: BMW Performance (Aero Kit, Aero Rocker Panels), X5M Roof Railing, LCI Grills, 3M 25% Tint, LUX H8 V3 2007 328xi Alpine White / Black Dakota (wifey's ride) 2001 X5 3.0i Topaz Blue / Grey (sold)
|
|
#6
10-21-2013, 02:40 PM
|
||||
|
||||
|
Quote:
__________________
2009 X5 3.0si Black Sapphire / Black Nevada + STOCK: Sport, Premium, Tech, Adaptive Drive, Self-Leveling, Sirius, Climatised/Heated/Comfort/Active Seats, High Gloss Shadowline + MODS: BMW Performance (Aero Kit, Aero Rocker Panels), X5M Roof Railing, LCI Grills, 3M 25% Tint, LUX H8 V3 2007 328xi Alpine White / Black Dakota (wifey's ride) 2001 X5 3.0i Topaz Blue / Grey (sold)
|
|
#8
10-23-2013, 12:14 AM
|
|||
|
|||
|
Quote:
  Nice work on the rail swap,,I was thinking of doing it on our diesel. .
__________________
X5M Eisenmann exhaust, de-Catted down pipes, 22" HRE wheels, ECUProgram stage II (700hp) tune X5 35d Tuned and Lowered Last edited by Sylvan Lake V35; 10-23-2013 at 12:23 AM.
|
|
#9
10-23-2013, 02:40 AM
|
|||
|
|||
|
I have the low profile rails. Anyone know which crossbars will work? Or will the ones that fit the regular rails also work on the low profile ones?
__________________
 2006 E90 330i (retired) 2009 E90 335i (retired) 2012 E70 X5 50i MSport
|
|
| Bookmarks |
|
|
|
|


 Linear Mode


