
|
|
|
|
||||||||||
| Xoutpost server transfer and maintenance is occurring.... |
| Xoutpost is currently undergoing a planned server migration.... stay tuned for new developments.... sincerely, the management |
 |
|
|
LinkBack | Thread Tools | Display Modes |
|
#61
 02-01-2020, 01:28 PM
|
|||
|
|||
|
https://www.pelicanparts.com/techart...eplacement.htm I was going to attack mine today but I won't have time it seems. This procedure seems less involved but It looks a bit tight to get them out.
__________________
2010 BMW M6 * Black Saphire Metallic * Full Black Merino Leather 2019 BMW X3 M40i * Alpine White * Mocha Leather 
|
| Sponsored Links | |
|
|
|
|
#62
02-01-2020, 03:12 PM
|
||||
|
||||
|
Quote:
My HF engine support bar came in and a test fit does show it will fit across the front if I only support the support bracket in the front by the vanos and PS reservoir. I looked for one in the rear but isn't very evident where it might be. I wonder if the transmission mounts would support the rear and allow me to simply support the front?
__________________
Digital Competition Systems The older I get... The faster I was... No Fear 
Last edited by Overboost; 02-01-2020 at 04:51 PM.
|
|
#63
02-02-2020, 01:31 AM
|
|||
|
|||
|
Quote:
|
|
#64
02-02-2020, 08:42 AM
|
||||
|
||||
|
Yeah i think the front lift point is enough for this job. But I'm with you, i would prepare to lower the subframe. Just read the comments in that Pelican article.
So, are you installing new bolts or just the mounts?
__________________
2000 e39 M5 Titanium on Black 2006 e53 M54 Titanium on Black 2007 e83 Black on Black Sport pkg 2004 Avalanche 2500 lifted 4.88 gears 1994 jacked up Jeep 1987 GMC lifted short bed on tons
|
|
#65
02-02-2020, 12:14 PM
|
||||
|
||||
|
And all in. So freaking easy I can't believe I was so nervous about replacing them. The HF support bar works perfect on the 3.0L on the single bracket up front only. In short once the engine is lifted, you need another .25"-.5" additional clearance to get the studs of the mounts clear from the brackets once the mounts are moved out of the pockets on the subframe.
On the right side I just loosened the bracket from the engine and that one came right out. Pull it out towards the front. On the left side I just loosened the 3 subframe mounting bolts on the left and didn't even touch the 3 on the right side. I flexed the left side down a little with a pry bar and the mount came right out. Pull it out to the rear. Since the job took 2 hours from raising the X to having it sitting back on new mounts, and the reinforcement plate is out I am going to replace the oil level sensor I ordered previously so off to the auto parts store to get some oil and a filter. I'll edit the steps in this thread:
__________________
Digital Competition Systems The older I get... The faster I was... No Fear
Last edited by Overboost; 02-03-2020 at 08:22 AM.
|
|
#66
02-02-2020, 01:12 PM
|
|||
|
|||
|
Thanks for the write up and photos Overboost. You made my work a lot easier. Just so I'm clear, you removed the engine mount brackets from the engine and subframe and made the engine mount swap on the bench? That's what Bentley and Newtis suggest. I was concerned reading that, that it was going to turn into a cluster. If I'm reading you right it's not a big deal?
I have a new oil level sensor to put in as well. Now the controversial question, reuse or new stiffening plate bolts? =O
|
|
#67
02-02-2020, 01:25 PM
|
||||
|
||||
|
Quote:
Left side engine mount bracket is impossible to loosen or remove because of all the CCV and intake mainifold hoses in that area so lowering the subframe .5" got me what I needed to remove the mount. It was very easy for me, I can't believe I was dreading this work but from all the other engines, it may not be this easy. 3.0L is a piece of cake, even easier than the E46. 
__________________
Digital Competition Systems The older I get... The faster I was... No Fear
Last edited by Overboost; 02-02-2020 at 06:40 PM.
|
|
#69
02-02-2020, 04:38 PM
|
||||
|
||||
|
Quote:
Anyway finished up the oil level sensor, oil change and oil filter and took it for a drive. The vibration at idle is completely gone. No more rattles from items in the console or items in the door panel pockets and the feel of the steering wheel is perfect. And no, I reused the reinforcement plate hardware without a second thought. 
__________________
Digital Competition Systems The older I get... The faster I was... No Fear
|
|
#70
02-02-2020, 04:50 PM
|
||||
|
||||
|
Quote:
From the TIS... Engine mount control The controllable engine mounts are switched to hard or soft corresponding to operating conditions. Function The pressure converter connects the engine mounts to the vacuum supply. When activated by the DDE master control unit, the pressure converter switches vacuum to the engine mounts which in turn switch to soft. The engine mounts are activated at: - low speeds (under around 60 km/h) and - below engine speeds that are dependent on the coolant temperature (the engine speeds are between 1000 rpm and 1200 rpm) Troubleshooting If a defect occurs in the activation of the pressure converter, a fault is stored. The engine mount control is switched off if one of the following faults occurs: - Driving speed signal - Coolant-temperature sensor 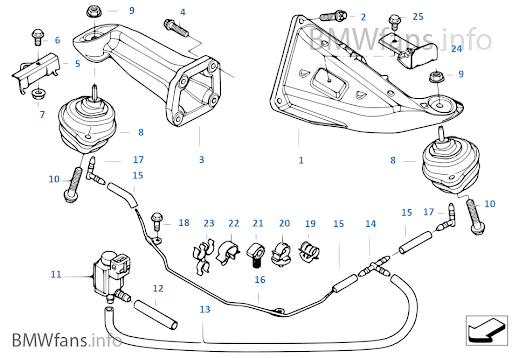
__________________
Wayne 2005 BMW X5 3.0d (b 02/05) 2001 BMW F650GS Dakar (b 06/01) 
|
|
| Bookmarks |
|
|
|
|


 Linear Mode


