Home Forums Articles How To's FAQ Register
Go Back   Xoutpost.com > BMW SAV Forums > X5 (E53) Forum
Arnott
User Name
Password
Member List Premier Membership Today's Posts New Posts

Xoutpost server transfer and maintenance is occurring....
Xoutpost is currently undergoing a planned server migration.... stay tuned for new developments.... sincerely, the management


Reply
 
LinkBack Thread Tools Display Modes
  #71  
Old 02-12-2016, 08:14 PM
Member
 
Join Date: Jun 2013
Location: Virigina, USA
Posts: 2,573
StephenVA is on a distinguished road
__________________

2005 X5 4.8IS
The Blue ones are always FASTER....

Current Garage:
2005 X5 4.8is
2002 M5 TiSilver
2003 525iT
1998 528i
Former Garage Stable Highlights
2004 325XiT Sport
1973 De Tomaso Pantera, L Model
1970 Dodge Challenger T/A 4 sp Alpine White
1970 Dodge Challenger T/A 4 sp GoManGo Green
1971 Dart Sport, “Dart Light” package
1969 Road Runner 383
1968 Ply Barracuda 340S FB Sea-foam Green
Reply With Quote

Sponsored Links

  #72  
Old 06-03-2016, 06:28 AM
LVP LVP is offline
Member
 
Join Date: Mar 2014
Location: Ontario
Posts: 845
LVP is on a distinguished road
I just did this on the front passenger side. One thing to note that will help others. If you look at step 2 of the door handle carrier steps, you can see that as you remove the blank or the lock, there are small indents in the straight profiles of it. When re-installing, you need to insert the blank/lock as far as it will go, press the carrier tight from behind and slide the blank/lock towards the handle. So, squeeze together tight, slide blank/lock towards the handle. This will lock the two together in alignment, but it will also align properly to get that screw mentioned in step 8 of the first post to line up.

Hope that helps.
__________________
Daily Drivers:
- 2008 535i, 290,000km
- 2004 X5 4.4, 01/2004 production, 380,000km
- 1998 328i, 370,000km

Track:
- 1996 328i, track/race car, ~300,000km

Winter:
- 2013 Ski-Doo MXZ X 800 E-TEC, trail can
- 2001 Ski-Doo MXZ 600 w/800 engine, exhaust
- 1978 Ski-Doo Olympique 340 (vintage race sled)
- 1977 Ski-Doo Olympique 340E

Reply With Quote
  #73  
Old 06-17-2016, 11:35 PM
Member
 
Join Date: Jun 2005
Location: Vancouver
Posts: 59
Sphengali is on a distinguished road
BrianX54.4is, thank you so much for the fantastic article, used it to replace 2 different locks yesterday! I had to slim-jim the one door as you detailed, as it stopped opening from inside and outside and central, and replace the lock. Your post made it go super easy! Thank you so much!
__________________
2002 X5 4.4i sport/NAV/ski - upgrades: electrochromatic mirror, aluminium pedals, tinted front windows, 20" rims, //M wheel w/ paddle shifters, CarPC (CarX)
Reply With Quote
  #74  
Old 03-03-2017, 06:14 PM
Member
 
Join Date: Feb 2011
Location: PLANO TX USA
Posts: 23
rkthoka is on a distinguished road
Hi

Not sure if anyone monitoring this thread, if yes may I know your inputs.

On a cold day, my door carrier got struck and with immature knowledge, I pull the handle inside Black wire circular knob off from the place.

Here is the problem, I replace carrier first since I have an issue with key fob does not lock but I use to have rest all like side mirrors all door mirrors and lights are working.

I thought it could Actuator issue then I replace that one.

since then, door mirror will not up and down, key fob will not work, left mirror does not work, only things are working are all lights and driver side door works.

I can here sometimes first unlock on key fob make noise at the door that tells actuator has been working.

after checking further I realized below connectors are loose. If I press on top and then hit the buttons then they are working otherwise they are not

white-gray/green ==> connector for lights and door mirror
Black ==> Side Mirrors

and another switch it seems one of the metal rounds is missing in one of the female port. I do not know to post the pics here.

May I know how will I able to fix this issue and post images
Reply With Quote
  #75  
Old 10-28-2017, 09:12 AM
Member
 
Join Date: Oct 2017
Location: London, UK
Posts: 12
Leicesterboy15 is on a distinguished road
I have been hovering here for a while but I thought this was worthy of a response, I am 5 months into X5 ownership.

This is a very old thread but I am sure its still helping lots of people. It helped me complete a seemingly impossible and expensive task - how do you fix the lock if you can't open the door to get the door card off?!

I followed the instructions and it worked perfectly for me. Two things I will say - make sure you read step 1 properly, I originally put the rod down the wrong gap and had no luck but in the right spot the door was open in seconds!

Second thing is I had a can of copper grease spray and I used this to lube the lock, I took it out the door to do this but realised that you can spray the lock in situ and work the handle a few times until it moves freely. It doesn't save much time but its worth noting, might be worth a precautionary spray on all other locks!

The hardest part for me was getting that stupid plastic clip in the middle of the door car back in to the bracket when putting the door card back on!
Reply With Quote
  #76  
Old 03-06-2018, 03:46 PM
Blackjetvette97's Avatar
Member
 
Join Date: May 2008
Location: Henderson, NV
Posts: 79
Blackjetvette97 is on a distinguished road
Hi all,
Just read through this excellent post(great write-up!)! FYI---that little black plastic dealio in the middle of the inside of door panel is called a "Grip Support"(Part #51418156532). They break cuz they get brittle and when you give a yank to get panel off after detaching all clips/wires/connections/etc., they will crack sometimes.

Steve
__________________
'04 E53 3.0i
189K+ miles
Reply With Quote
  #77  
Old 03-07-2018, 02:48 PM
Member
 
Join Date: Dec 2017
Location: london
Posts: 2
petabusa is on a distinguished road
Stumped

Quote:
Originally Posted by BrianX54.4is View Post
Quite a few of us have experienced problems with the door locks sticking whereby either (a) the door cannot latch closed (pull the door closed and it just swings open again - the latch will not catch) or (b) the door has latched closed and now cannot be opened from either the inside or outside handles even though the door pin/operating rod pops up and down ok with the central locking.

Although there are various things that can go wrong with the lock and outside handle carrier - a common problem can be caused by the door lock mechanism sticking due to corrosion of the moving parts where the cable from the outside handle carrier connects to the door lock. Pulling the outside handle causes the lock mechanism to move up but then it sticks in the up position and it's return spring does not reset it to the resting position when the handle is released. This situation leaves the inner lock mechanism in a position where neither the outside or inside handle can release the catch to open the door.

Lubricating the sticking part involves accessing the door lock which of course involves removing the door card, side airbag and then the lock. Sounds a bit daunting but it's actually strightforward enough and the whole job took me about an hour not having done it before.

Of course if the situation is as (b) above then the lock mechanism must be unstuck before the door can be opened to remove the lock.
The good news is that it is possible to free the stuck mechanism without risking any damage or attempting to remove the door card with the door still closed!!!
Once you know in your minds eye the whereabouts of the stuck parts within the door cavity - a little "keyhole surgery" is all that's needed to get the door open.

You will need the following:
20 inches of wire coat hanger or welding rod or similar thin but stiff wire to free the stuck lock mechanism.
T20 Torx driver/wrench to remove door card.
T30 Torx driver/wrench to remove door lock.
4mm Hex wrench to remove the key cylinder (only required if working on the drivers door).
10mm Socket/wrench to remove the side airbag.
Flat head driver to pry door card clips, window switch and footwell light.
Spray on grease to lubricate the lock mechanism.

I used a welding rod which is quite thin but also very stiff. A wire coat hanger should work just as well. Put a small right angle bend about 8mm on one end and mark the wire about 10 inches from this bend with some tape (as a depth gauge). Bend the other end of the wire in the same or opposite direction (so you can tell which way the other end is pointing when it's in the door).

With the window open - the wire can be pushed down into the door cavity where the inner window channel cover ends. By pure chance, this entry point will drop the wire down exactly where you need it to go!
DO NOT PUT THE WIRE DOWN BETWEEN THE GLASS AND THE INNER SEAL - THIS WILL SCRATCH THE WINDOW TINT!!!

Here is a link to the RealOEM parts diagram of the front door control. Part #1 is the focus of our attention.

Here is a pic of the welding rod I prepared for the job and illustrates how far the wire will need to go down into the door cavity.
Attachment 34751

1. Okay - let's get started!
Open the window and insert the wire between the rubber channel cover and window frame as shown and push it down vertically about 9 to 10 inches with the bent end pointing towards the door jamb. Use the bend at the other end of the wire as a direction reference.
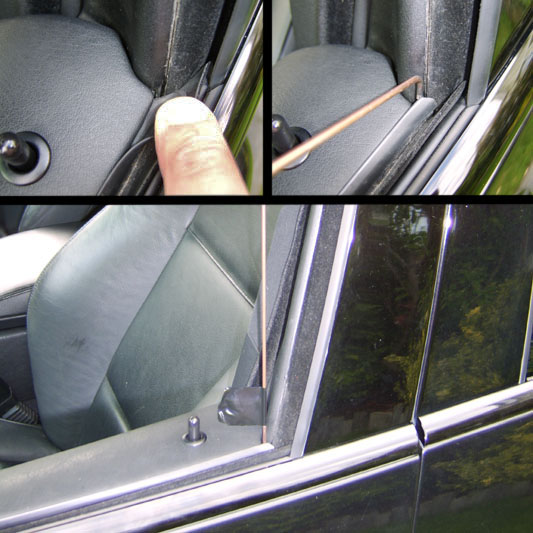
Attachment 34752

2. Raise the outside handle slightly as you prod downwards with the wire. When you feel the handle being pulled back in as you prod down - you know the wire is hitting the right spot. Prod down frimly a few times and then try the inside handle to release the door. Persist with this method until the inner handle releases the catch and the door opens. I got the door open in about a minute. The following pics from inside the door will show you what you are aiming to achieve.
Pic "A" shows the lock mechanism stuck in the raised position.
Pic "B" shows the wire successfully pushing the mechanism down to it's rest position. The door can now be opened with the inside door handle.
Pic "C" shows the wire as it rests on the now reset mechanism.
Pic "D" shows the wire rising as the outside handle is pulled.
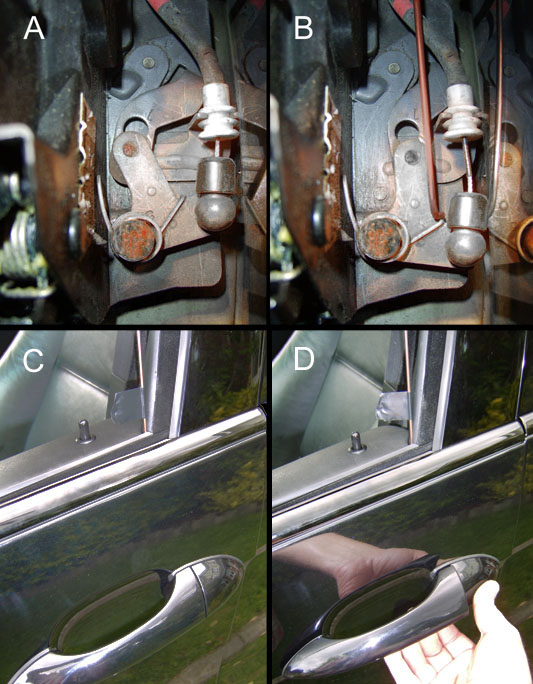
Attachment 34753

3. Now that you have the door open, close the window and remove the door card as follows.
First remove the upper trim as shown below and pop off the "Airbag" sign.
Carefully pry up the window switch and disconnect the wiring as shown.
Attachment 34754

4. Remove the 4 T20 torx screws arrowed red and remove and disconnect the footwell light.
Attachment 34755

5. Starting at the lower inner corner carefully pry free the plastic retaining clips holding on the door card using the flathead driver (use a cloth between the tool and paintwork to avoid scratching).
Now use your fingers working along the bottom and then up the sides to free the remaining clips.
Pull the door card firmly away from the metal clips along the top edge.
Unclip the inner handle bowden cable clip as shown and remove the LED light from the inner door release lever.
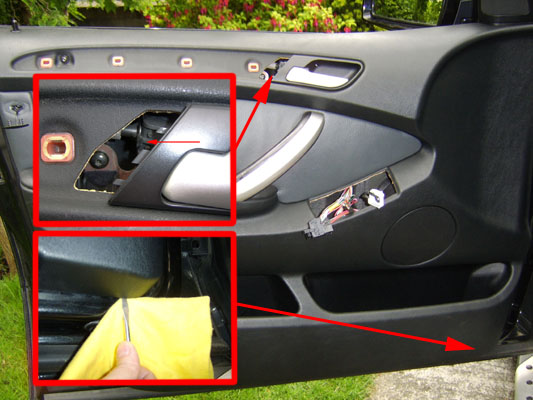
Attachment 34756

6. Put the door card out of the way and the door now looks like this.
Unfix the airbag by removing the 3 bolts - DO NOT DISCONNECT THE CABLE (this could store an SRS fault code).
Gently peel back the foam lining as shown.
Refix the airbag temporarily to the lower fixing point using one bolt as shown.
Attachment 34757

7. Here is a view into the cavity towards the lock (the welding rod used free the mechanism is still in situ).
Release the inner handle bowden cable clip and push out and unhook the cable from the lock.
Use a flathead driver to pop the outer handle cable off the lock at the points shown below.
Attachment 34758

8. If working on the drivers side lock you will need to next remove the key
cylinder.
Pop off the blind plug in the door jamb (centre piece first) and remove the hex screw as shown below.
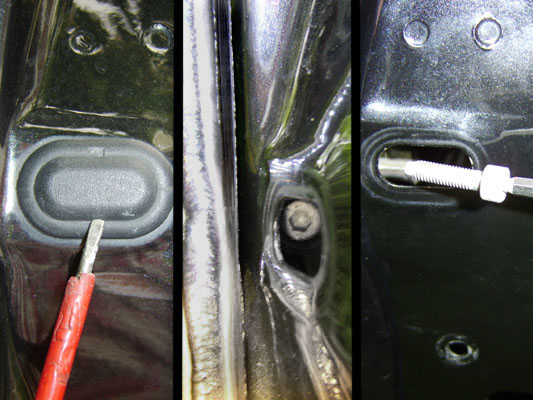
Attachment 34759

9. Pry out the key cylinder (the pic shows the passenger door so this is a cylinder blank).
Now remove the 3 T30 torx screws to release the lock.
Rotate the lock in the door cavity to access and remove the wiring connector
Remove the lock from the door cavity as shown.
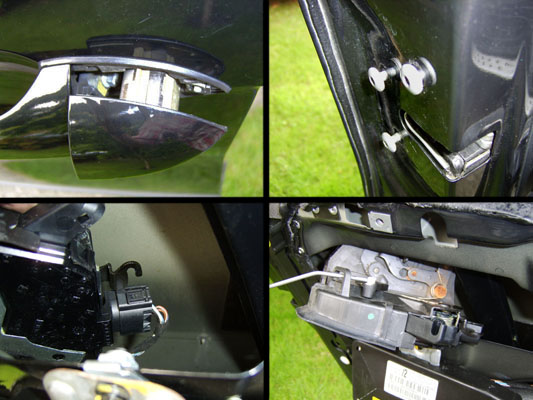
Attachment 34760

10. Here is a pic of the now removed lock.
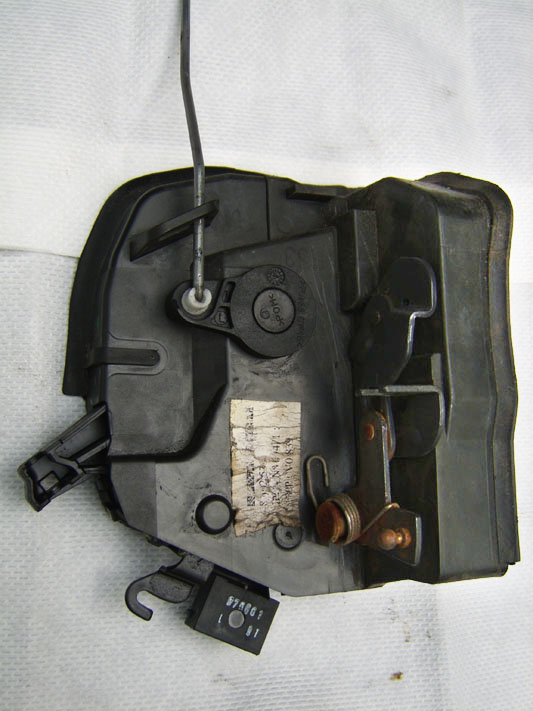
Attachment 34761

11. Below we can see the rust on the moving joints of the exposed mechanism causing the problem.
Apply a good coat of the spray on grease and work it in until the mechanism operates smoothly.
Attachment 34762

Reassemble everything in the reverse order.

[MODS - CAN THIS POST BE PUT IN THE X5 TIPS & TRICKS PAGE?]
Firstly this is a brilliant post but it has not worked for me pushed down hard on the rod as it says but still wont open .Completely stumped don't what to do next ??
Any suggestions most welcome can't think what to try next
Thanks
Reply With Quote
  #78  
Old 06-20-2018, 11:41 AM
Member
 
Join Date: Apr 2018
Location: North Wales
Posts: 1
Grommit is on a distinguished road
Thumbs up

Great write up worked absolutely perfectly. Thank you. Door now back in operation.
Took the handle carrier out for a quick check and lub job, just in case, having had to replace the one of the drivers side a while back.
One point, it may be worth placing a small block of wood in the door jamb, to prevent you inadvertently knocking the door closed whilst manoeuvring around it, like what I did. Both handles were disconnected at the time!!!!!
Reply With Quote
  #79  
Old 07-19-2018, 03:43 PM
Member
 
Join Date: Jul 2018
Location: Cumbria
Posts: 1
ste007 is on a distinguished road
My passenger door has been stuck since we had that bad weather a few months ago,some days the door took 2 or 3 attempts to lock or unlock until eventually it stayed stuck locked.

I have managed to get the door panel off and when looking inside the recess my lock is actually stuck in the position in figure B rather than figure A.

I have pulled on interior door release cable whilst pushing the mechanism up and down but the door still won't open.


My car is in for its MOT tomorrow so I can only hope they can sort it otherwise it won't pass

PS What a bad head trying to get the panel off

Last edited by ste007; 07-19-2018 at 03:48 PM.
Reply With Quote
  #80  
Old 10-02-2018, 03:15 PM
MrT MrT is offline
Member
 
Join Date: Oct 2018
Location: SoCal
Posts: 1
MrT is on a distinguished road
Excellent post. Just went through this for the first time on my '02.

I've done a lot of things on this car, and this ranks right up there in the PIA factor. I used a genuine part and even then had a problem with the new allen head bolt not easily aligning and screwing in to the lock tumbler. Ended up grabbing my original one and it screwed in just fine.

I lost my mind for a good period of time as I went to insert the handle during the reassembly. Got the pivot in just fine (push hard from inside while pushing in hard on the handle to easily insert pivot as well as add some lube). But what jammed me up was that the bolt on the outer part of the handle that has the small nut had moved back a bit and I could no longer lift up on the handle. The screw was apparently catching on the inside of the handle with the door carrier.

Pricing was all over the place with the dealers that ranged from $150-250. I mentioned to 4th dealer I called, who wanted $210 and at least had in stock, and he matched at $150.
Reply With Quote
Reply

Bookmarks


Posting Rules
You may not post new threads
You may not post replies
You may not post attachments
You may not edit your posts

BB code is On
Smilies are On
[IMG] code is On
HTML code is Off
Trackbacks are On
Pingbacks are On
Refbacks are On


All times are GMT -4. The time now is 01:07 AM.
vBulletin, Copyright 2024, Jelsoft Enterprises Ltd. SEO by vBSEO 3.6.0
© 2017 Xoutpost.com. All rights reserved. Xoutpost.com is a private enthusiast site not associated with BMW AG.
The BMW name, marks, M stripe logo, and Roundel logo as well as X3, X5 and X6 designations used in the pages of this Web Site are the property of BMW AG.
This web site is not sponsored or affiliated in any way with BMW AG or any of its subsidiaries.