
|
|
|
|
||||||||||
| Xoutpost server transfer and maintenance is occurring.... |
| Xoutpost is currently undergoing a planned server migration.... stay tuned for new developments.... sincerely, the management |
|
|
LinkBack | Thread Tools | Display Modes |
|
#1
 07-11-2009, 10:19 AM
|
||||
|
||||
|
Quite a few of us have experienced problems with the door locks sticking whereby either (a) the door cannot latch closed (pull the door closed and it just swings open again - the latch will not catch) or (b) the door has latched closed and now cannot be opened from either the inside or outside handles even though the door pin/operating rod pops up and down ok with the central locking.
Although there are various things that can go wrong with the lock and outside handle carrier - a common problem can be caused by the door lock mechanism sticking due to corrosion of the moving parts where the cable from the outside handle carrier connects to the door lock. Pulling the outside handle causes the lock mechanism to move up but then it sticks in the up position and it's return spring does not reset it to the resting position when the handle is released. This situation leaves the inner lock mechanism in a position where neither the outside or inside handle can release the catch to open the door. Lubricating the sticking part involves accessing the door lock which of course involves removing the door card, side airbag and then the lock. Sounds a bit daunting but it's actually strightforward enough and the whole job took me about an hour not having done it before. Of course if the situation is as (b) above then the lock mechanism must be unstuck before the door can be opened to remove the lock. The good news is that it is possible to free the stuck mechanism without risking any damage or attempting to remove the door card with the door still closed!!! Once you know in your minds eye the whereabouts of the stuck parts within the door cavity - a little "keyhole surgery" is all that's needed to get the door open. You will need the following: 20 inches of wire coat hanger or welding rod or similar thin but stiff wire to free the stuck lock mechanism. T20 Torx driver/wrench to remove door card. T30 Torx driver/wrench to remove door lock. 4mm Hex wrench to remove the key cylinder (only required if working on the drivers door). 10mm Socket/wrench to remove the side airbag. Flat head driver to pry door card clips, window switch and footwell light. Spray on grease to lubricate the lock mechanism. I used a welding rod which is quite thin but also very stiff. A wire coat hanger should work just as well. Put a small right angle bend about 8mm on one end and mark the wire about 10 inches from this bend with some tape (as a depth gauge). Bend the other end of the wire in the same or opposite direction (so you can tell which way the other end is pointing when it's in the door). With the window open - the wire can be pushed down into the door cavity where the inner window channel cover ends. By pure chance, this entry point will drop the wire down exactly where you need it to go! DO NOT PUT THE WIRE DOWN BETWEEN THE GLASS AND THE INNER SEAL - THIS WILL SCRATCH THE WINDOW TINT!!! Here is a link to the RealOEM parts diagram of the front door control. Part #1 is the focus of our attention. Here is a pic of the welding rod I prepared for the job and illustrates how far the wire will need to go down into the door cavity.  1. Okay - let's get started! Open the window and insert the wire between the rubber channel cover and window frame as shown and push it down vertically about 9 to 10 inches with the bent end pointing towards the door jamb. Use the bend at the other end of the wire as a direction reference. 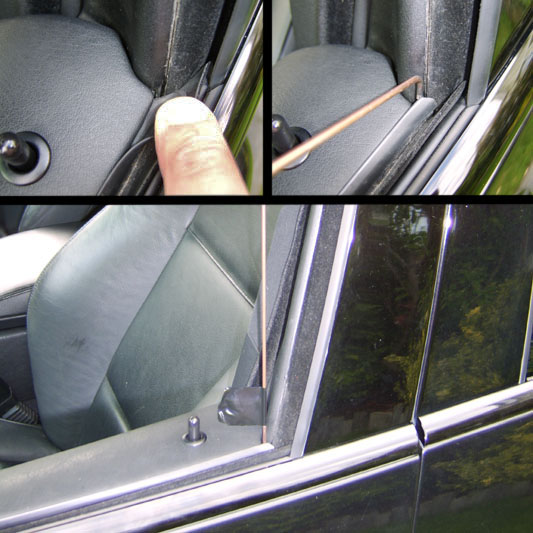 2. Raise the outside handle slightly as you prod downwards with the wire. When you feel the handle being pulled back in as you prod down - you know the wire is hitting the right spot. Prod down frimly a few times and then try the inside handle to release the door. Persist with this method until the inner handle releases the catch and the door opens. I got the door open in about a minute. The following pics from inside the door will show you what you are aiming to achieve. Pic "A" shows the lock mechanism stuck in the raised position. Pic "B" shows the wire successfully pushing the mechanism down to it's rest position. The door can now be opened with the inside door handle. Pic "C" shows the wire as it rests on the now reset mechanism. Pic "D" shows the wire rising as the outside handle is pulled. 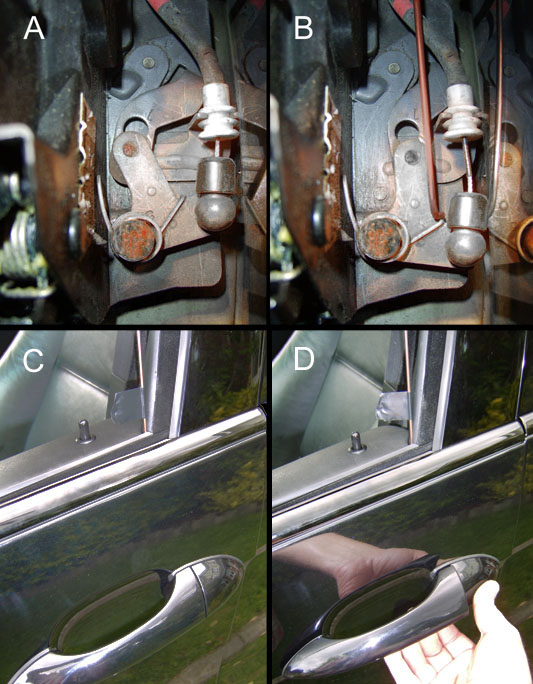 3. Now that you have the door open, close the window and remove the door card as follows. First remove the upper trim as shown below and pop off the "Airbag" sign. Carefully pry up the window switch and disconnect the wiring as shown.  4. Remove the 4 T20 torx screws arrowed red and remove and disconnect the footwell light.  5. Starting at the lower inner corner carefully pry free the plastic retaining clips holding on the door card using the flathead driver (use a cloth between the tool and paintwork to avoid scratching). Now use your fingers working along the bottom and then up the sides to free the remaining clips. Pull the door card firmly away from the metal clips along the top edge. Unclip the inner handle bowden cable clip as shown and remove the LED light from the inner door release lever. 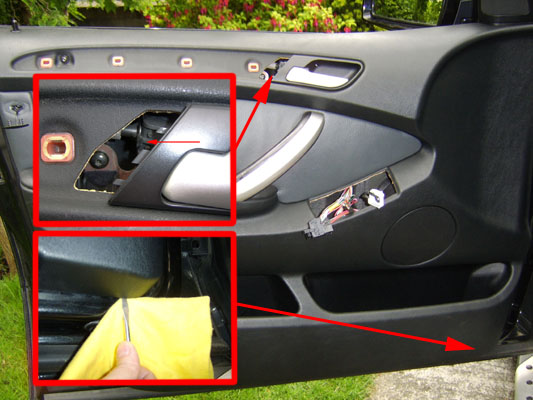 6. Put the door card out of the way and the door now looks like this. Unfix the airbag by removing the 3 bolts - DO NOT DISCONNECT THE CABLE (this could store an SRS fault code). Gently peel back the foam lining as shown. Refix the airbag temporarily to the lower fixing point using one bolt as shown.  7. Here is a view into the cavity towards the lock (the welding rod used free the mechanism is still in situ). Release the inner handle bowden cable clip and push out and unhook the cable from the lock. Use a flathead driver to pop the outer handle cable off the lock at the points shown below.  8. If working on the drivers side lock you will need to next remove the key cylinder. Pop off the blind plug in the door jamb (centre piece first) and remove the hex screw as shown below.  9. Pry out the key cylinder (the pic shows the passenger door so this is a cylinder blank). Now remove the 3 T30 torx screws to release the lock. Rotate the lock in the door cavity to access and remove the wiring connector Remove the lock from the door cavity as shown. 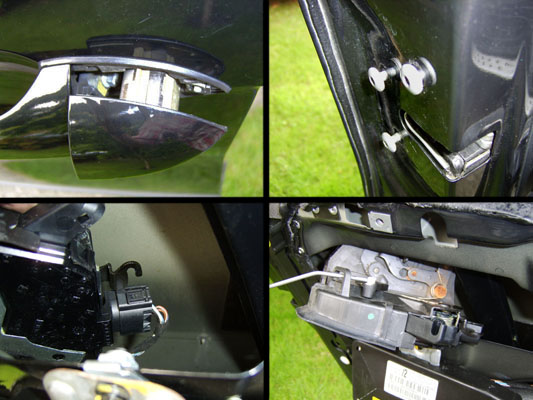 10. Here is a pic of the now removed lock. 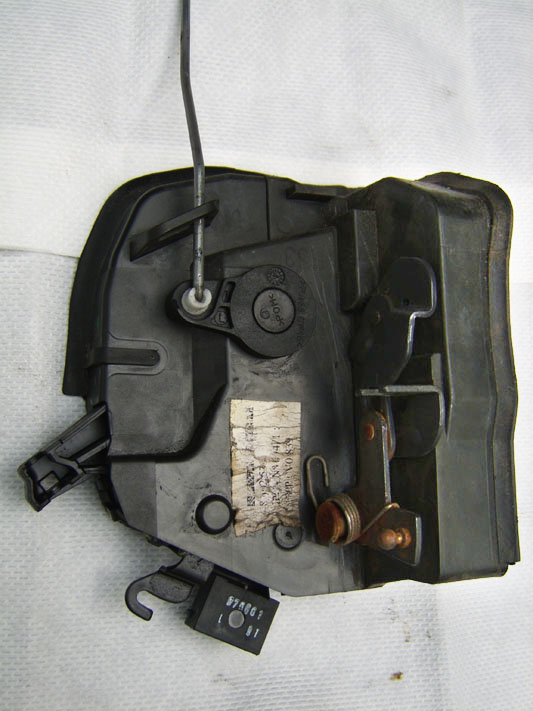 11. Below we can see the rust on the moving joints of the exposed mechanism causing the problem. Apply a good coat of the spray on grease and work it in until the mechanism operates smoothly.  Reassemble everything in the reverse order. [MODS - CAN THIS POST BE PUT IN THE X5 TIPS & TRICKS PAGE?]
__________________
Cheers, Brian ========================================= 2001 X5 4.4i Sport Black Sapphire, Hi Gloss Shadowline, Full Privacy Glass. Too Cool for Jack Bauer 

|
| Bookmarks |
|
|
|
|


 Threaded Mode

