
|
|
|
|
||||||||||
| Xoutpost server transfer and maintenance is occurring.... |
| Xoutpost is currently undergoing a planned server migration.... stay tuned for new developments.... sincerely, the management |
 |
|
|
LinkBack | Thread Tools | Display Modes |
|
#21
 05-03-2011, 12:50 PM
|
|||
|
|||
|
Thanks, and A-clutch Drum Question
Have another comment: Can't really tell from your otherwise excellent pic of all the parts, but looks like A-clutch drum might be early design without the reinforcing swedges that RRPhil talks about in his post to civdiv99 thread. If yours is early design what do you think about replacing with A-drum of new design? 
|
| Sponsored Links | |
|
|
|
|
#23
05-03-2011, 05:59 PM
|
||||
|
||||
|
Six or eight weeks have gone by since I visited this thread. Sorry I'm behind the curve on your project, or I would have weighed in sooner. On mine, I only disconnected the oil cooler lines from the trans and then zip-tied them out of the way (I've replaced the stock trans cooler with a B&M supercooler of greater capacity and mounted to the front of the rad behind the elect fan. Very clean fit and install, but that's another topic).
The sway bar comes out through wheel well after you remove the wheel from the side you are sliding it out. Transfer case is pretty light - I removed it first which makes it real easy to sight up along the top of the transmission case when working with bell housing bolts. (yer head will fit up where the transfer case was). Front drive shaft where it bolts to the front diff is a "sandwhich" of parts. Over time, that is not evident. Once you find the joints of the sandwich (tap the area to dislodge corrosion or free up the parts), then you can slide the shaft back into the transfer case and separate that sandwich after which the shaft will come forward far enough. You've already figured out that taking the tranny itself apart is not a big deal - but maybe I missed it - do you have the ZF manual? Also, make sure you retrieve the rubber grommets within the case where the oil lines connect to the D and E clutch (brake) pack, unless you already have a complete rebuild kit on hand. The grommets WILL tear when you pull the lower tower shaft and assy out of the case, and you will be stuck until you can replace those grommets. I also suggest loosening the screws holding the rear transmission to transfer case adapter (Torx 40) before you start pulling internal parts. Much easier to break them loose when you are dealing with the whole unit. Since everything else come out the "front end", I'd suggest strapping the case to something solid so it doesn't want to tip over while you are pulling the towers. The 2nd tower you pull is rather heavy for the amount of shaft you have to hold onto, and you greatly risk a smooth oily shaft slipping out of your hand while partway out of the case (it's a snug fit w/housing). I secured the case vertically, and removed that tower using an engine crane w/rubber clamp onto the shaft. Allows you to move slowly and carefully and not have to manually hold and maneuver and support and so forth as you pull the assy. Civdiv99
|
|
#24
05-03-2011, 07:10 PM
|
|||
|
|||
|
TriX5,
Great work so far! As you mentioned that there was a lot of metallic debris floating around your transmission I wondered if you were intending to strip the valve block to check & clean it? Both pressure reducing valve circuits, for example, have a mesh filter fitted ahead of the solenoid valves to protect them from debris, which may have become partially blocked? 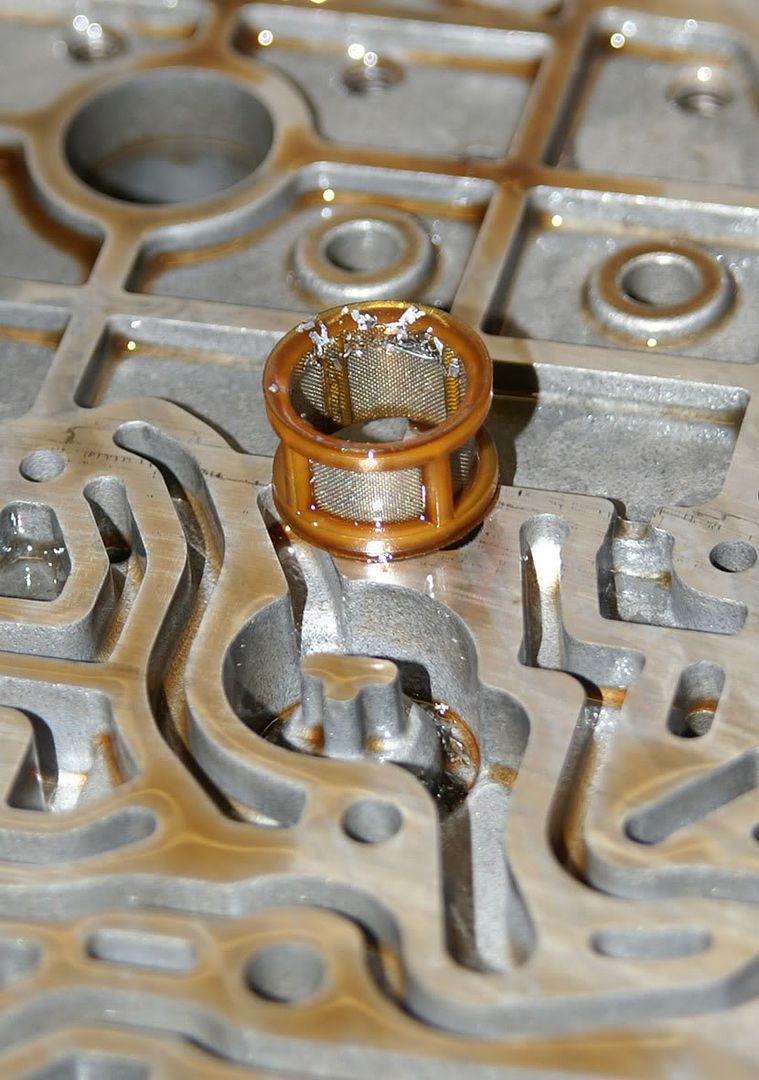 The valve block is easy to strip and rebuild. There will be a new gasket included in the overhaul kit and the only tool required is a Torx T27 driver which you must already possess to have got this far. 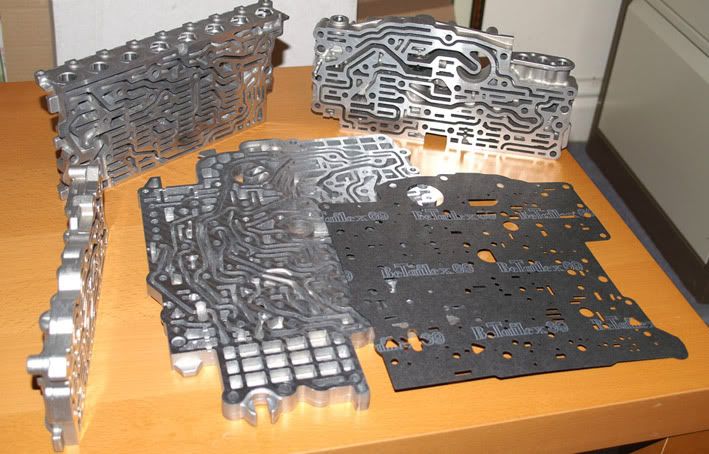 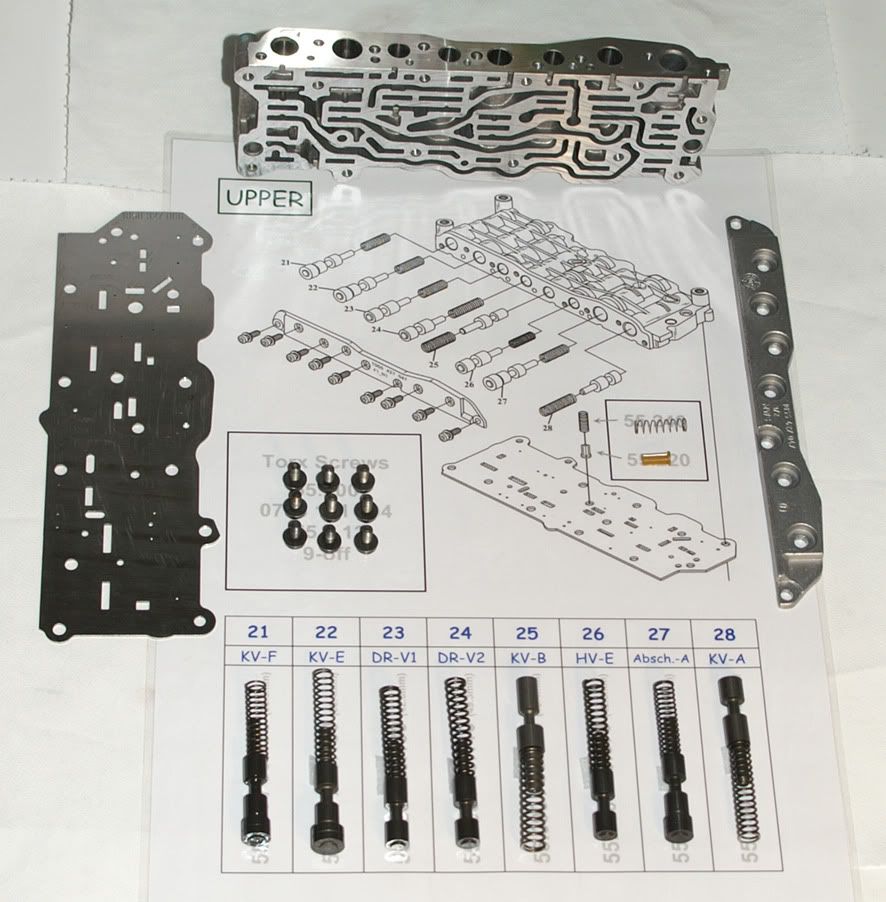 Phil
|
|
#25
05-03-2011, 07:21 PM
|
||||
|
||||
|
Aaaah, thanks for those pictures Phill! Yes, I ordered the kit for the valve body. I think it is worth having a look for shavings in there and as a preventive maintenance item.
Also, given that I drained everything by now, AT, TQCV and cooler, once the whole thing is back on the car, do I simply fill through the fill hole and keep going with engine running once at level? Or do I pour fluid into the TQCV before I fit it on the AT? For those US based, I don't have a washing station. Two questions, where can I buy one reasonably priced and what liquid to use that does not interfere with the AT fluid once reassembled? Finally, I was wondering if I should keep the oil lines to the cooler and cut off the rubber parts with the fiitings and then reassemble with new hoses and a couple of hose clamps? The rubber would be on smooth pipe and might slip off? How much pressure comes on there anyway? CivDiv, the grommets are in the overhaul kit, I had to shear one of them as I could not remove it. Everybody, thanks for the interest, help and support! :-)
|
|
#26
05-05-2011, 10:07 AM
|
|||
|
|||
|
Ive attached a few more photos showing the valve block internals, in case its of any help.
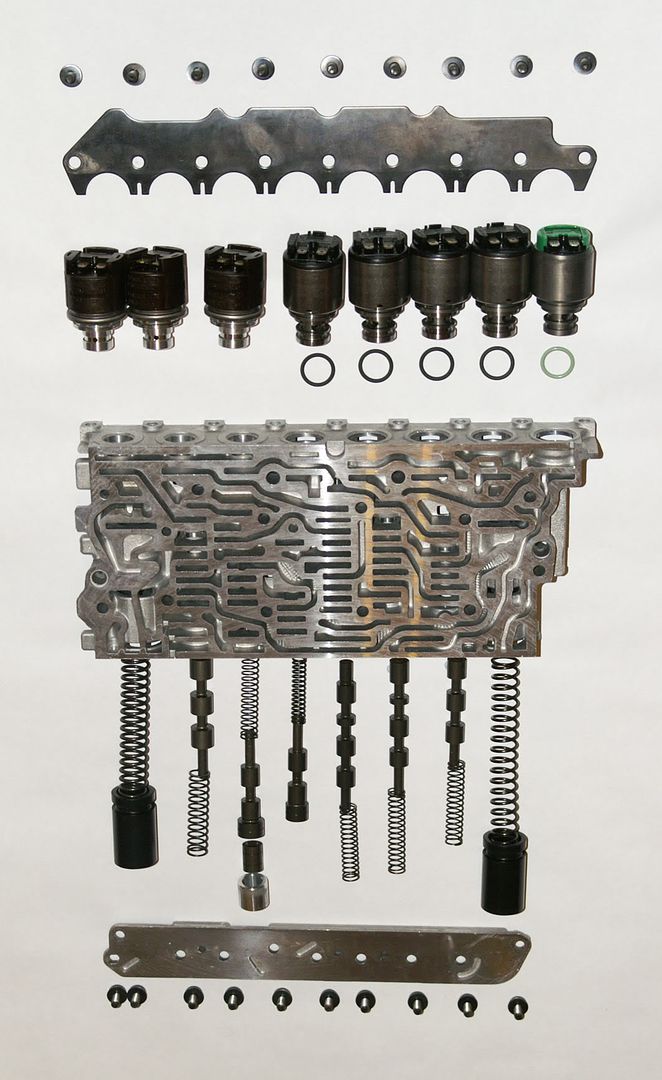 Lower Rear Block 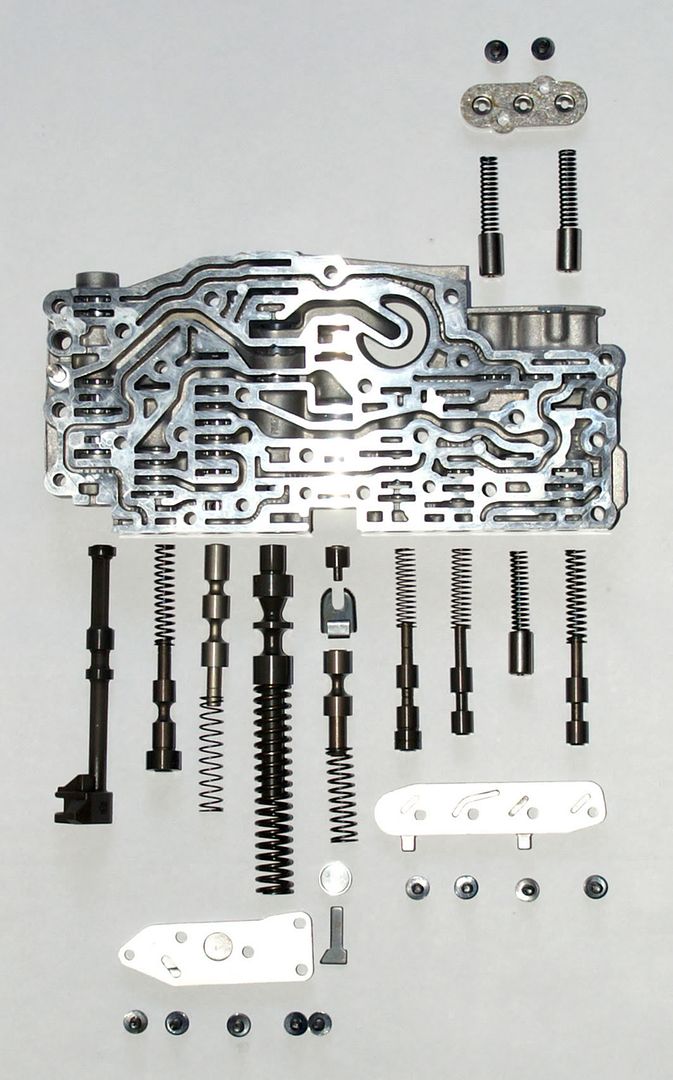 Lower Front Block 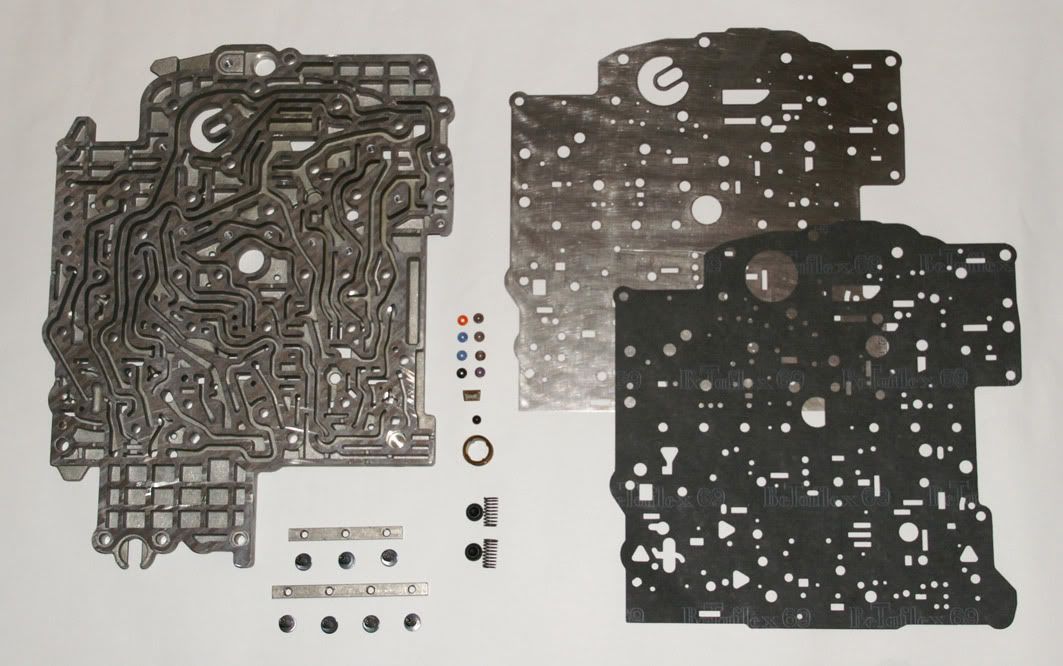 Duct Plate & Orifice Plate 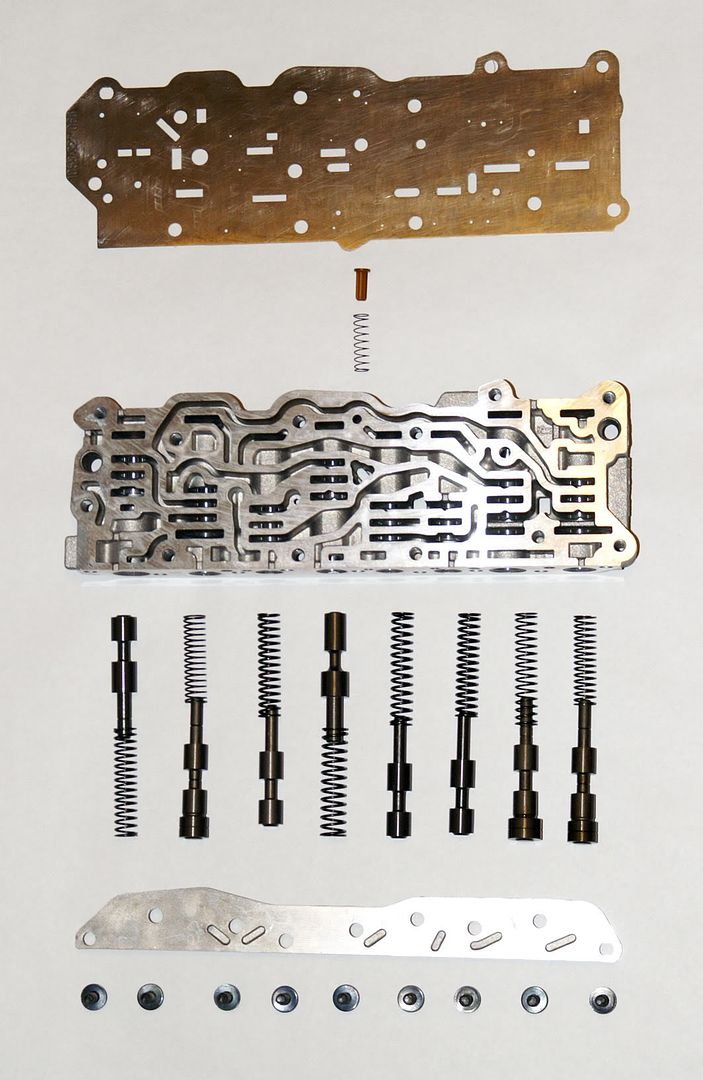 Upper Rear Block Regarding pre-filling the torque converter with fluid I must admit that I dont bother. The 5HP24s pump shifts around 15 litres/minute at tickover so it will only take a few seconds to fill the converter. For the rubber jump tubes that seal the C & D clutch feeds between the maincase and the shared clutch drum, I have made a special tool that enables them to be pulled out whole (not unlike a cork from a wine bottle) making removal of the clutch drum a simple affair. If anyone needs details of the tool, just shout. Phil
|
|
#27
05-05-2011, 01:07 PM
|
||||
|
||||
|
Great photos.
__________________
2007 X3 3.0si, 6 MT, Premium, White Retired: 2008 535i, 6 MT, M Sport, Premium, Space Grey 2003 X5 3.0 Steptronic, Premium, Titanium Silver 2002 325xi 5 MT, Steel Grey 2004 Z4 3.0 Premium, Sport, SMG, Maldives Blue
|
|
#29
05-05-2011, 06:40 PM
|
|||
|
|||
|
Oh dear, I fear Ive really oversold my jump tube removal tool and youre now expecting some ingenious corkscrew-type device! Im sorry to disappoint but this is all it is :
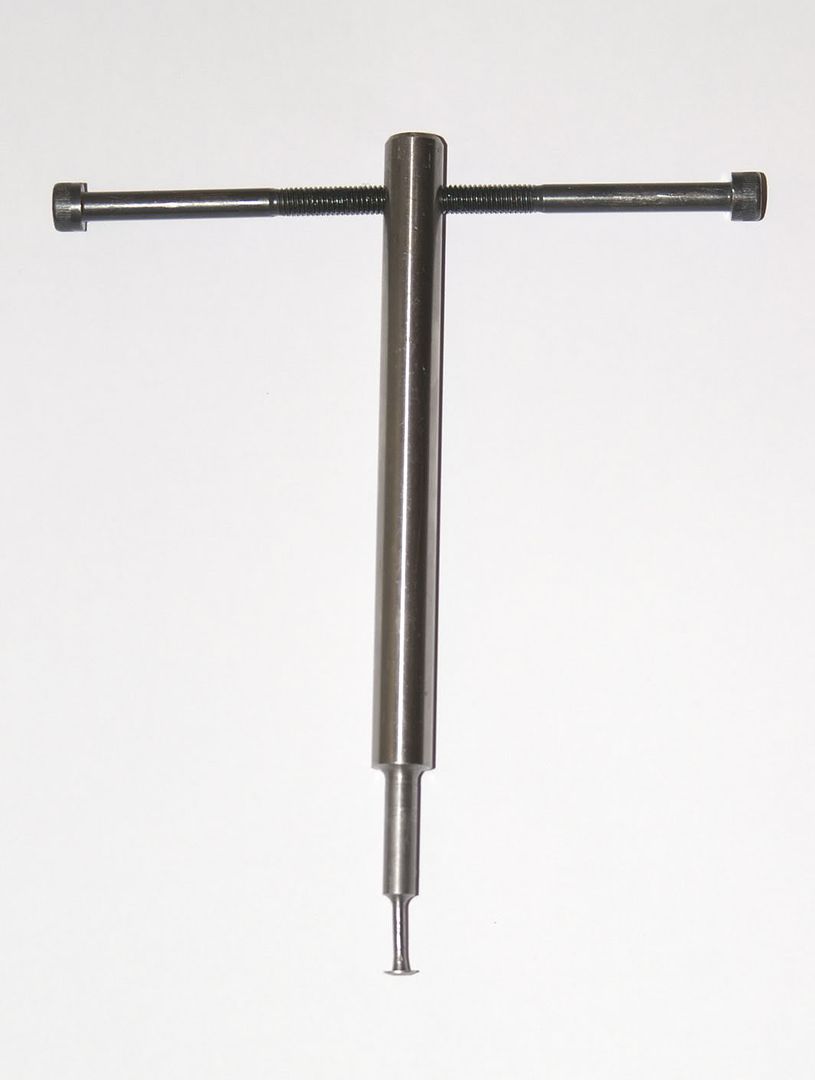 ..... well used & a bit bent after years of faithful service. You can see that the head just fits through the central hole in the jump tube : 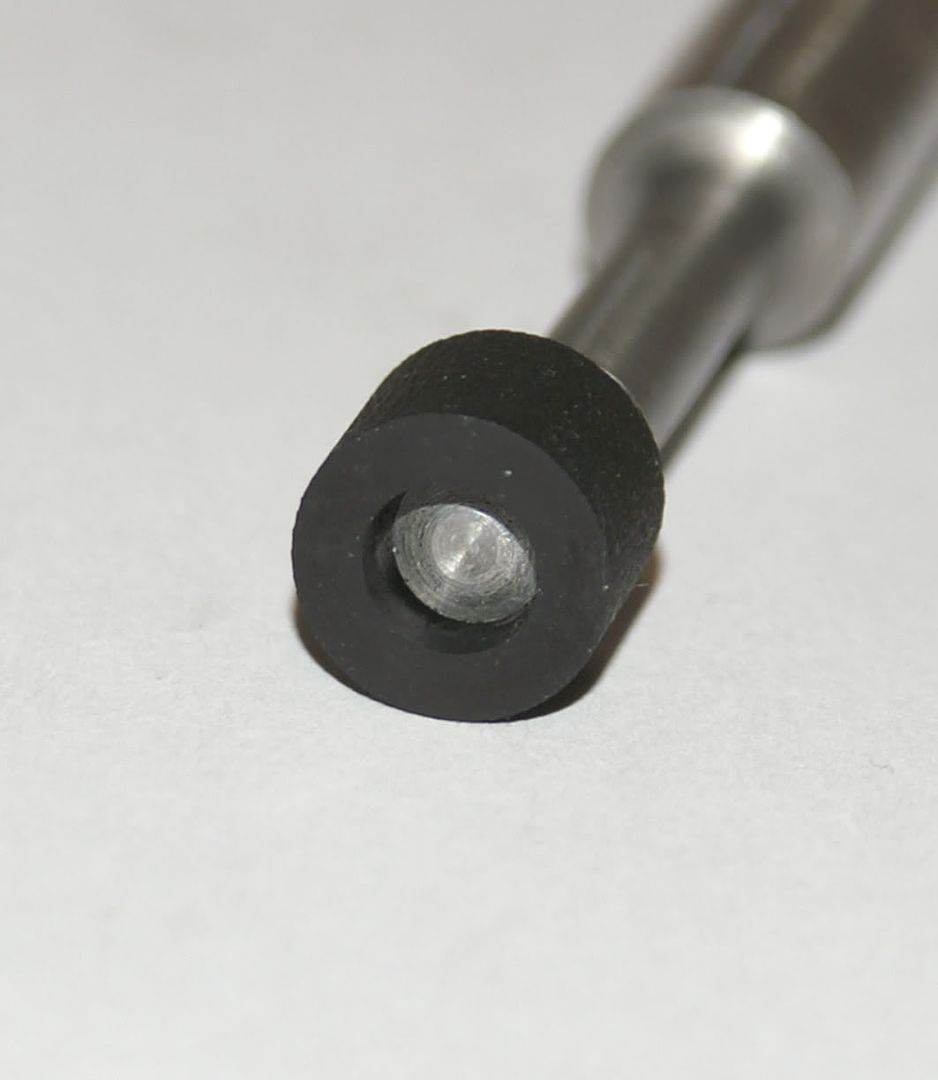 and then its pulled to one side to get between the spotface on the clutch drum that it seals against and the underside of the rubber tube then pull! 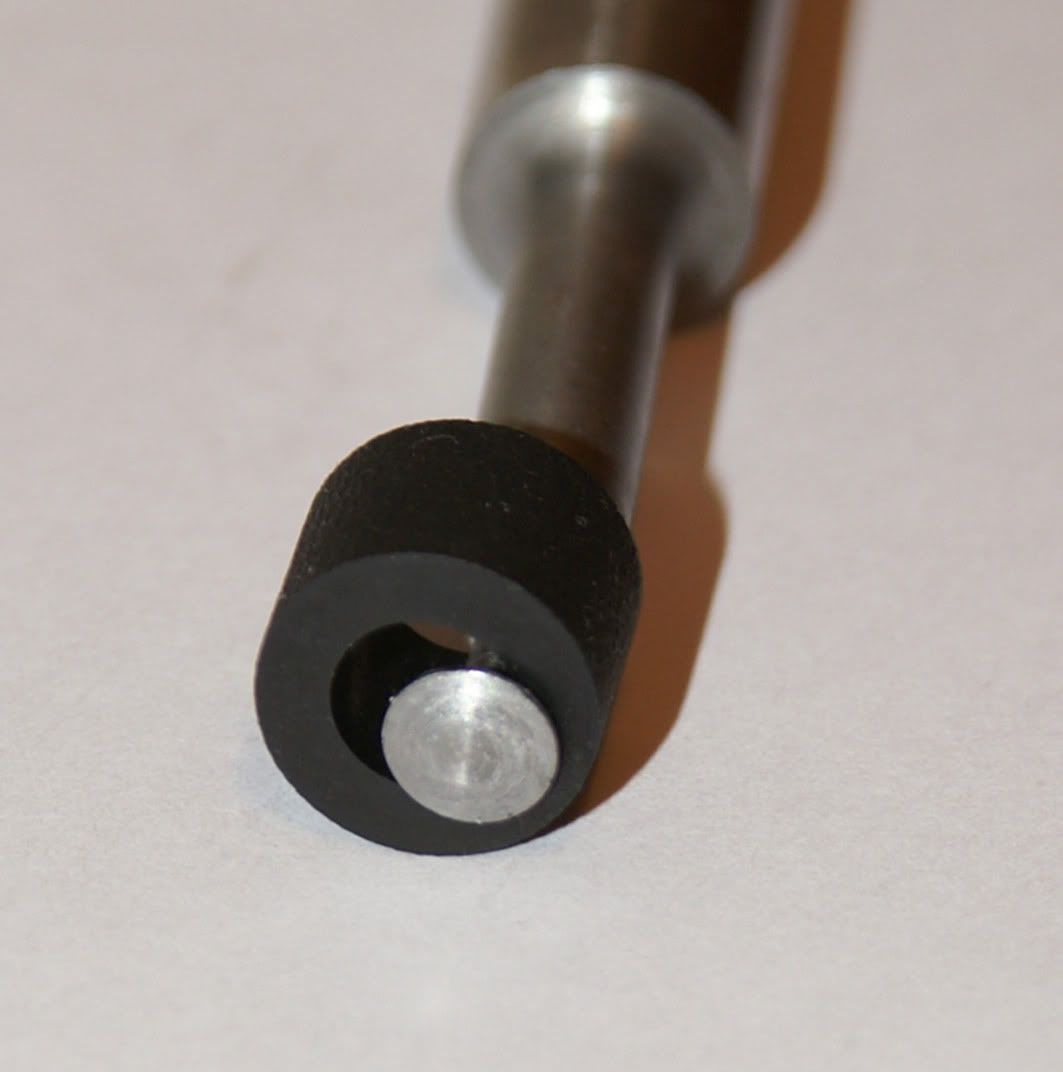 The official ZF tool - as shown in the repair manual - will, I suspect, look very similar : 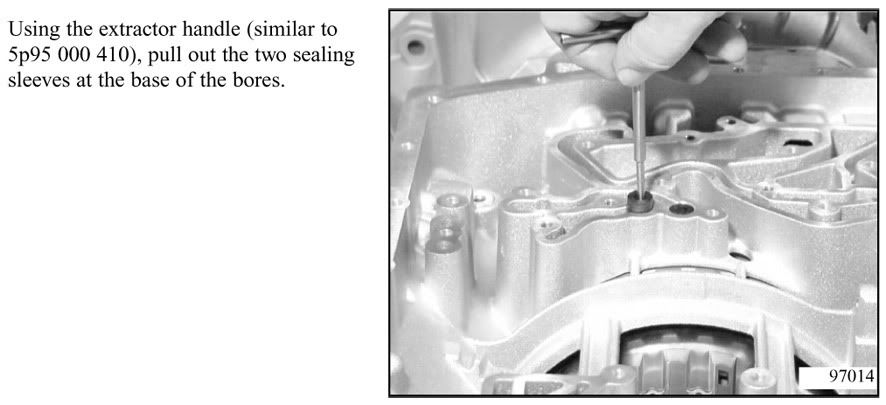 New tubes are included in the overhaul kit so it doesnt matter if they get damaged during the removal process. Phil
|
|
#30
05-05-2011, 09:21 PM
|
||||
|
||||
|
Wow, great pictures. Looks slightly daunting but doing it this weekend with plenty of time and daylight should be helpful.
I need to drop my TqCv in Baltimore tomorrow and order the new one. The rest of the day is filled with driving the desk again. Hope I find time on Saturday to work on the AT and I might manage to take Tuesday off but there always seems to be something happening that needs me to be at the office. These last few evenings been busy prepping the motor to swap the valley pan gasket. I am down to the intake manifold and maybe tomorrow evening I'll be getting the rear coolant manifold and the pan off. I guess I'll get the gaskets from the dealer rather than waiting for shipment. (Looking for some advise on what else to replace back there while I have access in a separate thread). There is no oil in the spark plug holes so I can at least skip that operation for the moment.
|
|
| Bookmarks |
|
|
|
|


 Linear Mode


