|
||||||||
| Xoutpost server transfer and maintenance is occurring.... |
| Xoutpost is currently undergoing a planned server migration.... stay tuned for new developments.... sincerely, the management |
 |
|
|
LinkBack | Thread Tools | Display Modes |
|
#1
|
||||
|
||||
|
The most common issues for the N62 are coolant and oil leaks from various places. These leaks can occur at relatively low miles will lead to expensive repairs if done by a shop. These leaks are caused by some bad design choices, cheap materials, and the engine running a little hotter than it probably should. Rubber gaskets get too hot, petrify, and fail prematurely. The N62 is used in a wide range of vehicles over a large year span. The below issues can impact certain variations of the N62 differently. The below information may not exactly match your vehicle. Your engine may not be prone to all of these problems and repairing it may vary slightly. Below are some great DIY’s/links from elsewhere on the internet… Valve covers E63 E64 N62 V8 Valve Cover Removal W/ Pics DIY - Bimmerfest - BMW Forums https://www.youtube.com/watch?v=u5Tqpk90gU0 https://xoutpost.com/bmw-sav-forums/...r-stuck-3.html Alternator bracket / Oil cooler thermostat seal http://www.xoutpost.com/bmw-sav-foru...k-2007-x5.html Secondary air system https://www.youtube.com/watch?v=CMOjFAKUt30 Valve stem seals E53 N62 Valve Stem Seal Replacement DYI - Bimmerfest - BMW Forums Coolant transfer pipe (valley pipe) & Valley pan https://www.youtube.com/watch?v=JioCTDpVpEo http://www.xoutpost.com/bmw-sav-foru...2-content.html https://xoutpost.com/bmw-sav-forums/...-n62-4-8l.html https://xoutpost.com/bmw-sav-forums/...christmas.html AC belt & pulley DIY https://xoutpost.com/bmw-sav-forums/...-question.html Additional information Common issues with the N62 engine. (Mods, consider making this a sticky) - Bimmerfest - BMW Forums https://en.wikipedia.org/wiki/BMW_N62 BMW THERMOSTAT PROBLEM AND SOLUTION. THE MOST IMPORTANT THING ON THIS SITE!! | BMW LOGIC7 RealOEM is an amazing resource. I've Referred to it frequently. BMW Parts Catalog COMMON PROBLEMS ~Valve cover gaskets leaking ~Upper timing cover gaskets leaking ~Coolant valley pan leaking - BMW uses a “built in” gasket on this valley pan. Usually you have to replace the whole pan to fix it but there are aftermarket gaskets available for purchase. Affordable aftermarket pan assemblies can also be purchased. Genuine BMW is also surprisingly affordable. ~Coolant transfer pipe leaking (valley pipe) – the infamous… There are several repair options here... Several companies make “expanding” pipes that require you to cut out your old pipe and then insert and expand/secure the new pipe in place. There is also a “stent” option that can be inserted behind the water pump that re-seals the pipe’s leak-prone front seal. All options have good reviews. Whatever you decide, DO NOT pay a shop to pull your engine to put in an original pipe. Huge waste of money… ~Eccentric motor seal leaking - Replacement seals usually come with the valve cover gasket kits so these typically don't need to be purchased separately. ~Alternator bracket leaking/Oil cooler thermostat leaking - these are located in the exact same spot but are two different procedures depending on whether your engine has an external oil cooler or not. (I really hope you have an oil cooler because the alternator bracket repair is a pain in the arse from what I understand…) You can figure this out by looking at your front bumper. There is a decorative lower grill on the driver’s side. If yours is solid plastic, then you do not have an oil cooler... If it is mesh and allows air to flow through it (and you should also be able to look inside and see the oil cooler) then you have an oil cooler and the repair is easier. Don’t let this fool you however, even if you have an oil cooler this job can still be a time consuming, back breaking pain in the ass and requires some specific tools to accomplish. ~Coolant expansion tank leaking – Typically the temp sensor O-ring but I have heard they are also prone to cracking. If it’s the sensor leaking do not replace the whole sensor or tank (what the dealership will tell you to do). Complete coolant system O-ring kits can be found online for as little as $25. ~Coolant hoses leaking - after they have been disconnected from whatever they are fastened to, they are prone to leaking due to the fact that they become compression-set in place. Once you have broken the seal and put them back on they are prone to immediately leak. Once again, the dealership will only sell you the entire hose assembly for a hefty price. Complete cooling system O-ring kits can be found online and are a much better alternative. ~Valve stem seals – The original design is failure prone. The new seals are redesigned and apparently much better. I have not had to do this repair myself (yet) but I know it is a common issue. If you are not having problems I would consider not doing this unless you really want to and are comfortable and competent in performing the repair. ~Valve cover diaphragms – These are prone to tearing and not functioning properly which will wreak havoc on your crankcase ventilation system. If not replaced, it can lead to other problems and more expensive repairs. This is a cheap and simple repair that could save you a lot of headache and money. ~Secondary air system – Used to reduce emissions. The system is prone to failure due to clogging and cracked hoses. Another issue I have not experienced myself, but I know it is a common problem with the N62. There are aftermarket cleaning kits that are apparently a much better alternative to the dealership fix. ~Various engine sensor seals leaking – VANOS sensor O-rings, camshaft position sensor O-rings, Valvetronic sensor O-rings. While these aren’t as common as some of the other repairs. They are still known to leak. They are cheap and easy repairs. Do them while the engine is apart. PARTS LIST ~Spark plugs - BOSCH# FR7KPP332 – Certain plugs do not always play nice with certain ignition systems even if they show “compatible” in some vendor’s registry. There are countless examples of this on many forums. IMO, dont take the risk. Get the OEM spark plugs and rest easy knowing you have exactly what your engine calls for. Getting fancy is a waste of money and may just cause you problems immediately or shortly down the road. BOSCH has a bad rep with plugs in other car brands but they work wonderfully in BMW’s, I wouldn't buy anything else for your N62. ~Coolant thermostat – Getting a modified thermostat that keeps the engine running a bit cooler is a great way to preserve a plethora of parts in your N62 engine. Including the countless rubber gaskets that are exposed to too much heat and get petrified and fail prematurely costing you either thousands of dollars or many hours in back-breaking frustration. bmwlogicseven.com and several other companies carry coolant thermostats at the reduced 90 degrees Celsius operating temperature. (Factory is 105). Another member discovered that some of the modified thermostats will throw a "low coolant temp" error code. And some of the modified thermostats like the ones from ECS Tuning are known to be of lesser quality. Here's more info on the topic... BMW 90C Thermostat For N62, N63, N73 Engines - Bimmerfest - BMW Forums ~ BMW THERMOSTAT PROBLEM AND SOLUTION. THE MOST IMPORTANT THING ON THIS SITE!! | BMW LOGIC7 ~O-rings – Cheap and easy to replace. Do ALL of them while you’re in there. VANOS sensors, camshaft position sensors, coolant system (remember they sell complete kits for cheap), Intake manifold/plenum (sometimes these are gaskets, it varies on model. Mine were large O-rings) Fuel injector O-rings, etc. ~Water pump pulley – This is debatable... The plastic ones get brittle and are prone to cracking/breaking over time (mine had a huge chunk missing out of it at only 80K.) These are easy to replace outside of a tune up so consider doing it another time. At the very least, thoroughly inspect it for cracking and damage. ~Water pump tube - Easily missed when ordering parts. This tube is at the top of the water pump and runs from the pump to the Valley pan.It is rubber and therefore wears out. If you are replacing the water pump or even removing it, you should replace this. ~Valve cover Diaphragms – Cheap and easy to replace. Essential preventative maintenance on the N62. ~Valve cover gasket kits – Should come with new bolt kits (including rubber grommets) and also eccentric motor seals. ~Spark plug tubes – These things can result in a hell of a time removing the valve cover. They fit tightly into both the cylinder head and the valve cover and essentially bond themselves at both ends over time. You will want to replace all 8. ~Pulley’s and belts – These are some of those “while I’m at it” items. There are two serpentine belts (Drive/Main and AC) and three easily replaceable pulley’s (belt tensioner, Idler, and Alternator). All of these are pretty affordable, and if it is time for you to do some of the above repairs, then these items may not be far behind in failing/squeaking like crazy. I recommend replacing all while everything is apart. ~Hose Clamps - Something most people don't think of until the reassembly phase. Some of the hoses you have to take off are attached with permanent 1-time only crimps. They are damaged upon removal and need to be replaced with a different hose clamp. Hopefully this reminder will save some people from taking last minute trips to the parts store. TUNE UP TIPS AND TRICKS ~First and foremost – BEFORE you begin to take everything apart, clean everything as much as possible with compressed air/vacuum cleaner. There will be dust, dirt, debris, leaves, gunk, junk, etc, in little nooks and crannies all over you engine. You know what happens when you don’t clean all that crap out and start pulling your valve covers and intake manifold off? It all falls into your engine! The last thing you want is tiny rocks and dirt falling into your engine un-retrievable. ~Second – Remove as many parts as possible to make room for the valve covers. In some vehicles/models, There is not appropriate clearance to take them off. Period... Is it possible? of course. Is it easy/safe? Hell no. I broke the over $500 eccentric shaft sensor while taking my passenger side valve cover off because I tried to do it first without removing the aluminum AC line. Expensive lesson learned... ~Removing stuck valve covers – Once all of the bolts have been loosened/removed. Try pulling up on your valve cover. Is it stuck? Try CAREFULLY prying in between the VC and cylinder head with a putty knife or large flathead screwdriver. Work your way around the VC as much as possible spacing out your pry points as to not damage the gasket mating surface. Continue to do this working your way front to back, back and forth. And you will eventually have a slight gap in between your VC and cylinder head. If you have reached this point and the valve cover is still stuck, the spark plug tubes are the culprits. DO NOT wiggle the valve cover around, and FOR THE LOVE OF GOD AND ALL THAT IS HOLY DO NOT hit it with a mallet. Remember that $500+ eccentric position sensor? There is very little clearance in the valve cover for it and the sensor is firmly bolted in place to the head. Additionally, the plastic sensor has become very brittle with all of the heat it has been exposed to. The slightest bump can result in breaking it. (ask me how I know) Before trying the next step, see if you can get your fingers under the VC and pull up on it to pop it free. If not, continue to the next step... The safest remedy that I have come across is to get a helper, have them hold the VC in place as FIRMLY as possible. Get a long ratchet extension (I used a 3/8 drive 2 foot extension, ¼ drive may be more ideal as it is thinner) or similar sturdy rod and carefully slide it in between the VC and cylinder head. (for clarification: you are actually inserting INTO the engine, where the cam and valves are) Place the end of the rod firmly against the side of the spark plug tubes and with a hammer, give it a firm whack. Giving each spark plug tube a whack or two released them from the VC and made it possible for me to remove the valve cover, leaving behind the spark plug tubes in the cylinder head. Problem solved. Again, Your biggest concern while removing the VCs is to not damage the eccentric shaft position sensor! Another issue I ran into when doing mine were the rubber grommets that the bolts pass through. The bottom portion of the grommets are inside the valve cover. These are notorious for breaking up during removal and sprinkling hard plastic pieces into your engine. If at all possible, leave them on the valve cover and only remove them once the VC is off and away from the engine. In my case, that wasn't possible. The rubber had bonded itself to the bolts and the grommets were coming out with the bolts. I spent an hour fishing rock hard rubber pieces out of my engine. ~Oil cooler thermostat / Alternator Bracket - One of the most difficult things about replacing the gasket is getting the bolts that hold the housing off and on. There are two different size E-Torx bolts. Two E10's and one E12. The issue is there is not enough clearance to get a 3/8's drive socket onto the bolts. I tried using adapters, swivels, different extensions, ratchets, etc. and couldn't get the socket onto the bolt straight enough to crack it free. I tried and tried but was starting to strip the bolt head and stopped. How I was finally able to get it off was I bought a 1/4 inch drive "universal socket" set. Because they are E-Torx bolts, NO ONE carried a 1/4 inch drive socket. You can find 3/8 drive but not 1/4. I went to AutoZone, AdvanceAutoParts, O'Reilly's, Lowe's, Sears and Home Depot. No one carried it. They can be ordered online, but I didn't want to wait a week to finish my car. I ended up buying a Craftsman 1/4 in. drive universal socket set, and wouldn't you know! The socket was just thin enough to fit perfectly onto the bolts and I was able to remove them. I did NOT have to drain and remove the power steering system, raise the engine, remove the fender liners, nor remove the top portion of the oil cooler hoses. For the hoses, once un-done from the thermostat, you can zip tie them up and out of the way. A small mirror will also really help you out with this job. Because again, you cant see what you're doing and must do everything by feel. ~Making room for valve cover removal – The importance of this may vary depending on your vehicle/model. But regardless, the N62 is a tight fit in any engine bay that it's being utilized in. In my E70 X5 Sport, it was a pain… on the driver’s side the biggest problems were the wiring harness, auxiliary jump supply cable, and the water valve hose bracket just to name a few. The wiring harness is removed and zip-tied out of the way easily enough. As is the jumper post cable. The water valve hose holder I broke while trying to take it off. It looks like it should just pry off like all of the other plastic hose holders on the vehicle. NOPE! It screws off… Guess who broke theirs into pieces trying to pry it off? This guy! Unscrew it in a counterclockwise motion. On the passenger side, the two main things in the way were again the wiring harness and the aluminum AC line that runs from the firewall across the shock mount and down to the AC compressor. In my case, the VC COULD NOT be removed/re-installed without removing the AC line. So, before doing this repair yourself, I highly suggest that you get your AC system drained so that you can remove the line safely and get the VC off. It’s a pain having to drain and refill the AC refrigerant but again, in my case, there was no other option. As far as the wiring harness on the passenger side, it was a little tighter. The Electrical connection junction box is on the passenger side under the cabin air filters. Take the cover off and the brackets securing the wires but DO NOT unplug anything. It’s not necessary. The wires can be lifted up and give you enough clearance to remove the VC. No need to unplug stuff. ~Rear ignition coil removal – All of the ignition coils are easily removed with the exception of the furthest back on the driver’s side. In order to remove this coil you need to remove the folding plastic locking tab that is attached to all of the coils. It hinges on two plastic studs on the coil body itself. Carefully pry the clip past these studs and the locking tab will come off of the coil assembly. It is still a very tight fit but this will give you JUST enough clearance to get the coil out. The clip will have to remain off in order to reinstall the coil into the engine so leave the clip off until the coil is back in the engine during reassembly. ~Idler pulley/AC belt pulley adjustment trick – I couldn't find who originally came up with this idea but whoever you are, I love you... The adjustable pulley on the passenger side of the engine that tensions the AC compressor belt is a royal pain to get off and on. The “set” bolt is easily accessible as it faces towards the radiator. The “adjusting” bolt however faces towards the ground. Trying to get at it from below is near-impossible and from up top is back breaking. I've heard of people doing it from below using various extensions/adapters, but I have a plethora of them and wasn’t able to make it happen... I spent some time from up top working with a basic 3/8 ratchet and was able to get the bolt out. Once you get it off, Use a Dremel and cut a slot on the threaded end of the bolt. This allows you to use a flathead screwdriver to re-tighten the bolt making it 100X easier during the re-install and adjustment. ~Intake manifold/Plenum removal – There are 3 electrical connectors on the back of the intake manifold. DO NOT try to remove them while the manifold is still bolted in place. You can unbolt the manifold and pull it up from the engine, turn it sideways and then easily remove the electrical connectors. There is plenty of wire slack to do this. NOTE: there are metal bushings that go over the bolts that fasten the intake manifold to the engine. These metal bushings are not permanently attached to the intake manifold and can fall out during disassembly and reassembly. Be VERY careful not to let one of these fall into the engine. Cover everything up during this phase and make sure you don't drop one of those metal bushings into your exposed cylinder head and possibly down into the oil pan. This would not be fun to fish out. ~Valve cover Installation – After you have taken them off, installation is pretty straightforward. Do yourself a huge favor and remove the orange/red guide tabs. There are three of them on each valve cover. If you do not take them off you will have a nightmare of a time getting the valve cover back on properly. Even if you think the valve cover is going on properly you will likely break one or more of the tabs during tightening of the valve cover bolts. Like other plastic components, they have become very brittle and weak. The slightest bump during installation will break them. Use silicon gasket sealer over where the upper timing covers meet the cylinder head and also at the half-moons at the rear. Additionally, put a tiny smear of silicon over any gouges or scrapes that you may have put in the mating surface during VC removal. DO NOT overdue the silicon! A little goes a long way. Keep in mind most of it will be squished out during tightening. Lastly, the gasket mating surface must be perfectly clean. If there is any slight residue of oil the silicon will not bond properly. Wipe everything clean and then use brake cleaner, degreaser or rubbing alcohol and wipe it again. Then use another dry rag and wipe it again before installation. ~Throttle body cleaning - Due to the valvetronics system on the N62, cleaning the throttle body isn't really necessary. But if yours is exceptionally dirty or you just REALLY want to clean it, you must be very careful in doing so. First, only clean a throttle body with throttle body cleaner! Do not use brake cleaner or any other cleaner. Second, DO NOT press on or try to move the flap. It is locked in place and pressing on it will only break the gear or make it jump a tooth and be out of alignment. These throttle bodies are electronic "fly by wire" units and are controlled by the cars computer. They are not mechanical and cannot be manually opened. ~Cooling System - Here is a suggestion to prevent a cooling system blowout in your N62. Drain the BMW coolant(Manufactured by Valvolene/Ashland). Use Pentosin NF or Motul Inugel Expert Ultra. Neither of these has Ethylhexanoic Acid which is a plasticizer. Remove 2 bar coolant recovery cap and throw it in the trash. Then buy/install a GENUINE BMW 1.4 bar cap from a 2007 335i. Fill coolant recovery tank to minimum mark to leave room for expansion. Also use only Genuine BMW water pumps with composite rotor as these are there to prevent electrolysis and bearing wear, not for cheapness. Every aftermarket coolant cap I have come across does not function properly as well. If the 2 arrows do not line up when locking down the cap, do not use it. Every defective aftermarket cap I have seen including Febi brand are made in China. Buy your coolant cap at the stealer, don't be cheap. See the blue spots surrounding the valley pan? If you see this on your own vehicle the valley pan is leaking. It will need to be replaced. You can often see this with minimal removal of engine parts. 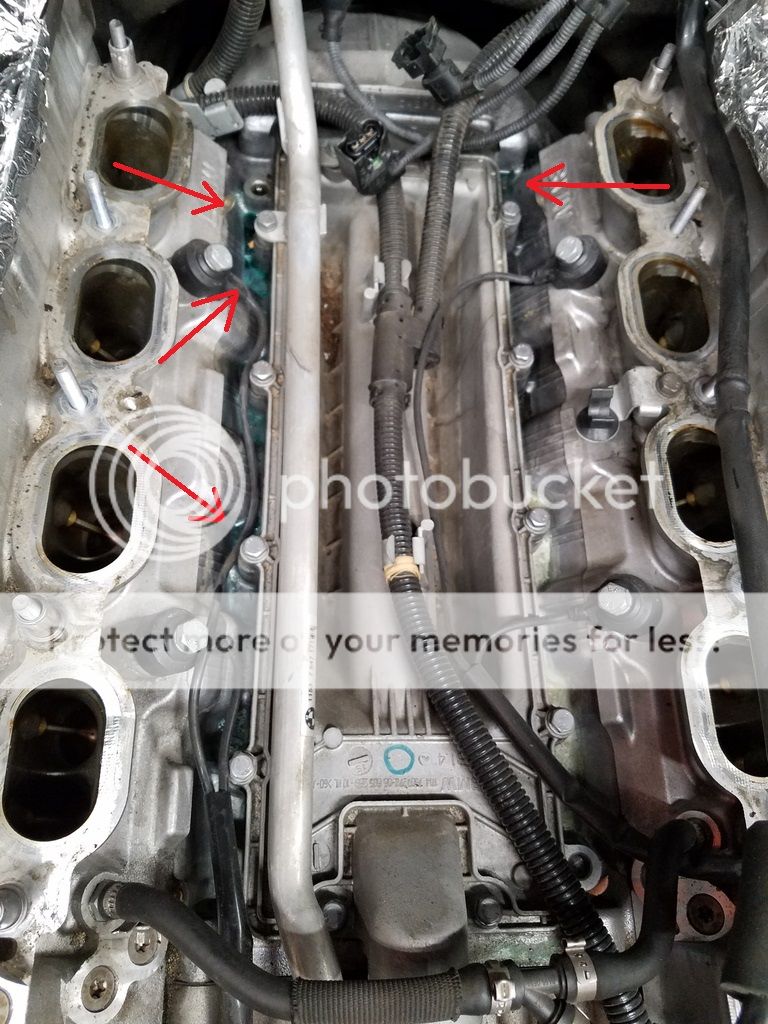 This is why it’s a good idea to replace your plastic water pump pulley while everything is apart. This was mine at only 80k miles. Again though, if you really don’t want to, it is easily replaced by itself later on down the road. 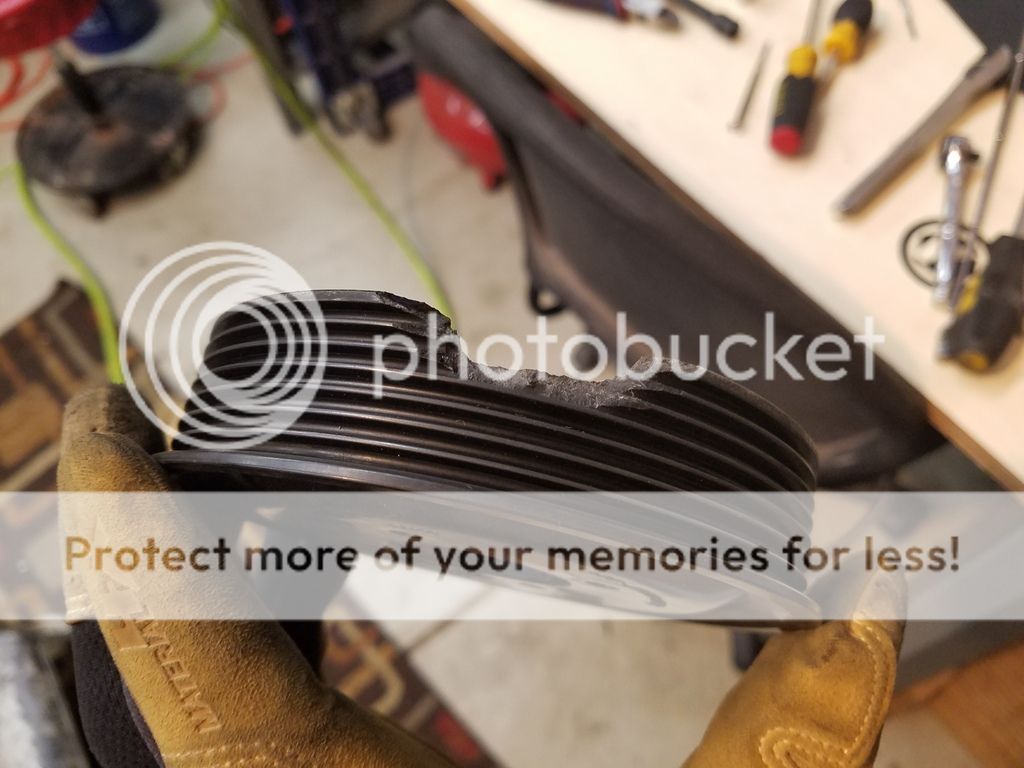 This is what can happen if you try to reinstall the valve cover with the guide tabs still in. Not only will you likely break at least one of them but it will take you 10x longer to get the valve cover properly seated. Do yourself a favor and remove them. 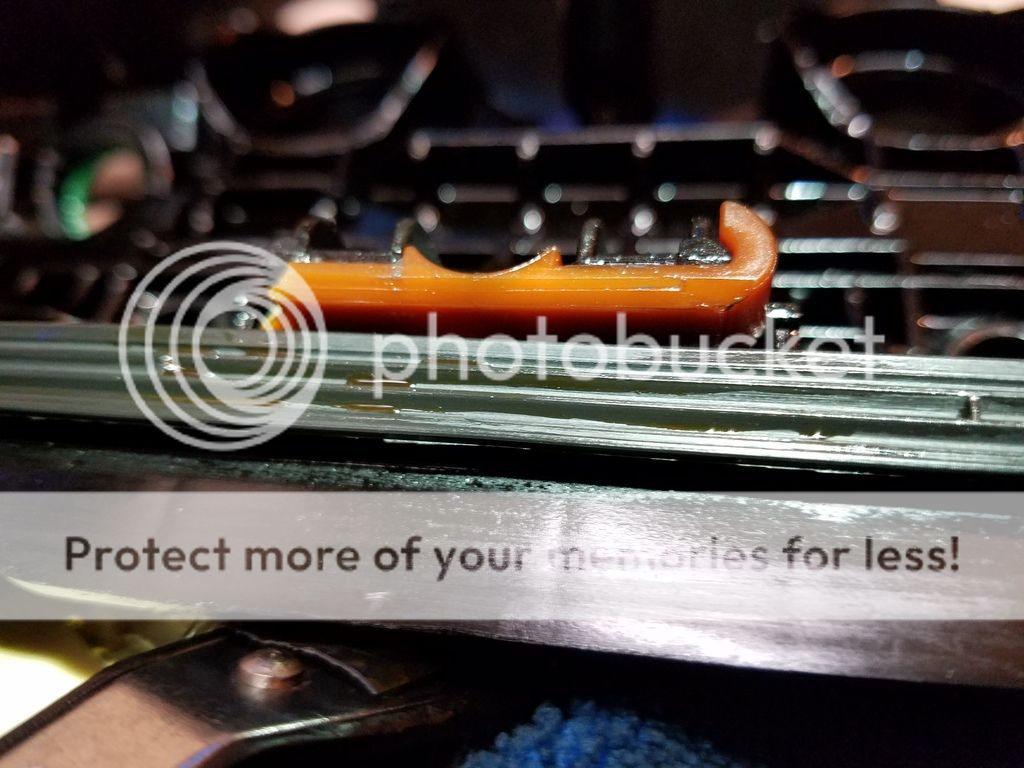 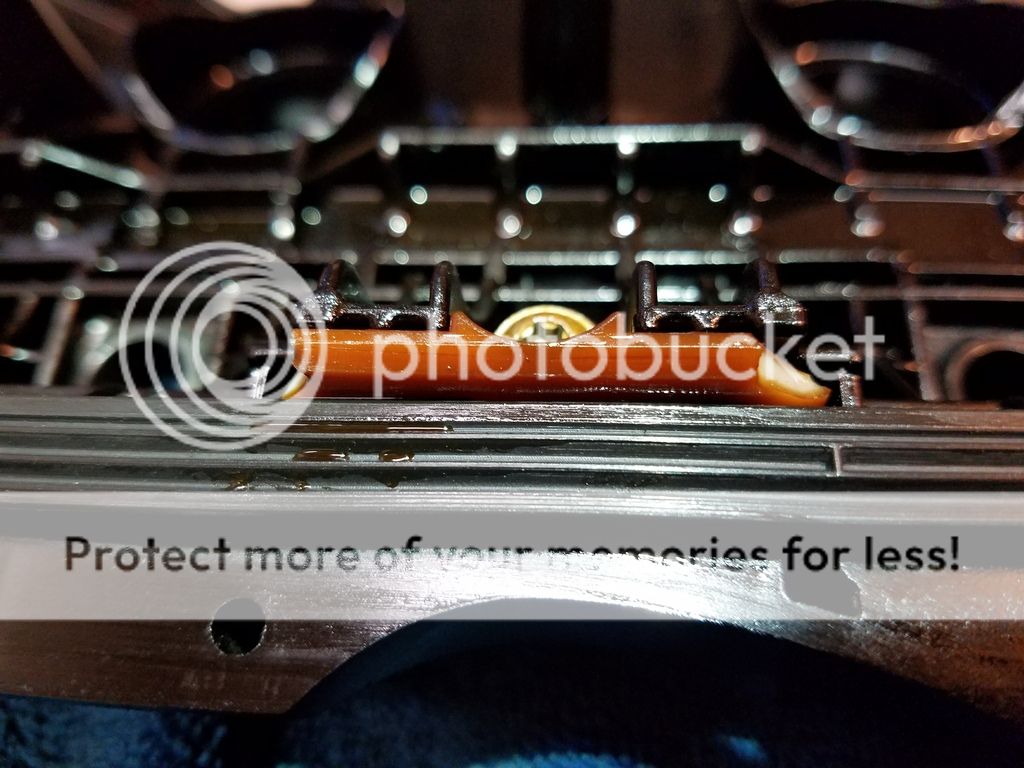 This may not be the best picture of the electrical box but still shows that you do not need to unplug anything to get the VC off. Remove the cover, remove the brackets that hold down the rubber wiring loom, and then pull up on the wiring loom. It will give you some extra clearance and wiggle room to get the valve cover off and on. 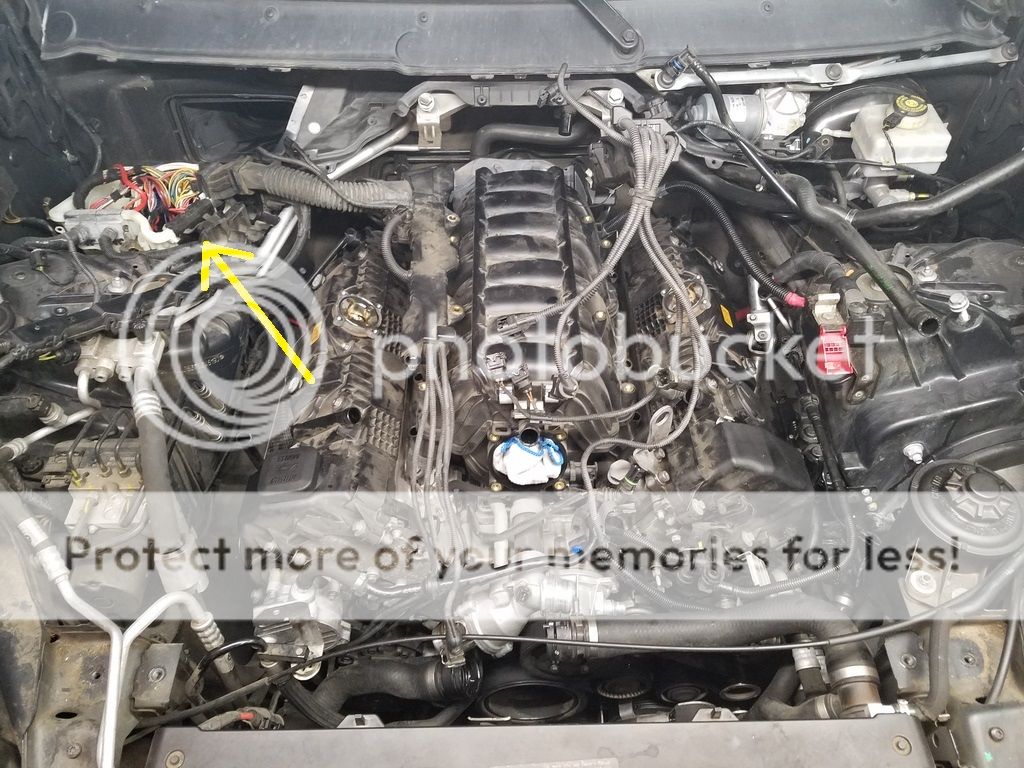 I found it very useful to cut a slit into the end of this bolt for re-installation and tightening. Someone else on the forum came up with the trick and it made everything much easier re-assembly and belt-tightening wise. I used my Dremel and carefully cut a slit roughly 1/8th of an inch in. Just enough for a flathead screwdriver. I got the bolt started back in by hand and then used a flathead to tighten it as much as possible. Final tightening had to be done with a ratchet but cutting the slit sped up the process a lot for me. 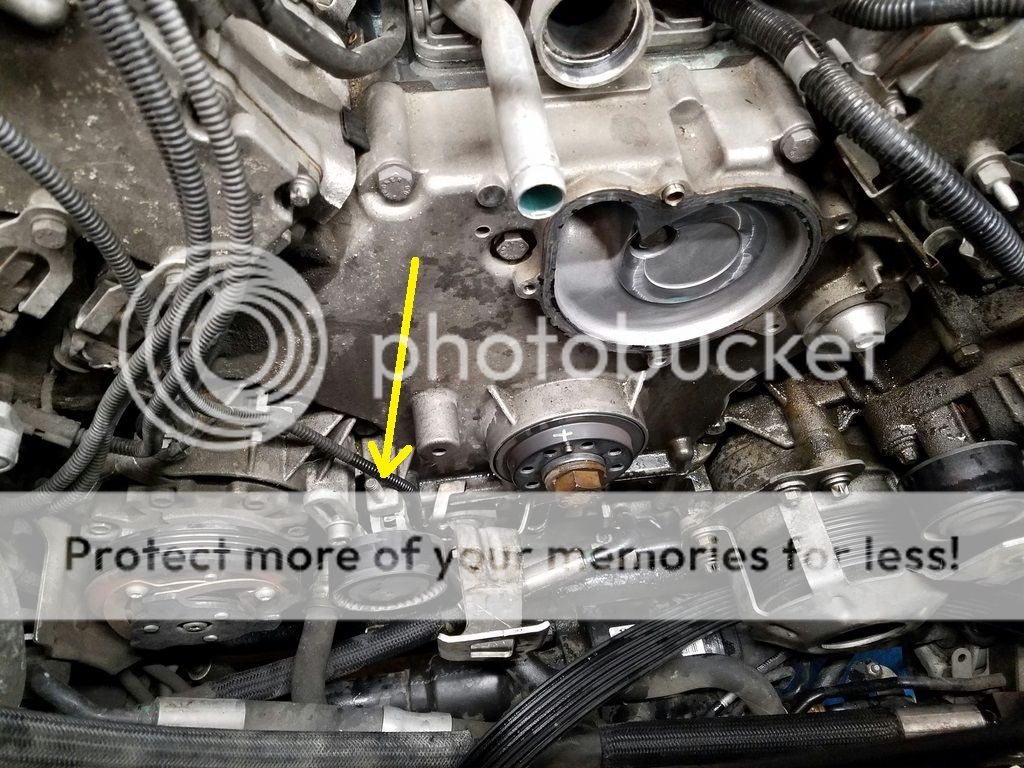 Take a close look at these springs while the valve cover is off. This is the first place sludge and gunk build up tends to rear its ugly head. If you see this in your engine, I would suggest you shorten your oil change intervals. Whatever you do, don't follow BMW's 15k oil change schedule. It's too long. I change mine about every 5-8ish thousand miles. 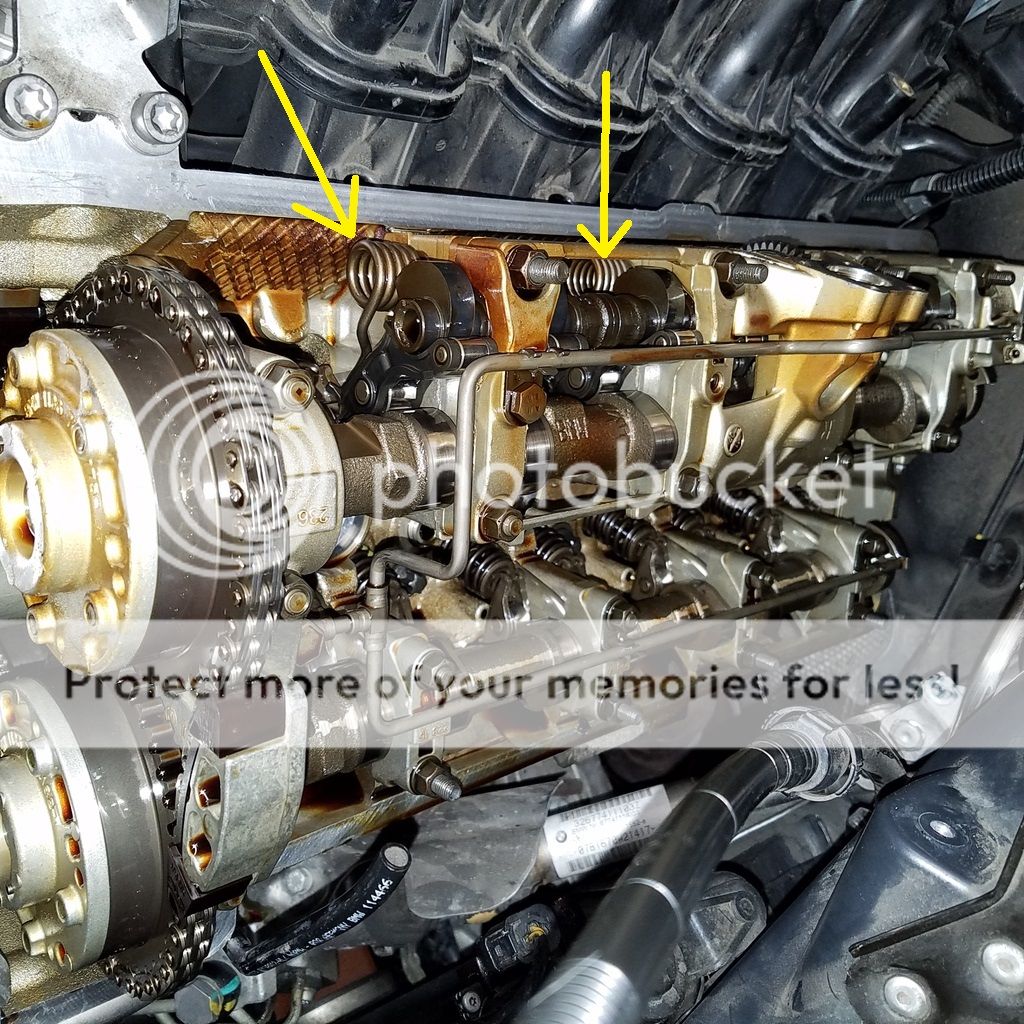 This is the hose holder that UNSCREWS. Do not try to pry it off like my dumb ass did. It will break. It holds the two hoses that run from the firewall down to the water valve on the drivers side of the car. 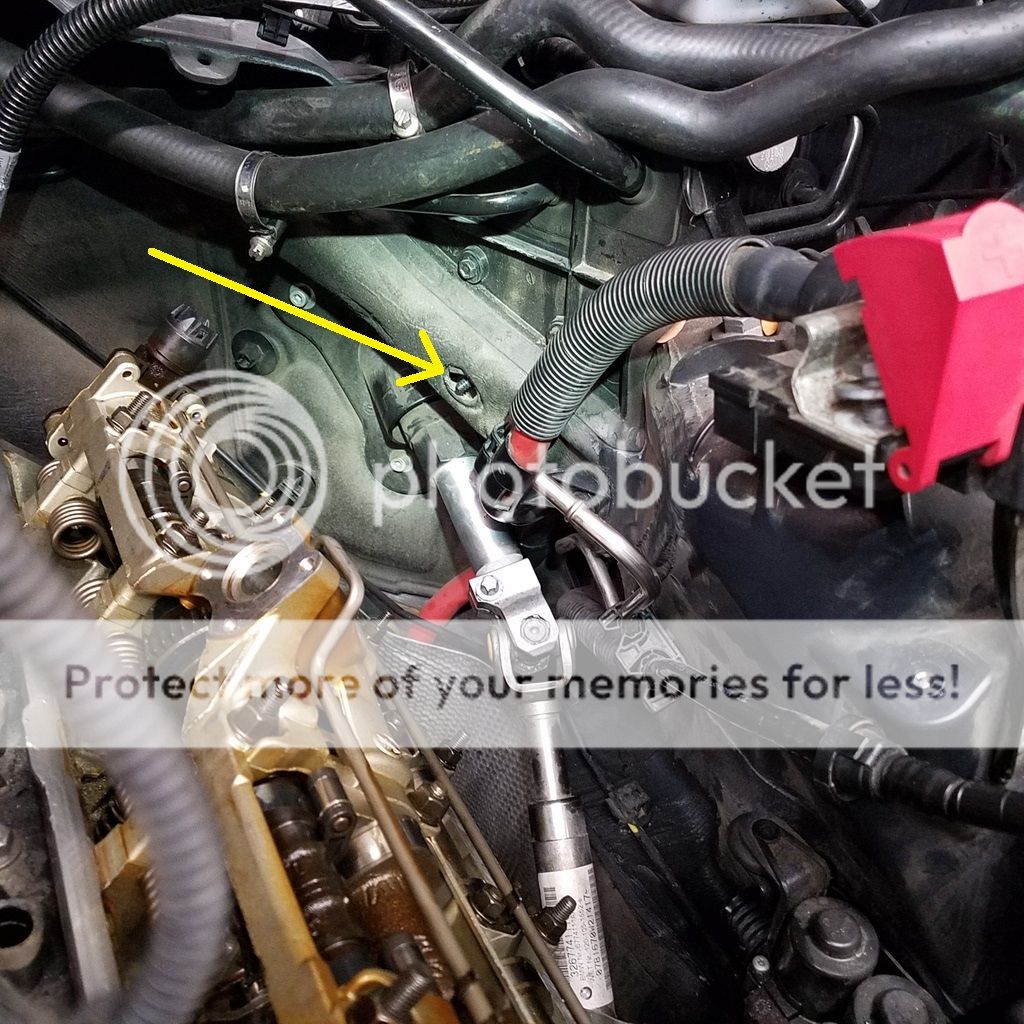 Broken $500+ eccentric shaft sensor. This is why you need all the clearance you can get and be VERY careful when removing/installing the valve covers. Not only is the body of the sensor easy to break (like mine did) But the locking tabs or "ears" that hold the plug in are incredibly thin and brittle. 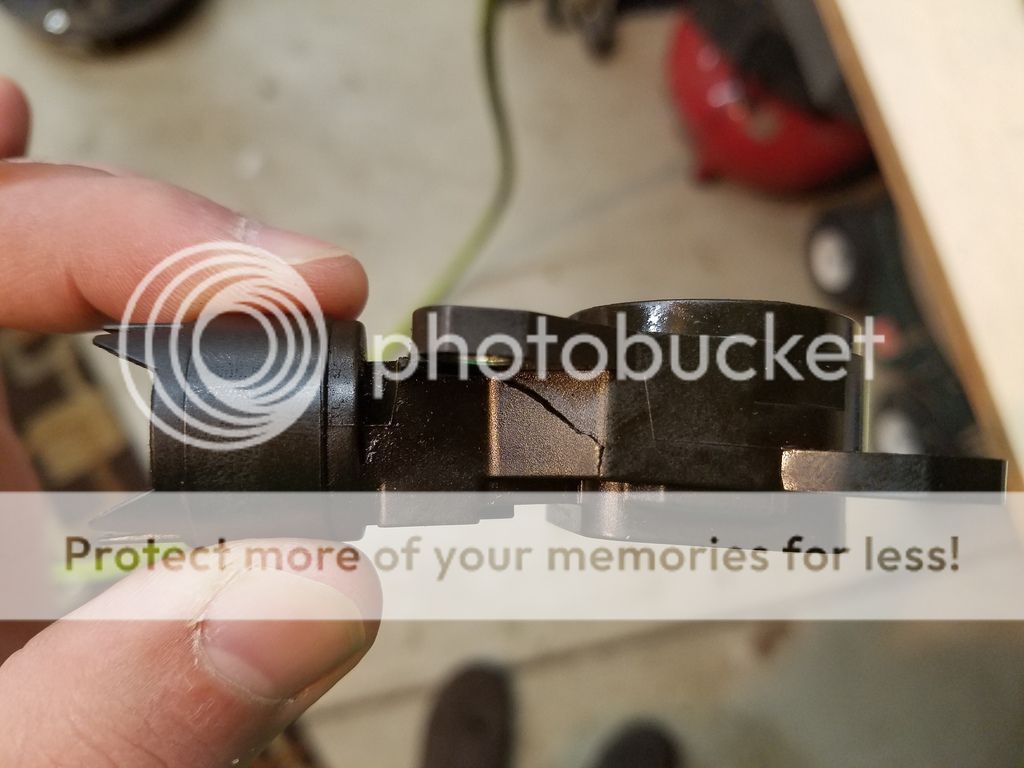 Sludge in the crankcase ventilation system. This is what happens when you get moisture in your engine and it doesn't evaporate completely. Usually caused by taking too many short trips and the engine does not have enough time to warm up fully and dissipate all of the moisture. Fairly normal but too much of it can cause problems. Clean it out and replace the ventilation diaphragms that are prone to failure. 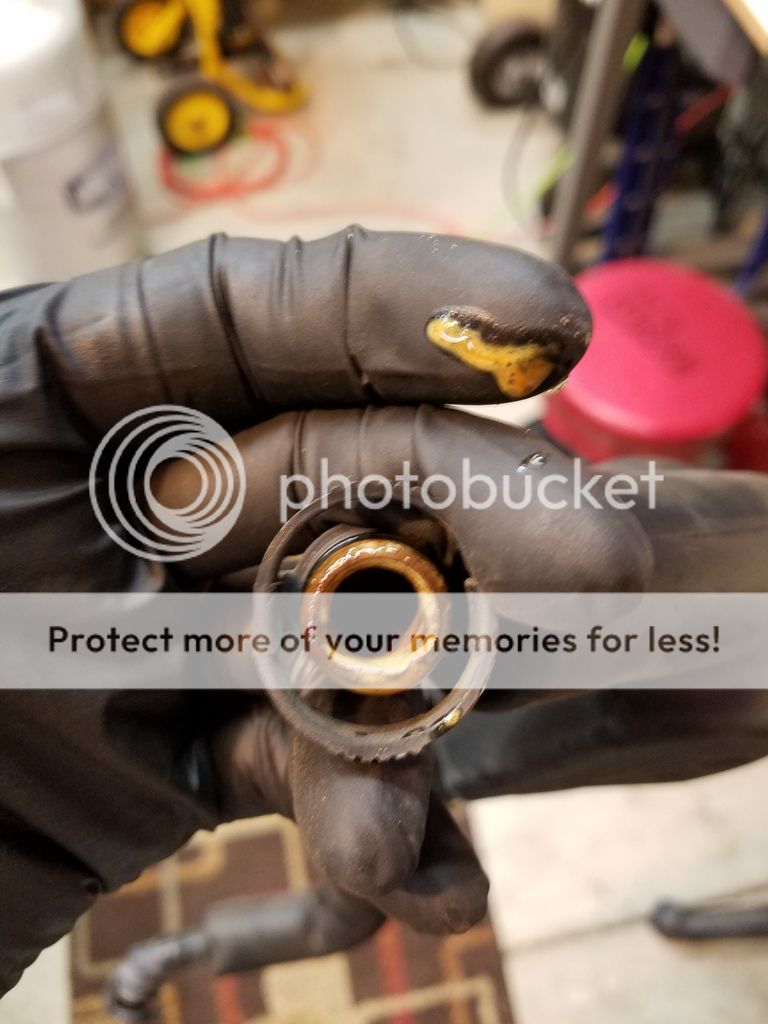 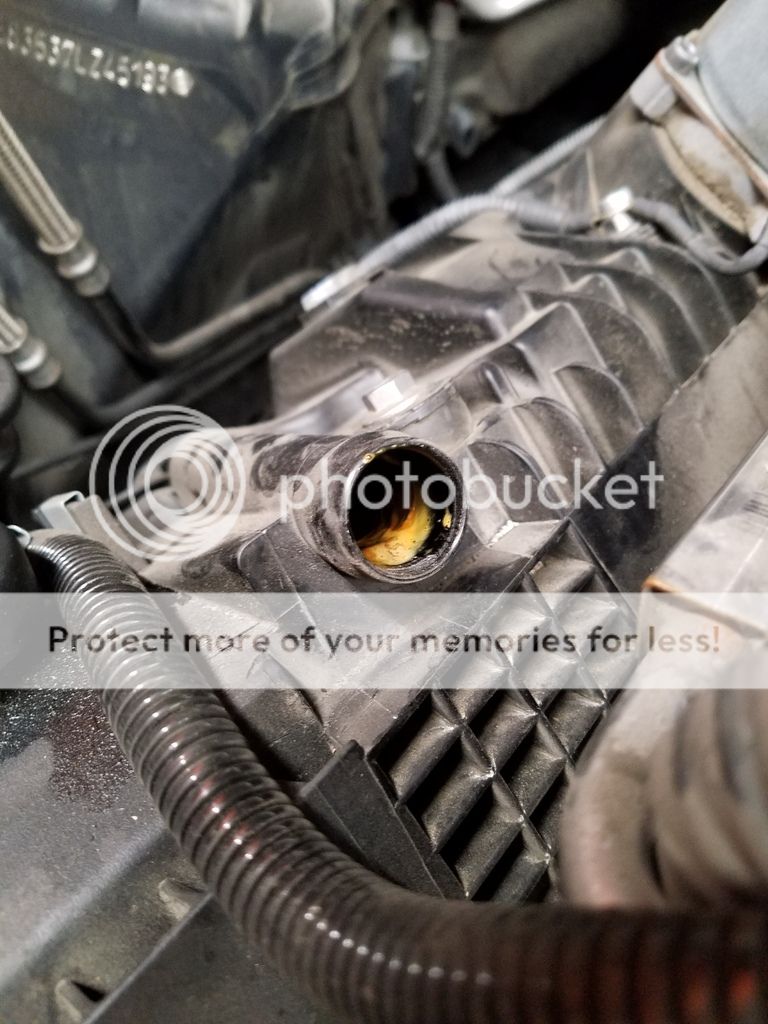 See the black line going around the water pump outlet? that is O-ring remnants. After you have removed a hose the O-ring will need to be replaced. They have a tendency to bond themselves to whatever they are attached to. Breaking the seal results in damage and they will leak if you don't replace them. Even if you don't see any O-ring left behind like below, they still become compression-set and wont seal well after they have been removed. 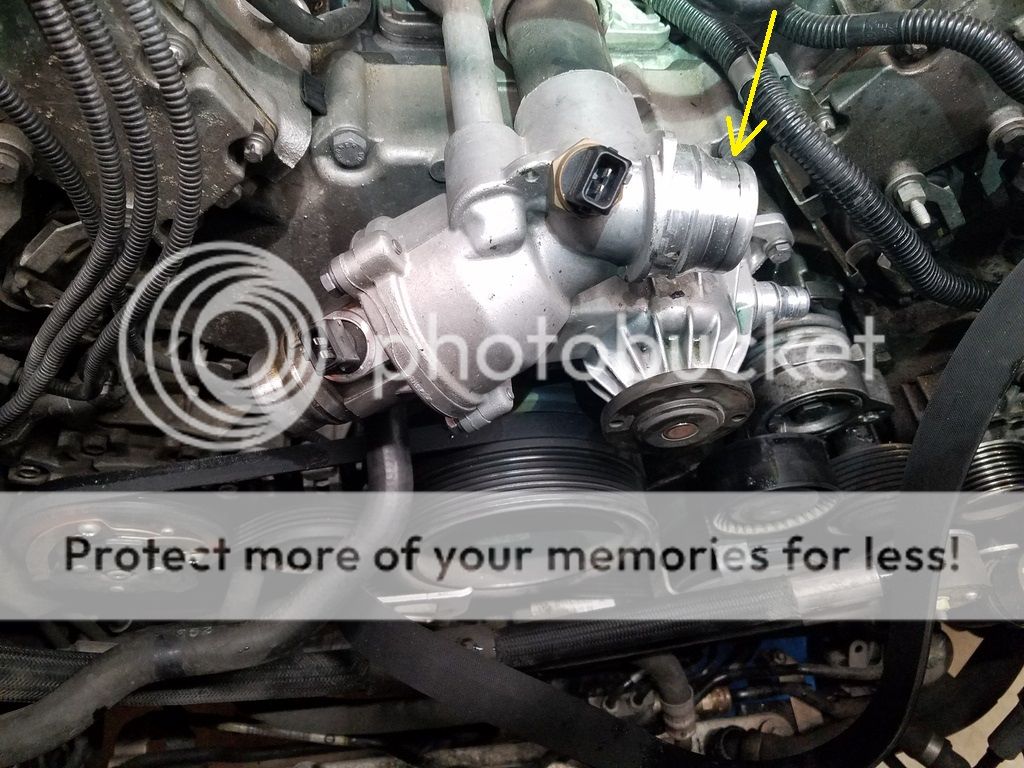 A lot of the plastic on your engine is going to be brittle and easy to break. From the eccentric shaft sensor, to the electrical connectors, to the plastic cooling system components, water pump pulley, and various other things. Be very careful when removing and re-installing these plastic items. Everything is going to be prone to cracking and/or breaking. The below cooling hose runs from the radiator to the water pump. There is a small outlet tube at the water pump end that I broke on mine while re-installing. I put a hose clamp on it and began tightening. Before the hose was even tight I heard a faint "click". The outlet tube had cracked at the base. The whole hose assembly had to be replaced. 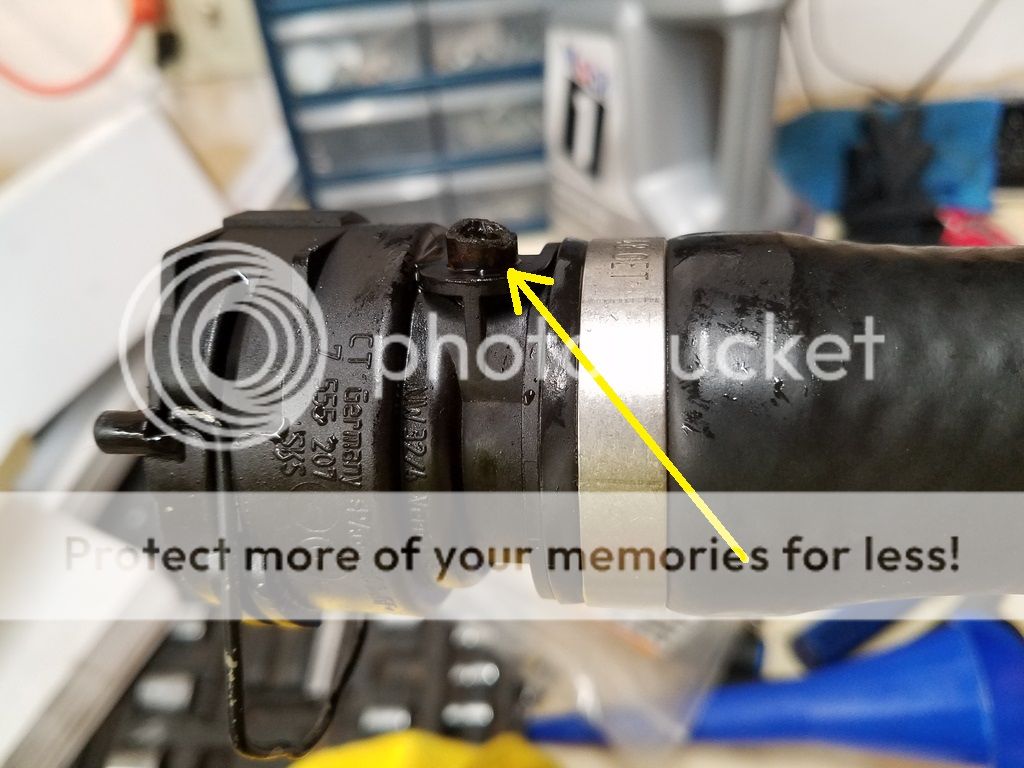 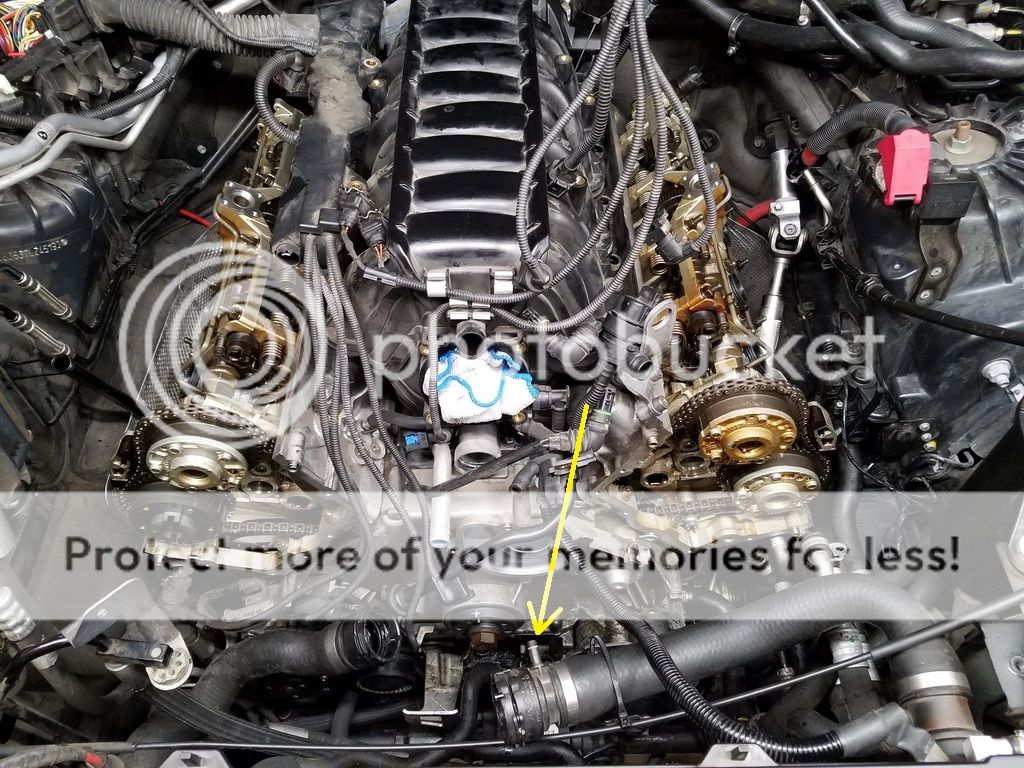 Here is that much loved valley pipe. It is supposed to be surrounded by coolant as there are passageways leading into the block and elsewhere in the engine that the pool of coolant flows to. If you do an expandable pipe be sure to drain out all of that coolant and block the passageways before you begin cutting. I would also suggest you make two cuts before removing the pipe. Only cutting 1 time means you have to lift up on the pipe to remove it which could cause metal shavings to slide down the pipe and into your engine. It could be an unnecessary precaution but "better safe than sorry" is always a good policy.  If you have to remove coolant or oil lines be VERY careful when removing the locking clips. They are designed to "slide into the unlock position" But pulling on them just a little too hard can cause them to come off completely and chances are they are going to spring off in some direction. I removed one of my oil lines and did just this... It was awkward and hard to reach and I ended up pulling a little too hard on it with a pick and it came off and rocketed into my garage somewhere. To this day, I still haven't found it. THEY DO NOT SELL REPLACEMENT OIL CLIPS! You can find the coolant ones online but the oil locking clips are different and do not exist aftermarket. The dealership will only sell you an all new hose assembly for a hefty price.  Here is the valve cover diaphragm. They are failure prone but very easy and cheap to replace. Don't take your engine apart without replacing these.  If you are doing a significant tune up on your N62 or any other vehicle for that matter, you will have to get into the engine bay from many different angles. Fender covers are a good investment to protect your shiny bits. A good gearhead buddy of mine uses foam yoga mats. Cheap thin mats are a waste of money, imagine dropping a heavy alternator on a fender only being protected by a thin fender cover. It will still do damage. If you are a DIY’er, thick quality fender covers are invaluable. Also, you can buy low-profile 4 foot LED shop lights at a number of home improvement stores for cheap. Fastening one to your hood is a great way to brightly light your entire engine bay. Highly recommend. 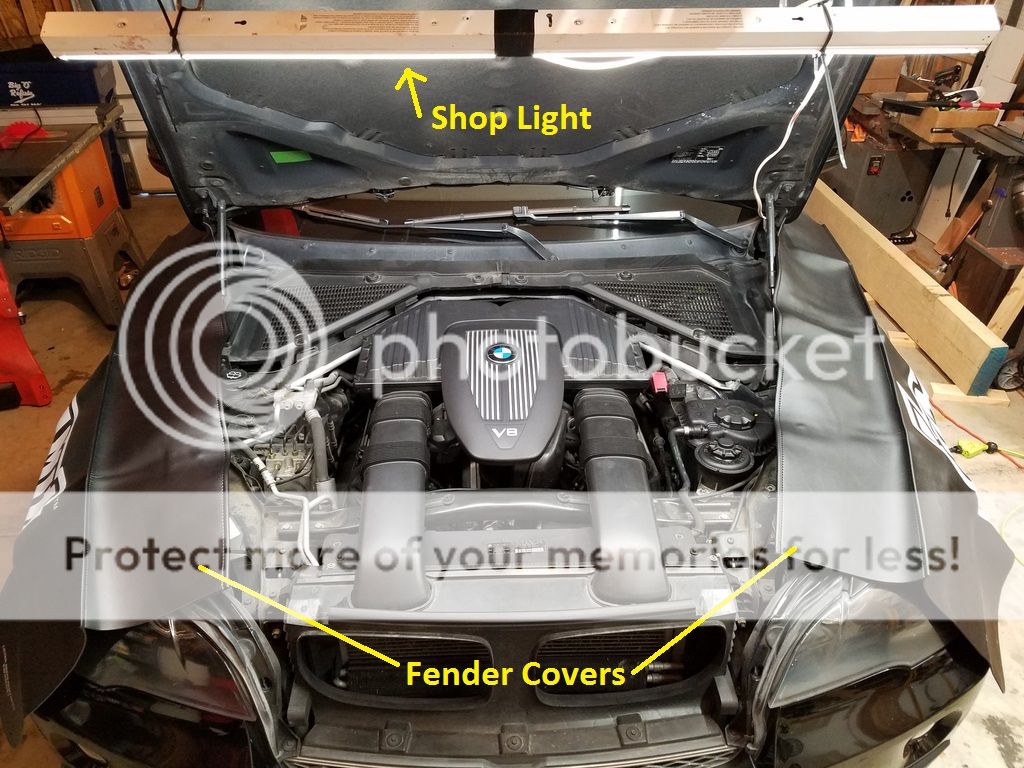 __________________
2007 E70 X5 4.8i Sport Package 8x,xxx Miles "My Precious" (Smeagol voice) 
Last edited by BustedKnuckles; 12-17-2021 at 01:17 PM. |
| Sponsored Links | |
|
|
|
|
#2
|
|||
|
|||
|
so good, it got posted twice

__________________
discs 'n drums 'n body roll |
|
#3
|
||||
|
||||
|
So yeah... In my editing I somehow posted it twice. Sorry for the duplication everyone. Not sure how to delete the other one. Already sent an email to the forum moderators to delete it. Oops...
__________________
2007 E70 X5 4.8i Sport Package 8x,xxx Miles "My Precious" (Smeagol voice) 
Last edited by BustedKnuckles; 01-03-2017 at 03:50 PM. |
|
#4
|
||||
|
||||
|
The thread title should be changed to
Why you should not buy an X5 4.8i. |
|
#5
|
||||
|
||||
|
Do other N62 vehicles not suffer from these issues? Do I own the worst configured N62 out there?
__________________
2007 E70 X5 4.8i Sport Package 8x,xxx Miles "My Precious" (Smeagol voice) 
|
|
#6
|
||||
|
||||
|
The E70 X5 N62TU is the worst vehicle BMW has made in the last 100 years. All N62 equipped vehicles will usually have the same problems, but the combination of the body equipment make it the most expensive vehicle to maintain.
|
|
#7
|
||||
|
||||
|
Lucky me!.. Well, I've already done a lot of engine repairs. Hopefully I don't have to tear into it again anytime soon...
__________________
2007 E70 X5 4.8i Sport Package 8x,xxx Miles "My Precious" (Smeagol voice) 
Last edited by BustedKnuckles; 01-05-2017 at 10:45 AM. |
|
#8
|
||||
|
||||
|
Still love mine, wouldn't trade it for anything else...
__________________
2008 4.8i X5 (2/25/08) 105k: Titanium Silver/Black; All -HUD; Aero Kit; 22" VS-130 w/Pirellis; ///M Shifter & Fr Brakes; Gauge Rings; Console Pads; Custom Wheel & Mats; Roof Rails Carbon Fiber: Int Trim, Nav Surround, Grill, Cluster Trim, Shifter & Eyelids 1.2" H&R; LUX AEs; LCI Tails; Rear Fogs; NBT EVO; ESS Tune; Meisterchaft GTC Exhaust |
|
#9
|
|||
|
|||
|
I don't disagree with anything you said, but this is precisely what can make this vehicle a bargain for the right person. When the vehicle was new, the 4.8 commanded a $10K premium over the 3.0. On the used market now they're roughly equal in price, probably due to better fuel economy for the 3.0. Also, it's not hard to find a 4.8 owner dumping the vehicle at a discount when faced with a $10K+ repair bill for valve stem seals, coolant transfer pipe repair, etc. A competent (and patient!) DIYer or indy can do these repairs for a fraction of the cost. Properly maintained, this 350hp SUV can be a lot of fun.
|
|
#10
|
|||
|
|||
|
Very good information. Subscribed.
__________________
Black Sapphire MetallicNevada BrownDark Bamboo e70 X5 xDrive4.8 Alpine WhiteCoral RedAluminum f30 328i Sportline/6MT Imola RedBlackBlack Aluminum e46 330i ZHP/6MT |
 |
| Bookmarks |
|
|
|
|