
|
|
|
|
||||||||||
| Xoutpost server transfer and maintenance is occurring.... |
| Xoutpost is currently undergoing a planned server migration.... stay tuned for new developments.... sincerely, the management |
 |
|
|
LinkBack | Thread Tools | Display Modes |
|
#1
 11-11-2007, 11:43 AM
|
|||
|
|||
|
KEF's Reflector Swap DIY
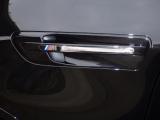
I am not a professional mechanic, just a very hands on auto enthusiast if you are not mechanically inclined, it is best to let somebody else tinker with your car. What you do to your car is your business, under no circumstances do I assume any responsibility for anything that should go wrong in the process of you attempting to do any of this. The use of this DIY is for reference only; I disclaim all LIABILITY FOR DIRECT, INDIRECT, INCIDENTAL, OR CONSEQUENTIAL DAMAGES OR INJURIES THAT RESULT FROM ANY USE OF THE EXAMPLES, INSTRUCTIONS OR OTHER INFORMATION IN THIS DIY. I own these photos and am sharing them with this X5 community at X5 world, I prefer these photos be kept in one place, that is you are not permitted to post them on your site without my written consent. So with that out of the way, I put this together basically because I have found no accurate source of information for this swap. My first BMW was an E46 M3 and I did the reflector swap on that car about 5 years ago all material on the net is referencing a swap on an E46 car where the reflector has a spring on it. DO NOT TRY TO PRY OUT YOUR REFLECTORS ON AN E70 X5 So what do we really have? Well, our reflectors actually are stuck on with double sided tape that is made of kryptonite. Seriously, this is some of the toughest tape I have ever worked with it takes real effort to get the reflectors off. Basically you must pry on them from the inside while pushing them in from the outside. So here we go: The drivers side and passengers side swap are done in different ways the passenger side is easier. To begin on the passengers side pull the plastic push-in body work down and towards you, it will simply pop out.  Looking into the reflector area, this is what you will see, the back side of the reflector.  Begin prying the reflector back while pushing the reflector in from the outside. Pay attention here - you do not want to crack the paint on the outside of the car by using a massive amount of prying action - push more than you pry.  When the reflector does finally pop off both of mine left ALL of the double sided tape attached to the fender. YOU MUST REMOVE ALL OF THE TAPE OR THE NEW REFLECTOR WILL NOT SEAT CORRECTLY.  Insert your arm into the fander and remove all of the tape - remember this is critical for this to work correctly.  Inside view showing all of the double sided tape removed.  Once the surface is cleaned, peel the backing off the new reflector, the pic below shows one side peeled off.  Push the reflector back in from the inside and you are finished!  The drivers side on is a different story, there is a radiator (oil cooler) in the way of the ducting so you can get at the reflector like the passenger's side.  So for this side you simply unscrew the 8mm screws holding the plastic bodywork in place and pull the bumper back a bit. I also removed 3 of the silver phillips head screws that attach the front bumper to its support.   Because you can't get your arm in an easily, this is how I removed the tape left over once the reflector popped in.  How the tape comes off  Pressing the reflector in on this side is a bit more difficult, but get your arm all the way in there to press firmly.  And that's pretty much it. Replace the screws you pulled off and put it all back together. Cheers, KEF 
|
| Sponsored Links | |
|
|
|
|
#5
11-11-2007, 12:42 PM
|
|||
|
|||
|
what is the point of removing them? cosmetic reasons?
|
|
#6
11-11-2007, 12:49 PM
|
|||
|
|||
|
Quote:
Quote:
|
|
#7
11-11-2007, 01:46 PM
|
||||
|
||||
|
Nice DIY write-up an pics. Thanks for the contribution

|
|
#9
11-11-2007, 04:20 PM
|
||||
|
||||
|
Good instructions, but, I like the idea of reflectors on the front and back bumpers. Not only look good, but gives one more measure of visibility.
__________________
E70 X5 3.0si Space Grey E36 Z3 2.5i Roadster, Sterling Gray Metallic
|
|
#10
11-11-2007, 09:44 PM
|
||||
|
||||
|
I did the same thing on my e92, but used a heat gun to loosen the original double sided tape. Its a lot easier and quicker than just trying to pry it out. Many folks at e90post have done this, a very easy mod. Quite a few people over there sell the painted and/or clear reflectors
__________________
Paul Seto - BMW Car Club of America National Capital Chapter (MD/DC/NoVA), Social Chairman 2002 Gray Green X5 4.4i 2007 Space Gray 335i coupe 2000 Titanium Silver M Roadster Become a BMW CCA member  . Click here to join online . Click here to join onlineJoin our new NCC Facebook Page Support me in this year's Bike MS Chesapeake Challenge!!!
|
|
| Bookmarks |
|
|
|
|


 Linear Mode


