
|
|
|
|
||||||||||
| Xoutpost server transfer and maintenance is occurring.... |
| Xoutpost is currently undergoing a planned server migration.... stay tuned for new developments.... sincerely, the management |
|
|
LinkBack | Thread Tools | Display Modes |
|
#1
 03-03-2015, 10:42 PM
|
|||
|
|||
|
Carbon Build Up 35d swirl flaps intake manifold M57 with pics
I have a 2008 e70 35d with the M57TU2D30 turbo diesel engine with roughly 80,000 miles. I have read numerous reports of carbon build up (CBU) on the intake manifold/EGR valve/top swirl ports/tangential ports/swirl flaps/intake valves on other diesel BMW engines. In particular, the 335d (which has a slightly different engine from the 35d, but quite similar) has frequently needed walnut blasting of the intake valves and ports. This link from an e90 forum on the M57 turbo diesel engine is one good example of this problem. Many people have used meth injection and/or EGR deletes to combat this. The conventional wisdom is that the 35d does not have much of a problem with carbon build up thanks to a different EGR design, and a heavier load on the engine. Due to a combination of curiosity, and a desire to prevent problems before they occur, I decided to investigate how much CBU I had. My car was running fine (other than a recent bad thermostat resulting in lower than optimal engine temps). There were no check engine lights, or codes that came up on my recently purchased BMWhat OBD scanner.
To cut to the chase, I had good news and bad news. The bad news: I had quite a bit of CBU on my EGR valve, intake manifold, and tangential swirl flaps. The good news: The above areas were all relatively easy to clean up. Also, (and I think most importantly) the intake ports and valves were quite clean. I used a Ryobi borescope from Home Depot to get a good look into the intake ports and valves. The top swirl ports had minor to moderate CBU for the first roughly 2 inches or so (the plastic portion of the valve cover). After about 2 inches the plastic valve cover portion converts to metal as the port approaches the intake valve. This metal area had a thin film of oily residue on it, but no CBU at all. I felt confident that the top swirl ports did not warrant aggressive cleaning. The intake valves looked very clean. The tangential ports were nearly pristine (!). Since the intake ports and valves are the hardest to clean (requiring walnut blasting), I choose to think of this as a glass half full situation. Here is a discussion with pics of what I did. For this post, I will only show what I did after I got the intake manifold off. I'll post another thread with how I got the intake manifold off (this site makes it difficult to upload more than 10 pics at once). First a bit of terminology. I believe my terms are correct, but I am a hobbyist - not a BMW tech. I am glad to be corrected if I am wrong. [Edit point: Terms edited on 3/4/15 to conform to later information received from ZetaTre in post #4] To the best of my understanding, air in the intake manifold can enter the cylinders via two different intake ports. The top "swirl port" and intake manifold connection is round and is shown with the red arrow below. The "tangential port" and intake manifold connection is rectangular and is shown with the yellow arrow below. At the intake manifold/tangential port union there is a flap valve that I understand to be termed a "swirl flap." These swirl flaps are controlled by a swirl flap motor, and open/close to varying degrees depending upon a central computer. These will be discussed in greater detail later. But first, here is a pic of my intake manifold removed: Note the round ends will connect to what are termed the top intake "swirl ports." The rectangular ends connect to what are termed "tangential ports." Inside the tangential port area of the intake manifold is the swirl flap. Here is a picture of one of my swirl flaps, with quite a bit of CBU. In order to clean up the swirl flaps, and the intake manifold, it must be disassembled. This is a picture of the underside of the intake manifold: The swirl motor controls the swirl flaps via an actuator rod. First, remove the 2 torx screws at shown by the yellow arrows above. Then the swirl motor will slide out. Then the swirl actuator rod must be carefully pried out from the clips (red arrows above). Be careful - don't break anything. Neither the motor, nor the actuator rod, nor the swirl flaps can be purchased separately. They can only be purchased as part of the entire roughly $800 intake manifold. After removing the actuator rod, things should look like this pic: The red arrow above points to the now released actuator rod. Remove the torx screws shown by the yellow arrows above. Now the swirl flaps are free to be removed. Again - be careful - don't break them! They cannot be purchased separately. So I was very careful to gently remove them with equal pressure on both sides - see pic below: With some gentle and symmetrical pressure, they all slid out easily. Now into a bin for overnight soaking in a degreaser: Sorry I don't have pics after cleanup, but I assure you they were pristine! I removed all the gaskets/rubber washers/retained bolts from the intake manifold and soaked it overnight in a white plastic garbage bin. An industrial degreaser diluted in hot water is what I used. I lined the bin with a garbage bag to make eventual cleanup a bit easier. As you can see, this is not a big deal. It didn't disturb the family dog a bit: The next morning I used a combination of brushes from Home Depot to scrub out the inside of the intake manifold. Sorry - no pics. But I'd say it was 95% clean. As I noted above, the tangential ports were essentially pristine. Here is a pic: I don't have a pic of what the Ryobi borescope revealed of the intake valves (both top swirl port valve and the tangential port valve) - but I didn't think it was worth dealing with a walnut blasting. The swirl ports were a bit more nuanced. Realize that first 2 inches or so of the swirl ports are plastic, and are part of the valve cover assembly. There I had a moderate amount of CBU. Not nearly as much as shown in the first 335d link that I referenced above, but still some. However, after the top swirl port transitioned to metal, all I had was an oily coating - no CBU at all. This pic hopefully shows what I mean: This was perhaps the worst of my top swirl ports. As I hope you can appreciate, there is some CBU initially. But as you look down the intake port, one can see the junction between the plastic valve cover where it transitions to metal. Just below that area one can see a clear streak (where the borescope scraped the oily residue off as I threaded it down to inspect the valve). As one can see, clean metal is just below the oily residue. No appreciable CBU. To clean up the CBU on the plastic portion of the valve cover, I first stuffed a bit of lint free rag down the intake port (to stop debris from getting down to the intake valve). Then I scraped the proximal portion of the intake port with a piece of hard wood formed as a scraper. I wanted to be sure not to damage the plastic of the valve cover portion of the intake port. Then I used a shop vac to suck out the debris that accumulated above the lint free rag "plug" mentioned above. Removed the "plug," and all was well. I replaced the intake manifold gaskets (parts 2 and 3 below).  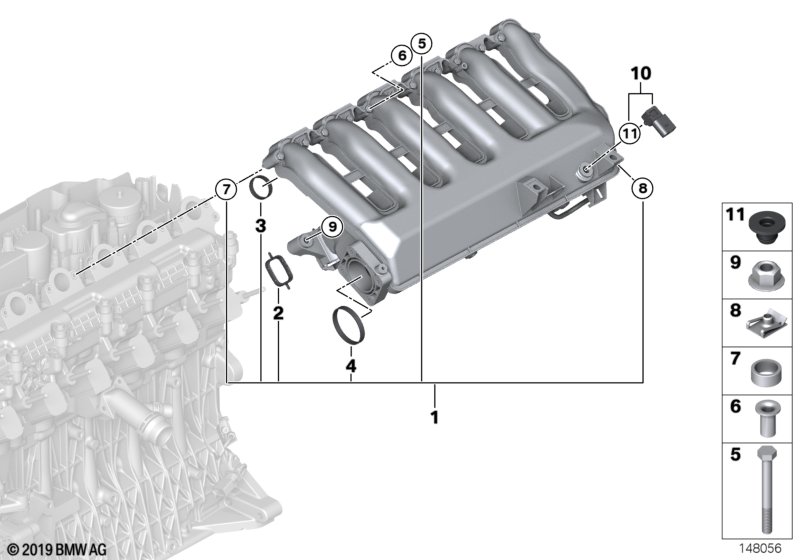 As an aside, one of my tangential port gaskets was beginning to fail, and there was a very small amount of oil leaking from the # 6 tangential port gasket onto the engine below. I'll make another post about how to remove the intake manifold. I may not understand the site well enough, but I am not able to upload more than 12 pics at once. So it makes it hard to discuss all aspects of this job in one thread. I'll be honest and say that my car doesn't seem to be running any differently now - so maybe all my efforts were for naught. But I doubt it - I think that eventually my swirl flaps would have become stuck, with subsequent check engine lights (CELs) and various codes. I keep telling myself that I saved myself from an inopportune future mechanical issue, but who really knows? Regards.
__________________
Stephen 2010 e70 35d- now driven by son #2 2005 e53 3.0 - now driven by son #1 2021 G05 45e PHEV - now driven by me 2008 ML320 CDI - driven by wife Last edited by sgrice; 05-18-2015 at 03:48 PM. 
|
| Bookmarks |
| Thread Tools | |
| Display Modes | |
|
|
|
|


 Threaded Mode

