
|
|
|
|
||||||||||
| Xoutpost server transfer and maintenance is occurring.... |
| Xoutpost is currently undergoing a planned server migration.... stay tuned for new developments.... sincerely, the management |
 |
|
|
LinkBack | Thread Tools | Display Modes |
|
#51
 12-10-2006, 09:14 PM
|
||||
|
||||
|
12VDC Bosch Relay 30A, part number 330-070, $2.64 12VDC 5-Pin Relay Socket, part number 330-075, $1.75 It cost about $8 to ship them   Here is a breakdown on the wire connections. The first number is the number on the socket. 85 Black - ground 86 White - power that energizes the relay - connect to car reverse wire 87 Yellow - hot when relay is energized - connect to pioneer purple wire 87a Red - hot when relay is not energized - not used (cover wire) 30 Blue - input power - connect to wire that is hot when car is running At first I was going to try and install the relay in the spare tire compartment since I needed to tap the reverse wire there. I changed my mind and decided to put it in the amp compartment. First I tapped the reverse wire. There are two reverse wires, I tapped the yellow-white one. 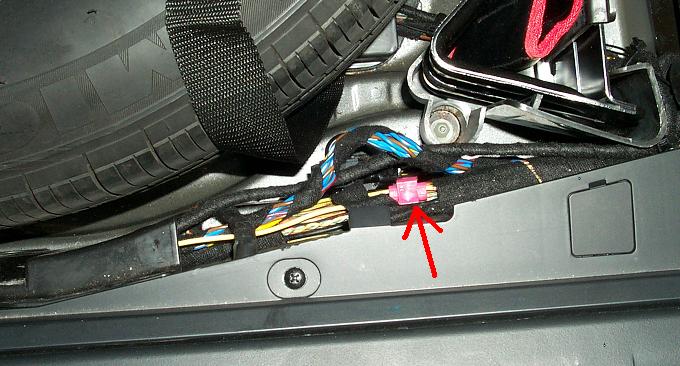 I ran the wire tap into the amp compartment.  Inside this compartment was a few screws near the brake lights (or whatever they are). I used one for the ground. I couldn't find a source for the input power so I tapped into the wire that used to power the amp. This wire is always hot even with the car off. I prefer a wire that is only hot when the car is running but in this case it is not a problem because the relay will not pull any juice since the Red wire is not connected to anything. If you decide to tap the amp wire be sure and remove fuse 72 (located where the sub-woofer is [or would be] located).
__________________
[Sold] 2004 X5 4.4i - Sterling Gray - Truffle Brown, Sport, Preminum, Rear Climate, DSP, Sirius, PDC, 132's (19 inch wheel), Comfort Seats Dynavin, JL Audio Stealthbox, Alpine PDX-5 Amp 
|
| Sponsored Links | |
|
|
|
|
#52
12-10-2006, 10:24 PM
|
||||
|
||||
|
i think the all wood looks great
__________________
"To become a member of a crew you've got to be 100% Italian so they can trace all your relatives back to the old country. See, it's the highest honor they can give you. It means you belong to a family and crew. It means that nobody can f@ck around with you. It also means you could f@ck around with anybody just as long as they aren't also a member. It's like a license to steal. It's a license to do anything"
|
|
#53
12-26-2006, 01:04 AM
|
||||
|
||||
|
The final step in this audio upgrade is the bezel. I have basically 3 options, black plastic, wood, or dash material. You can get the plastic look from Rich for $250, http://www.mybimmer.net/. My only concern with this bezel is that it is vertically centered. If you look back at my pictures you can see that the Z1 is close to the opening bottom. Maybe Rich can adjust the bezel to fit this off center location.
 I want the wood look. I agree with dr. jay that it looks the best. I'll have to get around to custom ordering it in the near future. So I ended up with material that is similar to the dash for now. Actually you can get any material you want, leather, vinyl, or whatever. I ended up getting some very inexpensive material that was similar to the dash (not quite a perfect match) to hold me over until I get the wood. Here are the materials I used: 1. Cardboard 2. Plastic grid plate 3. Black vinyl 4. Foam 5. Special foam glue 6. Velcro 7. Stapler 8. Very sharp scissors and other cutting tools Start by cutting the cardboad into rectangles so that they can fill the space between the radio and the sides.  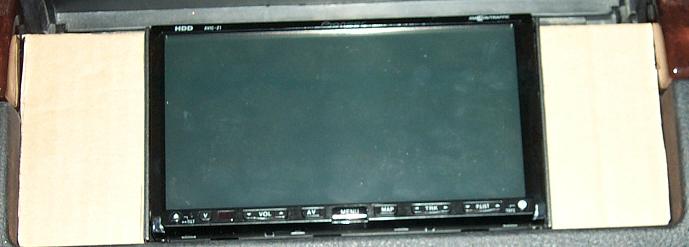 I purchased a Metro ABS Blank GridPlate, part #89-00-9030. This plate is 12" X 12" and is textured black on one side with a pre-cut grid on the other. It is very easy to cut this to almost any shape you want.  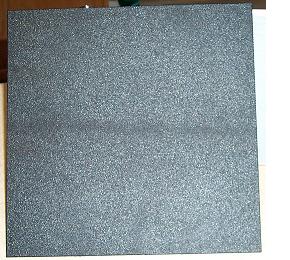 I cut the shape I wanted and placed velcro on it. The grid is cut so that it holds in place with friction. I then cut the foam into the shape that I wanted. The foam is cut so that I can tuck the top of it into the dash. I purchased the foam from JoAnn's Fabric and it is 3mm thick (thanks to my wife for this as I had no clue) (the grid is on the top and the foam is on the bottom).  The velcro has a sticky back but it does not stick well to the foam. So I use the stapler to help these stay in position. I also find that the foam glue works well for securing the velcro in place. The glue is made by the company that make liquid nails and is called "perfect glue 1". This glue is designed to work with foam.  Now that the velcro is in place I then cut the vinyl material (purchased from JoAnn's Fabric also, again thanks to my wife) in the same shape as the foam and then glued the material to the foam. The final step is to assemble the pieces. First place the grid into the dash, velcro side up. Then place the foam\vinyl on top of it. Tuck the top into the dash. This picture does not show how it really looks. The material is very close to the dash in color and texture.  Another option is to just use the grid for a bezel (no velcro and cut a full frame instead of the 3 sided frame pictured above). 
__________________
[Sold] 2004 X5 4.4i - Sterling Gray - Truffle Brown, Sport, Preminum, Rear Climate, DSP, Sirius, PDC, 132's (19 inch wheel), Comfort Seats Dynavin, JL Audio Stealthbox, Alpine PDX-5 Amp
|
|
#54
12-26-2006, 01:19 AM
|
||||
|
||||
|
These pictures show how the two parts come together.
 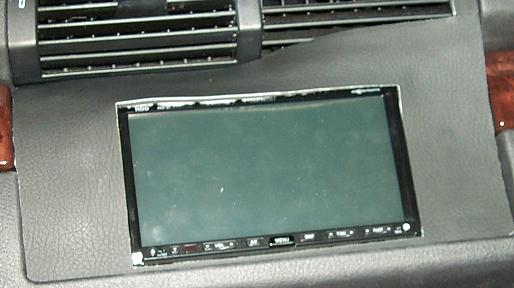 This step up allows me to switch out to another material any time I want.
__________________
[Sold] 2004 X5 4.4i - Sterling Gray - Truffle Brown, Sport, Preminum, Rear Climate, DSP, Sirius, PDC, 132's (19 inch wheel), Comfort Seats Dynavin, JL Audio Stealthbox, Alpine PDX-5 Amp
|
|
#56
12-26-2006, 04:14 PM
|
||||
|
||||
|
Wood! Nice!
 I wish you had the full frame for wood. That is my ultimate goal. I wish you had the full frame for wood. That is my ultimate goal.
__________________
[Sold] 2004 X5 4.4i - Sterling Gray - Truffle Brown, Sport, Preminum, Rear Climate, DSP, Sirius, PDC, 132's (19 inch wheel), Comfort Seats Dynavin, JL Audio Stealthbox, Alpine PDX-5 Amp
|
|
#57
04-21-2007, 05:57 PM
|
|||
|
|||
|
Can you play DVD Video while driving with this unit? I heard that Pioneer has some sort of new technology that actually senses if the car is moving. I know most units can be bypassed though. Can this one be bypassed?
|
|
#58
04-23-2007, 10:55 AM
|
||||
|
||||
|
Quote:
__________________
[Sold] 2004 X5 4.4i - Sterling Gray - Truffle Brown, Sport, Preminum, Rear Climate, DSP, Sirius, PDC, 132's (19 inch wheel), Comfort Seats Dynavin, JL Audio Stealthbox, Alpine PDX-5 Amp
|
|
#59
04-23-2007, 11:41 AM
|
||||
|
||||
|
The Wood looks awesome,if I only had the patience
__________________
"To become a member of a crew you've got to be 100% Italian so they can trace all your relatives back to the old country. See, it's the highest honor they can give you. It means you belong to a family and crew. It means that nobody can f@ck around with you. It also means you could f@ck around with anybody just as long as they aren't also a member. It's like a license to steal. It's a license to do anything"
|
|
#60
02-27-2010, 10:41 PM
|
||||
|
||||
|
Nice Work NextGen. I noticed that comparing these two pictures it looks like you also cut out another horizontal piece at the top of the enclosure in addition to the middle horizontal plastic piece. Is that true or just a photo illusion? I am about to cut that piece out to get my radio to sit higher.
top horizontal bar with slot in it..  and looks like piece cut out so radio sits higher. 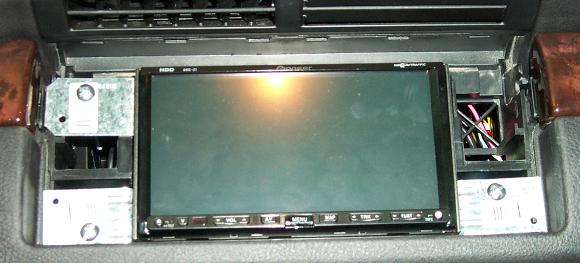 Thanks
|
|
| Bookmarks |
|
|
|
|


 Linear Mode


