
|
|
|
|
||||||||||
| Xoutpost server transfer and maintenance is occurring.... |
| Xoutpost is currently undergoing a planned server migration.... stay tuned for new developments.... sincerely, the management |
 |
|
|
LinkBack | Thread Tools | Display Modes |
|
|
|
#1
 06-18-2006, 09:32 PM
|
||||
|
||||
|
How To Install a BMW Factory Trailer Hitch on a 2006 X3
OK guys, unfortunately this post is a bit massive...
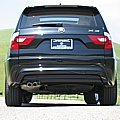
The other day I installed a factory BMW trailer hitch on my 2006 X3. Here is a pictorial breakdown of how I did it. I was hoping to find something this detailed when I was doing it, so I hope it helps someone else. I have divided the job up into three different sets of tasks and then show the results: Task 1: Remove the bumper Task 2: Install the new hitch and wiring harness Task 3: Cut the bumper and reinstall it NOTE: I have also attached a few BMW/TIS procedures to this post that I used. They should fill in anything I missed. Task 1: Remove the bumper 1. Looking at the rear wheel well, remove these three screws/nuts (8 & 10mm socket needed)  2. Using 8mm socket to remove liner.  3. The TIS instructions say to drill out the plastic rivet (see red arrow) but I didn't. Just (firmly) pull the liner out over the lip of the bumper (see green arrow). 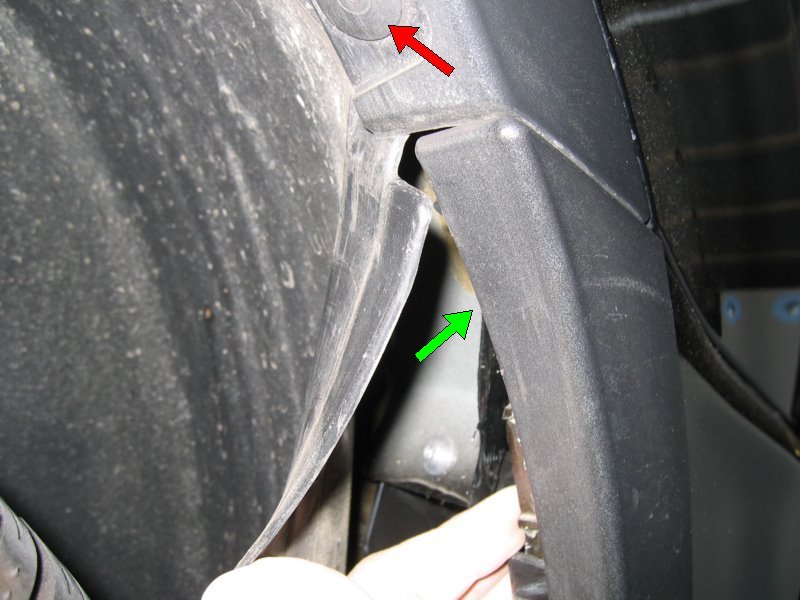 4.Arrow pointing to plastic rivet you do not need to drill out. Also holding plastic liner so you can see where the TORX screw is that you need to remove next. See green arrow for TORX screw location.  5. Remove TORX screw at the top of the bumper (also see previous pic).  6. I didn't think I had a TORX screwdriver so I used a small flat head screwdriver that worked fine. 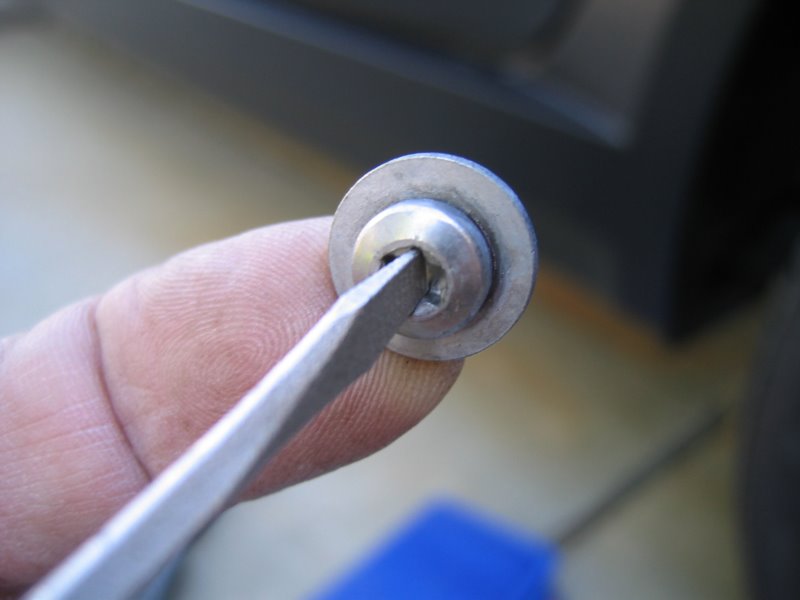 7. Remove these two screws next.  8. Next you have to remove three screws from underneath and towards the back of the bumper that hold it on. This pic shows the location of the screws once the bumper is removed (two in the corners and one at the bottom middle). Also see the next three pics.  9. Remove this screw near the muffler.  10. Remove this plastic nut in the corner by the muffler. This shot is looking straight up. The blurry thing is the muffler. Also see #8.  11. Remove this plastic nut in the other corner of the back. This shot is also looking straight up. Also see #8.  12. Next open the rear hatch and remove the bumper cover by first pulling up on the lower lip. It is held in by spring clips so just get a finger nail under lip and pull up. Once you have pulled up the entire length of the lower lip, pull the cover away from the vehicle and it will detach. The upper part is held in by hooks that will disengage easily. (When reinstalling, first re-hook the upper hooks and then press in the lower lip)  13. With the bumper cover removed, unscrew the four TORX screws that hold the top of the bumper on.  14. Better view of one of the four TORX screws holding the top of the bumper on.  15. DON'T DO THIS!!!! Now that all of the screws and nuts have been removed it is time to pull the sides of the bumpers away from the vehicle. DON'T DO IT LIKE THIS!!! At first I just pulled the outer painted shell out, but this is wrong. You need to pull both the outer painted shell and the inner white panel out together. Also see next pic.  16. This shows both the outer painted shell and the inner white panel being pulled out together. You will need to pull hard as the clips hold the top of the bumper in securely. 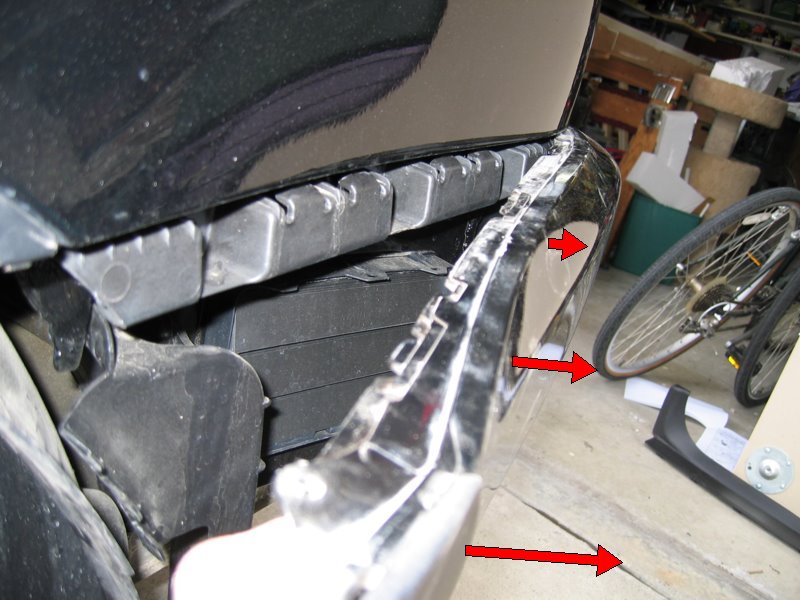 17. Here is a better view of the plastic clips that hold the top of the bumper in. When reinstalling the bumper you will need to press the top of the bumper VERY firmly back into these clips.  18. Once the sides of the bumpers have been pulled out you can pull the entire bumper out (towards the back) away from the vehicle (see arrow). Here is the bumper pulled back slightly. 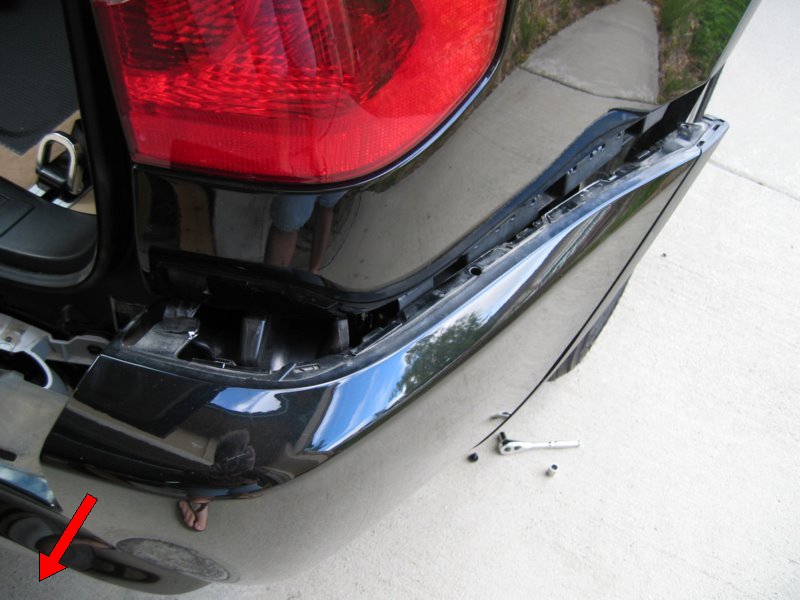 19. Another shot of the bumper pulled out a couple of inches from the installed position. Pull the bumper back, away from the vehicle (see arrows) to remove it.  End of Task 1: Remove the bumper Task 2: Install the new hitch and wiring harness 20. With the plastic bumper removed you need to remove the stock metal crash bumper. Unbolt the four bolts that hold it on (see arrows).  21. This shows the old bumper removed and the four bolts that held it on. These four bolts also hold on the new hitch/bumper.  22. Here is the new hitch/bumper installed. Tighten the bolts to the torque spec. in the TIS procedure. These four bolts are what attach the trailer to the vehicle, so it is important to make sure these bolts are tightened correctly (That said, since I didn't have a torque wrench, I just tightened them as tightly as I possibly could with a long handled socket wrench).  23. Attach the trailer wiring socket to the bracket using a TORX screwdriver (which I discovered I actually had) or flat head screwdriver if necessary.  24. First route the appropriate end of the wiring harness through the gray upper bumper plastic and down to the socket. Attach the plug to the socket and flip the red lock to make sure it stays. I then used one of the metal clips (see arrow) and zip ties that came with the BMW hitch kit to hold the harness up and away from the sharp metal edge.  25. Route the other end of the wiring harness under the gray upper bumper plastic and then push the plug through the hole shown.  26. Here is the rubber plug that you need to remove before pushing the wiring harness plug through the hole. Run the rest of the harness all the way through and push the rubber grommet in so it seats securely in the hole.  27. The TIS procedure wants you to remove the plastic bucket here, but I couldn't figure out how to do it without removing almost everything in the back corner of the vehicle. I could reach my hand throught the hole shown with the arrow and feel the socket that I needed to push the new plug into, so I decided to just do it by feel.  28. Here is a mirror I used to verify that I had connected the plug and socket together correctly.  29. Now you need to connect the white plastic box that came with the hitch kit. First undo the clips that hold on the floor of the luggage compartment right behind the back seat and in front of the removable hatch cover. I used a chisel to pry the inner black disc straight up. Once the black plug is up this high you should be able to pull the bottom part of the black fastener out, perhaps with some help from the chisel. There are three of these fasteners.  30. Instead of removing this part of the luggage compartment floor, which would have been a bunch more work, I just held it up temporarily with some braces (see arrows). That gave me plenty of room to work.  31. The wiring harness that connects to the white box is wrapped in a foam protective wrap (see arrow). Just undo the velcro and discard the protective wrap (I actually reused it to wrap around that metal brace to protect the wiring from rubing on the sharp metal).  32. Here is the white box and the wiring harness plug that get connected. 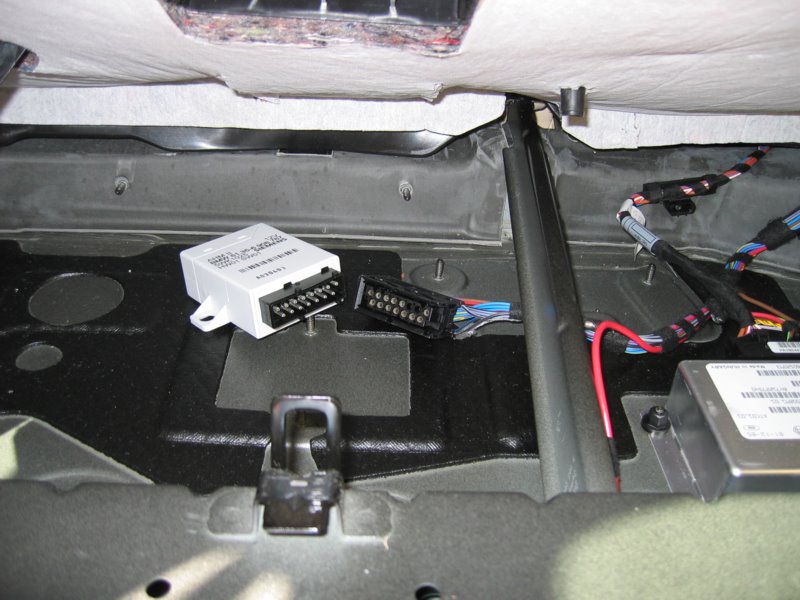 33. And here is the finished product with the connector connected and the white box anchored with the two black nuts that came with the kit.  End of Task 2: Install the new hitch and wiring harness Beginning of Task 3: Cut the bumper and reinstall it 34. Now it's time to cut the bumper. Here is the inside middle of the 06 bumper. I saw no cut-outs or indications of where to cut or any other markings that might help.  35. I started by marking the small starter hole, working my way out. At first I tried using a Dremel cutting wheel. This is a good way to get hot melted plastic in your eye and make a nasty looking cut, but it worked to get the hole started.  36. I graduated to using a jig saw set to a very low speed. Worked great and made nice clean cuts. Here is where I just about blew it by almost cutting above the crease line (see red arrow) The upper cut is not very clean because I was convinced I would need to cut above this line. Glad I didn't. Also, I decided to keep a strip of plastic at the bottom to tie the lower part of the bumper together. That seemed to work well (see green arrow).  37. To help see how I was doing I used a couple of boxes to put the bumper on and push it in as far as I could. This allowed me to see how far off I was (see next pic).  38. One of the early attempts. I looked to see how far off I was and then marked my next cuts with a pencil.  39. You also have to cut the inside white plastic a bit. Here is what I ended up with. Arrows mark the final cuts.  40. Here is the final cut on the outside. Now reinstall the bumper in reverse order of the way it was removed.  End of Task 3: Cut the bumper and reinstall it Results: 41. And here is the final outcome. Top line is a little jagged, but you can't really see it unless you bend down and look.  42. I forgot about leaving room to get a locking device in to lock the pin that holds the hitch assembly in the receiver (see arrow pointing at pin hole). I am just using a cotter pin that slides in the small groove now. I may just try to cut more white plastic on the inside with the dremel and reach in from behind to fasten the pin lock. Other wise, I might have cut a bigger hole to the right of the receiver (also see 48).  43. Finished from the other side.  44. Finished zoomed out.  45. Zoomed out some more. 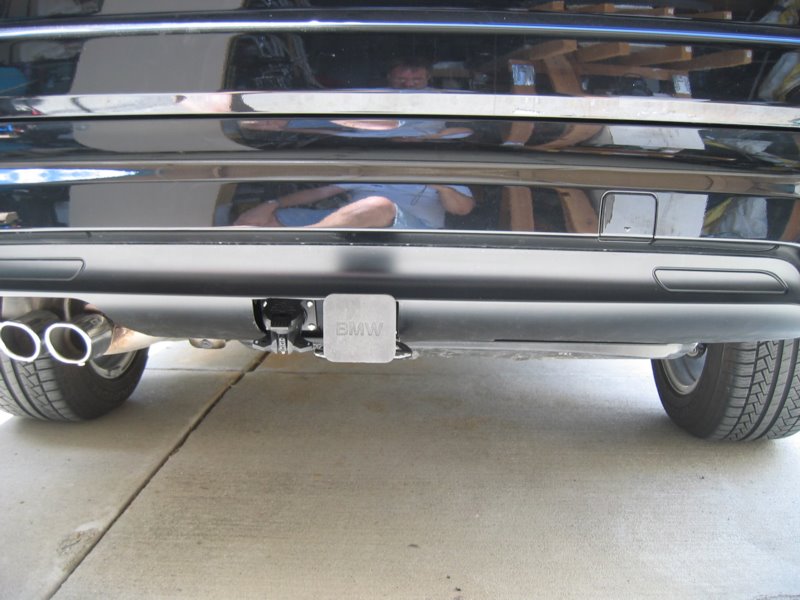 46. More. 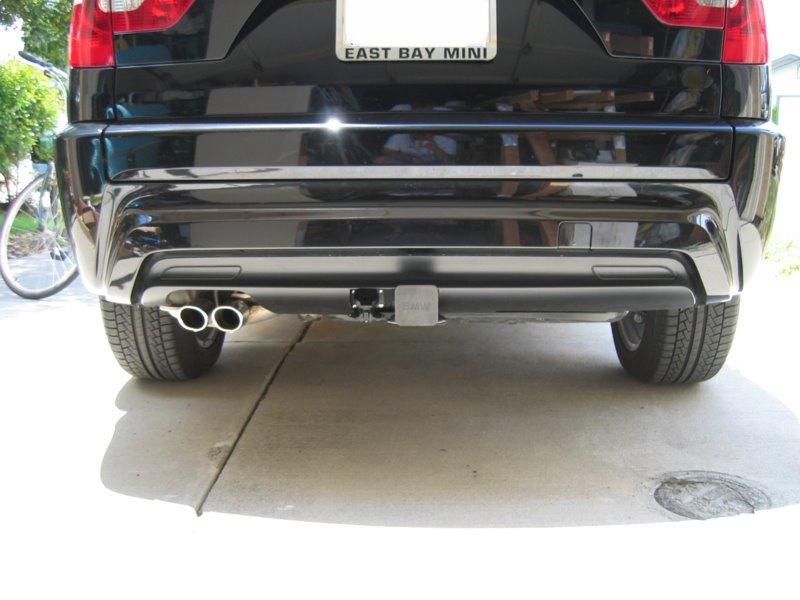 47. Whole thing came out great and really blends in well.  48. Actually towing something. Here is the cotter pin used to hold in the pin that holds in the hitch bar (see arrow). Like I pointed out before, not much room on the right for anything besides the cotter pin. Not enough room for any type of lock. I might need to cut a little more. 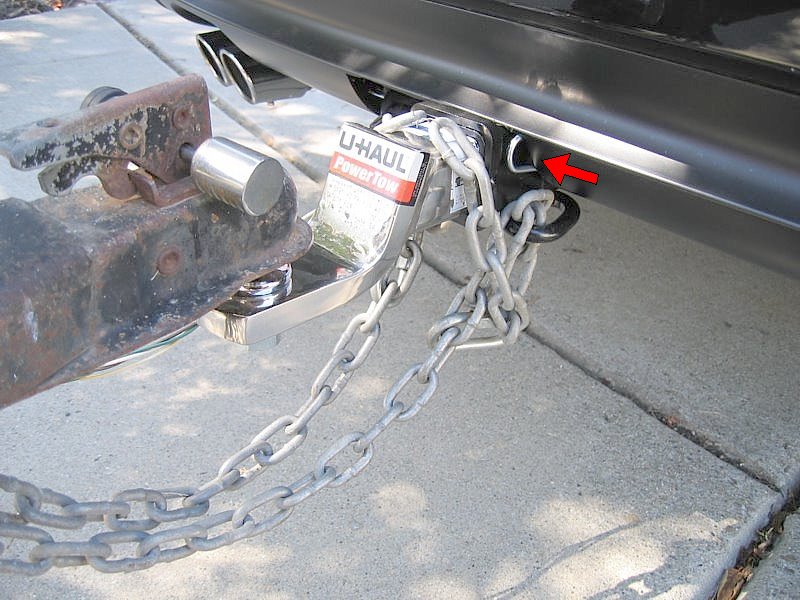 49. Towing, from the other side.  And that's it. Happy Hitch Installing! 
|
|
#2
06-18-2006, 09:59 PM
|
||||
|
||||
|
Very nice job!! Made this into an article and added it to the X3world home page
 http://www.x3world.com/articles/x3/b...h-2006-x3.html
__________________
 Xoutpost.com - where you come for the information but stay for the friendships
|
|
#5
06-19-2006, 06:10 AM
|
||||
|
||||
|
Great contribution. It's obvious that you got it all here - soup to nuts. From one member to another, thanks alot! This is probably the most significant DIY documentation from anyone in quite awhile.
|
|
#6
06-19-2006, 01:15 PM
|
|||
|
|||
|
Great job. Thanks for all the hard work putting together this DIY.
So, it seems that you had a tough time getting to the plug for the trailer wiring harness. I just need to tap the reverse positive. Do you remember if there was enough working room to be able to test/access the proper lead in the harness? TIA
__________________
David Macan Turbo / 997.1TT (gone) / e83 (gone)/ e46 M3 / e90 335xi (gone)/ Sienna XLE Ltd B7 A4 2.0T CVT (gone) / Pilot EXL-RES (gone)
|
|
#7
06-20-2006, 03:59 AM
|
||||
|
||||
|
Quote:
There was an attempt to show how to take that corner tray out in one of the PDFs that I attached but I never got it to work. Since I was able to attach the plug and socket by feel pretty quickly, I didn't try very hard. Most of the documents were for 2005s and before so maybe there was a change. Good luck! Quote:
|
|
#8
06-20-2006, 05:25 AM
|
||||
|
||||
|
Great job - well done !
I did the same retrofit over Easter but for a UK model You might want to check with a dealer whether the US X3 needs retrofit coding of the Light and DSC modules - I think the stability system can compensate for trailers but only if it's been coded to check for presence of trailer electrics and the trailer module. This should only take 30 minutes or so. It might be that US unlike European models are pre-coded. In the UK we have to fit the entire harness which routes back to the fuse box, light module, reverse common connector and a power feed - not a pleasant job ! Removing the bucket is time-consuming but not difficult. The various panels on the right of the trunk overlap top to bottom and must all be removed to get the bucket out. Remove each of the following in order: 1. Trim panels at tops of C and D pillars 2. Rear seat belt covers x 2 on right 3. Louver cover containing button for trim release 4. Partially detach right rear wheel well cover (large carpeted item with accessory socket) 5. Remove hatch opening top cover 6. Bucket has two screws at back and clips under lashing rail and wheel well trim. The bucket sits on 3 or 4 rubber feet - don't loose these, they fall off very easily when removing the bucket You'll need a recent copy of TIS to complete the above as you need to know where the various clips and screws are located and which way to pull the trim.
|
|
#9
06-20-2006, 09:26 PM
|
||||
|
||||
|
Quote:
Quote:
|
|
#10
11-28-2011, 04:48 PM
|
|||
|
|||
|
x2eme - I installed everything from the trailer hitch kit per your marvellous directions. However, I can't find, either by inspection or feel, the vehicle harness plug to connect the trailer wiring to. So do I need to remove the plastic bucket (which you didn't have to)?
davidr - I do have the TIS...could you please give me the document number so I find the bucket removal instructions you have summarized, or help direct me to the appropriate set of instructions? I looked around in TIS briefly today, but couldn't find these.
|
|
| Bookmarks |
|
|
|
|


 Hybrid Mode


