Home Forums Articles How To's FAQ Register
Go Back   Xoutpost.com > BMW SAV Forums > X5 (E53) Forum
Fluid Motor Union
User Name
Password
Member List Premier Membership Today's Posts New Posts

Xoutpost server transfer and maintenance is occurring....
Xoutpost is currently undergoing a planned server migration.... stay tuned for new developments.... sincerely, the management


Reply
 
LinkBack Thread Tools Display Modes
  #1  
Old 03-18-2009, 10:31 AM
TwinsPoppa's Avatar
Member
 
Join Date: Sep 2008
Location: Silver Spring, MD
Posts: 3,523
TwinsPoppa is on a distinguished road
Quote:
Originally Posted by cjawahir
thanks for the reply , I think the yellow multiplexer will work with the x5 up till 2005 , and will need the orange multiplexer for the newer model .

I spoke to yohotech and they sell the gt1 with the dvd cd so i dont need to buy the HDD, but can you tell me if the process to install the DVD is it difficult . any special thing I have to do .

cj
Yes, its my understanding that the yellow multiplexer SHOULD work with DIS v55. However, two important points to consider:

1) It has not been CONFIRMED to actually work with DIS v55. Meaning, none of us has actually installed v55 AND got it to see the yellow multiplexer. Not saying it doesn't just that we can't say a definite yes yet.

2) More importantly, even if it does work with v55, you will only be able to DIAGNOSE with v55. If you actually want to encode/program, you need to use SSS not DIS.

SSS, I believe, uses a different diagnostic head (OPS/OPPS) to program which NONE of us have right now. None of us have installed SSS yet.

For now, I'm concentrating on using DIS v43 because I KNOW that will diagnose and program the X. I will leave the VMware stuff to others for now.

Hopefully, that makes it a bit clearer.

EDIT: To answer your question about installing VMware and DIS v55, it SEEMS easy enough to install. However, as I explained above, none of us have confirmed it actually works with the yellow multiplexer - so, in turn, can't definitely say "yes, its easy to install and you don't need to do anything special".

Last edited by TwinsPoppa; 03-18-2009 at 10:44 AM.
Reply With Quote
  #2  
Old 03-18-2009, 10:47 AM
01 BMW_X5's Avatar
Member
 
Join Date: Feb 2008
Location: KS
Posts: 354
01 BMW_X5 is on a distinguished road
Quote:
Originally Posted by TwinsPoppa
Yes, its my understanding that the yellow multiplexer SHOULD work with DIS v55. However, two important points to consider:

1) It has not been CONFIRMED to actually work with DIS v55. Meaning, none of us has actually installed v55 AND got it to see the yellow multiplexer. Not saying it doesn't just that we can't say a definite yes yet.

2) More importantly, even if it does work with v55, you will only be able to DIAGNOSE with v55. If you actually want to encode/program, you need to use SSS not DIS.
I have Dis v55 up and running and it won't recognize the yellow multiplexer.
Been playing with it for about 4 days and still nothing.
Maybe its time to contact yohotech.
Can't get SSS to install because of password/file errors.
Solution is supposed to be in the works.

CJ, you may be better off spending the extra money and getting the software pre-installed on a HD.
__________________

Reply With Quote
  #3  
Old 03-18-2009, 10:55 AM
Member
 
Join Date: Sep 2006
Location: Trinidad wi
Posts: 46
cjawahir is on a distinguished road
Quote:
Originally Posted by 01 BMW_X5
I have Dis v55 up and running and it won't recognize the yellow multiplexer.
Been playing with it for about 4 days and still nothing.
Maybe its time to contact yohotech.
Can't get SSS to install because of password/file errors.
Solution is supposed to be in the works.

CJ, you may be better off spending the extra money and getting the software pre-installed on a HD.
yes I taught it would be problems with the dvd only , I ask yohotech for the price of both the HDD and DVD.

I had problems with carsoft 6.3 and now get it to work in vista softaware .

I dont want to have that type of problem ,the pre install software is ok but the HDD can only work in an IBM t30 .

cj
Reply With Quote
  #4  
Old 03-31-2009, 01:11 AM
Member
 
Join Date: Mar 2009
Location: sd, ca
Posts: 10
ganesht is on a distinguished road
Quote:
Originally Posted by 01 BMW_X5
I have Dis v55 up and running and it won't recognize the yellow multiplexer.
Been playing with it for about 4 days and still nothing.
Maybe its time to contact yohotech.
Can't get SSS to install because of password/file errors.
Solution is supposed to be in the works.

CJ, you may be better off spending the extra money and getting the software pre-installed on a HD.
The best thing to do is to create a hybrid install dvd, which has dis v55 with dis v44 cooked in, i have dis v50 right now but am looking for v43/44 to cook into my install.

From those who i have spoken to they have the diag capability of v55 with coding capability of v44.

If anyone has the v43/4 install dvd please pm me..

Last edited by ganesht; 03-31-2009 at 01:20 AM.
Reply With Quote
  #5  
Old 03-31-2009, 01:36 AM
Member
 
Join Date: Mar 2009
Location: sd, ca
Posts: 10
ganesht is on a distinguished road
Quote:
Originally Posted by ganesht
The best thing to do is to create a hybrid install dvd, which has dis v55 with dis v44 cooked in, i have dis v50 right now but am looking for v43/44 to cook into my install.

From those who i have spoken to they have the diag capability of v55 with coding capability of v44.

If anyone has the v43/4 install dvd please pm me..
I found the directions:

1) Install DIS44 base
2) Prepare "special" DIS5x Progman (using rar and ultraiso) :
2.1. remove from original dis5x progman iso
- packages\data\progmcfg.tar
- packages\scripts\i95progm
2.2. add from dis 44 progman to "special" dis5x progman iso
- packages\data\sgc_ecu.tar
- packages\data\sgcupdat.tar
- packages\scripts\i95sgcup
- DAT.XX\sgc
3) Insert "Special" DIS5x pogman disk and start DIS
4) Go to Administration->activate CD->DIS install (note not update - only install), enter password, installation must start.
5) After installation enjoy the DIS5X diagnostic capabilities with DIS44 coding/programming.
Reply With Quote
  #6  
Old 03-31-2009, 03:37 PM
TwinsPoppa's Avatar
Member
 
Join Date: Sep 2008
Location: Silver Spring, MD
Posts: 3,523
TwinsPoppa is on a distinguished road
How to install & Configure DIS v55 with VMware

1 – Set your laptop IP address, Subnet Mask and Default Gateway
a) Go to Start Menu, Control Panel and open Network Connections. Right-click on the Local Area Connection you will be using and select Properties.


b) The Local Area Connection Properties dialog box pops up. Highlight Internet Protocol (TCP/IP) and click on the Properties button. The Internet Protocol (TCP/IP) Properties dialog box pops up.
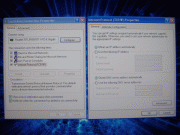

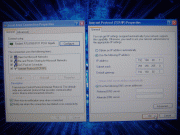
c) Select the Use the following IP address radio button. Enter the following information and select the OK button afterwards:
IP = 192.168.68.1
Subnet Mask = 255.255.255.0
Default Gateway = 192.168.68.1


2 – Install & Configure VMware Player software
a) Copy the VMware Player install EXE onto your HDD, along with the DIS v55 files, for faster installation. The files total about 6GB.

b) Run the install EXE and follow the prompts and any recommendations.

c) After the reboot, run VMware Player. Under Commands double-click on the Open icon. The Open Virtual Machine dialog box pops up. Navigate to where you stored the DIS v55 files on your HDD and select the DIS 55 English.vmx file – click on the Open button to continue.


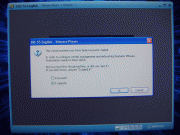
d) You will receive a pop-up that asks if you move or copied the virtual machine. Select the I copied it radio button and click on the OK button to continue.

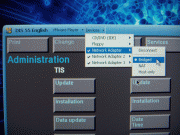
e) Once DIS v55 is open go to the menu bar at the top and select Devices. From the pull-down menu, mouse over Network Adapter and click on Bridged at the following menu. Notice it also says Disconnect above it. This means it’s already CONNECTED – don’t click on Disconnect. Apply those settings for both Network Adapter 2 and Network Adapter 3.


3 – Configure DIS v55 to recognize DK (yellow diagnostic head)
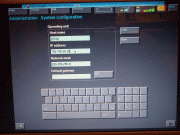
a) Hit CTRL + G to switch to DIS v55. You will be in the Administration section by default. Select Config, System and look under Operating Unit. Set Operating Unit IP address to = 192.168.68.35. Leave Network Mask as the default 255.255.255.0. Leave Host Name to the default of "gt1ap". Leave Default Gateway as blank also by default.


b) After all of that, you need to connect to the OBD-II on the X. It must be connected to the OBD-II port on the X as if you're about to run Diagnostics.

c) If you left, go back into Administration, Admin., Connection Setup and look under Operating Unit. You should now see an item under Free Diagnostic Heads. Highlight the item and then select Connecting.


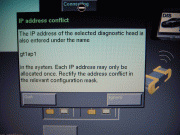
d) You will receive an IP address conflict prompt for "gt1ap1" (notice it is not "gt1ap"), select IGNORE. You will receive another similar prompt but it will say "gt1ap" this time, select IGNORE.


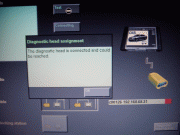
e) You will see a progress bar while its connecting. Once its finished select the TEST button and you should see a screen saying diagnostic head is connected and could be reached.


Done!

Last edited by TwinsPoppa; 04-01-2009 at 07:17 PM.
Reply With Quote
  #7  
Old 12-22-2010, 09:22 PM
bdriven's Avatar
Member
 
Join Date: May 2008
Location: Florida
Posts: 156
bdriven is on a distinguished road
Quote:
Originally Posted by TwinsPoppa View Post
1 – Set your laptop IP address, Subnet Mask and Default Gateway
a) Go to Start Menu, Control Panel and open Network Connections. Right-click on the Local Area Connection you will be using and select Properties.


b) The Local Area Connection Properties dialog box pops up. Highlight Internet Protocol (TCP/IP) and click on the Properties button. The Internet Protocol (TCP/IP) Properties dialog box pops up.


c) Select the Use the following IP address radio button. Enter the following information and select the OK button afterwards:
IP = 192.168.68.1
Subnet Mask = 255.255.255.0
Default Gateway = 192.168.68.1


2 – Install & Configure VMware Player software
a) Copy the VMware Player install EXE onto your HDD, along with the DIS v55 files, for faster installation. The files total about 6GB.

b) Run the install EXE and follow the prompts and any recommendations.

c) After the reboot, run VMware Player. Under Commands double-click on the Open icon. The Open Virtual Machine dialog box pops up. Navigate to where you stored the DIS v55 files on your HDD and select the DIS 55 English.vmx file – click on the Open button to continue.


d) You will receive a pop-up that asks if you move or copied the virtual machine. Select the I copied it radio button and click on the OK button to continue.


e) Once DIS v55 is open go to the menu bar at the top and select Devices. From the pull-down menu, mouse over Network Adapter and click on Bridged at the following menu. Notice it also says Disconnect above it. This means it’s already CONNECTED – don’t click on Disconnect. Apply those settings for both Network Adapter 2 and Network Adapter 3.


3 – Configure DIS v55 to recognize DK (yellow diagnostic head)
a) Hit CTRL + G to switch to DIS v55. You will be in the Administration section by default. Select Config, System and look under Operating Unit. Set Operating Unit IP address to = 192.168.68.35. Leave Network Mask as the default 255.255.255.0. Leave Host Name to the default of "gt1ap". Leave Default Gateway as blank also by default.

b) After all of that, you need to connect to the OBD-II on the X. It must be connected to the OBD-II port on the X as if you're about to run Diagnostics.

c) If you left, go back into Administration, Admin., Connection Setup and look under Operating Unit. You should now see an item under Free Diagnostic Heads. Highlight the item and then select Connecting.


d) You will receive an IP address conflict prompt for "gt1ap1" (notice it is not "gt1ap"), select IGNORE. You will receive another similar prompt but it will say "gt1ap" this time, select IGNORE.

e) You will see a progress bar while its connecting. Once its finished select the TEST button and you should see a screen saying diagnostic head is connected and could be reached.


Done!
Hi, I have done all the steps above, with no success, now, you mention that it must connected to the OBD, not the round connector under hood? right?
Thanks!
Reply With Quote
  #8  
Old 12-22-2010, 09:40 PM
mywidebody02's Avatar
Member
 
Join Date: Nov 2007
Location: Connecticut
Posts: 704
mywidebody02 is on a distinguished road
Quote:
Originally Posted by bdriven View Post
Hi, I have done all the steps above, with no success, now, you mention that it must connected to the OBD, not the round connector under hood? right?
Thanks!
if your truck has the round connector under the hood you must use that. the cap twists off and the cable goes on the twist till tight. is your vehicle manual or auto. need to supply year engine and tranny when asking questions. you also haven't really explained the trouble you r having. r u getting any bars at the top left? does it even see the head?
__________________
04 X5 4.8is
76 2002

X-Pipe and Dinan Mufflers: www.youtube.com/watch?v=eWQh-izaTcY

Pics http://www.flickr.com/photos/stevenb...7607968312734/
Reply With Quote
  #9  
Old 12-24-2010, 10:23 AM
bdriven's Avatar
Member
 
Join Date: May 2008
Location: Florida
Posts: 156
bdriven is on a distinguished road
Quote:
Originally Posted by TwinsPoppa View Post
1 – Set your laptop IP address, Subnet Mask and Default Gateway
a) Go to Start Menu, Control Panel and open Network Connections. Right-click on the Local Area Connection you will be using and select Properties.


b) The Local Area Connection Properties dialog box pops up. Highlight Internet Protocol (TCP/IP) and click on the Properties button. The Internet Protocol (TCP/IP) Properties dialog box pops up.


c) Select the Use the following IP address radio button. Enter the following information and select the OK button afterwards:
IP = 192.168.68.1
Subnet Mask = 255.255.255.0
Default Gateway = 192.168.68.1


2 – Install & Configure VMware Player software
a) Copy the VMware Player install EXE onto your HDD, along with the DIS v55 files, for faster installation. The files total about 6GB.

b) Run the install EXE and follow the prompts and any recommendations.

c) After the reboot, run VMware Player. Under Commands double-click on the Open icon. The Open Virtual Machine dialog box pops up. Navigate to where you stored the DIS v55 files on your HDD and select the DIS 55 English.vmx file – click on the Open button to continue.


d) You will receive a pop-up that asks if you move or copied the virtual machine. Select the I copied it radio button and click on the OK button to continue.


e) Once DIS v55 is open go to the menu bar at the top and select Devices. From the pull-down menu, mouse over Network Adapter and click on Bridged at the following menu. Notice it also says Disconnect above it. This means it’s already CONNECTED – don’t click on Disconnect. Apply those settings for both Network Adapter 2 and Network Adapter 3.


3 – Configure DIS v55 to recognize DK (yellow diagnostic head)
a) Hit CTRL + G to switch to DIS v55. You will be in the Administration section by default. Select Config, System and look under Operating Unit. Set Operating Unit IP address to = 192.168.68.35. Leave Network Mask as the default 255.255.255.0. Leave Host Name to the default of "gt1ap". Leave Default Gateway as blank also by default.


b) After all of that, you need to connect to the OBD-II on the X. It must be connected to the OBD-II port on the X as if you're about to run Diagnostics.

c) If you left, go back into Administration, Admin., Connection Setup and look under Operating Unit. You should now see an item under Free Diagnostic Heads. Highlight the item and then select Connecting.


d) You will receive an IP address conflict prompt for "gt1ap1" (notice it is not "gt1ap"), select IGNORE. You will receive another similar prompt but it will say "gt1ap" this time, select IGNORE.


e) You will see a progress bar while its connecting. Once its finished select the TEST button and you should see a screen saying diagnostic head is connected and could be reached.


Done!
I follow every step, I never get to see anything under free diagnostic heads.
Reply With Quote
  #10  
Old 12-24-2010, 05:41 PM
TwinsPoppa's Avatar
Member
 
Join Date: Sep 2008
Location: Silver Spring, MD
Posts: 3,523
TwinsPoppa is on a distinguished road
Quote:
Originally Posted by bdriven View Post
I follow every step, I never get to see anything under free diagnostic heads.

If I'm not mistaken, you will NOT see any free diagnostic head if it's ALREADY SEEN by the system.

Do you see the green bar indicating the system can see the diagnostic head?

Do you have a manual trans? If so, you have to put it in neutral.

Any way to get a screen shot of what you are seeing at the main DIS screen?

Assumptions, correct me if any of these are wrong:

1) You are using vmware. What version are you using?
2) You have the round OBD connector in the engine compartment.
3) When you try the GT1, you are actually connecting the GT1 to the round OBD connector under the hood (not the one under the dash).
Reply With Quote
Reply

Bookmarks

Tags
gt1 setup


Posting Rules
You may not post new threads
You may not post replies
You may not post attachments
You may not edit your posts

BB code is On
Smilies are On
[IMG] code is On
HTML code is Off
Trackbacks are On
Pingbacks are On
Refbacks are On


All times are GMT -4. The time now is 11:02 AM.
vBulletin, Copyright 2026, Jelsoft Enterprises Ltd. SEO by vBSEO 3.6.0
© 2017 Xoutpost.com. All rights reserved. Xoutpost.com is a private enthusiast site not associated with BMW AG.
The BMW name, marks, M stripe logo, and Roundel logo as well as X3, X5 and X6 designations used in the pages of this Web Site are the property of BMW AG.
This web site is not sponsored or affiliated in any way with BMW AG or any of its subsidiaries.