
|
|
|
|
||||||||||
| Xoutpost server transfer and maintenance is occurring.... |
| Xoutpost is currently undergoing a planned server migration.... stay tuned for new developments.... sincerely, the management |
|
|
LinkBack | Thread Tools | Display Modes |
|
#1
 06-19-2012, 02:39 AM
|
|||
|
|||
|
Rear Air Spring Replacement - with photos
I finally got sick of my leaking air suspension and decided to replace both rear air springs, even though only the right one was leaking. I figure they are both 12 years old and have done 220,000km so it was best to replace both, especially when shipping from USA was $80 for one spring or only $100 for both.
I purchased the new air springs from Arnott Industries for just $99.25 each. I also found a discount code BENZWORLD0312 which gave me 10% off :-) The links to the new springs are: New Rear Right Comfort Air Suspension Air Spring for 2000-2006 (w/ rear air leveling ONLY) X5 New Rear Left Comfort Air Suspension Air Spring for 2000-2006 (w/ rear air leveling ONLY) X5 I found the sales team at Arnott to be very helpful in confirming the part numbers and was given a quick quote for shipping to New Zealand. The parts were shipped on Thursday and arrived in New Zealand on the Tuesday, which is excellent considering the distance and timezones crossed. Parts were well packaged too. As mentioned in other posts, pulling the car apart takes longer than actually changing the springs, in fact changing the springs was so quick that I went through the documentation again thinking I must have missed some steps!  Putting the springs side by side shows how perished and out of shape the old springs were.  The cracking in the old right spring (the one that was leaking) is very obvious.  Most of the time was spent getting all the plastic parts out of the boot (trunk for you Americans) and getting the X5 up on the axle stands. I had only the supplied jack to use, which SUCKS since it doesn't lift straight up, but actually pulls the X5 towards you as it lifts. It is pretty scarey when you are lifting the second side up, and notice the axle stand on the far side leaning over about 15 degrees! I ended up grabbing the jack from my wife's car, which worked much better as it lifts straight up. I lifted the whole rear of the X5 up and placed it on my 4ton axle stands so I could work on both sides at once. DON'T DO THIS JOB WITHOUT AXLE STANDS! After I had the X5 on the axle stands, and had the wheels off, I then pulled the fuses and released the air from the reservoirs by undoing the banjo bolts slightly. It takes a few minutes for all the air to empty out, so be patient and grab a beer.   One of my air reservoirs was replaced a few years ago (due to a broken plastic clamp) so I had the original one on the left side and the newer one on the right. The older one was easier to work with, as the pipe from the reservoir to the air spring can be disconnected at both ends, giving you more freedom to work. The newer one can only disconnect at the air spring, so the black pipe (which is very stiff) is constantly in the way.    This is what the left side looks like once the air spring is out. I was happy to see that even with 12 years and 220,000km on the clock, there is no rust anywhere. It was also a good chance to check all the bushings and boots. You can also see my nice new bright yellow shocks, replaced just two weeks ago (one was leaking so I replaced them both).  When I pulled the old air springs out, each one had this cardboard gasket sitting on top between the spring and the car. There was no mention of this in the TIS documentation, and no replacement with the new springs, so I gave them both a good clean and put them on top of the new springs. They just sit on top, no glue or anything. I guess they are just there to prevent rattles?  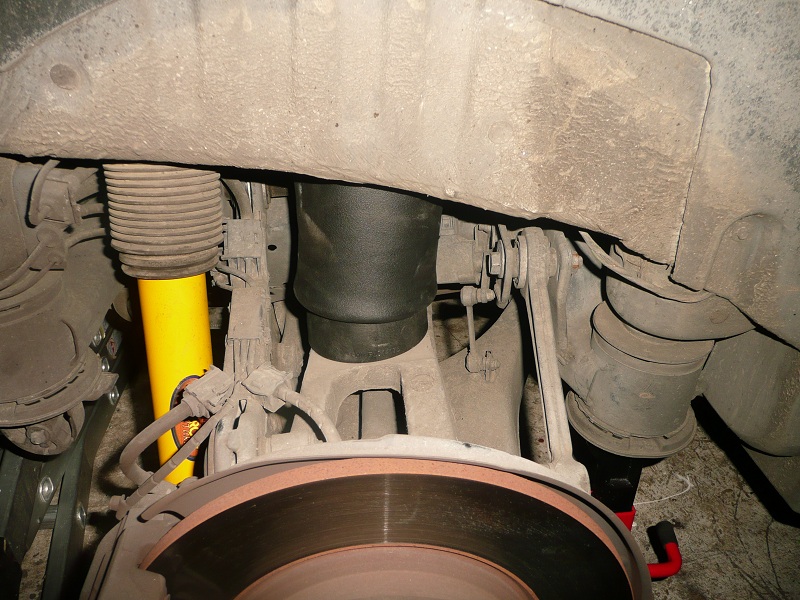 As mentioned, replacing the springs is very easy. Actually placing the new springs is best if you have a helper to help guide the pins into place from above and attach the clips, but this only takes about 2 minutes per side and doesn't cause dirty hands if you have a wife that doesn't like spending time in the garage :-) Probably the most difficult part of the whole process (apart from the useless OEM jack) was getting the clips off the bottom of the old air springs. I found a long handled flat head screw driver helped in pushing them part way off, and then I could pull them the rest of the way off with my fingers. You will need a torch as well to see what you are doing. After I had everything back together, I plugged all the fuses in, expecting the air compressor to start pumping, but nothing. I tried turning on the key, and even started the car (while still on the axle stands) but still nothing. No errors, just nothing. So I turned the key off again, pulled the fuses and put the wheels back on so that I could lower the truck onto the ground. I lowered the whole rear end down so it was still on the axle stands, but at their lowest setting. This had the truck sitting at about half of its normal height, and avoided having it sitting on completely deflated air springs. I then put the fuses back in and immediately the compressor kicked in and lifted the truck up off the axle stands. Success! I checked for leaks with some soapy water, and then went for a 20km drive. Everything seemed fine. Even better, 4 days later and the truck has not deflated at all! And with new air springs and shocks, it feels great, much less body roll through the corners. With 1200km of driving over mostly rough gravel roads coming up this weekend while chasing the WRC Rally, it will be nice knowing everything is nice and new.
__________________
Current Sold    
|
| Bookmarks |
| Tags |
| air suspension, diy |
| Thread Tools | |
| Display Modes | |
|
|
|
|


 Threaded Mode

