
|
|
|
|
||||||||||
| Xoutpost server transfer and maintenance is occurring.... |
| Xoutpost is currently undergoing a planned server migration.... stay tuned for new developments.... sincerely, the management |
 |
|
|
LinkBack | Thread Tools | Display Modes |
|
|
|
#1
 03-07-2013, 08:03 PM
|
||||
|
||||
|
My E53 Audio Upgrade - Stage 1 - Subwoofer & Monoblock
Hi guys. I'm kind of new here so I thought I'd contribute a bit and do a build log for my 06 X5.
My mission with stage 1 of my audio upgrade was to add low end to the stock system. My SAV has a stock 16:9 Screen, Navigation, bluetooth, steering wheels controls ect. it has the premium sound package with a DSP amp and 10 speakers so I figured a good way to start would be add a LOC interface/keeping my head unit and features and running a decent 12" sub and 1000-1500RMS of clean power. I already had a line on the 13aV.2 though a friend and I have ran alot of their stuff I the past and liked it. And having heard them already on a Nine.1 I knew they could get pretty low and still sound pretty accurate as well. The enclosure is custom. Kerf Port/Recessed Mount/2.4 cubes/33hz I grabbed the Nakamichi PA-1500 for a steal and after running their stuff in the past I'm thinking the sound quality and clean power will be there and match well with this single sub SQ orientated install. I went with the Audio Control LC2i for the factory integration piece. An audio engineer recommended something with bass restoration for my application with the stock DSP in the mix and the LC2i has their Accubass processing to prevent roll off at higher volumes on stock systems. I plan on sourcing a DLS Component set, LC6i or LC8 and a mid amp for the stage 2 upgrade in the near future. For wiring and fuse distribution I went with KNU. I Ran 0GA into the block with dual 4GA out for adding that mids amp for my stage 2 upgrade. 150A fuses on each circuit. 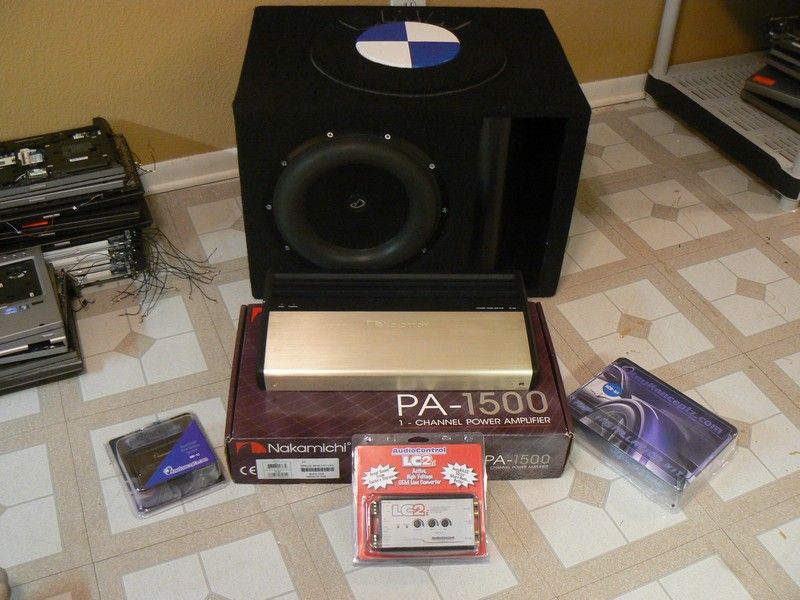 Elemental Designs 13A.v2 Dual 2ohm 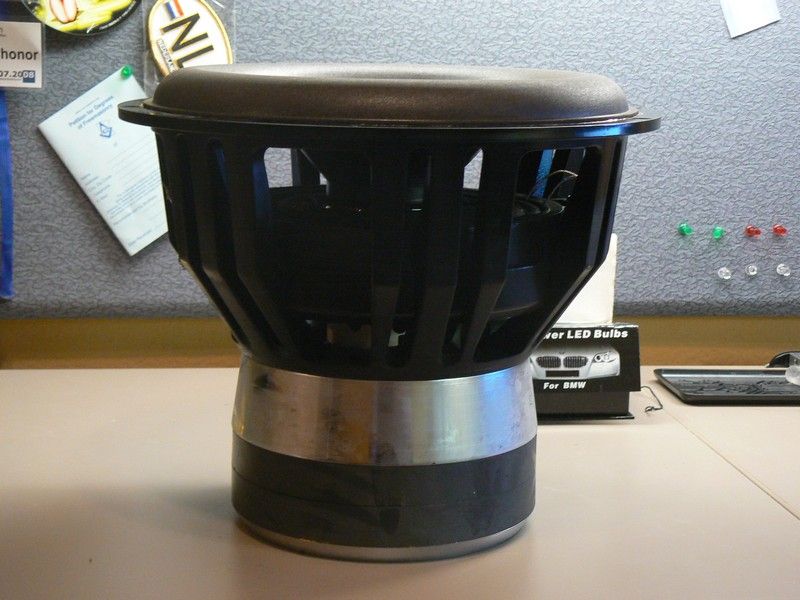 This is one heavy woofer...And I love the surround I can't wait to see this thing flex! 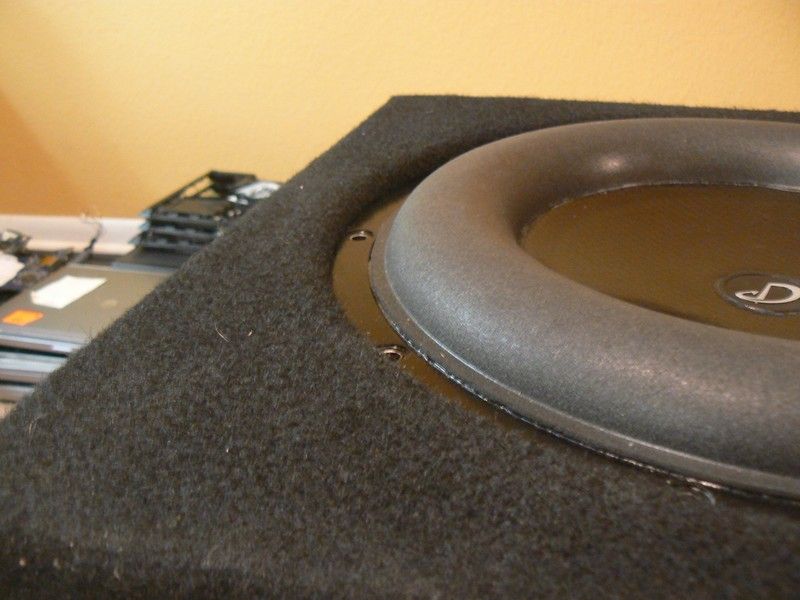 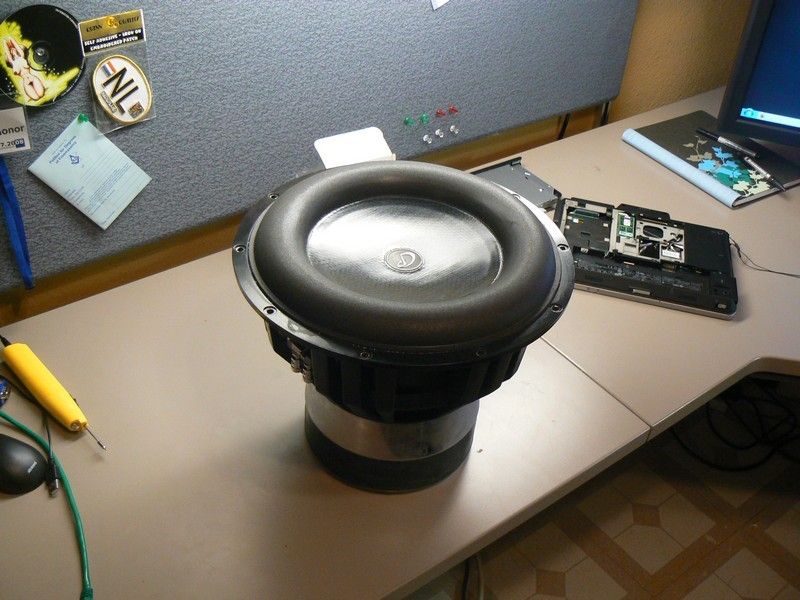 Nakamichi PA-1500 1200WRMS @ 1ohm 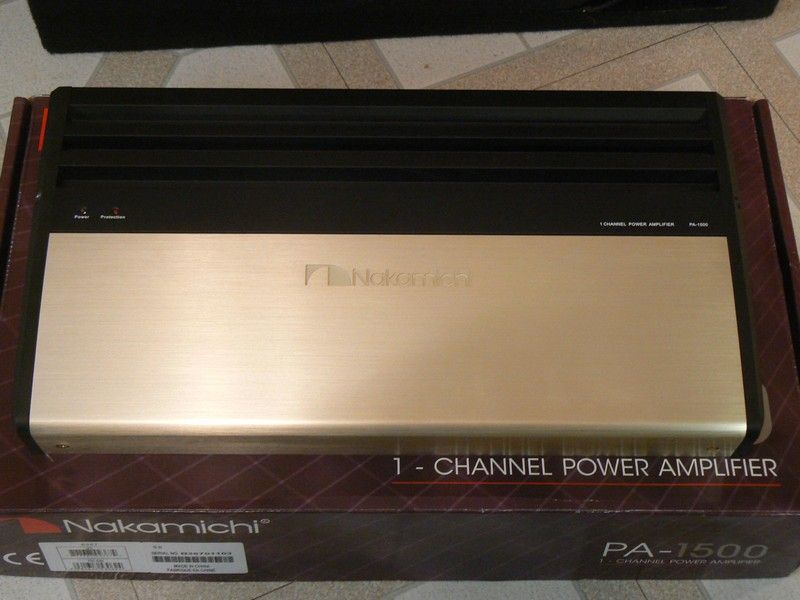 Audio Control LC2i 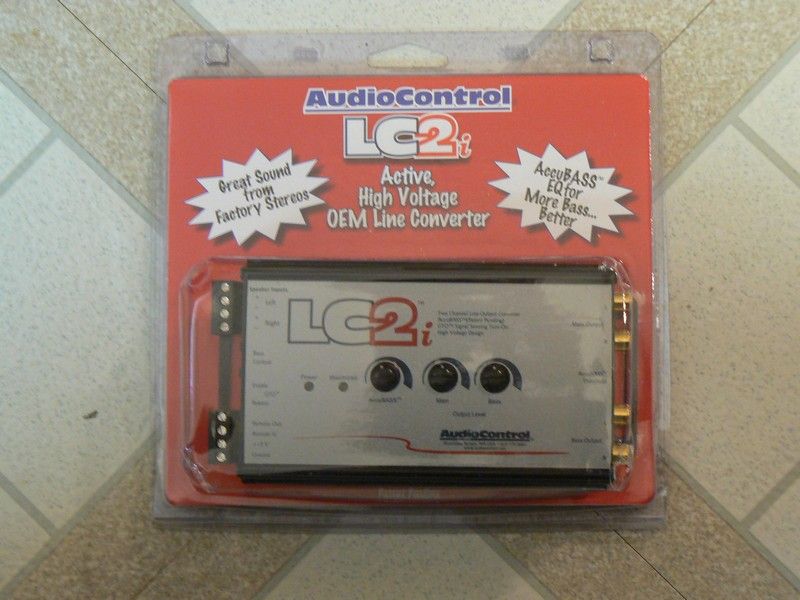 Knu KonFused Distro KNF-12 Single 0 or 4GA in to Dual 4 or 8GA out "Fused at 150A Per side" 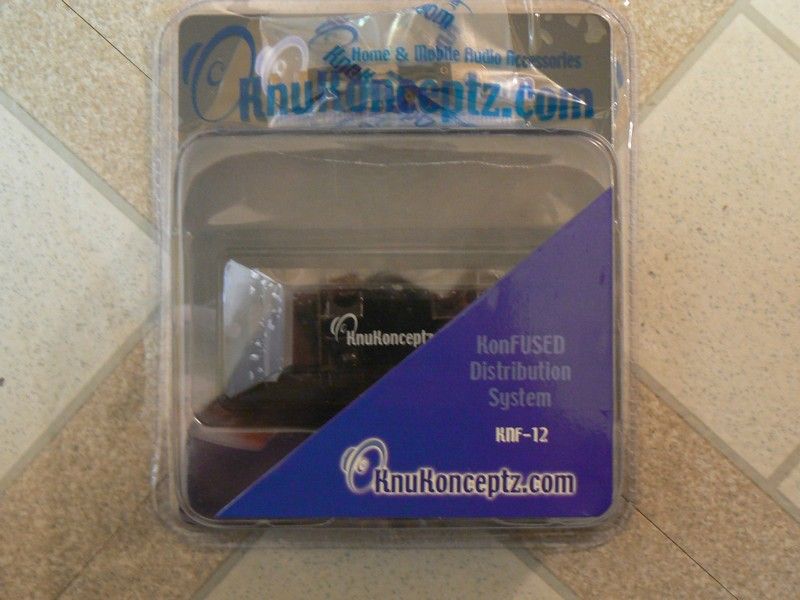 Now for the install.. Obviously it helps to give a step by step guide for others that haven't been there before.  The bare canvas...  Remove panel by changer/nav drive  Remove panel over stock sub/fuse Panel location this is the home for the LC2i so adjustments can be made easily. I removed the stock subwoofer enclosure last week in anticipation of this install. * It's just a couple of 10mm bolts on the floor pan and a Allen bolt behind the fuse block. 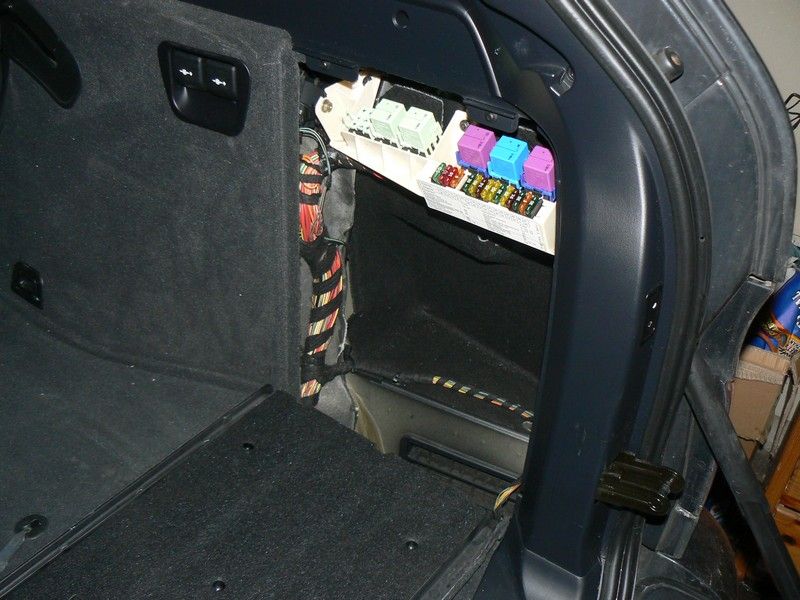 Now with those panels out of the way pull the floor panel up and expose the spare tire. Remove the wing nut/retention plate and use the pull handle to lift the tire up out of the well it's a nice feature to save on broken backs. "Just don't forget to put the webbing and handle back under when returning the tire to the well. 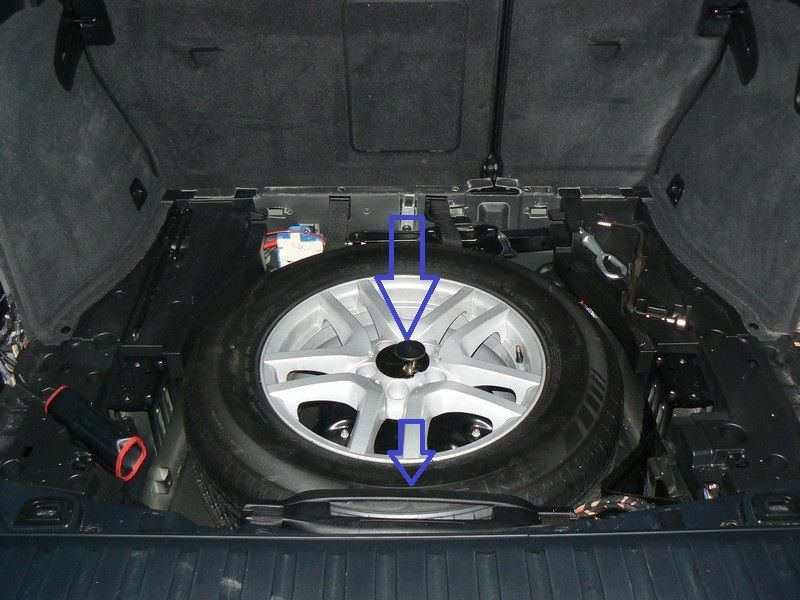 After the tire is removed you will be left with the pod that houses the air pump for the self leveling rear air suspension. *Be careful not to stress or pinch any airlines coming out of this unit when working in this area. Remove the two 13MM bolts from the rear of the frame and two 13mm from the front of the bracket.  BEFORE CONTINUING DISCONNECT THE NEGATIVE BATTERY CABLE! Now with the frame removed and set aside we can remove the cover for the radio module. It's secured by 3 Philips Head screws. 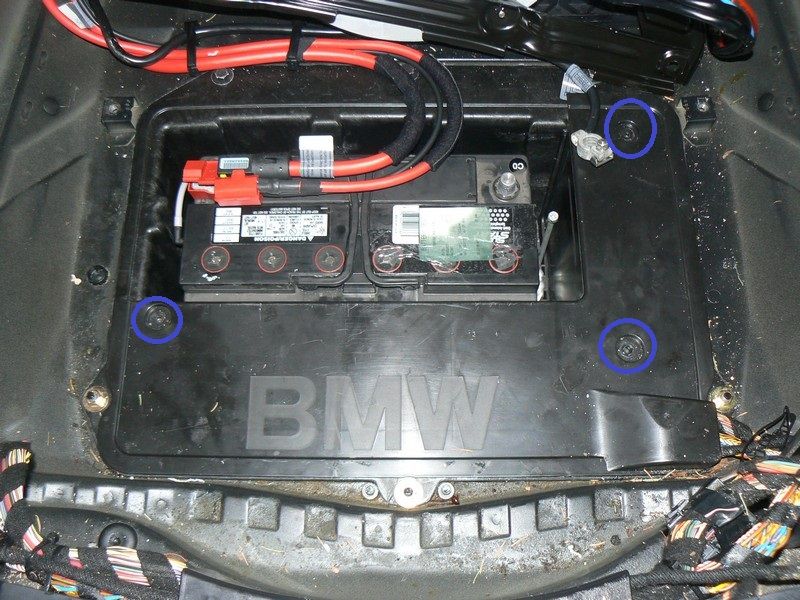 Once cover is removed we can pull some tape off the harness going into the radio module and connect into a 12V switched signal for our remote turn on wire for the amp. "The wire we want is Purple with a white stripe" 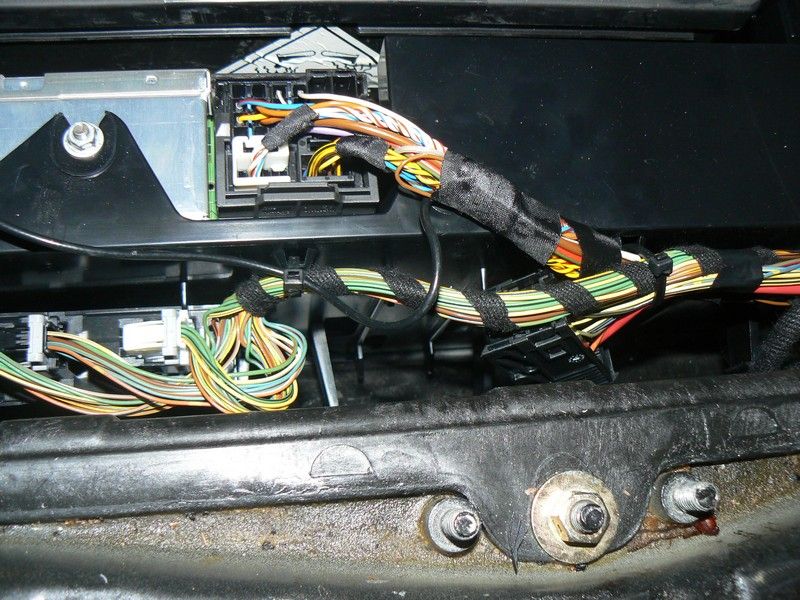 Next we solder, shrink wrap and zip tie the remote wire into the radio module harness 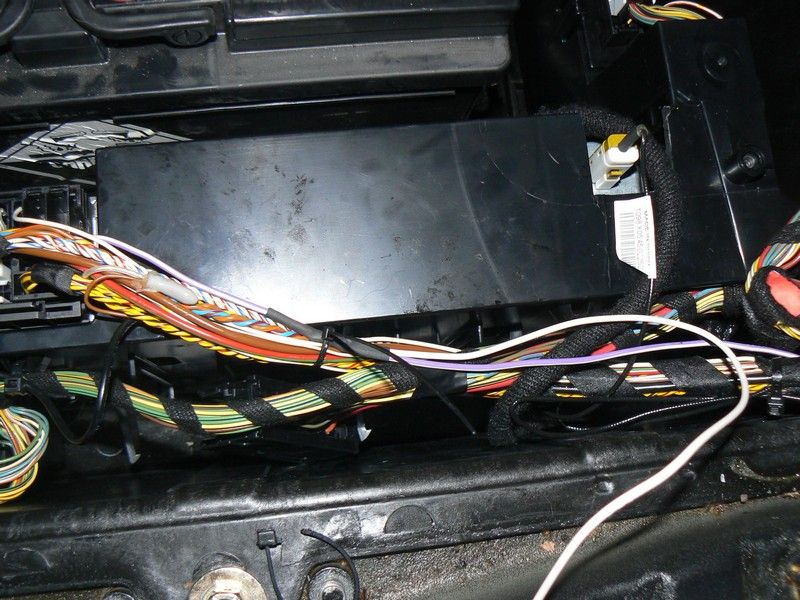 Now we can remove the cover on the floor by the former sub enclosure area. It's secured by 2 10MM plastic nuts. 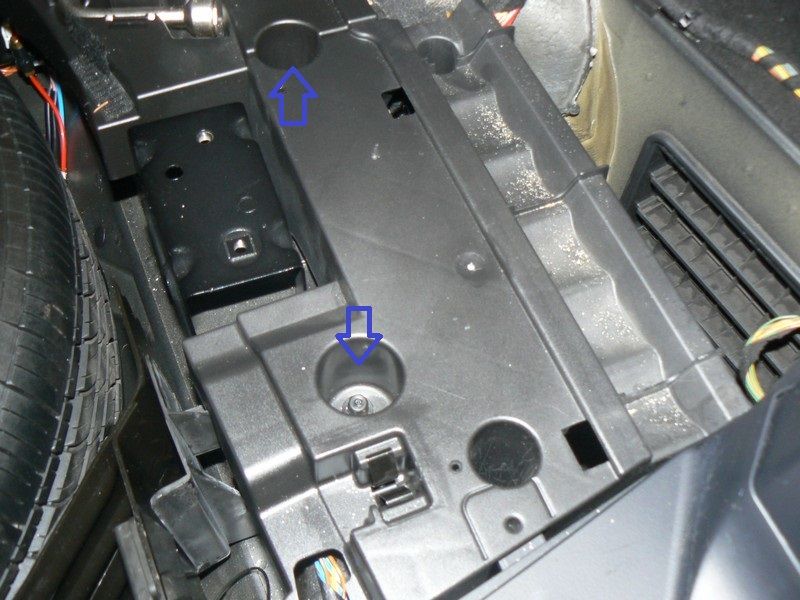 With the plastic cover removed it's time to tap the harness from the stock subwoofers to get the signal for the LC2i. We are after the twisted pair of Solid blue solid brown and solid yellow solid brown. The brown wires will be - and the yellow and blue wire are +  Time to add some length to get the signal wires back to the LC2i cubby. 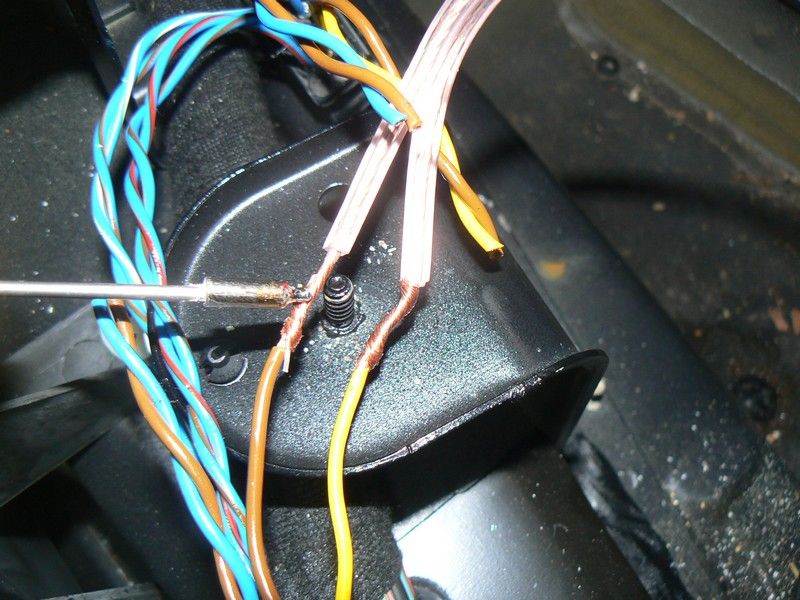 The Ground is next. I've added a Ground wire for the LC2i as well. 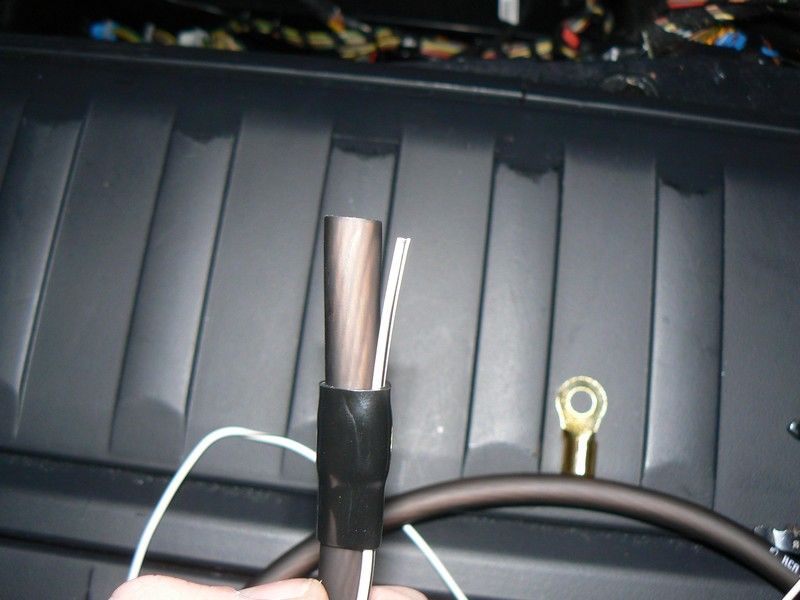 It will be connected to a factory frame ground point. No paint, bare metal. One 10MM nut secures it. 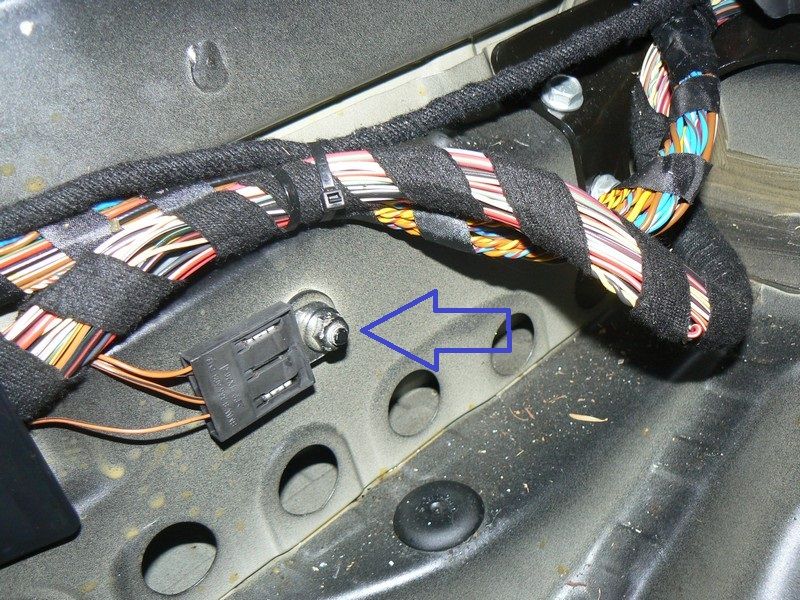 Now for the Power and fuse distribution. OGA into the KNu block with 4GA out to the Nakamichi and a small 12V lead for the LC2i. The holder is zip tied to the frame rail hole noted in pic and small 12V routed to LC2i cubby. 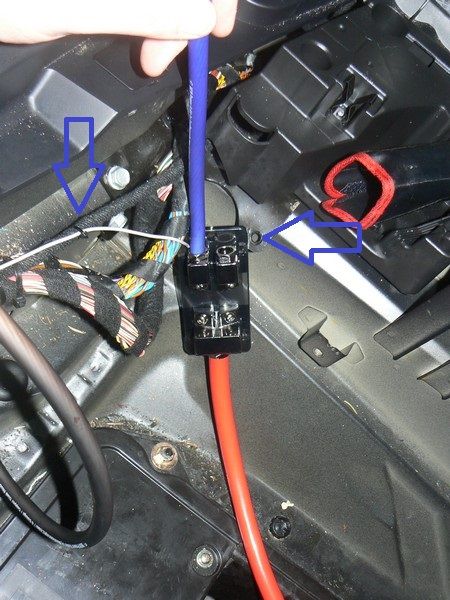 With 12V, Speaker Level inputs and ground supplied to the LC2i that can call be connected and put aside. 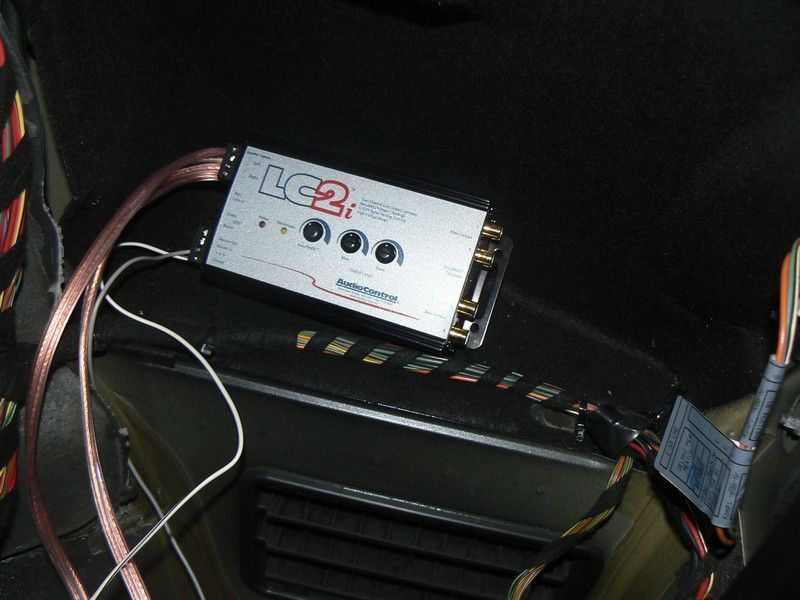 And on to the amp.... I wanted it to be clean with accessibility to adjust and keep cool. So I decided to place it in front of my enclosure mounted to the floor with all the wiring hidden coming up from under. So I did some measurements checked the underside for clearance and screwed it down into the floor cover. Now it time to drill out some wire routing paths. 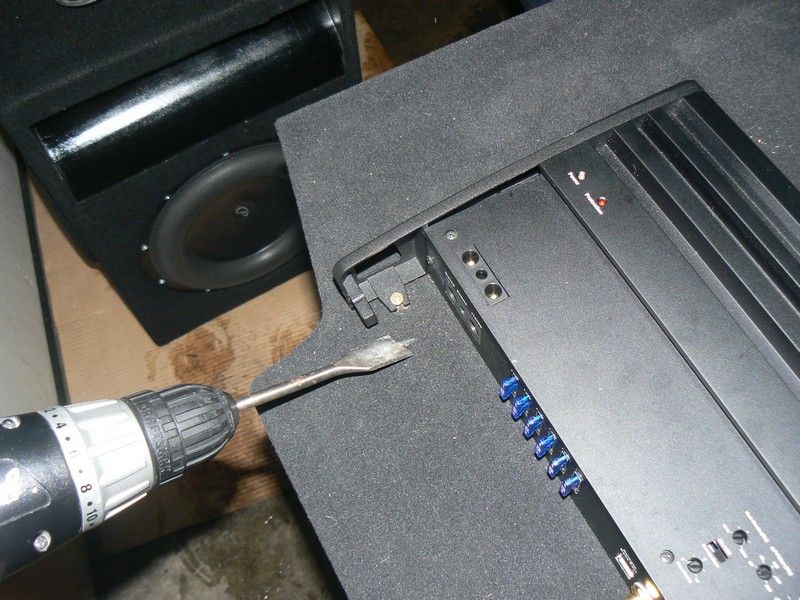 Drilled out and wiring routed. 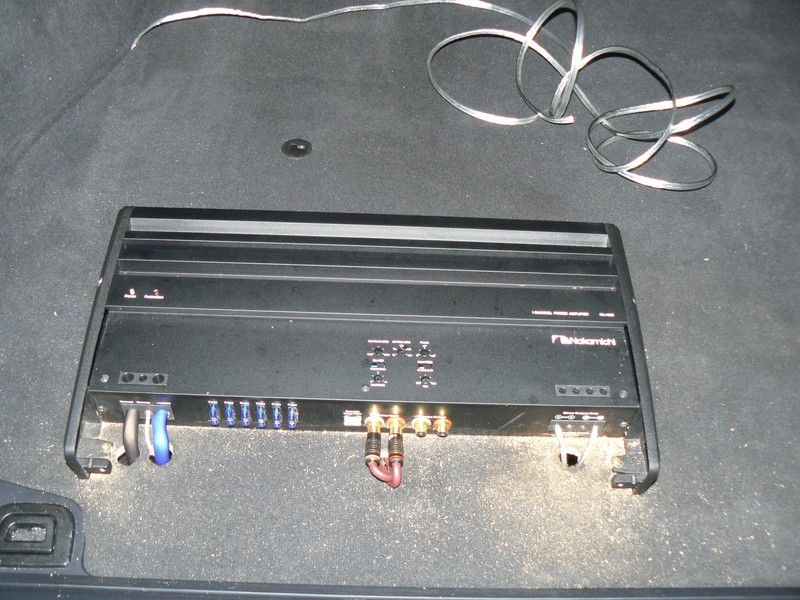 Now for some speaker wire connections for the box. My SMS Box has brass bolts so I'm using these guys from the knu kit for now. I'll prob switch to a ring in the future. 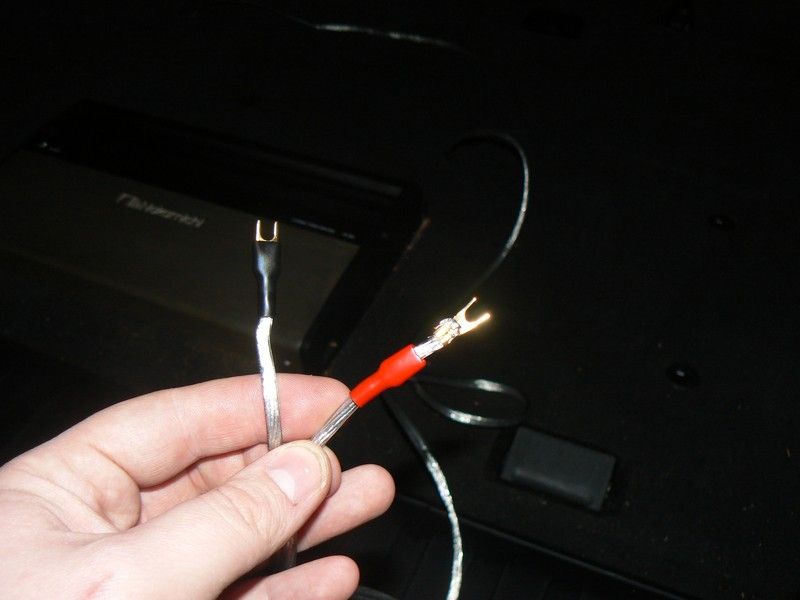 And the final result after cleanup and enclosure placement. I'm very happy with the results  
__________________
 Last edited by Lexicon740iL; 03-07-2013 at 08:11 PM. 
|
|
#2
03-07-2013, 09:01 PM
|
||||
|
||||
|
Clean install and nice write up!
Did you leave the wires for the amp long enough to still be able to lift up the cargo floor in the event of a flat?
__________________
2004 X5 3.0i Mod list: Currently Longer than the maximum allowed characters that can be typed here... 
|
|
#3
03-07-2013, 09:26 PM
|
||||
|
||||
|
Very nice. I bet it pounds. Nice write up. I'd love to hear it in person someday.
__________________
2002 X5 4.6is - Titanium Silver / Black Alcantara - Dinan Stage 2 - Bilstein/Eibach - Brembo BBK ----SOLD--- 1993 318i - Brilliantrot / Tan - bone stock daily driver
|
|
#4
03-07-2013, 09:40 PM
|
||||
|
||||
|
Nice write-up.
For lifting up the spare tire, attach the handle (small arrow) to the hook (where the top lift gate lock onto) on the lower lift gate. When you lower the lift-gate, the spare will be pulled up, then you slide it out. It wasn't design for pulling it by hand (eventhough you can use it that way) you are missing a plastic stick next to the tow hook, that keep the lower gate open so you can slide the spare out with both hand. It should be in the manual
__________________
 00 E39 DINAN S1 //M5 (82k miles) 06 E53 DINAN 4.8iS, born 2/18/2006 (126k miles) http://www.xoutpost.com/bmw-sav-foru...s-my-dslr.html 90 Straman Z32 TwinTurbo Convertible, (1 of 44 ever made) 5 speed, 444rwhp/451rwtq 01 360 Novitec Spider F1 (26k miles) Last edited by tmv; 03-07-2013 at 09:46 PM.
|
|
#5
03-08-2013, 12:14 PM
|
||||
|
||||
|
Quote:
Good call on the proper use of the lifting strap. I will add that note to my DIY. I was aware of it but didn't point out the proper use when I referenced the strap in the write up. I think is a pretty slick design. The diagram is on the underside of the floor cover as well I believe. My Plastic stick is laying in the spare tire well in this pic. it fell down when I was removing the SLS pod. Quote:
I have a remote level control for the amp to install and several adjustments on my LOC and AMP to dial in the amount of bass I'd like. So my application is not really the norm. Here is a link to what someone found to be good settings for stock DSP on our vehicles. Hopefully this helps you. http://www.xoutpost.com/articles/x5/...gs-bmw-x5.html
__________________
Last edited by Lexicon740iL; 03-08-2013 at 12:30 PM.
|
|
#6
03-08-2013, 05:47 AM
|
||||
|
||||
|
A very nice and professional install there man!
Out of interest what do you set the Bass level on the head unit too?
|
|
#7
03-08-2013, 11:56 AM
|
||||
|
||||
|
Quote:
I left 6ft of extra wire under the floor for removal of the spare. This length worked perfect as the floor can be lifted out and rested against the tailgate for full access if necessary. The write up took a while but I figured if another forum member looking to add a sub and amp could benefit for a detailed guide it's worth my time and effort  Quote:
__________________
Last edited by Lexicon740iL; 03-08-2013 at 12:08 PM.
|
|
#8
03-18-2013, 05:49 AM
|
||||
|
||||
|
That's great Thanks a lot.
I plan on eventually fitting an after-market mono block amp and sub to my DSP system so your write up is perfect. For the time being I'll try adjusting my DSP settings to the link you recommended.
|
|
#9
03-19-2013, 10:00 PM
|
|||
|
|||
|
front stage
I'm in the process of doing my second E53 and I've got to say that's some nice clean work....As far as your front stage I'd avoid the dls because they are tough to deal with in the u.s. I would instead opt for this setup which is very reasonably priced and will pretty much bolt right up with minimal mods....The Madisound Speaker StoreI I would also check out this guy's E39 build thread. This guy is an absolute guru on this setup and it works......I'm actually trying to upgrade to the alpine 701 processor and have full control from the head including bluetooth and navi...Wish me luck... I'll be starting the build in about two weeks and I'll try to post some pics.
Here's a list of my gear. Processing/oem integration Intravee ibus-ainet converter Alpine pxa-h701 Alpine Kca-420i Audio Control LC2i Amps 2 each Jl Audio 600/4 HD Jl Audio 750/1 Hd Speakers Front stage Hertz Mille Ml2800, Ml700, Ml1600 (full active setup) Rear fill Audison Voce Midbass with Morel MdM 55 midrange Modified to fit factory housing (passive setup with mid to roll of at 7.5Khz) Subwoofer Jl Audio 10w7ae in 1cu net sealed in modified factory location. Power system Optima Yellow Top (2nd battery next to spare tire in rear well) Upgraded factory battery to East Penn Mfg Agm Intimidator) Cadence high strand 0/1 gauge to jl dat blocks homemade signal cables Last edited by malcris; 03-19-2013 at 10:09 PM.
|
|
#10
04-10-2013, 01:05 AM
|
||||
|
||||
|
Quote:
Using the intravee the way Richard does, the head unit is faked out and the Alpine unit takes over signal processing. You can toss the DSP and factory amp, if I am reading things correctly. Replacing the factory amp with a halfway decent aftermarket amp(s) and adding the signal processing capabilities of the Alpine unit alone will make a great difference in the sound. I just added a JL XD 600/6 (an OK amp) to my 2011 E90 M3 and the difference was quite remarkable. I have Hybrid Audio Technologies speakers and decent aftermarket amps in my 2002 M3, so I have some idea of what a halfway good system can sound like. I'd like to add signal processing to the 2002 M3, but the stuff that's out there is more expensive than I'd like to spend right now or has integration issues (cleansweep, bitone, etc.). Anyway, some nice ideas here and if anyone has info on how to get the interface cable (box) setup for the intravee like RichardP has, I'd love the info! Good luck with the install above. Looks like a lot of work (fun).
__________________
Kirk Las Vegas 2016 X5 40e Mineral White/Black Dakota Leather, ZLL, ZCW, ZDA, ZDB, ZPP, multi contour seats, rear side window shades, HK stereo 2011 E90M3, 6-speed manual
|
|
| Bookmarks |
|
|
|
|


 Hybrid Mode


