
|
|
|
|
||||||||||
| Xoutpost server transfer and maintenance is occurring.... |
| Xoutpost is currently undergoing a planned server migration.... stay tuned for new developments.... sincerely, the management |
 |
|
|
LinkBack | Thread Tools | Display Modes |
|
#101
 12-30-2016, 01:22 PM
|
|||
|
|||

|
| Sponsored Links | |
|
|
|
|
#102
04-21-2022, 02:14 PM
|
|||
|
|||
|
Inspired by this thread, I have successfully removed my N55 engine out of a 2011 X5.
Most UT videos show engine lowered down from lift. Not many people take engine out from top. Thank you for showing us how BergA. Even this thread is old. It is still helping people. 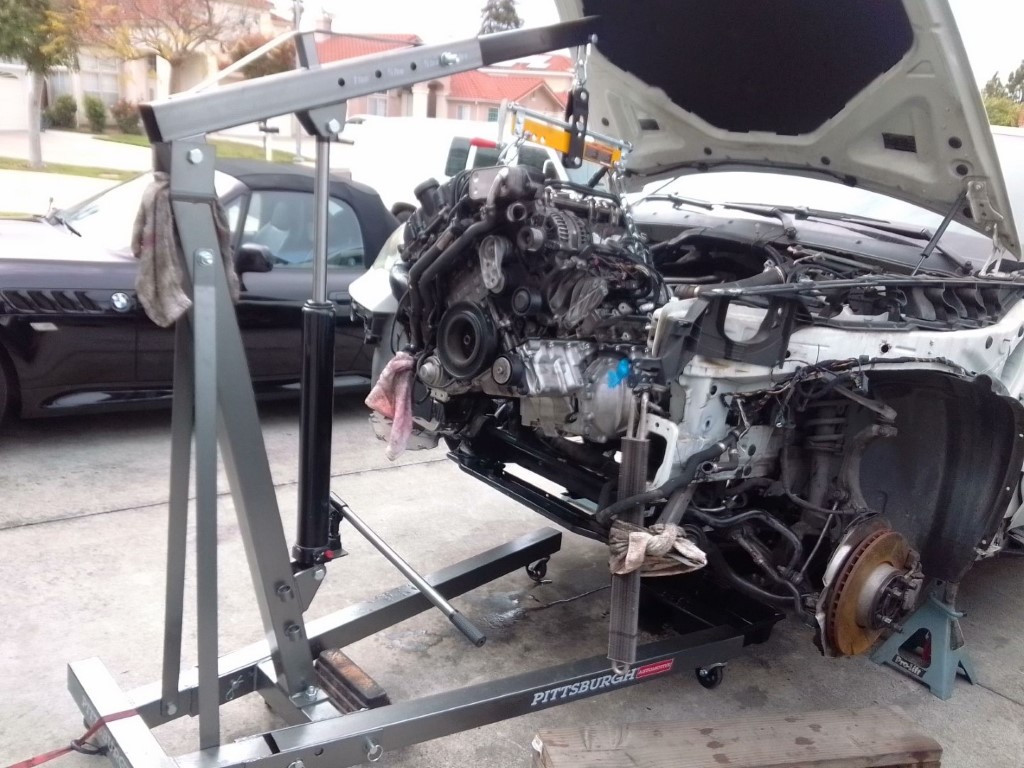 Note: Fender was removed for bodywork. You don't have to.  A few things I did differently. I used a transmission jack to support the tranny and it allows me to jack it up to the highest possible position while keeping it in straight line with the engine. You need that to pull the engine 2-3 inches before lifting it up. No need to remove the front diff. With the engine and tranny lifted up, front diff will clear the steering rack. No need to drop / lower the subframe. I removed the AC condenser. It is just too much in the way. I loosened the crank bolt while the engine was still in the car. I used a flywheel lock to hold crank in place. Much easier than after engine is out. I used a modified prybar to pull fuel injectors. 4 of them were pulled by hand. 2 stubborn ones by the prybar. I guess I was lucky that I did not break them.  It took me one day to disassemble the engine and found the cylinder 2 has spun bearing: 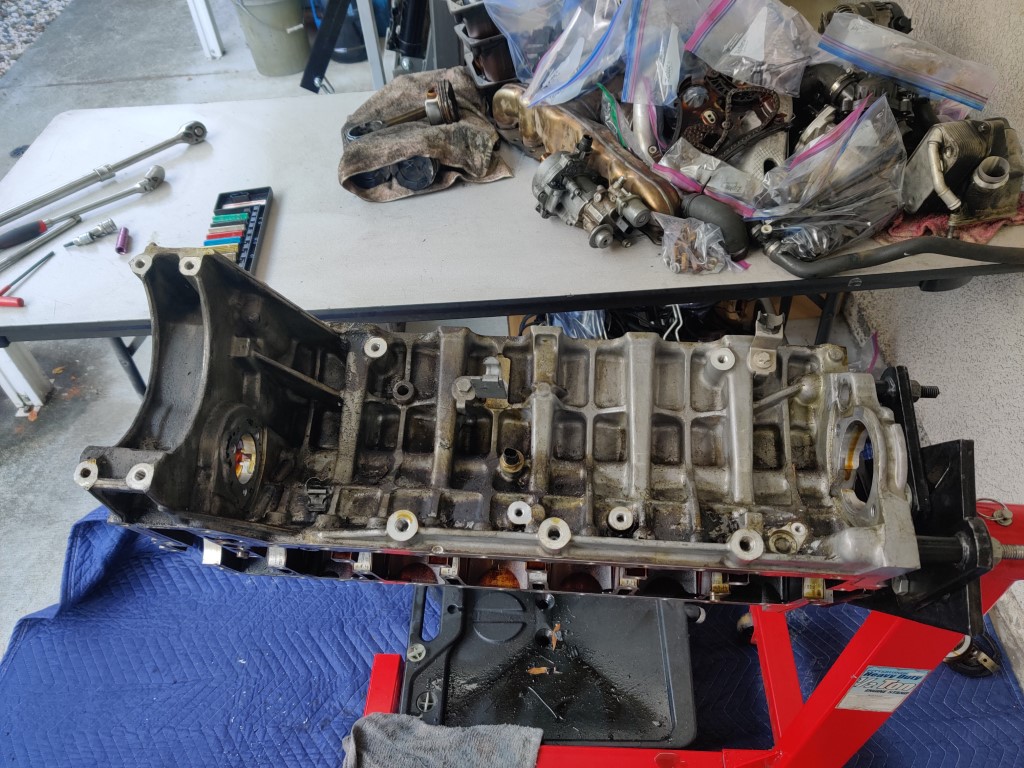 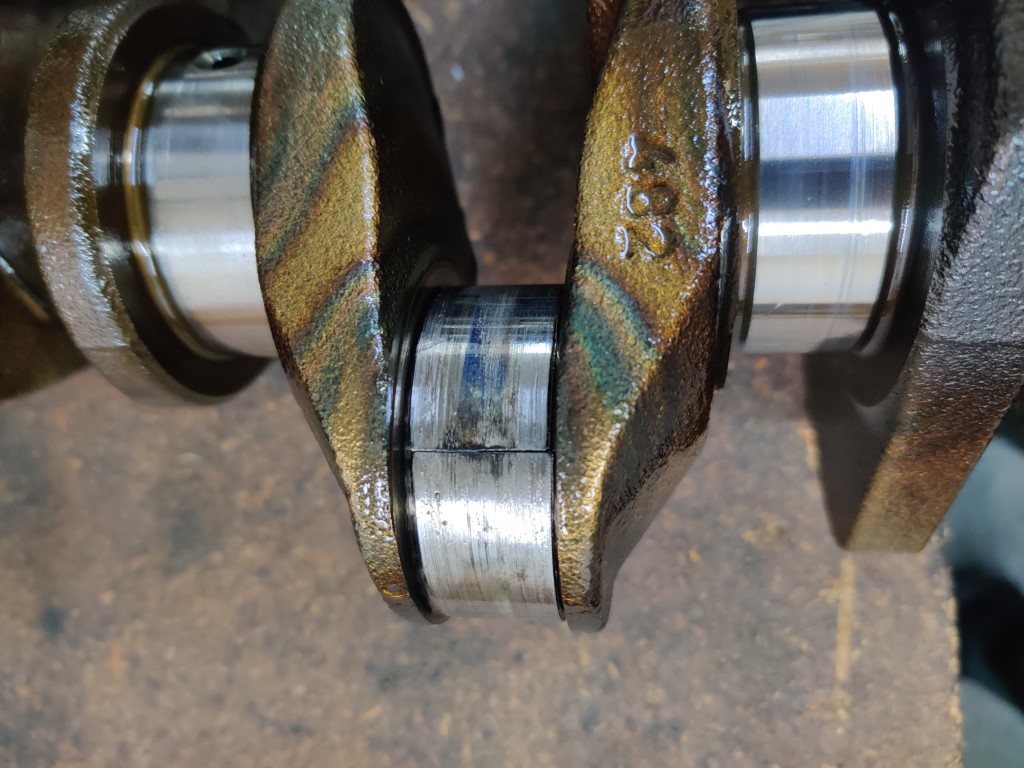 Now the block and the crankshaft are in machine shop for degreasing and weld and grind. Oh, when installing the bed plate, I plan not to use injection as BMW has changed their method..... Thanks to SimpleCarGuy's video: 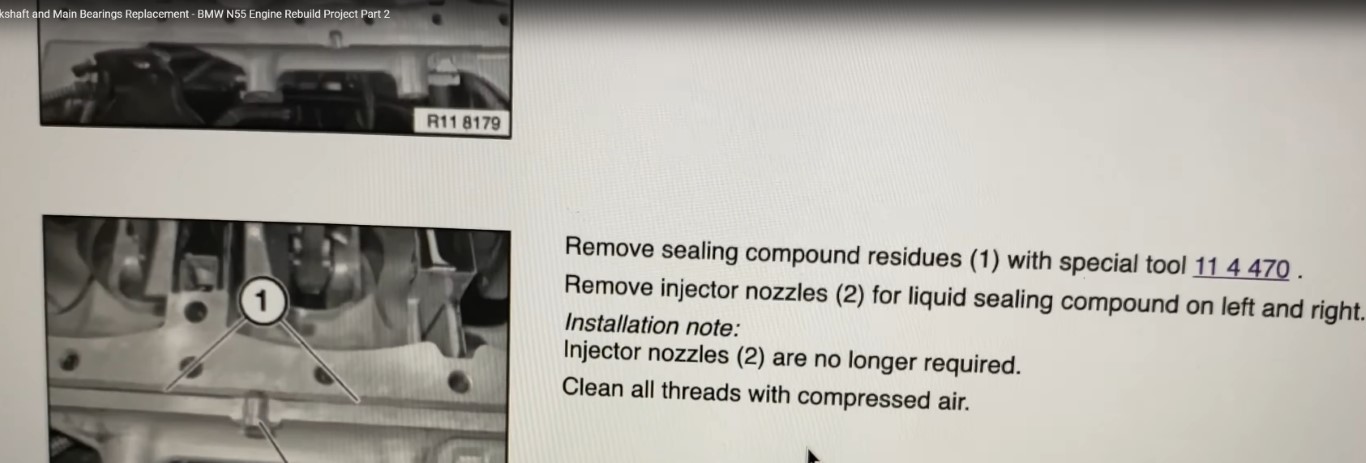 Now, I am deciding how to handle the cylinder head. A lot of sludge and carbon buildup inside the intake. I am debating if I need to replace the stem seals and check the lifters. Too bad there isn't any YT videos for disassembling the valvetronic. 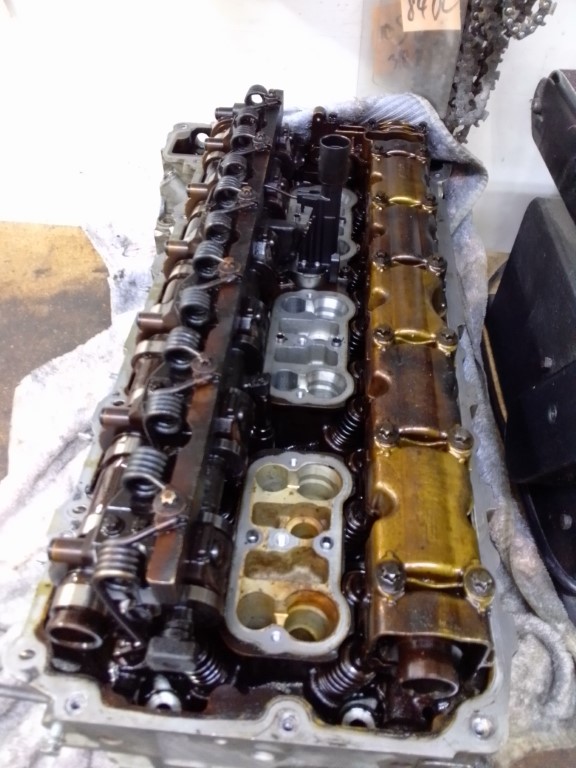 Oh, if u can't wait for that 6" long T60 bit from amazon, this oreily T60 socket bit plus 3/8" extension will work too. Last edited by fixingstill; 04-21-2022 at 02:49 PM. Reason: more info...
|
|
#104
04-21-2022, 03:29 PM
|
||||
|
||||
|
Good work. Wouldn't be cheaper to just drop in a good replacement engine? Disclaimer, I haven't looked at prices of an N55.
I just retimed my N52. Can't imagine it being much different for the N55. Check Nathan's BMW Workshop YT channel. He might have something for you on there regarding the procedure. TIS should tell you as well.
__________________
2005 X5 4.4i Build 04/05 Maintenance/Build Log Nav, Pano, Sport (Purchased 06/14 w/ 109,000 miles) (Sold 8/15 w/121,000 miles) 2006 X5 4.8is Build 11/05 Maintenance/Build Log Nav, DSP, Pano, Running Boards, OEM Tow Hitch, Cold Weather Pckg (Purchased 08/15 w/ 90,500 miles) 2010 X5 35d Build 02/10 Nav, HiFi, 6 DVD, Sports Pckg, Cold Weather Pckg, HUD, CAS, Running Boards, Leather Dash, PDC, Pano (Purchased 03/17 w/ 136,120 miles)
|
|
#105
04-21-2022, 03:30 PM
|
|||
|
|||
|
Awesome write up, and glad to hear the thread has been helpful! You are killing it
 You made a very important point about the gasket sealing surfaces. We no longer have to use the sealant injection process, which was poorly documented and very hit-or-miss. I recently did an N55 with the new process and no issues whatsoever. What a relief. Disassembling the valvetronic is easy, assuming you have the correct spring compressor tool. Hit me up if you want to borrow mine. Besides valvetronic, theres nothing unusual about that cylinder head.
|
|
#106
04-21-2022, 04:21 PM
|
|||
|
|||
|
https://www.amazon.com/dp/B08H5J78GZ
It has 50% off promo code. Ended up $54.
|
|
#107
04-29-2022, 03:49 PM
|
|||
|
|||
|
Sent the crankshaft to do a weld and grind on rod #2 and they found out it is cracked on rod #3. Now I have to find a replacement crankshaft at top $.... sigh.
  Good idea to get a long block ready before u take a seized engine out. The worst case scenario will always hit u.
|
|
#108
10-19-2022, 08:30 PM
|
|||
|
|||
|
Engine Bay Connectors
I hope I can resurrect this post, if only for my selfish reasons
Anyway, I too have an x5 e70 n55 and just finished rebuilding it. The engine is already in the bay and hooked up, except for three connectors. 1. I cant seem to find where the oil pan level sensor connector is hiding. I looked everywhere and it just vanished into thin air. Any ideas where to look for it? 2. Finally, I have two connectors that I have no clue where to connect them to: the tiny one is on the same wire as is the a/c compressor and the larger one comes out of the module right beneath the air intake. I attach a pic for recognition. Anyone could point me in the right direction would be greatly appreciated!!! Also, I do have some photos and suggestions of mine in case anyone is/was up to the challenge to remove their n55 and wants more insight. Thanks in advance!!!!
|
|
#109
10-27-2022, 09:59 AM
|
|||
|
|||
|
Faded memory I have but I think I had the same problem. I think the fuel rail pressure sensor is the same as the oil level sensor and u might have connected the oil level sensor plug to the rail pressure sensor.
Hope u have already figured it out.
|
|
#110
11-01-2022, 11:19 AM
|
|||
|
|||
|
Well, youre right, the large one in the picture is for the fuel rail.
And yes, I found the the oil level plug - it was tangled up between the subframe and the engine. Done. However, I still cant figure out the little connector in my previous pic. Any idea where that goes? The car is fully assembled back together but I get all kinds of codes and the engine is in the limp mode. Before I can fully scan with inpa/ista, I need to finish the hook up, sort of makes sense . Any ideas? Thanks
|
|
| Bookmarks |
|
|
|
|


 Linear Mode


