
|
|
|
|
||||||||||
| Xoutpost server transfer and maintenance is occurring.... |
| Xoutpost is currently undergoing a planned server migration.... stay tuned for new developments.... sincerely, the management |
 |
|
|
LinkBack | Thread Tools | Display Modes |
|
#92
 02-20-2020, 01:26 PM
|
||||
|
||||
|
Quote:
 Kids/wife/house/fleet take up all of what used to be my "modding" time. 
__________________
2005 X5 4.4i Build 04/05 Maintenance/Build Log Nav, Pano, Sport (Purchased 06/14 w/ 109,000 miles) (Sold 8/15 w/121,000 miles) 2006 X5 4.8is Build 11/05 Maintenance/Build Log Nav, DSP, Pano, Running Boards, OEM Tow Hitch, Cold Weather Pckg (Purchased 08/15 w/ 90,500 miles) 2010 X5 35d Build 02/10 Nav, HiFi, 6 DVD, Sports Pckg, Cold Weather Pckg, HUD, CAS, Running Boards, Leather Dash, PDC, Pano (Purchased 03/17 w/ 136,120 miles) 
|
|
#93
02-21-2020, 11:58 AM
|
||||
|
||||
|
Quote:
One question about the ZL1 wheels... Any plans on replacing that Chevy center cap? If you already answered that question, just chalk it up to me drooling over all the pics in this thread and not paying much attention to the text...
__________________
2007 X5 4.8i - 12/06 Build - Silver/Black - 3rd Row
|
|
#94
02-21-2020, 01:06 PM
|
||||
|
||||
|
Thanks for the differential update, waiting on your full DIY as I have front and rear 3.15s holding down the garage floor. Did you notice any issues running the 3.64 front and 3.15 rear like you did? Would have thought there shouldn't be any with the torque split built into the X5, but going by a few of the "you must change both diffs . . ." statements. Again thanks for the modding inspiration.
|
|
#95
02-21-2020, 02:49 PM
|
|||
|
|||
|
Quote:
 Quote:
Evan
|
|
#97
02-24-2020, 12:49 PM
|
|||
|
|||
|
I was able to get the X5 on some dynos, both a Mustang Dyno and a Dynojet.
Mustang was 317whp 504wtq Dynojet was 370whp 520wtq For those that don't know Mustang dynos use load and typically read lower. In general Mustang dynos should be more accurate but it's hard to say since it all comes down to proper calibration. Dynojets are more common for "big stick" comparisons amongst enthusiasts as dynojets are simply and measure power based off how quickly the vehicle can spin a drum, less variables to manipulate the numbers. The dynojet operator was starting the pulls at way higher RPMs then he should have, shame on me for not picking up on this but he was going WOT between 2,500 and 3,000 rpm (seriously) and the M57 makes peak TQ around 2,950 so for my observant BMW diesel enthusiasts you may notice the Dynojet TQ numbers seem low, this is why, with a clean pull TQ #s would likely be ~550wtq. On the Mustang dyno I was able to compare my custom inlet to the OEM airbox and although the data isn't perfect since the engine was getting a little heat soaked, it looks like the intake does flow better and offered more power, roughly +10hp +10tq. I am patiently waiting for the shop to email me the overlaid graphs. On the Dynojet I did 2 pulls with my custom intake and 2 with just a 3.5" velocity stack mounted on the MAF. The pulls are so chaotic and the data so sloppy it's hard to discern what's going on but there was no measurable difference between the two. Mustang session 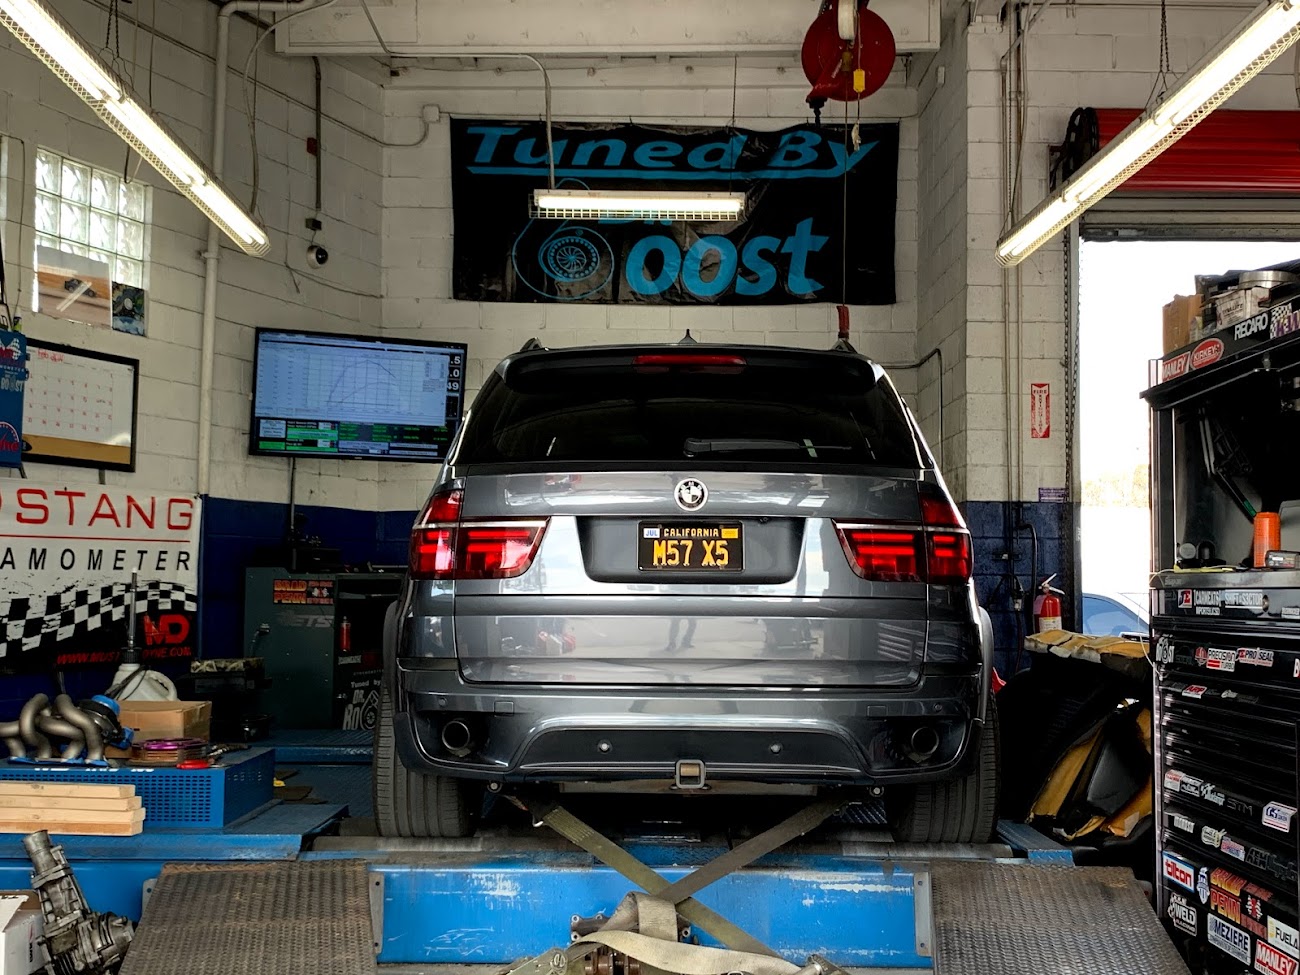 Dynojet session  Custom Intake  Velocity stack 
|
|
#98
04-17-2020, 04:42 PM
|
||||
|
||||
|
Went through all the pages, really inspiring stuff! Love the attention to detail and craftsmanship. Thinking about getting back into a 35d myself
Subscribed
__________________
2004 BMW M3 Individual 2009 BMW E70 X5 35d 2011 BMW E70 X5 35d - Totaled 2009 BMW M3 E90 - SOLD 2006 E53 X5 4.8iS - SOLD 2002 E46 M3 Convertible - SOLD 2006 E46 M3 ZCP - SOLD 2011 E70 X5 35d - SOLD 2000 E39 ///M5 - SOLD 2003 E53 X5 4.6iS - SOLD 2006 E83 X3 3.0i MSport - SOLD 2000 E46 323Ci - SOLD
|
|
#99
04-28-2020, 02:04 PM
|
|||
|
|||
|
It's been a while but this update is a good one!
I finished building and installed my Brembo big brake kit, which uses F10 M5 front calipers and rotors along with Porsche Panamera rear calipers with F85 rotors. 6-piston front 4-piston rear monoblock Brembo calipers. I posted details on the BBK here: https://xoutpost.com/bmw-sav-forums/...ml#post1182346 Here are some pics of the finished product.         In other news I also got around to installing my Provent 200 OCC. It's a bit of a pain to install given it's huge size but I am happy with how it came out. Time will tell if I need to make revisions because some people have had issues with hoses becoming compromised over time from oil, leaking fittings etc. I built a block off plate out of some 1/4" aluminum. I hacked it up with an angle grinder, a drill, and Dremel. Surprisingly it came out pretty good! I also bought some adapters from Australia via eBay that step the HGUE 1" hose bungs on the Provent down to a more manageable 19mm 3/4" hose. This offers many more hose options and the smaller hoses are easier to work with. I built a bracket for the Provent out of another bracket I had laying around (LED light bar IIRC) and some aluminum stock.    I also chopped down my dipstick, it was obnoxiously high as it was designed to have the engine cover and large air intake box installed so I cut it down so it's still functional but out of the way, this also freed up some room for more direct Provent hose routing.   For vacuum source I use the OEM plastic pipe that runs along the valve cover, I bored it out so a 10orb to 12an adapter could be threaded in. I am happy with this as it can be removed and the system can 100% be reverted to stock relatively easily, I don't plan to do this but it's nice having the option.  I modded the Provent as others have done to regulate the strong vacuum on the system. You can also see the clear hose in the background which I use for my drain, it's plugged a ziptied away by the transmission splash shield. Some have ran this back into the dipstick but I prefer to drain the oil myself so I can see how effective the system is.  While I really wanted the OCC to be out of sight, given it's size and the layout of the engine bay I couldn't find a decent solution even while exploring relocating items like the HVAC coolant lines and valve. Where my Provent has a fairly prominant location, it is very accessible and it does visually block some unsightly vacuum and fuel lines just behind it. This location also allowed for fairly clean and direct hose routing.      With the X5 in the garage for a bit I also repaired the boost leak on my ATM intercooler up pipe  Installed X6 OEM black grills  Replaced the cabin air filter  Clay-barred the paint  ....and cleaned the leather BEFORE  AFTER   Here are some additional pics!   
|
|
#100
04-28-2020, 02:25 PM
|
||||
|
||||
|
Looks great! That's some serious stopping power now. Engine bay is OEM+++++. Upgrade cluster is a must now for me after seeing yours.
How would I go about removing the engine vanity cover and air cleaner lower plenum as well to free up space and overall show the intake manifold like yours? Rerouted the air intake system to the passenger side?
__________________
2004 BMW M3 Individual 2009 BMW E70 X5 35d 2011 BMW E70 X5 35d - Totaled 2009 BMW M3 E90 - SOLD 2006 E53 X5 4.8iS - SOLD 2002 E46 M3 Convertible - SOLD 2006 E46 M3 ZCP - SOLD 2011 E70 X5 35d - SOLD 2000 E39 ///M5 - SOLD 2003 E53 X5 4.6iS - SOLD 2006 E83 X3 3.0i MSport - SOLD 2000 E46 323Ci - SOLD
|
|
| Bookmarks |
|
|
|
|


 Linear Mode


