
|
|
|
|
||||||||||
| Xoutpost server transfer and maintenance is occurring.... |
| Xoutpost is currently undergoing a planned server migration.... stay tuned for new developments.... sincerely, the management |
 |
|
|
LinkBack | Thread Tools | Display Modes |
|
#181
 11-07-2023, 05:53 PM
|
|||
|
|||
|
Quote:

|
| Sponsored Links | |
|
|
|
|
#182
12-10-2023, 12:15 PM
|
|||
|
|||
|
X5 has been chugging along being a versatile beast, currently approaching 135,000 miles young. The pile of parts for maintenance/mods has been growing and I am looking forward to diving into a couple projects when time allows.
Here are some snaps of the X5 with some Fall colors.   E70 x Colorado Mud - artist collaboration....    Fall turns into Winter    My plan was to collect/build a 20x10 square setup of OEM Style 343Ms from an F10 M5 (4 rears) but deals weren't really popping up and now winter is eminent and I decided to settle for a more conventional set of wheels. I found a set of OEM Style 611M (F85 X5M) locally. Not an ideal setup for winter due to the wide rears. 20x10 F and 20x11.5 R Listing photo didn't inspire confidence but I am glad I went to go check them out. They were being sold by a high end used car dealership and these wheels were a second set for an F85 that was traded in. The wheels were dirty and had some very minor blemishes but met my high quality standards which was nice as I won't need to fully recondition and powdercoat them. Price was right. The wide rears aren't ideal for winter duties but the worst part of these wheels are their weight, they're are chunky bois. Here is the original listing photo.  Original worn summer tires removed.  Bath time  Thankfully I am a BMW parts horder so I had a set of 68mm center caps laying around.  Moment of truth.... ....ooof!  OOOOOOF!!!!  2 wheels had very light rash and some light sanding was enough to clean most of it up. I also used a ceramic spray coating on them to help keep them slick to make winter clean up easier. Now we wait for tires, I will be running 275/45F 305/40R which is slightly narrower than stock sizes but aspect ratio is bumped up one size for more meat/cushion. Going with Michelin Pilot Alpin 5 SUV.       
|
|
#183
12-10-2023, 02:06 PM
|
|||
|
|||
|
I ordered a custom spec’d set of wheels using your wheel/spacer setups for reference. Your information is amazing, and your build is inspiring. Hopefully my calculations are right and I’ll be joining the 295/45R20 club soon.
|
|
#184
12-10-2023, 02:24 PM
|
|||
|
|||
|
Quote:
|
|
#185
12-11-2023, 12:08 AM
|
|||
|
|||
|
Quote:
|
|
#186
12-15-2023, 01:03 PM
|
||||
|
||||
|
Love the 'something of an artist myself' pic.
Just curious, why the wheel swap?
__________________
2007 X5 4.8i - 12/06 Build - Silver/Black - 3rd Row
|
|
#187
12-18-2023, 11:16 AM
|
|||
|
|||
|
Quote:
|
|
#188
12-22-2023, 10:00 AM
|
|||
|
|||
|
Feels weird to throw the winter setup on the X5 when it was 68F outside but that's Colorado for you. 5-7" expected for Christmas and no, that's not an inappropriate joke. hehehaha!
With the changing of the wheels I took the opportunity to swap my spherical front thrust arms for some OEM hydro/rubber units. With the rough paved roads and frequent trips on dirt fire roads here in CO the added isolation and comfort from the OEM arms is welcomed. I was chasing down some front end clunks which ended up being a loose bolt on the lower control arm. I also found the driverside sway bar bracket was missing on of it's bolts ...whoops. This explains not only the clunk but the very "tilty" side to side weight transfer. Hard to say how long this has been loose but my guess is quite a long time, like years as I clearly remember the clunking when driving offroad in Sedona to take engagement photos circa 2020. This sway bar bracket bolt was originally removed and reinstalled with a coolant hose clamp under it during the ATM intercooler install I assume that and the improper bolt torque led to my years of suffering listening to clunks. Should be good now!!  I snagged a set of Michelin Pilot Alpin 5 SUV tires used and the fronts had decent tread (8/32") but the rears were questionable so I ended up buying a new pair of rears. I ended up finding a few online retailers selling them for $131/ea and my local Discount Tire which is handling my tire swaps was able to price match even though they throw their mandatory and overpriced tire insurance in the mix at $75/tire. Nonetheless I am optimistic for these tires given their sporty demeanor and initial impressions on ride quality is very positive, curious to see how they perform in real snow. I went with 275/45/20 405/40/20 The tires in this size are actually an OEM "NO" variant and are built for E3 Cayennes. In predictable form I up sized the aspect ratio for a bit more cushion and fill of the fenders. Working within the constraints of tire options and <1% rolling diameter delta F/R for the X-Drive this is what worked. The 305 is a bit stretched on the 11.5" wide rear wheel but whatever. Summer/All Season setup for reference  Fronts  Rears..... WOOOOF!!  High contrast vs Low contrast  Although the OEM X5M wheels are painfully heavy the silver lining is they are made for X5s so I am able to ditch the monster 30mm rear spacers that accommodated Camaro wheels.   Took some time to fluff and buff the studs to keep the threads clean.  Studs remounted and 12mm spacer installed  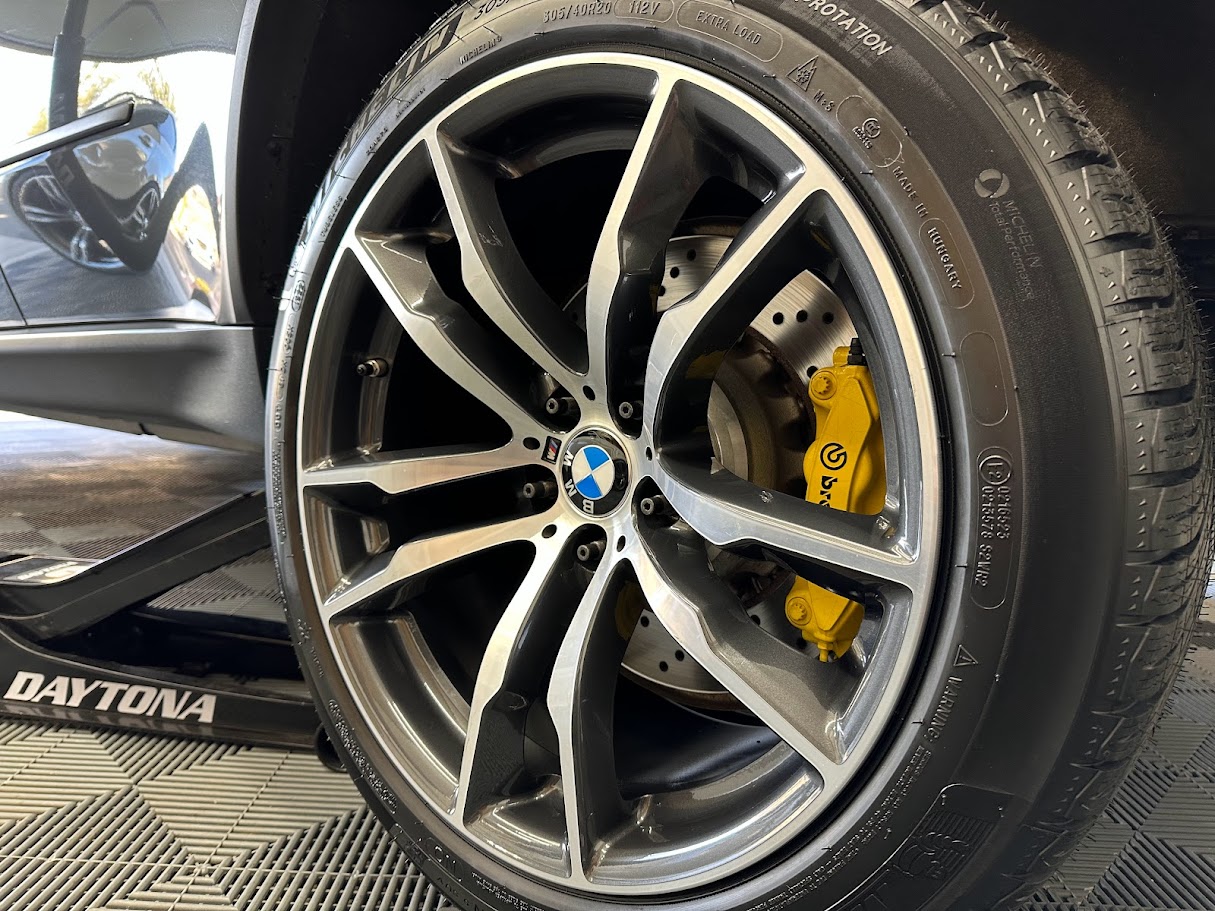 I kept the KWs are max ride height to see how I got on with the new setup and see if I could get away without lowering it. Excessive fender gap is offensive and I have standards. It was looking pretty good.  Then, when walking out from a store the light was hitting the tires just right to highlight that I did indeed need to lower the X5 a bit. Look at that rear fender gap "Ewww David!"  KW adjustment range is 235mm-260mm in the front (measured from strut pinch bolt to top of threaded KW collar. I went from 260mm down to 245mm. Rear links lowered to match. This gave me ~6.25" from top of wheel to lower edge of fender flare. Originally I had 10mm spacers up front but it offered a little too much poke relative to the rear so that was dropped to 5mm. 5mmF 12mmR Much better.     I particularly enjoy this photo since it shows off the stance/wheel offsets but also to the enthusiast's eye you may notice the custom cold air intake, the LED light bar, and the upgraded intercooler peeking through the grills.  I will admit I do appreciate the contrast the Style 611M wheels offer and I think the machine/gunmetal finish pairs well with the platinum grey metallic paint. Also, the machined wheels help tie in the chrome/silver headlights and aesthetically it all works pretty well. Definitely OEM+ Here are a couple collages showing the ride height Before/After Happy Holidays!  
|
|
#189
01-12-2024, 11:13 AM
|
|||
|
|||
|
After getting the winter setup installed and KW adjusted down I got an alignment done (lifetime at Firestone) and the results weren't great regarding camber. The E70 lacks useful adjustment in the rear and has no camber adjustment up front, not ideal when you are lowering a vehicle.
Previously I installed Meyle HD upper wishbones with a camber adjustment but never adjusted them. I also snagged some SPC upper trailing control arms for the rear and a magnetic camber gauge so I could crudely DIY this and see the improvement. Here are my "before" at-home measurements: FL -2 FR -1.6 RL - 4.2 RR -4.1 "After" at home measurements: FL -.6 FR -.5 RL -1.75 RR -2.2 "After" according to Firestone:  I asked for them to set total F/R toe to .02 instead of .2 and they weren't able to oblige. "We got as close as we could." But I've seen many posts of E70s getting the toe down to .02 so I know it's possible. I might go to another, more competent Firestone ....if such thing exists. Precise science! Garage floor level?  ...kinda  SPC control arms   Here is a look down at the top of the Meyle HD upper wishbones on the front. This is there "normal" position before.  ...and after with + camber maxed out. I couldn't find info online with their adjustment range but I think it is +/- 1 degree.  I also installed a new K&N filter, hydro sock, and cleaned the MAF. Performance greatly improved after this. I think I over-oiled my K&N previously and Colorado grime was clogging it up. I now have a significant performance gain, like >30% power. Whoops! Once I get ISTA properly installed I will reset the MAF and injector mean as well. I've never done this even with my various intake setups.   Local LKQ had a couple E70s so I grabbed a couple trim pieces I needed to replace broken ones and I also stumbled upon this tray/insert for the center console.  Living a life of true luxury ...with my Carmex in a secure spot. Colorado shit.   With temps dropping my battery was showing weakness. A bit annoying as I was trying to adjust my rear ride height via air suspension and sensors and the battery died, adding insult to injury my fancy-pants Schumacher INC-700a charger isn't powering up so I was forced to use my mobile power station / car jumper but it wasn't allowing the jump and stating the battery was in a protection mode. I was able to recover the battery over night with my trickle charger but the real solution was a new battery. Current battery was installed shortly before I bought the vehicle ~5 years and 55k miles ago. It was an AC Delco 49AGM. 95AH 900CCA. It aside from the drop in performance with ambient temps around or below freezing it has served me well. Replacement is Super Start AGM. 105AH, 950 CCA  Turns out when the last battery was installed it was never registered to the vehicle so the X5 thought it has a 105AH and it really had a 95AH. That has been corrected. 
|
|
#190
01-22-2024, 11:31 AM
|
|||
|
|||
|
I decided to try a different intake setup. My cold air intake has served me well over the past 4+ years but I wanted to try something with better filter protection. Now that I live in Colorado (previously San Diego) I find myself driving more off road and in winter conditions where there is exponentially more airborne dirt and grime. Yes, I know there is the OEM intake I could reinstall but that's so boooooring.
Intake was mostly inspired by the system I built for my N54 which utilizes the same filter and velocity stack.  "Less is more" was the mindset of this intake with the priorities being to minimize restriction and keep airflow smooth entering the MAF. Aside from having the outlet of the velocity stack slightly ovalized to perfectly match the MAF, this is as good as it gets. The bonus of the minimalistic design is a shorter and less expensive parts list. Measuring hood clearances, it will be tight but possible!  RACE TROCK!  The straight coupler's 4" length was a bit too tall and I needed to position the velocity stack as low as possible so I cut it down to 3". The filter literally has millimeters of clearance around it and when the hood is shut the padded insulation on the bottom of the hood juuuuuust barely touches the top of the filter. The insulation has maybe 3/4" of give to it so I don't foresee any issues with the tight clearances and the engine movement while under load but it is something I will keep an eye on.   ~$200 worth of parts: Vibrant 10960 Filter Vibrant 10592 Velocity Stack 3.5" Coupler 3.5"-3" Reducing Coupler HPS Worm Gear Clamps   For those who aren't familiar the Vibrant filter and velocity stack are designed to work together.   This filter is really stuffed into the engine bay so there were a couple modifications to accommodate. I used a large zip tie to pull the AC line out of the way and then my 335D engine cover needed a slight trim.   Finished product (for now). Initial impressions are very positive. Overall in the intake performs just like the cold are intake with excellent response. The most noticeable difference is the added induction noises in the cabin; the *whooooses* *psst pssts* and *wuhbuhbuh* is easily heard from the driver's seat. Some might find it annoying but I love hearing what the turbos are doing. There is still plenty of noises heard from outside the vehicle as well. I am very aware that this intake will be pulling warmer air from the engine bay and that was a sacrifice I was willing to make in exchange for the filter protection and turbo response. I plan to install an air scoop which will direct cold air towards the filter. I may also entertain building an additional heat shield to act as a partition between the filter and the exhaust manifold and turbos.    
|
|
| Bookmarks |
|
|
|
|


 Linear Mode


