
|
|
|
|
||||||||||
| Xoutpost server transfer and maintenance is occurring.... |
| Xoutpost is currently undergoing a planned server migration.... stay tuned for new developments.... sincerely, the management |
|
|
LinkBack | Thread Tools | Display Modes |
|
#1
 01-04-2015, 04:17 PM
|
|||
|
|||
|
35d worsening gas mileage - solved- thermostat/fan/EGR cooler - DIY with pics
I have a 2010 e70 35d with about 79,000 miles. Over the past 6 months or so I've noticed a drop in highway mpg from 31-32 to approx 25-26. After checking out a number of forum discussions (particularly bimmerfest and some European 335d forums), I thought possibly my thermostat was malfunctioning, with resultant low engine temps. Apparently, a low engine temperature can cause a number of issues - poor engine efficiency, plus some say the glow plugs stay on for temps <75 deg cent (may cause eventual early demise of glow plugs), and numerous people say the diesel particulate filter (DPF) regeneration mode requires a temp of 75-80 deg cent. So a low engine temperature for the diesels may cause poor mpg, burn out of glow plugs, and DPF malfunction.
This link on bimmerfest gives an excellent overview of the issue. As said by lpcapital in post #5: "While on a gasoline car if the engine temperature is a 10 or so degrees lower than optimal nothing major happens, the same is not true with our cars where the regeneration of the DPF occurs only if the coolant temperature is at a particular level, which appears to be 75C. There are plenty of reports of aged thermostats that keep the engine in the low 70s when cruising on freeways. Since the coolant temperature is below the threshold, the DPF doesn't regenerate, it clogs and people lose their mind figuring out what's wrong and start spending thousands to replace DPF and adding washes, remove the DPF all together." So I utilized the "hidden menu" as discussed in post #17 of the above link to check my operating temp. My temp (like many in other forum postings) was 72-73, and never over 75. BTW, post #17 talks about accessing the hidden menu with the ignition on, but engine off. If you do this, there is obviously no way to monitor coolant temperature while driving. No worries, though, you can access the hidden menu in the same way, but with the engine running. So start the car, idle in the driveway, and have a button pushing frenzy as described in post #17. The forums I've read express some uncertainty about what the operating temp is supposed to be, but (spoiler alert!) after getting to my thermostat it turns out that "88C" is clearly printed on the thermostat: And after I replaced the thermostat, my new operating temp was 85-86 deg, and mpg was back to 31-32 on the highway. So I'm pretty pleased. Here is a DIY for this job. To begin with, you'll need the usual assortment of sockets, including torx sockets, e-torx sockets, and socket extensions (it will be critical to have a roughly 7-8 inch reach from tip of a t-45 socket to end of socket extension(s) to get to the exhaust gas recirculator (EGR) cooler flange bolts). A mirror was a huge help in seeing back into the "guts" of the engine/EGR cooler interface. In addition, I highly recommend a "tight reach ratchet" to get to many of the bolts in tight spaces. [Edit on 12/18/16 - see post #180 - Andras comments that the tight reach ratchet is not absolutely necessary. I agree. I have since realized that if one removes the fan/shroud before removing the air ducts, then there is a lot more room to get to the air duct clamp bolts and the tight reach ratchet is not essential. But still, it's kind of a cool tool and might be nice to have in your box.] Here's a picture of the tight reach getting to a difficult to access clamp bolt - as viewed from the top: And here's a view of it down in the deep: There are a lot of connections, so I used bits of blue painter's tape as tags to mark every hose/electrical connector I took apart - that way I made sure I didn't forget to hook something back up. A very short (!) summary of the process is in post #15 of the above bimmerfest link. Understand that you'll need to remove the air ducts (both pre and post MAF), remove the engine cross bar, disconnect coolant hoses, remove the fan/fan shroud, remove EGR cooler (IMO this is the tough part), and now you've got access to the thermostat. It took me a little over 6 hours, though I was moving slowly so as not to make a mistake. Some more details: Start by removing the engine cross bar, and then disconnect the cable (?others have said this is hood release cable, but I don't know for sure?) that is attached to it. There is an electrical connection bracket attached to the cross bar - this needs to come off too. The bottom plastic skid plate needs to come off, otherwise the drained radiator fluid will splash (more) and make an even bigger mess. Next, begin draining most of the radiator. I couldn't find a drain bolt for the radiator, and ended up disconnecting various hoses at various times. I had a scavenger bucket, but (as noted above) still probably 25% went on the floor. Have a bunch of towels around to clean up the mess. **Edit 12/18/16 - see post #180 where Andras describes which radiator hose to disconnect which allows fluid drainage with minimal spilling/mess.** Removing air ducts pre and post intake muffler/MAF - see the Realoem link (below) to see what I'm talking about.   You'll want the tight reach ratchet to get to some of these duct clamp bolts. *Edit 12/18/16 - As noted above, in post #180 Andras points out the tight reach is not absolutely necessary. If you remove the fan/shroud before working on the duct clamp bolts then you can get by without it. Your choice.* The intake muffler (#1 in this link - see below) is removed by giving a good upward tug on the "legs" and main body of the intake muffler.  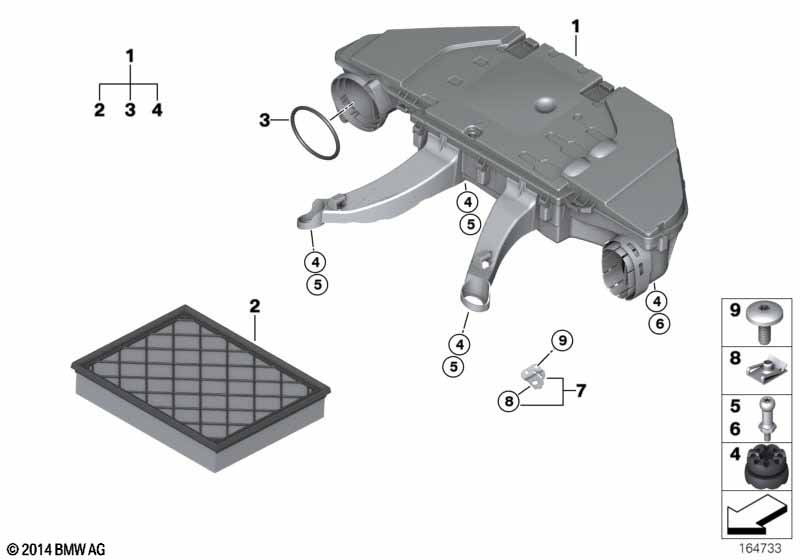 Remove fan/shroud: Remove the electrical connection on passenger side. Also remove the bracket (part 18 in below diagram - held on with a torx bolt) that holds the air hose coming from the intercooler to the throttle/EGR valve on the driver's side (the air hose I'm talking about is part #12 in this link - see below). Also, disconnect this air hose (and it's electrical connection) from the throttle body so it can be pushed out of the way so the fan/shroud can come out. ***Edit December 2016 - check out this link for a great DIY on bimmerfest that provides a lot of detail and pictures for removing the fan. The link is for a DIY on idler pulley belt tensioner, but there is a detailed description for removing the fan.***  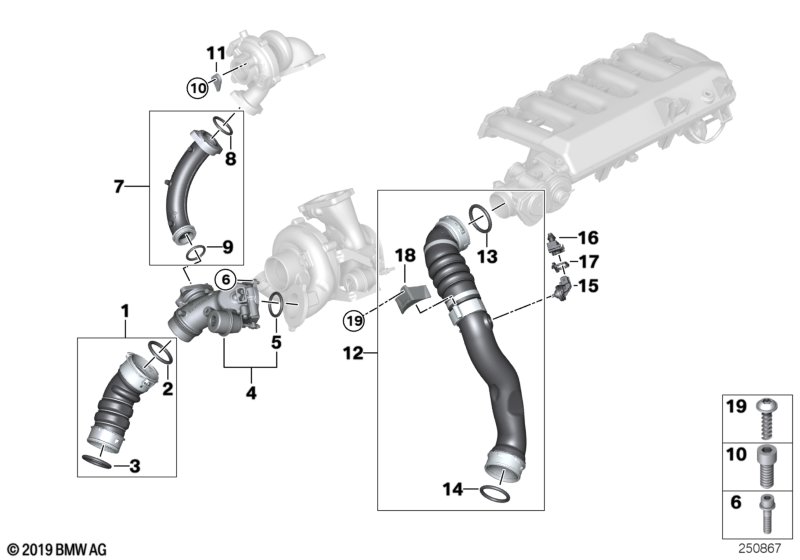 Also remove the main coolant hose that enters the top of the radiator on the driver's side (part #1 in this link - see below).  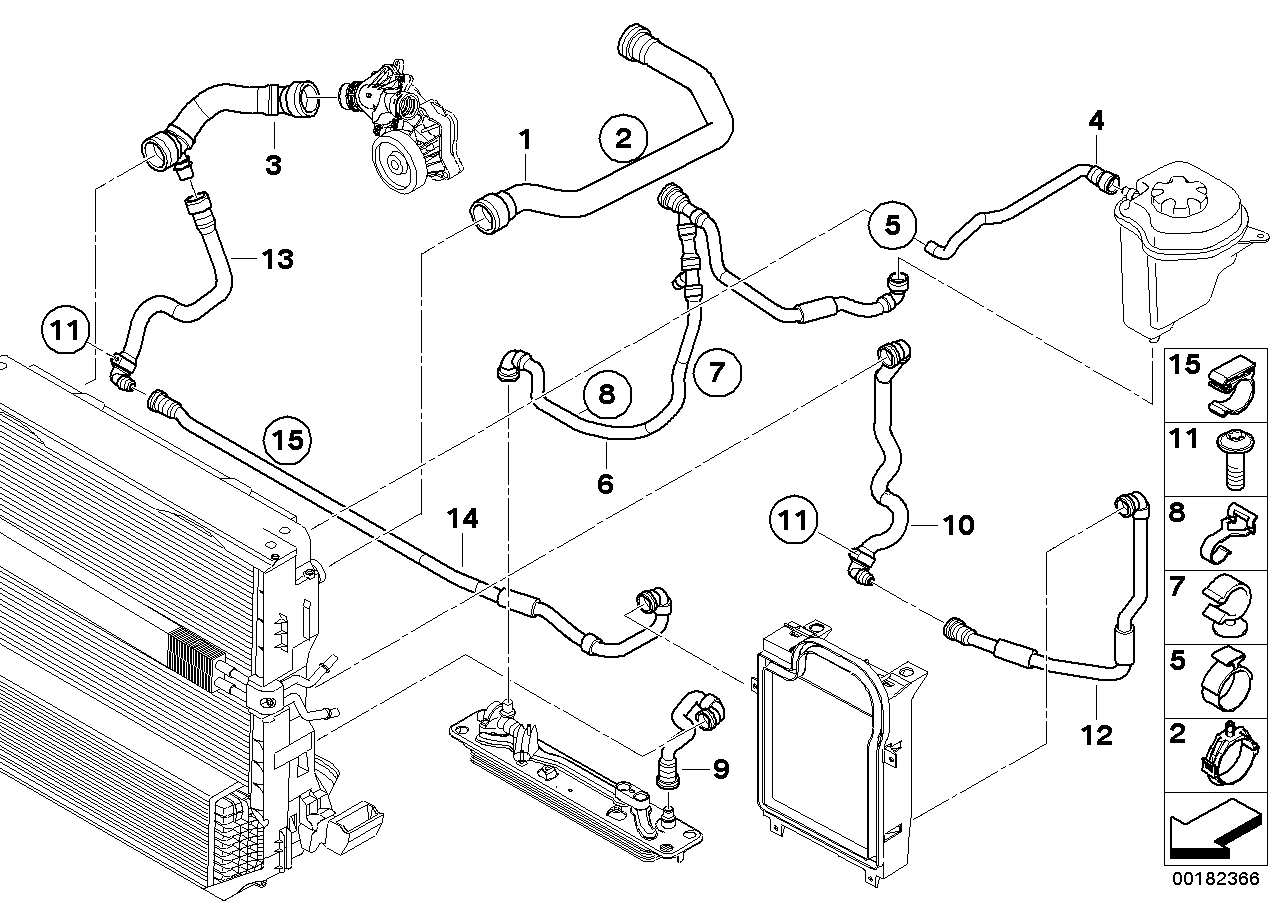 Now you should be able to lift the fan/shroud out without obstructions. There are two flanges/flaps/tabs (one on driver's side and one on passenger side) about six to eight inches down on either side that slide into slots to keep the fan and shroud in position. Use a screwdriver to press the flange in, and then you can lift the fan/shroud up a couple of inches. Once it's been lifted a few inches, be aware that the flange/flap/tab on the driver's side is hinged, and needs to be flipped inward (photos below will hopefully make this clear) to clear obstructions and allow the fan to be lifted out. Here is an overview pic of the fan/shroud with an arrow pointing to the "flippable flap" - Here is another up close pic - the "flippable flap" (red arrow) has now been flipped open. The yellow arrow shows the slot mechanism that helps keep the bracket for the charge air hose leading to the throttle (noted above) in position. Removal of the EGR cooler. The EGR cooler sits above the thermostat. The EGR cooler can be seen in this RealOEM link. See below - it is what hoses 6 and 7 connect to.  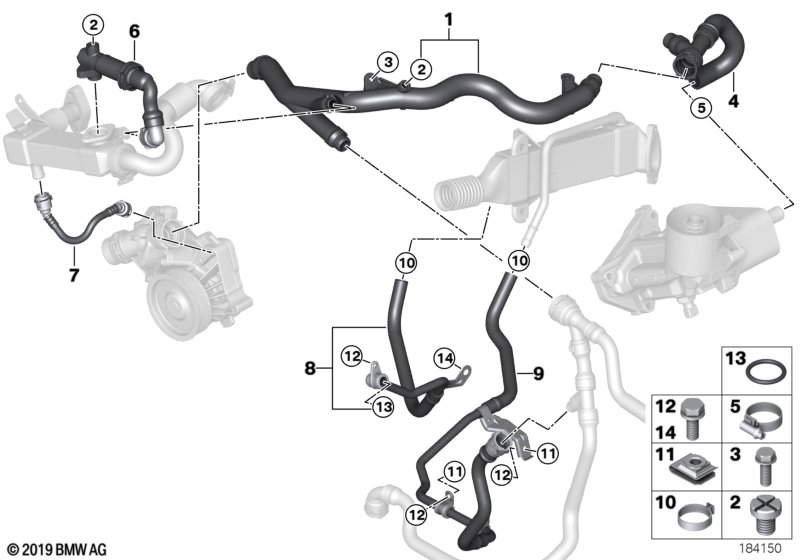 For another view, it is the big shiny rectangular metal object in the center of this pic: Undo the various electrical connections, the radiator hoses (6 and 7 as noted in the RealOEM link above), and the circumferential clamp (red arrow in photo above) that connects the cooler to the EGR valve. There was another connection (yellow arrow) that leads to a particularly difficult (for me, at least) electrical connection on the EGR valve. This electrical connection is shown in the next photo: I expected this electrical connection to easily come apart when the white tab was snapped back. However, I couldn't get it to come apart. Eventually, I was able to get it apart by slipping a very small flat screwdriver blade between the two connection parts as shown in the photo above. Then it disconnected easily. Not sure if I was doing something wrong, but I couldn't get it apart any other way (edit point: be aware the photo above was taken after completion of this job in order to document this (for me) difficult electrical connection. When I was actually doing the job the black plastic "leg" of the intake muffler that is obscuring the view of the screwdriver in the photo had been removed). Edit 4/21/2016 - See post #159 for great information from Shaman on how to remove this connector - it involves sliding the white tab back, then pinching/compressing it to release the locking tab. Disregarding electrical/vacuum connections, the EGR cooler is held in place by a total of five connection points - the circumferential clamp discussed above, two mounting bolts (easy to see), and by two flange bolts that are hidden underneath (and to the side of) the vacuum pump. The vacuum pump is the large silver circular object sitting above the EGR cooler in the photo above. The two EGR cooler flange bolts were/are the tough part, IMO. I could barely see the top flange bolt by peering in between various vacuum hoses and electrical cables. The only way I could see the bottom flange bolt was with a mirror. The flange bolts are T45. You'll need an extension set that measures roughly 7-8 inches from the tip of the torx socket to the end of the extension set. I could see enough to get the socket into the top bolt, but had to use a mirror and "memory braille" to get into the bottom bolt. Here is an overview picture of the socket/extension/wrench on one of the bolts: And here is a picture taken that (I hope) demonstrates using the mirror to confirm visualization of the proper placement of the socket on the top flange bolt. The camera is pointed toward the front of the car, so the reflection in the mirror is toward the rear of the car. The red arrow shows the socket in place on the top flange bolt. I undid the flange bolts first, then the mounting bolts. The flange bolts stayed in place on the flange as the EGR cooler was removed. I was terribly afraid that once loosened I would drop the flange bolts deep into the engine compartment - never to be found again. So I stuffed a rag under the flange area (poked it into position with a screwdriver) so that if they fell they would be saved by the rag rather than drop down into the abyss. At this point, I was able to easily lift the EGR cooler out of the way and place it on top of the engine. With the EGR cooler out of the way, the thermostat replacement was straightforward - 2 hoses and 4 bolts (though the rigid water pipe on the driver's side of the thermostat [part #1 on this link from RealOEM - see below] has a positioning bolt (I think it's part #3) that needed to be removed to allow thermostat removal). Here is a picture with the thermostat out and the EGR cooler sitting on top of the engine: The single red arrow shows where the thermostat was removed. The double red arrows point to where the mounting bolts go. The EGR flange that accepts the flange bolts I discussed at length above is shown by the yellow arrow. The green arrow leads to the difficult electrical connection I talked about earlier. Putting back together was not too bad, with a couple of caveats: 1) A lot of connections. Again, I recommend tagging things with tape so you make sure you don't miss something. 2) The EGR cooler flange bolts (again!). You can't reach the flange with your fingers to start the bolts. The bolts have to be attached to the 7-8 inch extension and then carefully (memory braille on the bottom bolt, again) put into position. I didn't want to drop the bolts, so had a cloth in position under the flange to catch a potentially dropped bolt. In addition, I stuck some blue painter's tape on the end of the T45 socket (adhesive toward the socket) and then pressed the bolt onto the socket. The tape gave enough friction so that the bolt was held on quite securely. Here is a pic of what I'm talking about - here I have an e-torx socket attached to the torx socket instead of the bolt, but hopefully you understand: The EGR cooler flange bolts are not magnetic, so a magnet would be no help in retrieving a dropped bolt. (edit point added) - Also, see ZetaTre post # 14 on this posting for one suggested way of tightening the various EGR connection bolts. Also, ninja zx11 has a posting (link is here) which includes a detailed description of the order in which to tighten bolts, and the torque settings. 3)When you put the fan/shroud back in place, be aware there are tabs at the bottom of the shroud that fit into slots near the bottom of the radiator. The diagram (RealOEM link is here) below has the number 4 pointing to one of the bottom tabs of the shroud. In case you're wondering why you can't see any tabs on the top of the shroud, that is because the top of the shroud has slots (rather than tabs). So (not counting the charge air hose bracket) the fan/shroud has a total of 6 connection points - 2 slots/tabs on the bottom, 2 flaps that clip in on the sides (driver's side has the "flippable flap"mentioned above), and 2 smaller slots/tabs on the top).  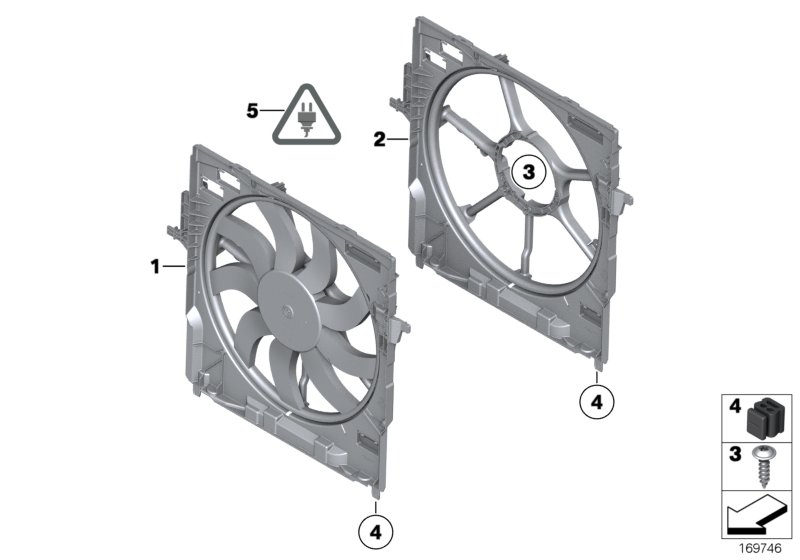 As I said, it took me about 6-7 hours, but I was going really slowly. Overall difficulty - I'd rate it as about a 6 on 1-10 scale. Even though the ultimate goal is a thermostat change, the difficult parts were getting the fan/shroud out, and the EGR cooler out. As I said, my mileage has improved, and hopefully I've saved my glow plugs and DPF! Hope the above is helpful. Stephen 1998 ML 320 - now driven by son #1 2005 e53 3.0 - now driven by son #2 2008 ML320 CDI - now driven by wife 2010 e70 35d - now driven by me Last edited by sgrice; 12-01-2022 at 01:17 PM. 
|
| Bookmarks |
|
|
|
|


 Threaded Mode

