
|
|
|
|
||||||||||
| Xoutpost server transfer and maintenance is occurring.... |
| Xoutpost is currently undergoing a planned server migration.... stay tuned for new developments.... sincerely, the management |
 |
|
|
LinkBack | Thread Tools | Display Modes |
|
#221
 08-19-2023, 12:07 PM
|
||||
|
||||
|
Quote:
I will say that I did an Arnott spring conversion on my wifes Grand Cherokee a few months ago and it had PU perches in the back for the springs. Ive been disappointed with the kit for other reasons specific to the Grans Cherokee application , but so far no problems with the perches.
__________________
Current Original owner 2002 E53 X5 4.4i to 4.6i swap 2025 G06 X5 50e Former 1972 Audi Fox 1986 Saab 900S 1996 BMW Z3 1998 BMW E36 M3 Sedan 2004 BMW E46 M3 2006 Audi A3 Quatro 1993 Mopar 318 Jeep Grand Cherokee 2015 V6 Jeep Grand Cherokee 
|
| Sponsored Links | |
|
|
|
|
#222
10-02-2023, 05:22 PM
|
||||
|
||||
|
I began the amp and speaker installation today on the X. The basic plan is to use Oe speaker wires from a new Kicker 4 channel amp to drive Kicker two-way speakers in the OE rear door locations and components in the front door and pilar locations. Today was spent pulling the old amp and bracket, removing the rear door panels and speakers, installing the new rear speakers, sorting out the wiring to these rear speakers, and finalizing the amp location and mounting.
I did start with an easy win, a BMW roundel mounted over the Method center cap on my spare: 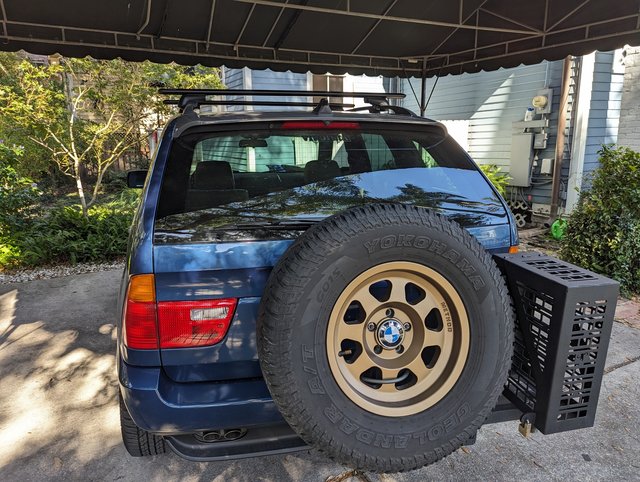 Then I pulled the left trunk cubby and trunk floor apart to get to the amp bracket and remove it, with the amp. The door cards were a pain, as usual and I'll be off to autozone tomorrow to load up on JB Weld. In a new twist, the right rear door pocket/ash tray came off, along with a number of previously unrepaired plastic brackets. Good times. The speakers went in easy (I'd previously installed them into ebay enclosures) but I noticed the wire colors on each side were the same (Yellow and Brown). This dashed my cunning plan of simply tracing different colors back to the amp plug and splitting them off to attach to the new amp. Bentley to the rescue. The left rear is yellow and brown all the way to the amp, but the right rear is spliced somewhere and comes out a different color at the amp. Bentley was right on all but one of the front doors, but by that time the only two remaining similar gage wires in the amp plug were easy to spot. I labeled all of them and tested each speaker location with a flashlight battery to ensure I could hear a faint pop from each. This also served to check the polarity at the newly installed rear speakers as I could see them flex outward when the battery was attached to the speaker wires. I am using the factory plugs at the enclosures and bridged those to the speaker connections. End result: 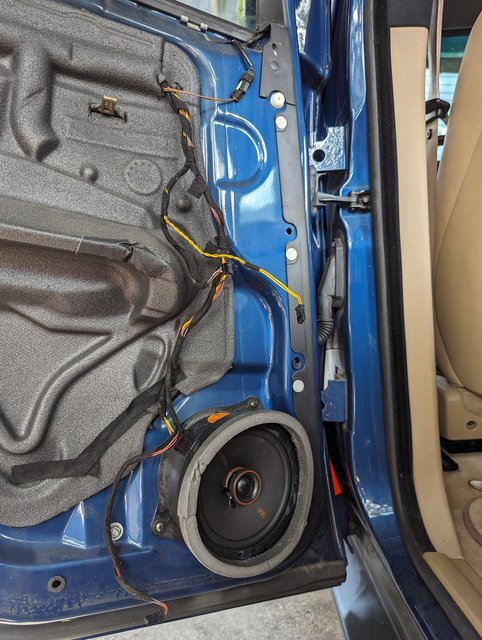 Last up for today was to test mount the amplifier and drill the holes. I bought some rubber washers just to isolate it and keep any rattles, rubbing, etc. down, and will hit the holes I drilled with some primer and paint before the final installation. I left too much RCA cable in the back, but I wasn't sure how I was going to mount it. I know its going to be a stretch in the dash to the head unit, so I'm hopeful I can pull some of the extra from back to front. I may need to remove the front left A pillar to do this. 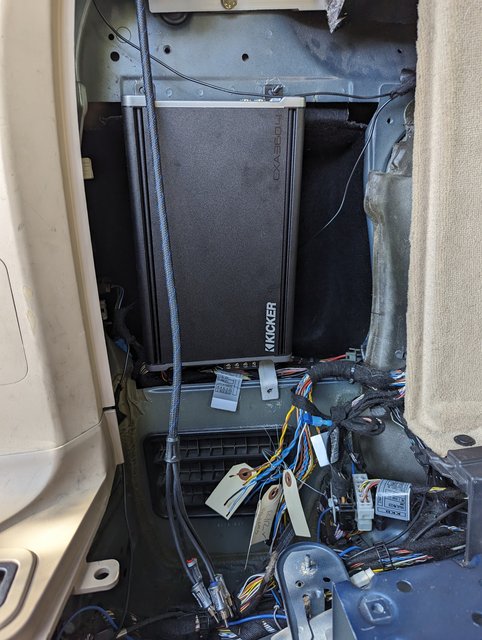 I'll get the rear door cards glued up tomorrow and pull the front cards to install the two way speakers. I also need to repair the front right airbag as the plug is so worn it backs off and triggers a light in the dash. I may end up pulling one of the rear door airbag plugs since these have never been turned on since we've owned the car. In theory there isn't much to do in the dash except remove the line output converter and plug in the RCA cables. I also want to tap off the cigarette lighter wiring to make the head unit dim at night. I missed this on the initial install. Last but not least will be to pull the negative terminal on the battery and connect the amp to ground, power and the OE amp trigger. I'll take another swing at a phantom voltage test with my new multimeter and hopefully not brick this one up too.
__________________
Current Original owner 2002 E53 X5 4.4i to 4.6i swap 2025 G06 X5 50e Former 1972 Audi Fox 1986 Saab 900S 1996 BMW Z3 1998 BMW E36 M3 Sedan 2004 BMW E46 M3 2006 Audi A3 Quatro 1993 Mopar 318 Jeep Grand Cherokee 2015 V6 Jeep Grand Cherokee Last edited by Henn28; 10-05-2023 at 11:25 AM.
|
|
#223
10-05-2023, 11:12 AM
|
||||
|
||||
|
Aside from having to come up with another bracket for the lower support of the amp (the one I made didn't work), the sound upgrade on my X5 is finally complete. It took way too long at the end of the day, mostly because I put off this last part for a while due to the fact that this sort of fiddly work isn't my strong suit. Its also been way too hot down here to work on the car outside until this month. Thanks to Chrystal works for advice and pointers along the way. His upgrade as documented on a different site is fantastic.
The amp connections were straigh forward. I grounded it to a convieneint ground point at the rear left of the car, under the floor (where the wire harnesses run left/right arcoss the from cubby to cubby. Like the sub I installed earlier, the power for the new amp comes from the fusible link box, near the left air spring compressor accumulator: 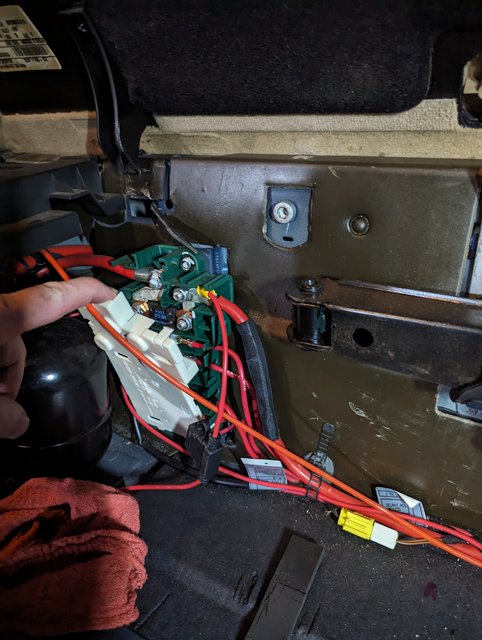 The amp wiring has its own fuse so I secured it to the left side of the top (FL1, 200 Amp) fuse, which comes directly from the battery. The trigger for the amp is the same as the powered sub, the original amp trigger which now goes directly to the new amp. Speaker wires were previously sorted out and tested for which speaker location they run to and polarity, since some of the wire colors change at some point in their runs to the speakers. Next up was to pull the Kenwood receiver out and remove the line output converter which was needed to make it work with the OE amp. Then I did my best to simplify and square away the wiring mess I had simply shoved into the hole in the dashboard when I put the Kenwood in. There is still a ton of wiring as the receiver supports the backup cam, an added Sirius radio antenna, a GPS antenna, FM antenna, RCAs for sub and new speakers, the box that allows some of the steering wheel controls to work, grounds, etc. I was dreading pulling all four door panels again, and they didn't disappoint. Two tubes of JB Weld and some of the black weather strip sealant later and I had the new speakers installed in the OE locations, panels repaired as needed and the right front airbag plug swapped out with one from a rear door. My plan to put the tweeters in the side-view mirror posit hit a snag when I saw how the OE tweeters were mounted with a bracket that wouldn't work on the new tweeters (larger diameter), but then I realized that the new ones fit very securely into the triangular OE foam surrounds: 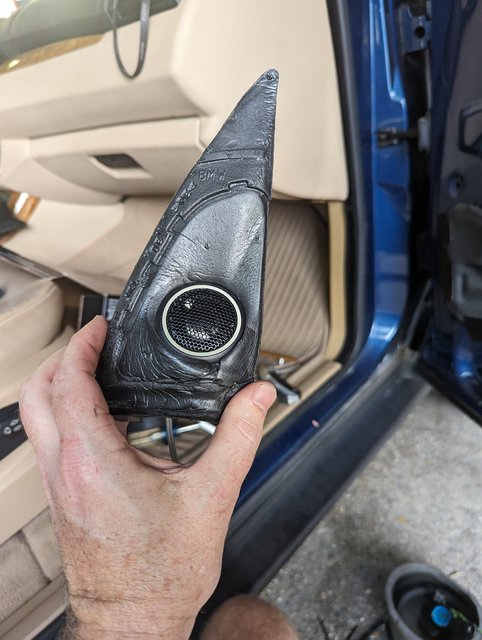 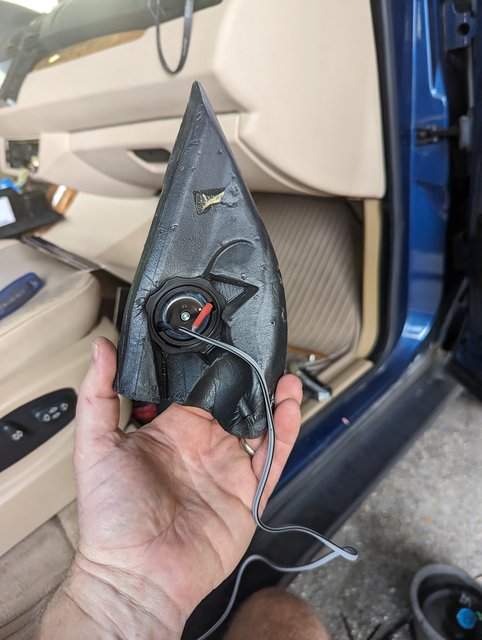 They even point in the OE direction towards the listener. Shockingly simple for the X5. I glued the foam pieces back onto the door frames and ran and spliced all the cables. I was stumped on where/how to mound the crossovers boxes in the front doors, and I was running out of time, so I ended up just wrapping them in packing foam and dropping them to the bottom of the door. This should work fine as they are wedged into the bottom and don't interfere with the window, but I'll probably try to raise them up a bit with two sided 3M tape the next time I'm in the door, just in case I develop a door leak. I tested everything before putting all four door cards back on and am very happy with the results. Super crisp sound, way, way more base than the OE system, and zero distortion at levels far beyond what I'll listen to the system at. Running the android auto phone through the Kicker amp makes it sound much, much better to the person on the other end of the phone. For some reason the BMW amp didn't do a good job processing this signal. At some point I need to re-jigger more wiring behind the receiver for a better fit, and eventually I'd like to come up with a better surround to go around it. The plastic piece from Crutchfield is clunky and cheap, to my eyes. I've wanted to learn how to work with veneer for some time, so may experiment in making a wooden surround at some point to match the X5 wood. All I would consider this upgrade a 7 r 8 on the PITA scale (out of 10). Nothing was overly complicated, just lots and lots of fiddly work that can't be rushed. I was smart enough for once to work out a detailed plan based on other's experiences and advice, and mostly stick to it. I also think using the existing speaker wires was the way for me to go, personally. Probably not the best option for someone looking for a really high-quality sound system upgrade, but I doubt I could personally tell the difference between the OE and new speaker wires. The thought of dragging new speaker wire throughout the car and out to the doors made me want to vomit. Running the RCA cables over head when I had the liner out last year worked out really well too. Zero interference from power cables, etc. this way.
__________________
Current Original owner 2002 E53 X5 4.4i to 4.6i swap 2025 G06 X5 50e Former 1972 Audi Fox 1986 Saab 900S 1996 BMW Z3 1998 BMW E36 M3 Sedan 2004 BMW E46 M3 2006 Audi A3 Quatro 1993 Mopar 318 Jeep Grand Cherokee 2015 V6 Jeep Grand Cherokee Last edited by Henn28; 10-05-2023 at 11:27 AM.
|
|
#224
11-12-2023, 01:54 PM
|
||||
|
||||
|
LSD mod
I finally got moving on putting an LSD into the rear diff of my E53. After some research and reading I opted for a Quaife LSD, which uses sets of helical gears in the carrier to seamlessly transfer torque to the side with more traction. Plusses are that its seamless in its operation, quiet on the highway, progressive and most of all, they make one to fit the E53 rear end....supposedly. I half expect something to show up that the ring gear won't fit on.
Since the X is my daily I bought an complete diff off of ebay to rebuild and am pretty happy that what showed up is in very good shape. It had obviously been rebuilt at least once, and fairly recently, and the oil was very clean with no debris in it. My initial plan is to not touch the pinion gear since it feels smooth when turned and the pinion gear looks like new. Those bearings are a pain to remove without a press, but should last for a long time if the diff is set up correctly. In fact, the output bearings too should last the life of the X5 generally, but new ones are needed for the new diff as they can't be removed and reused. 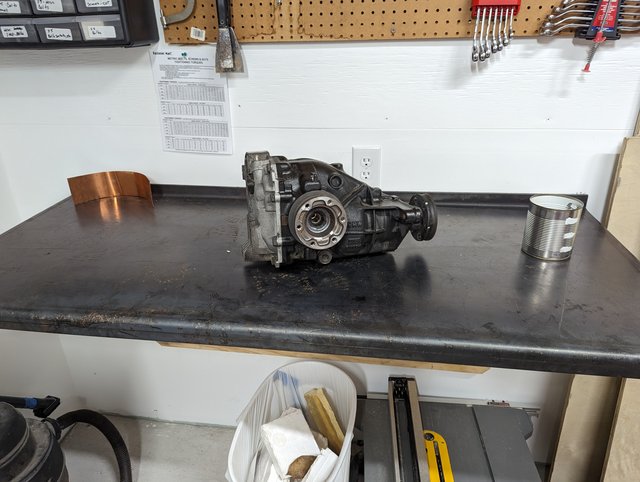 The stub axles pop out with a crowbar and the splines look factory fresh and the oil seals pop out too with long bar and some persuasion. Things came to a screeching halt then as I broke two snap ring pliers on the bearing retaining snap rings, which double as spacers. Northern tool came to the rescue with a larger (internal ring) tool and I wrestled them out today. 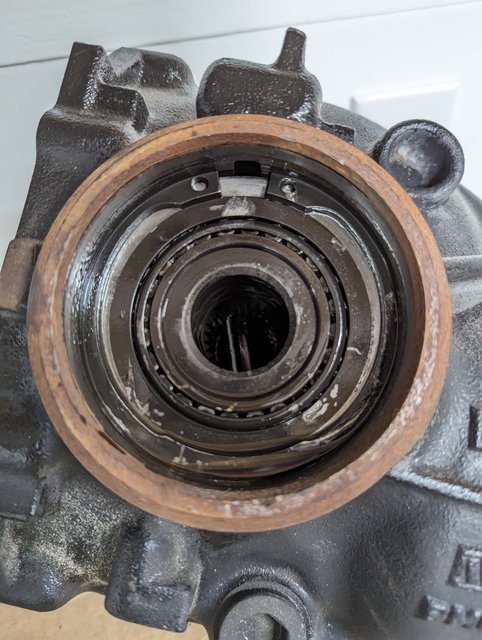 The output bearing races then simply fall out with the snap rings out, unlike the pinion races which need to be pressed or hammered out with a punch. With the races out the diff carrier can be eased out of the pumpkin, and disassembly is complete. These are 188K BMW "medium" diffs (no output flanges), so its a pretty simple job with the right size snap ring tool. I labeled the kept the races as I'll toss toss the diff carrier with its bearings in the parts pile, just in case... 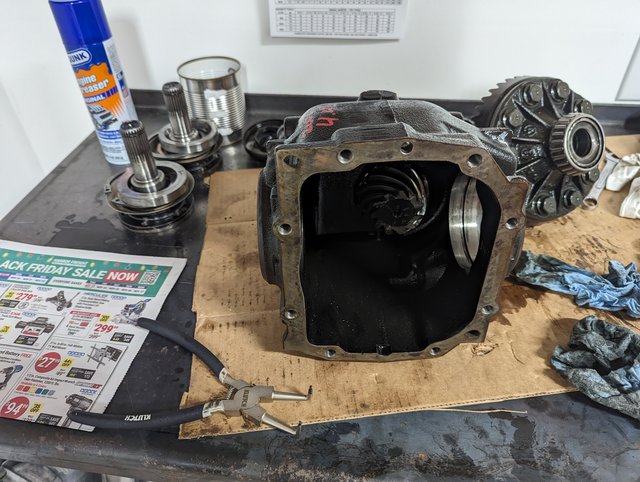 As far as new parts, I have output bearings and races coming, and the Quaife will have new seals and clips for the stub axles (I think) with it when delivered this week. Quaife, and the shop I bought it from, claim that the same shims can be used without screwing up backlash, etc. so it is key not to mix the snap rings up before labeling them "L" and "R" with a sharpie. Assembly should be quick, in theory. I intend on testing backlash and how the gears are meshing with colored paste once I get it back together with the LSD. Shim sets are available for these 90MM non flanged output cases, but hopefully I won't need to spring for it. Sadly, the output bearings are difficult and expensive to find. New ones are needed for the new diff carrier. The pinion bearings are much more common and less expensive. Next up: get the impact out and hopefully the ring gear will play nicely when I try to remove it. I'll also do a deep clean of the pumpkin and cover while I wait for the quaife and bearings to arrive. One other note, with the old rear diff out I was able to compare it to some pics of the front diff carrier I found on line. They are different in width it looks like, and the front ring gear is held on by 8 bolts while the rear has 10. Presumably then the same quaife unit cant be used up front.
__________________
Current Original owner 2002 E53 X5 4.4i to 4.6i swap 2025 G06 X5 50e Former 1972 Audi Fox 1986 Saab 900S 1996 BMW Z3 1998 BMW E36 M3 Sedan 2004 BMW E46 M3 2006 Audi A3 Quatro 1993 Mopar 318 Jeep Grand Cherokee 2015 V6 Jeep Grand Cherokee Last edited by Henn28; 11-12-2023 at 02:06 PM.
|
|
#225
11-12-2023, 04:34 PM
|
|||
|
|||
|
Looks interesting! Let us know how it drives once everything is in place.
Do you have a link where you purchased the lsd?
|
|
#226
11-12-2023, 04:42 PM
|
||||
|
||||
|
Willdo. I'll update when my parts come in and I get it all installed, and as I check the backlash and gear patterns. Seems straighforward, especially since I'm not pulling the pinion, but its my first diff rebuild so I'm sure it will go off the rails for a bit.
Quaife model QDF13N for the rear diff. Birds Automotive in the UK is Quaife's official retailer... https://www.birdsauto.com/ but you can find them elsewhere too. They were very helpful during the process, so I gave them the business. They can also include a full refresh kit, etc. or whatever else you may need. But I found the output bearings at DiffsOnline for a bit better price than Birds, after shipping. I'm sure you can find it here in the states
__________________
Current Original owner 2002 E53 X5 4.4i to 4.6i swap 2025 G06 X5 50e Former 1972 Audi Fox 1986 Saab 900S 1996 BMW Z3 1998 BMW E36 M3 Sedan 2004 BMW E46 M3 2006 Audi A3 Quatro 1993 Mopar 318 Jeep Grand Cherokee 2015 V6 Jeep Grand Cherokee
|
|
#227
11-13-2023, 12:24 PM
|
||||
|
||||
|
Diff progress
I finished breaking the diff down today and cleaning the pumpkin, ring gear and cover. It seems to have been recently painted, so I'm going to save myself the trouble and not shoot it with some spray paint.
My cheap impact wrench made quick work of the 10 ring gear bolts. Once loose I threaded them in about 50% and very gently tapped with a hammer on opposite heads to start working the ring gear loose. 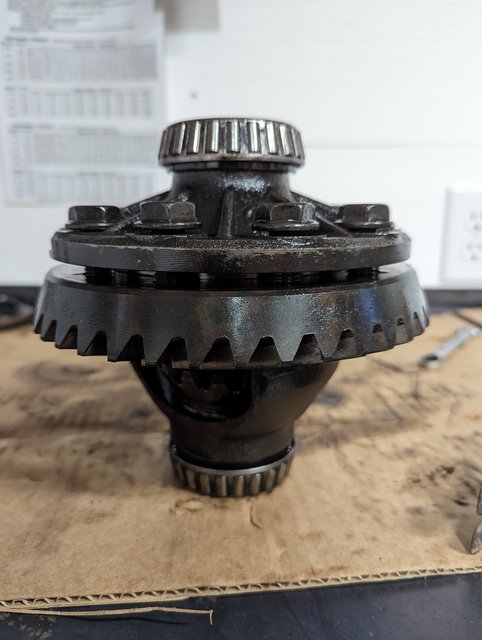 Once I had a bit of clearance, pry bars on either side popped the gear off. Neither the hammering or pry bar work took very much effort at all. The bolts are 12.9 grade so I think they could take some abuse. Fortunately working around the both heads with a gentle tap was all that was needed to start it working free. 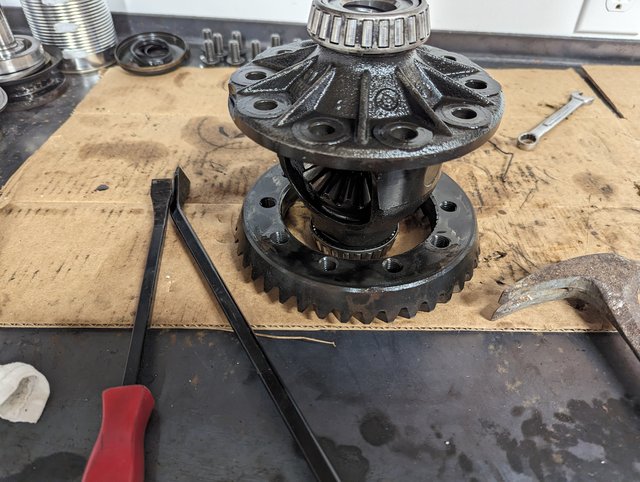 Next up was a good clean with degreaser for the pumpkin, ring gear and cover. The oil was very clean when I drained what was remaining, but there was definitely build up on the inside of the case and cover. The pinion and ring gear look pristine to my untrained eye. 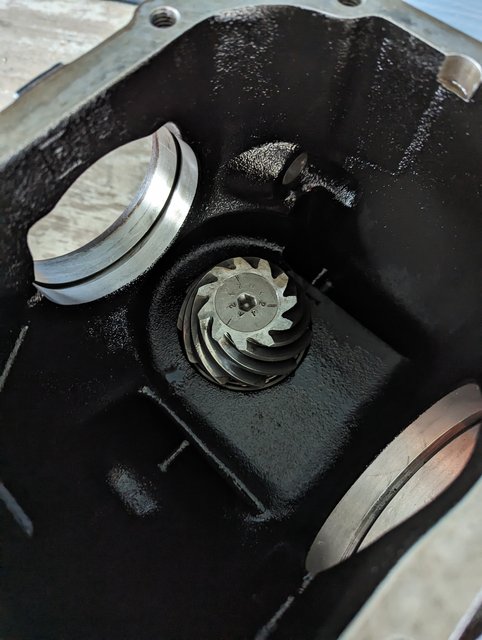 Finally, I put a 30mm socket on the pinion flange bolt and tested the pinion bearing preload with my super cheap craftsman beam wrench. From what I read 20 inch lbs is roughly what the pinion pre-load should read (running, versus break away torque which will be higher). I read about 2 ft/lbs, which equals about 24 inch lbs. I may drive the thing out to my indy and ask his opinion on how smoothly it is turning as it feels a bit rough noisy to me. I, however, don't have any idea what it should feel like. Its also likely full of degreaser now, despite my efforts to drain the whole thing, so I'll work some oil into the pinion shaft and see how it feels then. 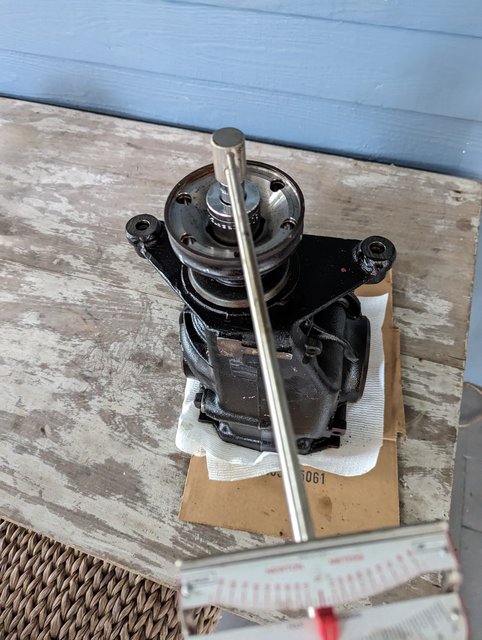 The quaife diff is supposed to be delivered today and then I"m just waiting on the output bearings. I do need to find a roughly 50mm diameter something to drive the bearings onto the diff. The inner race from the old diff bearings would work great, but that would entail getting them off and that is a chore. An axle nut socket is just a hair too small unfortunately.
__________________
Current Original owner 2002 E53 X5 4.4i to 4.6i swap 2025 G06 X5 50e Former 1972 Audi Fox 1986 Saab 900S 1996 BMW Z3 1998 BMW E36 M3 Sedan 2004 BMW E46 M3 2006 Audi A3 Quatro 1993 Mopar 318 Jeep Grand Cherokee 2015 V6 Jeep Grand Cherokee Last edited by Henn28; 11-13-2023 at 12:54 PM.
|
|
#228
11-13-2023, 06:07 PM
|
|||
|
|||
|
Nice work!
I've got a kit like this to press bearings and bushings in. ATPEAM 52-in-1Custom Bushing Driver Tool Set | Transmission Wheel Axle Bearing Race Seal Installer Remover | Bush Removal Puller Bearing Press Tool Kit https://a.co/d/5TgStxz This is interesting, I've never come across lsd for e53 automatic. I've seen lots for manual tranny, but never automatic. Please take lots of pictures when installing. My diff is out right now, I had it sandblasted and coated. I would consider installing an lsd as well. Do you have a link for the bearing set? Here in canads they don't sell any. I'm rebuilding the transfer case, and purchased a bearing kit, but a couple of bearings were plain wrong. One of them didn't have a snap ring groove in, so I had to chase that bearing somewhere else. I may follow your footsteps and do the differential. The only reason I'm a bit apprehensive about the differential is the pre-load you're dealing with right now. Did you install a new crush collar? For the life of me I cannot find one. I heard if take of the collar but, you're supposed to replace the crush sleeve, or differential will fail a few months down the road. Are you reusing the old one?
|
|
#229
11-13-2023, 06:12 PM
|
|||
|
|||
|
https://www.ebay.ca/itm/143387386218...mis&media=COPY
Is this the one you purchased? Doesn't say e53 on this ebay listing, but maybe it's the one?
|
|
#230
11-13-2023, 10:14 PM
|
||||
|
||||
|
Model number is QDF13N ...so that's the one. Birds Auto was a bit cheaper, 950 GBP or something like that.
Quaife arrived and happily the ring gear is going to bolt right up. Dimensionally it seems identical to the BMW diff carrier. 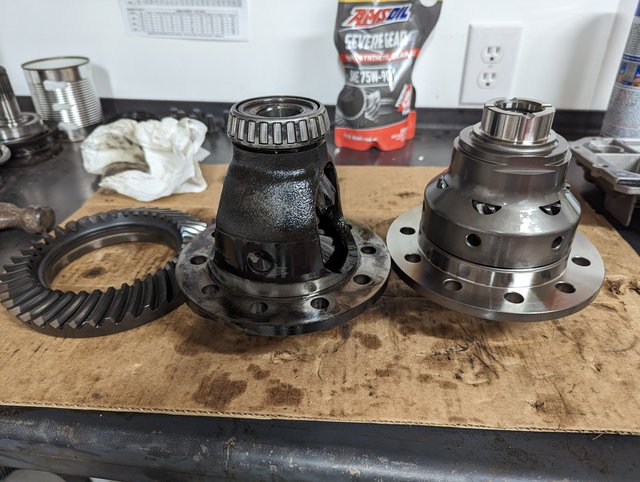 Instructions call for heating the ring gear to 100C in boiling water, then installing it. I may stick it in the oven for an hour or two at 150F as I don't have compressed air to blow the bolt holes and threads out. Then red Loctite, 100 NM, plus another 30 degrees on the 10 bolts.
__________________
Current Original owner 2002 E53 X5 4.4i to 4.6i swap 2025 G06 X5 50e Former 1972 Audi Fox 1986 Saab 900S 1996 BMW Z3 1998 BMW E36 M3 Sedan 2004 BMW E46 M3 2006 Audi A3 Quatro 1993 Mopar 318 Jeep Grand Cherokee 2015 V6 Jeep Grand Cherokee Last edited by Henn28; 11-14-2023 at 03:14 PM.
|
|
| Bookmarks |
|
|
|
|


 Linear Mode


