|
||||||||
| Xoutpost server transfer and maintenance is occurring.... |
| Xoutpost is currently undergoing a planned server migration.... stay tuned for new developments.... sincerely, the management |
 |
|
|
LinkBack | Thread Tools | Display Modes |
|
#241
|
||||
|
||||
|
leak update
Back from work last night and after checking under the car (dry, happily) I went to limp the car onto the road for the tow to my Indy shop and she fired right up and ran strong. I drove it around for 5 minutes, cleared the codes and the motor sounded strong none returned. My fear was that I broke a wire in the harness when I peeled it off the motor and laid it off to the right side of the engine bay. The insulation and wires are quite brittle at this point. But now my working theory is that I got water into the harness boxes and or other critical point(s) during a heavy rainstorm last week while the motor was apart. The cowl was off and I found some water in the valley the next morning and despite a thorough vacuum followed by a compressed air blow out, I suspect some remained in the harness. She's still headed out to my indy today under her own power since I have an appointment I don't want to waste. In her near future are new Bilstein B4 struts, strut bearings, etc. to replace the OE struts that are shot, a vacuum bleed of the coolant system, a new throttle plug wired in, maybe the new LSD diff installed if I can get it together while the car is with him, and I'll get him to put all the ridiculously challenging injector clips on. I found all 8 of mine on backwards when I put the harness back on. I reused my OE harness when I did the motor swap and didn't notice they were installed backwards. The new motor ran great for 2 years, but clearly the plugs were not 100% seated. In other news, the LSD swap came to a halt because the new diff wouldn't fit in the housing with the OE snap ring shims. I suspect the taper bearings I bought are ever so slightly different. I am new to working on diffs, but I've learned that the shim tolerances are measured in tenths and even hundredths of MMs. Fortunately I found a package of 10, 188K "medium" diff snap ring shims from Racing Diffs (in Serbia I think) that run incrementally from 3 to 4 mm and which will arrive tomorrow. Hopefully some combo of these shims will give the proper backlash. The OE shims will fit but are way too tight and jam the crown gear against the pinion, not allowing the diff to turn at all. My OE snap ring shims are marked 3.64 on the left and 4.0 on the right. I suspect I need maybe a 3.5 or 3.4 on the left side. If I can get the thing together, and with the proper backlash while my indy still has the X5 this week, I'll take it out to him to install along with the new driveshaft CV joint I bought and center bearing. I've been getting a definite 'ping' sound when I select drive and reverse which could be quite a few things, but I'm hopeful that the new diff, center bearing and CV joint will take care of it.
__________________
Current Original owner 2002 E53 X5 4.4i to 4.6i swap 2025 G06 X5 50e Former 1972 Audi Fox 1986 Saab 900S 1996 BMW Z3 1998 BMW E36 M3 Sedan 2004 BMW E46 M3 2006 Audi A3 Quatro 1993 Mopar 318 Jeep Grand Cherokee 2015 V6 Jeep Grand Cherokee Last edited by Henn28; 12-12-2023 at 05:26 PM. |
| Sponsored Links | |
|
|
|
|
#242
|
||||
|
||||
|
Diff Progress Finally
The X5 has stayed leak and misfire free this past week so shes at the shop for a full front strut refresh, a vacuum bleed of the coolant system, some ride height tweaks with INPA (my version stopped working on my laptop), and correctly installed injector clips which my Indy says he can get on without pulling the harness…again. Unfortunately my diff shims from RacingDiffs hadn’t shown up in time for me to finish that job and toss it in the car, with the new bushings for him to install before I dropped it off. I don’t have easy access to a bushing tool so would have liked him to do that part.
The shims arrived all the way from Serbia on Thursday evening so yesterday I got to work. 10 snap ring shims from 3 to 4 mm, in .1mm increments. 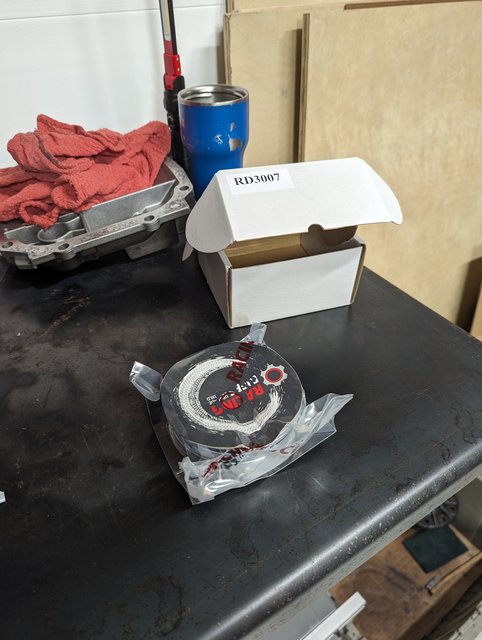 The OE left shim (that locked the new diff up) was 3.6, so I went with the 3.4 on that side, and the OE 3.8 shim on the right. The fact that the diff would at least turn told me I was on the right track. The gear mesh pattern told me that the diff needed to shift to the right however…the drive side was too far to the heal side of the crown, and the coast was not engaged very much, and was too far to the toe side: 3.5 mm shim for the left and 3.7 for the right gave me what to my amateur eye looks like an OK mesh pattern…a tiny bit off, but I decided to stick with it due to fact that the shims were gettingdifficult to get in (and out if needed) with a race driver and punch as needed: 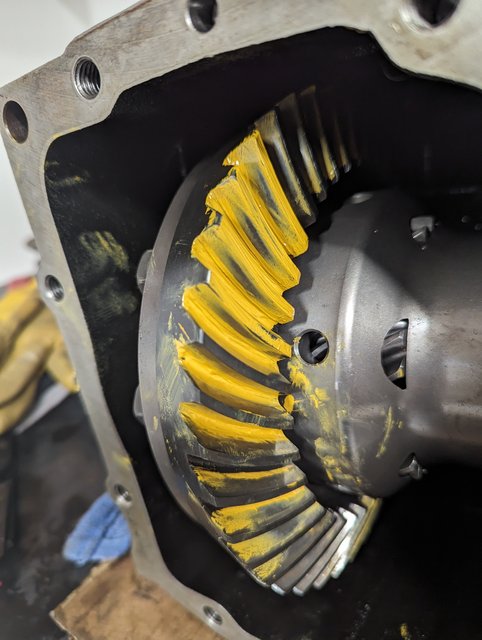 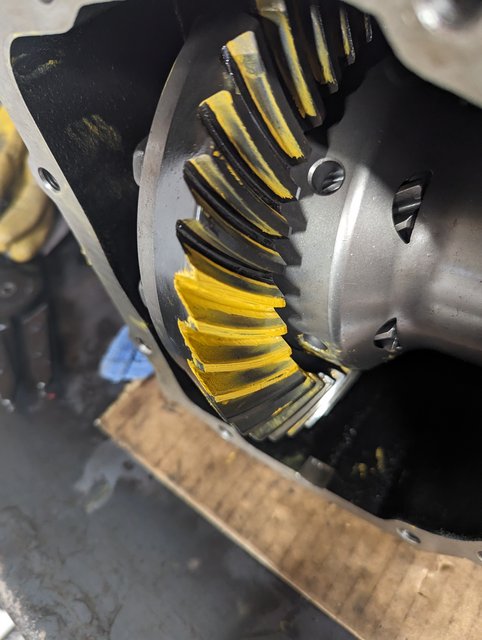 Next came the backlash measurement which came in right at .08mm, which is right in the acceptable range according to Quaife. 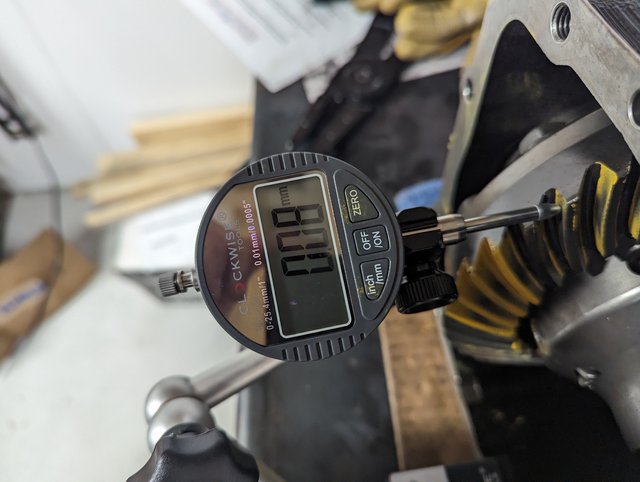 I may fiddle around with the backlash measure technique a bit more next week as I’m not 100% sure I have it right. A few more YouTube videos will get me squared away! Next I gave the bearings, housing, etc a good clean and popped some OE BMW seals in each side with no drama. New circlips on the stub axles and in went the left side reasonably easy. The OE stub axles are a tight fit in the Quaife, but some antiseize in the bore and gear oil on the axle splines helped. A rubber mallet was needed to get it to bottom out in the inner grove. The right sided however was real PITA. The Quaife has a grove milled into its output stub axle bore that kept catching the retaining clip on the stub axle and freezing it. I could not get the stub axle past this point and into the splined section of the Quaife. I finally had to pop it back out with a punch from the other side, which broke the snap ring. After locating the two pieces I put the original snap ring back on the axle stub and was able to work it past this point and down into the splined section and finally bottom it out with a rubber mallet. The pic below shows the grove(arrow) which grabbed the snap ring on the output stub axle. The old snap ring was happily a bit more squashed and worn I guess: 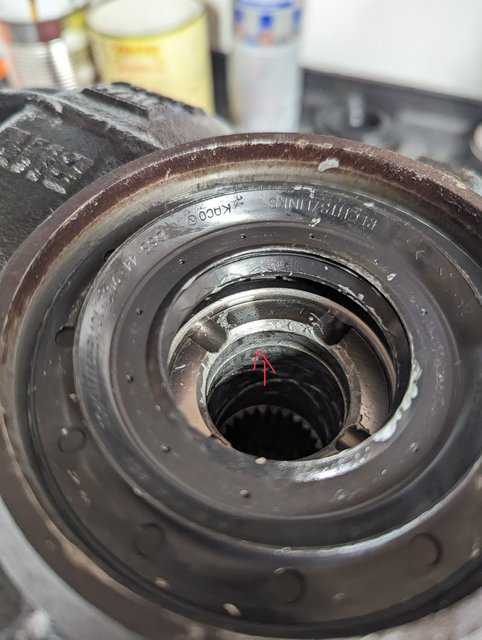 All in all not a terrible project, so far. The Quaife was no where near correct with the OE shims, which could be the Quaife, or more likely is due to the new taper bearings being slightly different dimensions than the OE FAG units (which aren’t available any longer). The Quaife seems like a really tightly machined piece of gear. The 188k medium differential is a pain in the sense that it uses snap ring shim rather than bolt on flanges with shims. They are not readily available, are a pain to work with ( broke 2 snap ring tools) and need some hammer and punch persuasion to get seated. The old races from the oe bearings were very helpful as spacers, something to tap on so I wasn’t tapping on the new races to get them in, and to get the output seals in. Next up is to get it in the car. Time will tell if my decision not to pull the pinion was a good one. I will have a spare Diff though if I need to revisit something on the Quaife diff after it is in. Buyng the eBay diff for the Quaife was a good decision I think as I could take my time building it up, waiting for parts, etc. Take everything above with a grain of salt, or 10. Nothing on this project was cosmic, but I relied on YouTube, Quaife’s instructions and forum reading. Bentley says nothing about rebuilding a diff unfortunately. I was amazed at how the diff is really not even as advanced as refrigerator technology, but the tolerances involved are very, very small.
__________________
Current Original owner 2002 E53 X5 4.4i to 4.6i swap 2025 G06 X5 50e Former 1972 Audi Fox 1986 Saab 900S 1996 BMW Z3 1998 BMW E36 M3 Sedan 2004 BMW E46 M3 2006 Audi A3 Quatro 1993 Mopar 318 Jeep Grand Cherokee 2015 V6 Jeep Grand Cherokee Last edited by Henn28; 12-17-2023 at 01:18 PM. |
|
#243
|
||||
|
||||
|
Merry Christmas all.
Brief update: I re read the Quaife installation instructions, did some more YouTube research, and emailed the Racing Diffs experts directly about backlash measurement and the fact that the diff with the Quaife in it has a very small amount of rotstional play (less than a mm) in the input flange (pinion). The upshot of the above is that the output bearings are preloaded such that testing backlash takes a bit more leverage than just pushing on a crown gear tooth with a finger as I had done. Seems silly now, but there is some drag on the diff carrier and once I applied some additional force on it I got a backlash reading of .14mm. Quaife says that .08 to .14 is within spec, and up to .2 can be acceptable depending on your application. The Racing Diffs Guru said that the minor lash in the pinion at the input flange isn’t a worry, as long as the backlash and pinion preload checks good. so I’m happy with the “new” diff it as it sits in my work shed on Christmas Eve. The X5 is back from the shop with new front struts and all the misc bits that go along with that job. I still have a slight “clunk” from the right front over bumps, which I had hoped the struts would fix. I’ll check the torques on the sway bar links, and everything else up there, but I suspect I’ve got a bushing that is going. Next up is to install the new diff, along with a center bearing and a new driveshaft cv joint. Might as well, since getting the drive shaft out will be easier with the diff out first. Seems like lift work, but I’d rather do it in my driveway frankly. I have access to two lifts, but neither are convenient in my lazy estimation. I will see what auto zone has for rent regarding bushing tools, and hope something will work on the diff bushings.
__________________
Current Original owner 2002 E53 X5 4.4i to 4.6i swap 2025 G06 X5 50e Former 1972 Audi Fox 1986 Saab 900S 1996 BMW Z3 1998 BMW E36 M3 Sedan 2004 BMW E46 M3 2006 Audi A3 Quatro 1993 Mopar 318 Jeep Grand Cherokee 2015 V6 Jeep Grand Cherokee |
|
#244
|
|||
|
|||
|
Glad to hear your project is going well.
I got the kit from racing diffs, going to install it soon. Front end clanking could be a balljoint. Raise that wheel and test by moving up and down and left and right with your hands. As for the differential bushings, you can make yourself a tool, very easy job https://youtu.be/P91yrmAtxFM?si=Qbl-p492eopSfdXH |
|
#245
|
||||
|
||||
|
Diff Install
Diff install took two days of driveway work. A lift would have made things a lot easier but I wasn't sure I could get it done during my days off and didn't want to get the car stuck on the lift I share.
I put the rear of the car up on jack stands and left the wheels on. There are times when you need to keep the wheels from turning so either the parking brake, or be ready to let the car down a bit onto the pavement, then back up when you need to turn the wheels. The parking brake worked for me most of the time, but some of the fasteners need a lot of torque to loosen and then re-torque at the end. Two floor jacks are nice as the axles pop much more easily into the output flanges if the rear suspension isn't fully extended. Or you could lower the car a bit onto the ground. - drop the exhaust from the resonator back. I didn't do this at first, but eventually caved in and did it. Should have done it earlier and removed it fully. As it was I just let it swing down, which helped a bit. -Undo the heat shield back tot he resonator and bend it down. - Undo the driveshaft CV joint bolts from the diff input flange. A ratchet wont fit unfortunately so Its tedious and the driveshaft must be held with a pry bar, the parking brake, or put the wheels on the ground. - Undo the torx head bolts that hold the axle to the diff output flanges. These are a pain and can only be reached when the bolts are at certain clock positions due to the rubber boot, etc. Do one or two, then turn the wheels, lock them with the parking brake, rinse and repeat. I bought 6 new ones just in case some of them were too mangled to reuse. The torx heads can get nasty after repeated use. There are six per axle. The axles can then be levered free of the flanges and tucked up by the parking brake cables. - Get a jack into position and support the diff, then remove the 3 bolts. They are torqued to 122 ft/lbs, so they are a pain on your back. The diff is now free and will drop down on the jack. I made a jig out of wood to help support it. Not super necessary to remove as gravity is quite helpful, but it was a huge help installing the new diff. 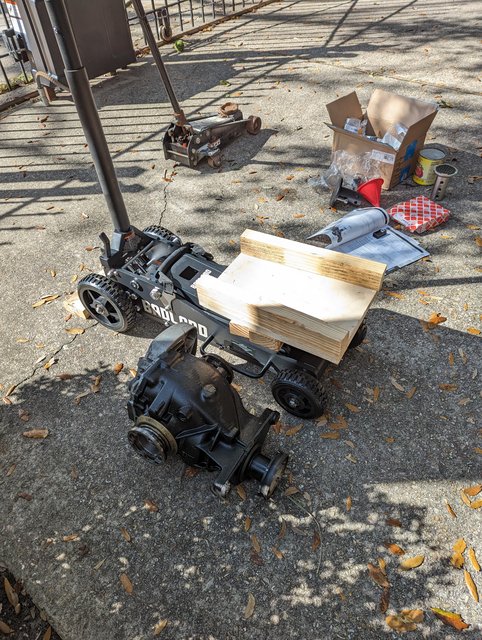 Diff finally out of the car....this took most of a day, but as these things go I could probably drop it again in several hours. 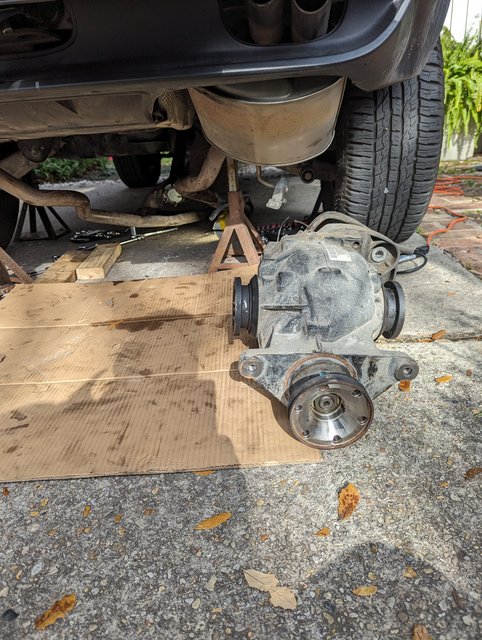 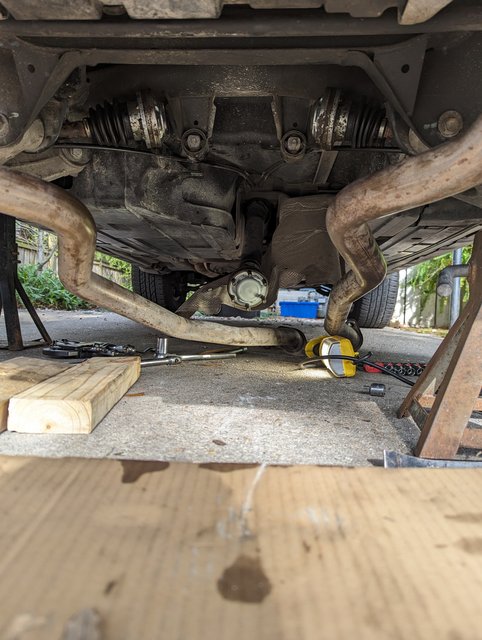 Next came the driveshaft as I needed to replace the CV joint and the center bearing. Its a straight forward exercise with the diff out. Way easier than with the diff in. Three bolts at the guibo (t-case end) and two holding the bearing up and it drops out. The bolt holding the two halves together is a pain as the 18mm (I recall, maybe) wrench will only turn a few mm at a time inside the U joint. As the bolt comes out, keep knocking on the driveshaft flange (tcase side) with a hammer to separate the two halves and pull the bolt back in so the wrench will continue to fit. Slow, but it it will eventually come out. Mine was on insanely tight, but I recall it only needs to have 50 something ftlbs on it. The CV joint comes off with a few taps of a rubber mallet after the circlip is removed. Note, I chose to reuse the metal cover, but getting it off was a pain. A new one is cheap and buying one would have saved me some time trying to get the old one off without too many bends where I pried with the pick, screwdriver, etc. 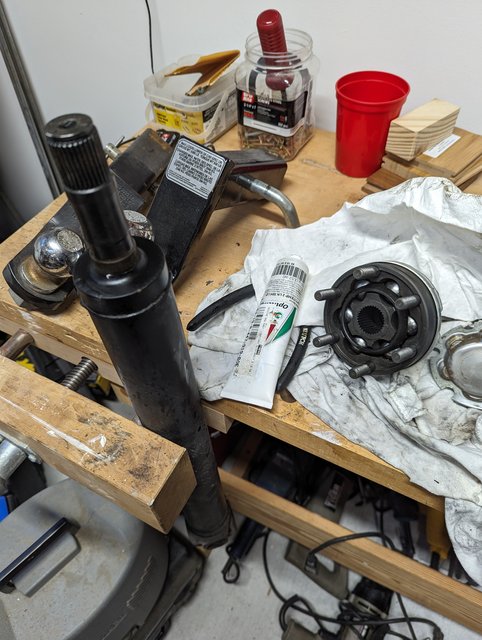 I cleaned the splines, put a little grease on them and tapped the new CV joint on with a big socket. Then the circlip went on and I packed it full of the special grease BMW calls for. Keep working the joint up and down, in and out, etc. and work as much grease in as possible. Then clean up the flange where the gasket goes and set the cover back in. I held it on with the two of the old nuts for the installation. 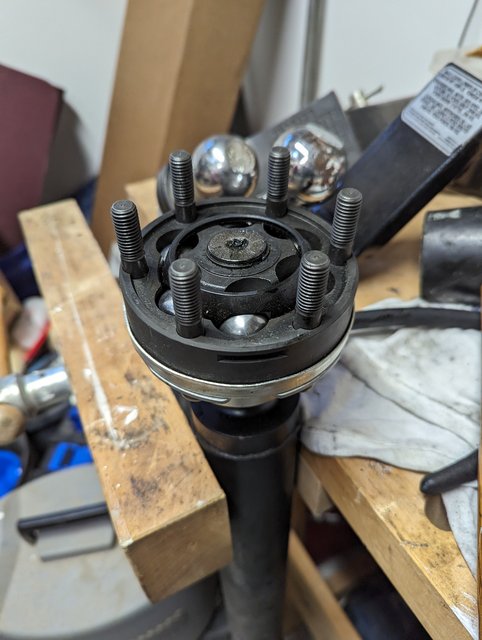 Next came the driveshaft center bearing. The rubber was mostly intact, but really dry and brittle. A mat knife cut must of the rubber off, to allow my three leg puller to pull the rest of the rubber off the actual bearing. The puller popped the bearing off easily after that. 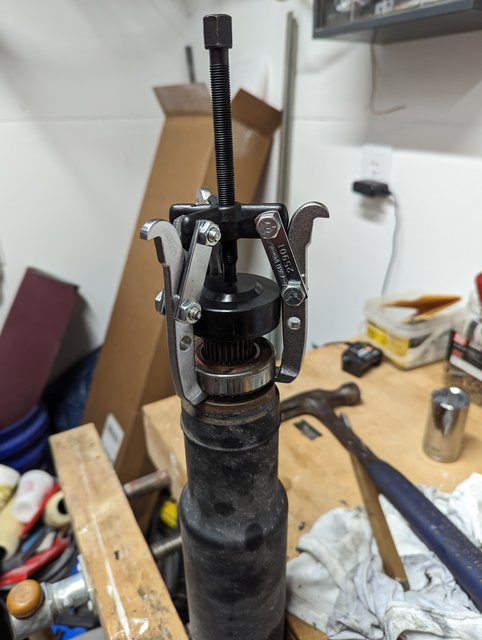 The new one went on easily tapping with an appropriately sized socket. After this it all went back in...driveshaft first, supported by wire at the cv joint, then the diff on the jig, slowly went up and I slide the cv bolts and axles home as it went into place. The axles needed to be unflexed a bit with floor jacks under the rear suspension. For all these parts as I popped two fasteners in as the parts connected, just to hold the mess together. Then the diff went all the way up and I slide the front bolts in and caught a few threads. Then the back bolt and nut finally. After that it was just tedious tightening, refastening and final torques. I witness marked everything so I can keep an eye on it all to make sure it stays torqued.
__________________
Current Original owner 2002 E53 X5 4.4i to 4.6i swap 2025 G06 X5 50e Former 1972 Audi Fox 1986 Saab 900S 1996 BMW Z3 1998 BMW E36 M3 Sedan 2004 BMW E46 M3 2006 Audi A3 Quatro 1993 Mopar 318 Jeep Grand Cherokee 2015 V6 Jeep Grand Cherokee |
|
#246
|
|||
|
|||
|
Damn dude I can smell the 90w lube from here!
__________________
2001 E53 M54 5MT Oxford green over crusty black leather
2014 F30 N55 6MT mineral gray over red leather |
|
#247
|
||||
|
||||
|
No kidding, that stuff reeks. Drove it for a couple days and all seems in order so in addition to new tension struts and ball joints today to try and stop a newly persistent rattle over bumps, I’ll drain the diff, look for chunky stuff and assuming all is well, fill it back up and be done with it.
__________________
Current Original owner 2002 E53 X5 4.4i to 4.6i swap 2025 G06 X5 50e Former 1972 Audi Fox 1986 Saab 900S 1996 BMW Z3 1998 BMW E36 M3 Sedan 2004 BMW E46 M3 2006 Audi A3 Quatro 1993 Mopar 318 Jeep Grand Cherokee 2015 V6 Jeep Grand Cherokee |
|
#248
|
||||
|
||||
|
I’m gaining more confidence slowly with the X5 on roads I wouldn’t have taken up here before the Quaife diff was in. I’m still not, and won’t go down anything really greasy, but it’s 25 degrees so things are pretty solid.
I chickened out on one approach to this field and went all the way around to the other side as the road didn’t descend through a deep drainage wash. I did head out thru the wash and the x5 blasted right up the snowy hill. 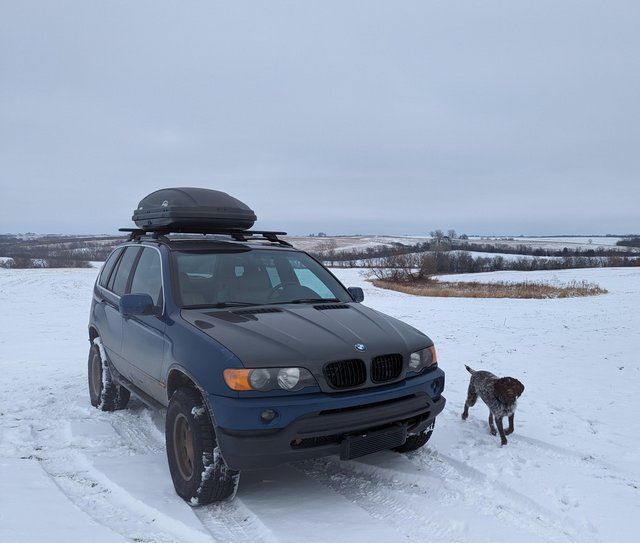 I picked up an odd whistling sound when the car is cold, and only at certain RPMs…my anxiety tells me it’s an output bearings, or cv, etc., but frankly it could be anything, just car noises from a car that only sees the real cold once a year. It actually sounds a bit like alternator whine thru the stereo, but why now!?
__________________
Current Original owner 2002 E53 X5 4.4i to 4.6i swap 2025 G06 X5 50e Former 1972 Audi Fox 1986 Saab 900S 1996 BMW Z3 1998 BMW E36 M3 Sedan 2004 BMW E46 M3 2006 Audi A3 Quatro 1993 Mopar 318 Jeep Grand Cherokee 2015 V6 Jeep Grand Cherokee Last edited by Henn28; 01-08-2024 at 09:01 AM. |
|
#249
|
|||
|
|||
|
Awesome job on the diff, big job but you aced it. I'm enjoying the journey with you.
|
|
#250
|
||||
|
||||
|
Thanks, it was an adventure, and pretty straight forward in some respects (removing and reinstalling the drivetrain and diff), but the actual diff rebuild suffered from a lack of info. The quaife instructions were specific to the 188K diff (ours), but they lost their usefulness when the backlash didn't work out on the OE snap rings and I had to find a snap ring set. Their instructions assume its all going to work out great with your OE diff housing, pinion and shims. I didn't look in TIS, and in retrospect should have to see if they have detailed instructions on rebuilding a diff. I pay for a daily subscription when I need to.
A couple tools are definitely required: a dial gauge for checking backlash (cheap on amazon), a caliper, a set of punches, and a really heavy duty set of snap ring pliers. I broke two and finally found a really large set on Amazon for pretty cheap (from tip to top of handle is about 20 inches). Even those were at their limit pulling the output shaft rings out when messing with the pre-load. I saw a video (quaife maybe, or Racing Diffs) where they used a super heavy-duty tool that used a puller type threaded rod arrangement to squeeze the snap rings, rather than the standard plier type tool, but I couldn't find it anywhere. I'm not sure why our medium case diffs use the snap ring arrangement, but it seems like the circular shim/bolt on output flange type diffs used on most other BMW medium case diffs are much easier to work with. Those shims too are much more readily available as a set. The bearings too are significantly cheaper. If I burn through the output bearings on this diff because I screwed up the preload I'll go with the "new" style ball bearings, rather than the OE style taper bearings as they are cheaper. I'll drain the oil again when I get home, at which point the diff will have 2k on it. I did an initial fill with cheap gear oil from Autozone and drained it after a few days of driving at home, before getting on the road for this trip. The magnetic plug had a very little bit of "mud" on it and one very small piece of metal that looked like a super thin piece of wire, about 3 mm long...like something left over from the gear milling process. It also could have come from forcing the snap ring shim into the right side, which was very tight. I did a thorough spray out with degreaser before closing it up, but there are lots of places for stuff to hang out in the diff! Hopefully the oil will be in good shape and I'll fill it up with Amsoil Severe Gear again and call it complete. One thing I wish I could have done was replace the bushings in the subframe for the diff. I have a bushing c-clamp type tool, but none of the cups were of the correct size for any of three bushings, nor was the "c" deep enough to reach the rear bushing. They all looked in OK shape, but I'm sure they are somewhat brittle and stiff after 22 years.
__________________
Current Original owner 2002 E53 X5 4.4i to 4.6i swap 2025 G06 X5 50e Former 1972 Audi Fox 1986 Saab 900S 1996 BMW Z3 1998 BMW E36 M3 Sedan 2004 BMW E46 M3 2006 Audi A3 Quatro 1993 Mopar 318 Jeep Grand Cherokee 2015 V6 Jeep Grand Cherokee Last edited by Henn28; 01-08-2024 at 01:25 PM. |
 |
| Bookmarks |
|
|
|
|